EXTERIOR ROOF VENTILATOR LOUVER REASSEMBLY
PROCEDURE

 1. REPAIR INSTRUCTION
Clean the roof ventilator louver sub-assembly surface.
Remove any acrylic foam tape remaining on the roof ventilator louver sub-assembly.
Degrease the roof ventilator louver sub-assembly installation surface using non-residue solvent.
2.INSTALL NO. 1 ROOF VENTILATOR PAD LH
Using a heat light, heat a new No. 1 roof ventilator pad LH and roof ventilator louver sub-assembly LH installation surface.
| Item | Temperature |
|---|---|
| No. 1 Roof Ventilator Pad LH | 20 to 30°C (68 to 86°F) |
| Roof Ventilator Louver Sub-assembly LH |
- NOTICE:
- ·
Do not heat the roof ventilator louver sub-assembly LH or No. 1 roof ventilator pad LH excessively.
·Do not touch the heat light and heated parts.
·Touching the heat light may result in burns.
·Touching heated parts for a long time may result in burns.
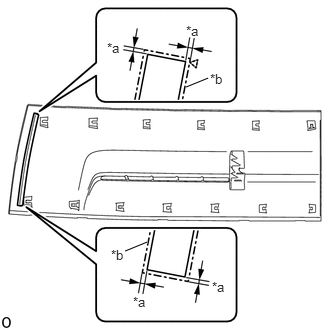
Remove the peeling paper of the acrylic foam tape trying not to touch the adhesional surface and install the No. 1 roof ventilator pad LH as shown in the illustration.
- HINT:
-
Firmly press the No. 1 roof ventilator pad LH to attach it.
| *a | 1.0 mm (0.039 in.) |
| *b | Mark Off Line |
3.INSTALL NO. 1 ROOF VENTILATOR PAD RH
- HINT:
-
Use the same procedure described for the LH side.
63874
4.INSTALL ROOF VENTILATOR MOULDING LH
Using a heat light, heat a new roof ventilator moulding LH and roof ventilator louver sub-assembly LH installation surface.
| Item | Temperature |
|---|---|
| Roof Ventilator Moulding LH | 20 to 30°C (68 to 86°F) |
| Roof Ventilator Louver Sub-assembly LH |
- NOTICE:
- ·
Do not heat the roof ventilator louver sub-assembly LH or roof ventilator louver moulding LH excessively.
·Do not touch the heat light and heated parts.
·Touching the heat light may result in burns.
·Touching heated parts for a long time may result in burns.
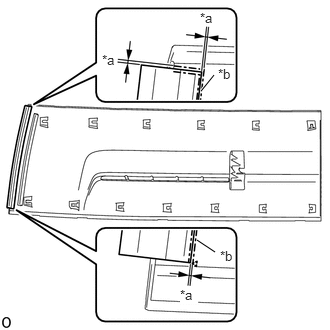
Remove the peeling paper of the acrylic foam tape trying not to touch the adhesional surface, and install the roof ventilator moulding LH as shown in the illustration.
- HINT:
-
Firmly press the roof ventilator moulding LH to attach it.
| *a | 1.0 mm (0.039 in.) |
| *b | Mark Off Line |
63873
5.INSTALL ROOF VENTILATOR MOULDING RH
- HINT:
-
Use the same procedure described for the LH side.
6.INSTALL NO. 2 ROOF VENTILATOR PAD LH
Using a heat light, heat a new No. 2 roof ventilator pad LH and roof ventilator louver sub-assembly LH installation surface.
| Item | Temperature |
|---|---|
| No. 2 Roof Ventilator Pad LH | 20 to 30°C (68 to 86°F) |
| Roof Ventilator Louver Sub-assembly LH |
- NOTICE:
- ·
Do not heat the roof ventilator louver sub-assembly LH or No. 2 roof ventilator pad LH excessively.
·Do not touch the heat light and heated parts.
·Touching the heat light may result in burns.
·Touching heated parts for a long time may result in burns.
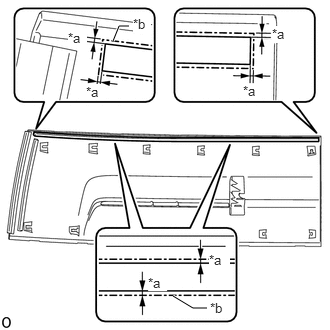
Remove the peeling paper of the acrylic foam tape trying not to touch the adhesional surface, and install the No. 2 roof ventilator pad LH as shown in the illustration.
- HINT:
-
Firmly press the No. 2 roof ventilator pad LH to attach it.
| *a | 1.0 mm (0.039 in.) |
| *b | Mark Off Line |
7.INSTALL NO. 2 ROOF VENTILATOR PAD RH
Using a heat light, heat a new No. 2 roof ventilator pad RH and roof ventilator louver sub-assembly RH installation surface.
| Item | Temperature |
|---|---|
| No. 2 Roof Ventilator Pad RH | 20 to 30°C (68 to 86°F) |
| Roof Ventilator Louver Sub-assembly RH |
- NOTICE:
- ·
Do not heat the roof ventilator louver sub-assembly LH or No. 2 roof ventilator pad RH excessively.
·Do not touch the heat light and heated parts.
·Touching the heat light may result in burns.
·Touching heated parts for a long time may result in burns.
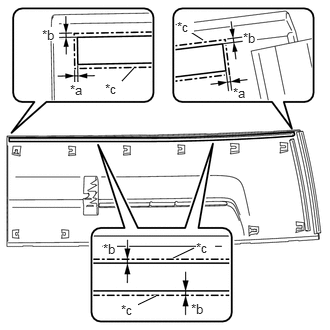
Remove the peeling paper of the acrylic foam tape trying not to touch the adhesional surface, and install the No. 2 roof ventilator pad RH as shown in the illustration.
- HINT:
-
Firmly press the No. 2 roof ventilator pad RH to attach it.
| *a | 1.0 mm (0.039 in.) |
| *b | 0.7 mm (0.028 in.) |
| *c | Mark Off Line |
55789E
8.INSTALL COWL TOP VENTILATOR LOUVER PROTECTOR LH
Using a heat light, heat a new cowl top ventilator louver protector LH and roof ventilator louver sub-assembly LH installation surface.
| Item | Temperature |
|---|---|
| Cowl Top Ventilator Louver Protector LH | 20 to 30°C (68 to 86°F) |
| Roof Ventilator Louver Sub-assembly LH |
- NOTICE:
- ·
Do not heat the roof ventilator louver sub-assembly LH or cowl top ventilator louver protector LH.
·Do not touch the heat light and heated parts.
·Touching the heat light may result in burns.
·Touching heated parts for a long time may result in burns.
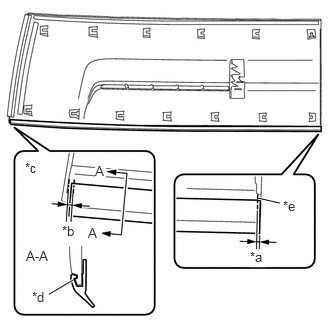
Remove the peeling paper of the acrylic foam tape trying not to touch the adhesional surface, and install the cowl top ventilator louver protector LH as shown in the illustration.
- HINT:
-
Firmly press the cowl top ventilator louver protector LH to attach it.
| *a | 1.0 mm (0.039 in.) |
| *b | 2.0 mm (0.078 in.) |
| *c | Installation Range |
| *d | Specified |
| *e | Mark Off Line |
55788C
9.INSTALL COWL TOP VENTILATOR LOUVER PROTECTOR RH
Use the same procedure described for the LH side.
10.INSTALL NO. 3 ROOF VENTILATOR PAD LH
Using a heat light, heat a new No. 3 roof ventilator pad LH and roof ventilator louver sub-assembly LH installation surface.
| Item | Temperature |
|---|---|
| No. 3 Roof Ventilator Pad LH | 20 to 30°C (68 to 86°F) |
| Roof Ventilator Louver Sub-assembly LH |
- NOTICE:
- ·
Do not heat the roof ventilator louver sub-assembly LH or No. 3 roof ventilator pad LH excessively.
·Do not touch the heat light and heated parts.
·Touching the heat light may result in burns.
·Touching heated parts for a long time may result in burns.
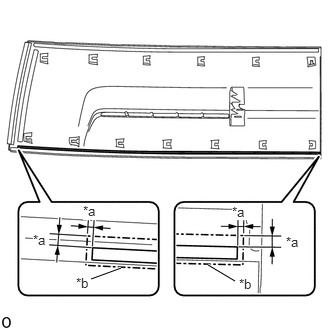
Remove the peeling paper of the acrylic foam tape trying not to touch the adhesional surface, and install the No. 3 roof ventilator pad LH as shown in the illustration.
- HINT:
-
Firmly press the No. 3 roof ventilator pad LH to attach it.
| *a | 1.0 mm (0.039 in.) |
| *b | Mark Off Line |
11.INSTALL NO. 3 ROOF VENTILATOR PAD RH
- HINT:
-
Use the same procedure described for the LH side.
63812
12.INSTALL NO. 4 ROOF VENTILATOR PAD
Using a heat light, heat a new No. 4 roof ventilator pad and roof ventilator louver sub-assembly LH installation surface.
| Item | Temperature |
|---|---|
| No. 4 Roof Ventilator Pad | 20 to 30°C (68 to 86°F) |
| Roof Ventilator Louver Sub-assembly LH |
- NOTICE:
- ·
Do not heat the roof ventilator louver sub-assembly LH or No. 4 roof ventilator pad excessively.
·Do not touch the heat light and heated parts.
·Touching the heat light may result in burns.
·Touching heated parts for a long time may result in burns.
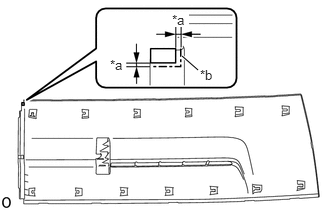
Align the No. 4 roof ventilator pad in the position shown in the illustration.
| *a | 1.0 mm (0.039 in.) |
| *b | Mark Off Line |
Remove the peeling paper of the acrylic foam tape trying not to touch the adhesional surface, and install the No. 4 roof ventilator pad as shown in the illustration.
- HINT:
-
Firmly press the No. 4 roof ventilator pad to attach it.