2TR-FE ENGINE MECHANICAL ENGINE UNIT DISASSEMBLY
PROCEDURE

 12282D
1.REMOVE ENGINE HANGER
Remove the 2 bolts and 2 engine hangers.
16620D
2.REMOVE V-RIBBED BELT TENSIONER ASSEMBLY
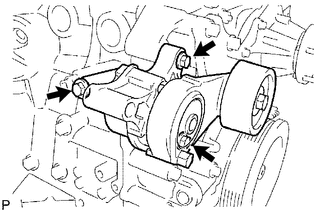
Remove the 3 bolts and V-ribbed belt tensioner assembly.
16321
3.REMOVE WATER INLET
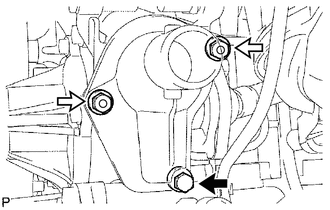
Remove the 2 nuts, bolt, water inlet and gasket.

|
Bolt |

|
Nut |
16331A
4.REMOVE THERMOSTAT
Remove the thermostat and gasket.
83530
5.REMOVE ENGINE OIL PRESSURE SWITCH ASSEMBLY
Using a 24 mm deep socket wrench, remove the engine oil pressure switch assembly.
89615
6.REMOVE KNOCK SENSOR
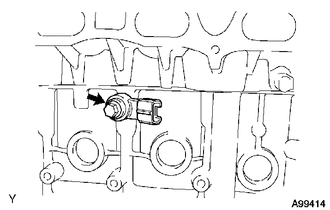
Remove the bolt and knock sensor.
11301M
7.REMOVE CAMSHAFT POSITION SENSOR
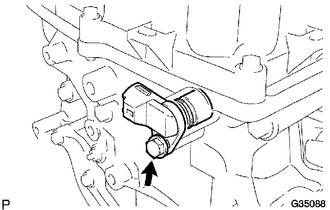
Remove the bolt and camshaft position sensor.
Remove the O-ring.
11301K
8.REMOVE CRANK POSITION SENSOR
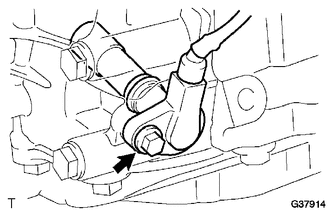
Disengage the wire harness clamp.
Remove the bolt and crankshaft position sensor.
11101J
9.REMOVE CAMSHAFT TIMING OIL CONTROL VALVE ASSEMBLY
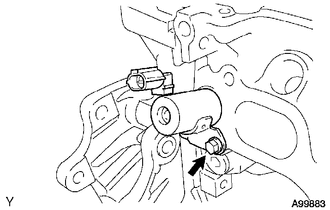
Remove the bolt and camshaft timing oil control valve assembly.
Remove the O-ring.
19100P
10.REMOVE SPARK PLUG
Remove the 4 spark plugs.
12108
11.REMOVE OIL FILLER CAP SUB-ASSEMBLY
Remove the oil filler cap sub-assembly from the cylinder head cover sub-assembly.
12204
12.REMOVE VENTILATION VALVE SUB-ASSEMBLY
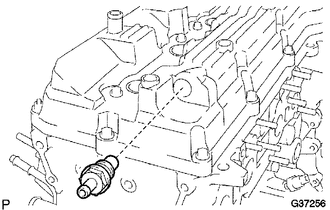
Remove the ventilation valve sub-assembly from the cylinder head cover sub-assembly.
11201
13.REMOVE CYLINDER HEAD COVER SUB-ASSEMBLY
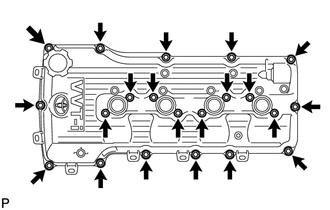
Remove the 19 bolts, 2 nuts, cylinder head cover sub-assembly, cylinder head cover gasket and No. 2 cylinder head cover gasket.
13471
14.REMOVE CRANKSHAFT PULLEY SUB-ASSEMBLY
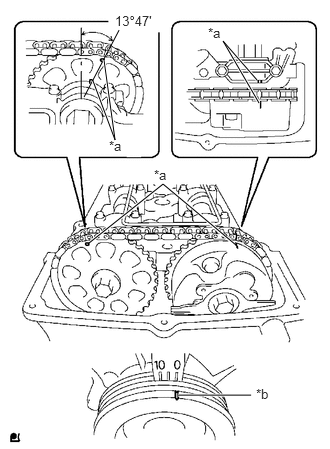
Turn the crankshaft pulley sub-assembly, and align the groove with timing mark 0 on the timing chain or belt cover sub-assembly.
Check that the timing marks on the camshaft timing gear assembly and camshaft timing gear or sprocket are aligned with the timing marks on the No. 1 camshaft bearing cap, as shown in the illustration.
| *a | Timing Mark |
| *b | Groove |
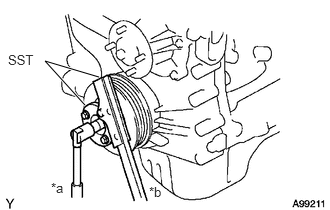
Using SST, hold the crankshaft pulley sub-assembly and loosen the bolt.
- SST
- 09213-54015 (91651-60855)
09330-00021
| *a | Turn |
| *b | Hold |
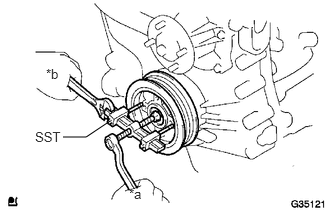
Temporarily tighten the bolt.
Using SST, remove the crankshaft pulley sub-assembly.
- SST
- 09950-50013 (09951-05010, 09952-05010, 09953-05010, 09954-05021)
| *a | Loosen |
| *b | Fix |
12102A
15.REMOVE NO. 2 OIL PAN SUB-ASSEMBLY
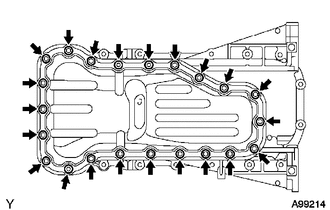
Remove the drain plug and gasket.
Remove the 20 bolts and 2 nuts.
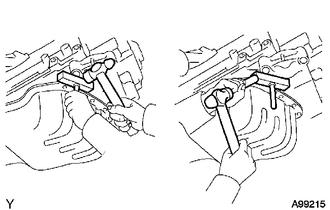
Insert the blade of an oil pan seal cutter between the oil pans. Cut through the applied sealer and remove the No. 2 oil pan sub-assembly.
- NOTICE:
-
Be careful not to damage the contact surface of the oil pans.
15104
16.REMOVE OIL STRAINER SUB-ASSEMBLY
Remove the bolt, 2 nuts, oil strainer sub-assembly and gasket.
12101
17.REMOVE OIL PAN SUB-ASSEMBLY
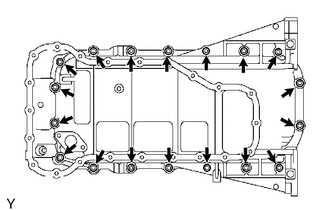
Remove the 16 bolts and 2 nuts.
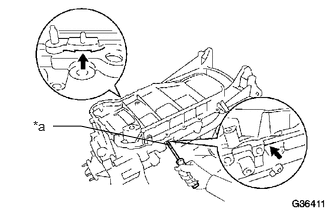
Remove the oil pan sub-assembly by prying between the oil pan sub-assembly and cylinder block with a screwdriver.
| *a | Protective Tape |
- NOTICE:
-
Be careful not to damage the contact surface of the cylinder block and oil pan sub-assembly.
- HINT:
-
Tape the screwdriver tip before use.
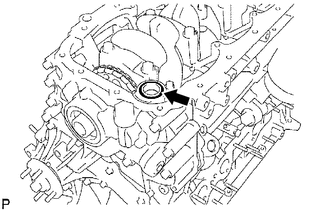
Remove the O-ring.
11302
18.REMOVE TIMING CHAIN OR BELT COVER SUB-ASSEMBLY
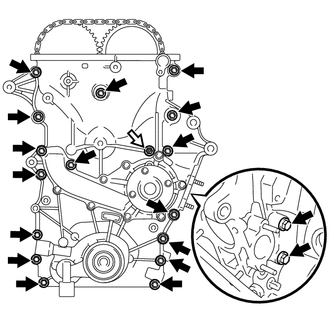
Remove the 18 bolts and the nut shown in the illustration.
|
|
Bolt |
|
|
Nut |
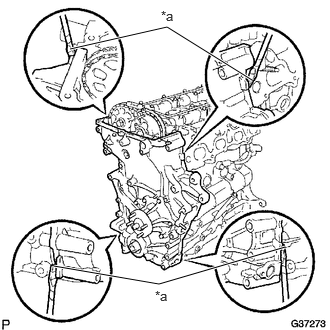
Remove the timing chain or belt cover sub-assembly by prying between the timing chain or belt cover sub-assembly and cylinder head sub-assembly or cylinder block with a screwdriver.
| *a | Protective Tape |
- NOTICE:
-
Be careful not to damage the contact surfaces of the cylinder head sub-assembly, cylinder block and timing chain or belt cover sub-assembly.
- HINT:
-
Tape the screwdriver tip before use.
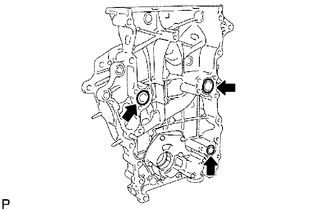
Remove the 3 O-rings.
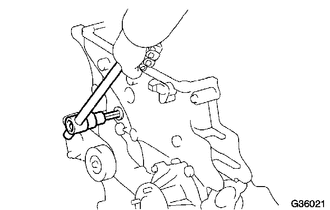
Using a 10 mm socket hexagon wrench, remove the chain cover plug.
16100
19.REMOVE WATER PUMP ASSEMBLY
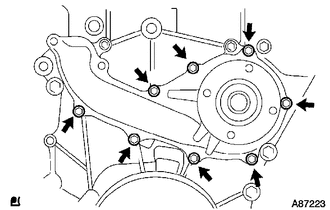
Remove the 8 bolts, water pump assembly and gasket.
11301C
20.REMOVE TIMING GEAR CASE OR TIMING CHAIN CASE OIL SEAL
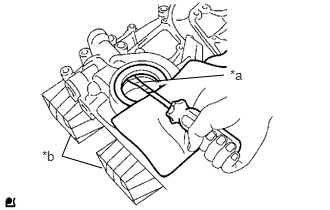
Using a screwdriver, pry out the timing gear case or timing chain case oil seal.
| *a | Protective Tape |
| *b | Wooden Block |
- HINT:
-
Tape the screwdriver tip before use.
15131
21.REMOVE OIL PUMP RELIEF VALVE
13566B
22.REMOVE TIMING CHAIN GUIDE
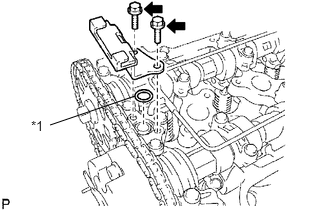
Remove the 2 bolts, timing chain guide and O-ring.
| *1 | O-ring |
13540
23.REMOVE NO. 1 TIMING CHAIN TENSIONER ASSEMBLY
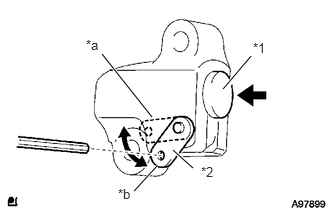
Move the stopper plate upward to release the lock, and push the plunger deep into the tensioner.
Move the stopper plate downward to set the lock, and insert a hexagon wrench into the hole on the stopper plate.
| *1 | Plunger |
| *2 | Stopper Plate |
| *a | Upward |
| *b | Downward |
- NOTICE:
- ·
When the No. 1 timing chain tensioner assembly is removed, do not rotate the crankshaft.
·When the chain sub-assembly is removed and the camshaft needs to be rotated, rotate the crankshaft 90° to the right.
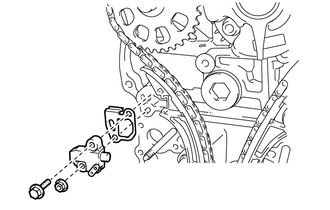
Remove the bolt, nut and No. 1 timing chain tensioner assembly and chain tensioner gasket.
13559
24.REMOVE CHAIN TENSIONER SLIPPER
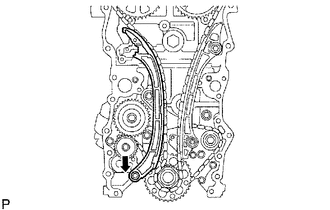
Remove the bolt and chain tensioner slipper.
13561
25.REMOVE NO. 1 CHAIN VIBRATION DAMPER
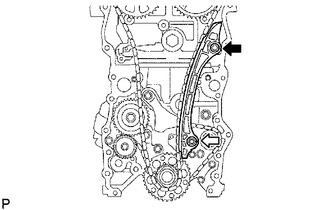
Remove the bolt, nut and No. 1 chain vibration damper.
|
|
Bolt |
|
|
Nut |
13506
26.REMOVE CHAIN SUB-ASSEMBLY
13521
27.REMOVE CRANKSHAFT TIMING GEAR OR SPROCKET
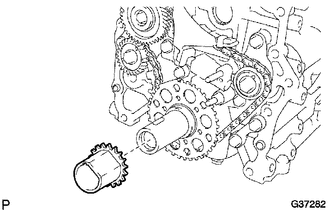
Remove the crankshaft timing gear or sprocket from the crankshaft.
19315B
28.REMOVE CRANKSHAFT POSITION SENSOR PLATE
13511
29.REMOVE CAMSHAFT
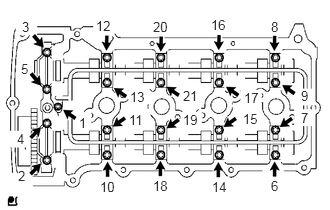
Uniformly loosen the 21 bolts in the several passes in the order shown in the illustration.
Remove the 9 bearing caps, oil delivery pipe, O-ring and 2 camshafts.
- NOTICE:
- ·
Place the camshaft on a flat surface, maintain it in this position and loosen the bolts uniformly.
·If prying the camshaft out with a tool, do not apply excessive force.
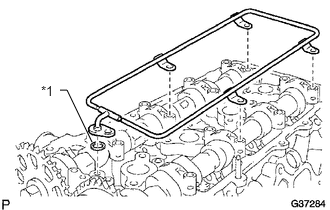
Remove the oil delivery pipe and O-ring from the bearing caps.
| *1 | O-ring |
Remove the 9 bearing caps.
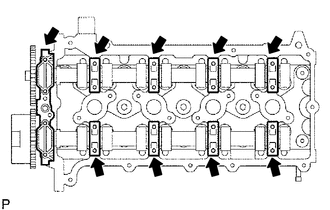
Remove the 2 camshafts.
13523
30.REMOVE CAMSHAFT TIMING GEAR OR SPROCKET
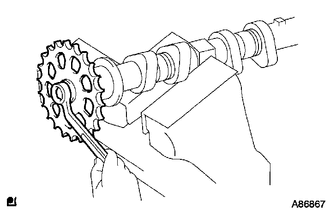
Fix the No. 2 camshaft between aluminium plates in a vise.
- NOTICE:
-
Be careful not to damage the No. 2 camshaft.
Remove the sprocket bolt and camshaft timing sprocket.
13050
31.REMOVE CAMSHAFT TIMING GEAR ASSEMBLY
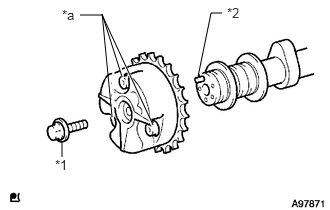
Remove the flange bolt from the camshaft timing gear assembly.
| *1 | Flange Bolt |
| *2 | Straight Pin |
| *a | Do Not Remove |
- NOTICE:
- ·
Be sure not to remove the other 3 bolts.
·If planning to reuse the gear, be sure to release the straight pin lock before installing the gear.
11101
32.REMOVE CYLINDER HEAD SUB-ASSEMBLY
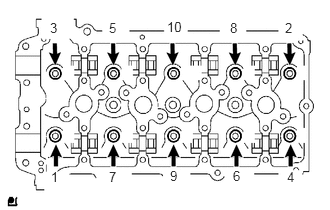
Using a 10 mm bi-hexagon wrench, uniformly loosen the 10 cylinder head set bolts in the sequence shown in the illustration.
Remove the 10 cylinder head set bolts and 10 plate washers.
- NOTICE:
- ·
Be careful not to drop plate washers into the cylinder head sub-assembly.
·Head warpage or cracking could result from removing cylinder head set bolts in an incorrect order.
Remove the cylinder head sub-assembly.
11115
33.REMOVE CYLINDER HEAD GASKET
Remove the cylinder head gasket.
13562
34.REMOVE NO. 2 CHAIN VIBRATION DAMPER
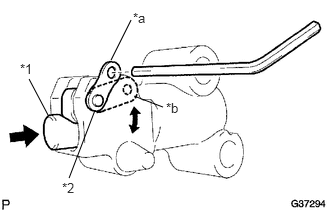
Move the stopper plate downward to release the lock, and push the plunger deep into the No. 2 chain tensioner assembly.
Move the stopper plate upward to set the lock, and insert a hexagon wrench into the hole on the stopper plate.
| *1 | Plunger |
| *2 | Stopper Plate |
| *a | Upward |
| *b | Downward |
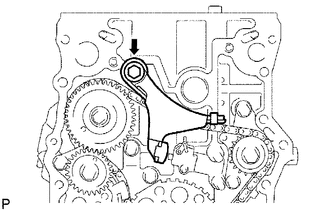
Remove the bolt and No. 2 chain vibration damper.
13563
35.REMOVE NO. 3 CHAIN VIBRATION DAMPER
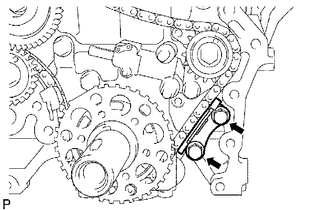
Remove the 2 bolts and No. 3 chain vibration damper.
13550
36.REMOVE NO. 2 CHAIN TENSIONER ASSEMBLY
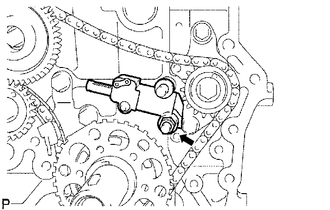
Remove the hexagon wrench from the No. 2 chain tensioner assembly.
Remove the nut and No. 2 chain tensioner assembly.
13507
37.REMOVE NO. 2 CHAIN SUB-ASSEMBLY
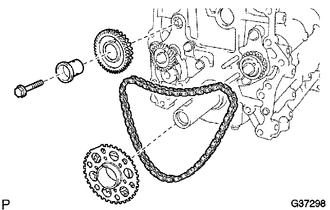
Remove the bolt, balanceshaft drive gear shaft and balanceshaft drive gear sub-assembly.
Remove the No. 2 crankshaft timing sprocket and No. 2 chain sub-assembly.
13554
38.REMOVE NO. 4 CHAIN VIBRATION DAMPER
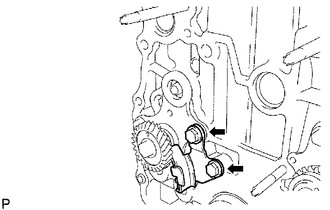
Remove the 2 bolts and No. 4 chain vibration damper.
13471A
39.REMOVE CRANKSHAFT PULLEY SET CRANKSHAFT KEY
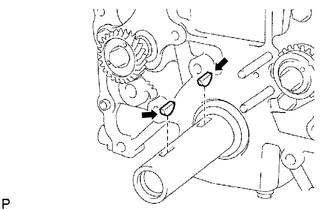
Remove the 2 crankshaft pulley set crankshaft keys from the crankshaft.
15601
40.REMOVE OIL FILTER SUB-ASSEMBLY
Using SST, remove the oil filter sub-assembly.
15710
41.REMOVE OIL COOLER ASSEMBLY
Remove the oil cooler union and oil cooler assembly.
15609
42.REMOVE OIL FILTER BRACKET SUB-ASSEMBLY
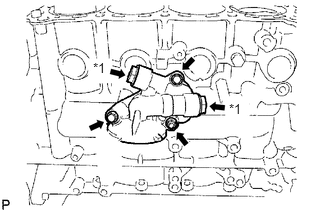
Remove the 2 screw plugs and 2 gaskets from the oil filter bracket sub-assembly.
| *1 | Plunger |
Remove the 2 bolts, nut and oil filter bracket sub-assembly.
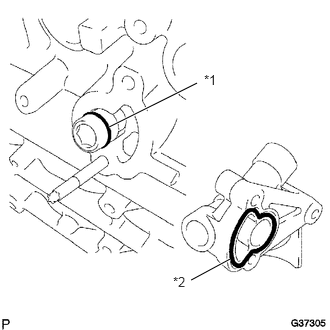
Remove the gasket and O-ring.
| *1 | O-ring |
| *2 | Gasket |
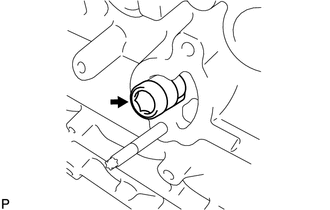
Using a 14 mm hexagon wrench, remove the oil filter bracket union.
11381
43.REMOVE ENGINE REAR OIL SEAL RETAINER
Remove the 6 bolts.
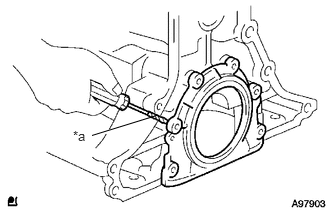
Using a screwdriver, pry out the engine rear oil seal retainer.
| *a | Protective Tape |
- HINT:
-
Tape the screwdriver tip before use.
13801
44.REMOVE NO. 1 VALVE ROCKER ARM SUB-ASSEMBLY
- HINT:
-
Each rocker arm must be reinstalled to its original location.
13716
45.REMOVE VALVE STEM CAP
- HINT:
-
Each valve stem cap must be reinstalled to its original location.
13750
46.REMOVE VALVE LASH ADJUSTER ASSEMBLY
- HINT:
-
Each lash adjuster must be reinstalled to its original location.
13715
47.REMOVE EXHAUST VALVE
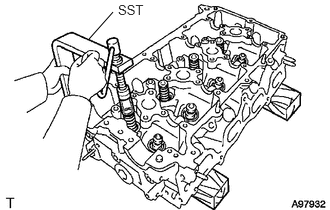
Using SST and wooden blocks, compress the compression spring and remove the valve spring retainer locks.
- SST
- 09202-70020
| *a | Wooden Block |
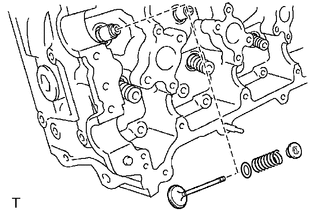
Remove the retainer, compression spring, exhaust valve and valve spring seat.
- HINT:
-
Each exhaust valve must be reinstalled to its original location.
13711
48.REMOVE INTAKE VALVE
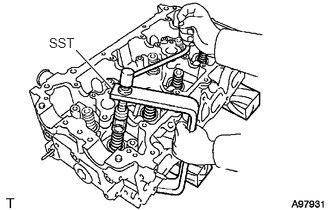
Using SST and wooden blocks, compress the compression spring and remove the valve spring retainer locks.
- SST
- 09202-70020
| *a | Wooden Block |
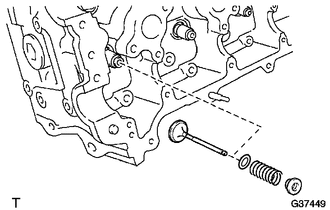
Remove the retainer, compression spring, intake valve and valve spring seat.
- HINT:
-
Each intake valve must be reinstalled to its original location.
13711A
49.REMOVE VALVE STEM OIL O-SEAL OR RING
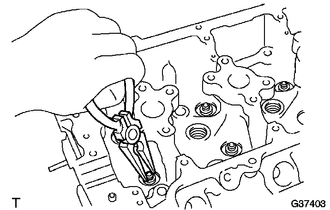
Using needle-nose pliers, remove the valve stem oil O-seal or ring.
15678A
50.REMOVE OIL CONTROL VALVE FILTER
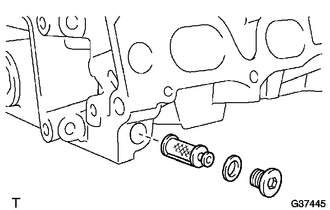
Using an 8 mm hexagon wrench, remove the screw plug.
Remove the oil control valve filter and gasket.
51.REMOVE NO. 1 STRAIGHT SCREW PLUG
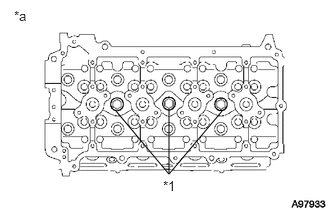
Using a 10 mm hexagon wrench, remove the 3 No. 1 straight screw plugs and 3 gaskets.
| *1 | No. 1 Straight Screw Plug |
| *a | for Front Side |
52.REMOVE NO. 2 STRAIGHT SCREW PLUG
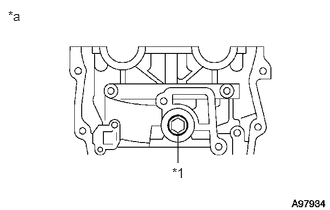
Using a 19 mm hexagon wrench, remove the No. 2 straight screw plug.
| *1 | No. 2 Straight Screw Plug |
| *a | for Front Side |
53.REMOVE STUD BOLT
Remove the 11 stud bolts.
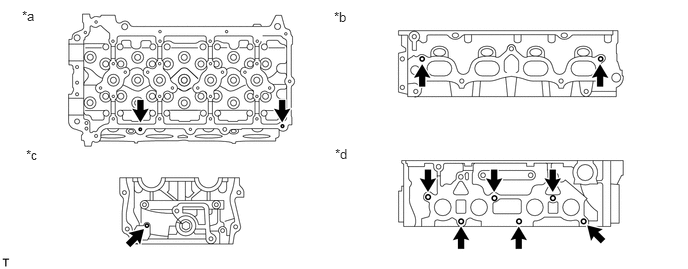
| *a | Upper Side | *b | Intake Side |
| *c | Front Side | *d | Exhaust Side |
54.INSPECT CONNECTING ROD THRUST CLEARANCE
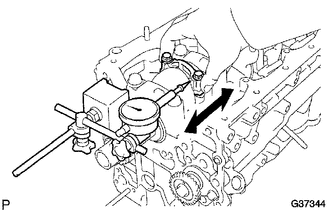
Using a dial indicator, measure the thrust clearance while moving the connecting rod back and forth.
- Standard thrust clearance:
0.15 to 0.35 mm (0.006 to 0.014 in.)
- Maximum thrust clearance:
0.40 mm (0.016 in.)
If the thrust clearance is greater than the maximum, replace the connecting rod assembly(ies). If necessary, replace the crankshaft.
55.INSPECT CONNECTING ROD OIL CLEARANCE
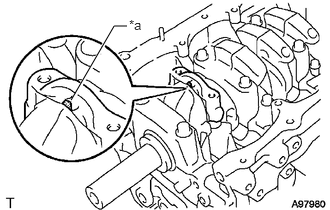
Check that the front marks on the connecting rod and cap are aligned.
| *a | Front Mark |
- HINT:
-
The front marks on the connecting rods and caps are for ensuring the correct reassembly.
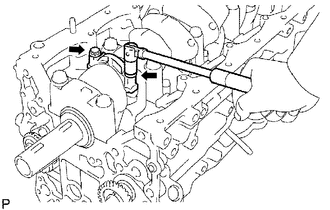
Remove the 2 connecting rod cap bolts.
Using the 2 removed connecting rod cap bolts, remove the connecting rod cap and lower bearing by wiggling the connecting rod cap right and left.
- HINT:
-
Keep the lower bearing inserted into the connecting rod cap.
Clean the crank pin and bearing.
Check the crank pin and bearing for pitting and scratches.
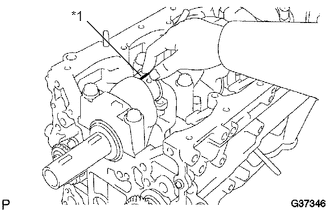
Lay a strip of plastigage on the crank pin.
| *1 | Plastigage |
Install the connecting rod cap.
- NOTICE:
-
Do not turn the crankshaft.
Match the numbered connecting rod cap with the connecting rod.
Align the pins of the connecting rod cap with the pin holes on the connecting rod, and install the connecting rod cap.
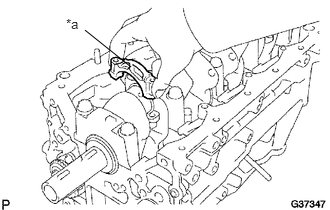
Check that the front mark on the connecting rod cap is facing forward.
| *a | Front Mark |
Install the connecting rod cap bolts.
- HINT:
- ·
The connecting rod cap bolts are tightened in 2 progressive steps.
·If any connecting rod bolt is broken or deformed, replace it.
Apply a light coat of engine oil to the threads and under the heads of the connecting rod cap bolts.
Install and alternately tighten the bolts to the connecting rod cap in several passes.
- Torque:
25 N*m (250 kgf*cm, 18 ft.*lbf)
If any connecting rod cap bolt does not meet the torque specification, replace it.
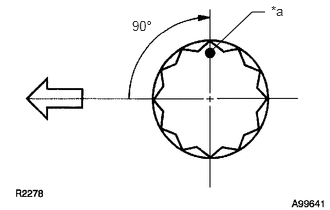
Mark the front of the connecting rod cap bolts with paint.
Retighten the connecting rod cap bolts 90° as shown.
Check that the painted mark is now at a 90° angle to the front.
| *a | Paint Mark |
|
|
Engine Front |
Remove the 2 bolts and connecting rod cap.
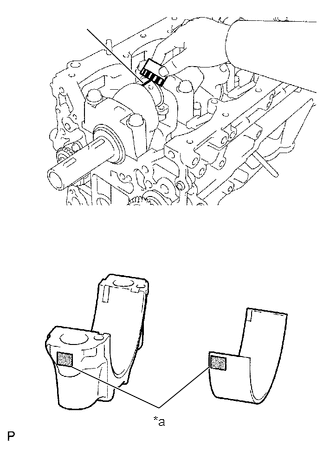
Measure the plastigage at its widest point.
- Standard oil clearance:
Item Specified Condition No. 3 journal 0.024 to 0.038 mm (0.00094 to 0.00150 in.) Except No. 3 journals 0.030 to 0.044 mm (0.00118 to 0.00173 in.)
If the crank pin or bearing is damaged, replace the bearing. If necessary, replace the crankshaft.
- HINT:
-
If replacing a bearing, replace it with one that has the same number as its respective connecting rod cap. Each bearing's standard thickness is indicated by a 4, 5 or 6 mark on its surface.
- Standard bearing center wall thickness:
Mark Specified Condition 4 1.487 to 1.490 mm (0.0585 to 0.0587 in.) 5 1.491 to 1.493 mm (0.0587 to 0.0588 in.) 6 1.494 to 1.496 mm (0.0588 to 0.0589 in.)
| *1 | Plastigage |
| *a | Mark |
Completely remove the plastigage.
56.REMOVE PISTON WITH CONNECTING ROD
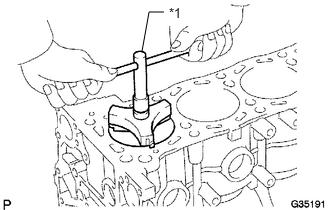
Using a ridge reamer, remove all the carbon from the top of the cylinder.
Push the piston, connecting rod assembly and upper bearing through the top of the cylinder block.
| *1 | Ridge Reamer |
- HINT:
- ·
Keep the bearing, connecting rod and cap together.
·Arrange the piston and connecting rod assemblies in the correct order.
57.INSPECT CRANKSHAFT THRUST CLEARANCE
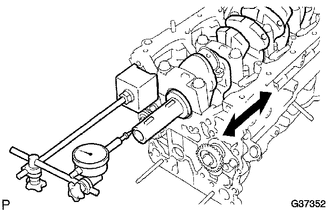
Using a dial indicator, measure the thrust clearance while prying the crankshaft back and forth with a screwdriver.
- Standard thrust clearance:
0.020 to 0.220 mm (0.0008 to 0.0087 in.)
- Maximum thrust clearance:
0.30 mm (0.0118 in.)
If the thrust clearance is greater than the maximum, replace the thrust washers as a set.
- Thrust washer thickness:
2.440 to 2.490 mm (0.0961 to 0.0980 in.)
58.INSPECT CRANKSHAFT OIL CLEARANCE
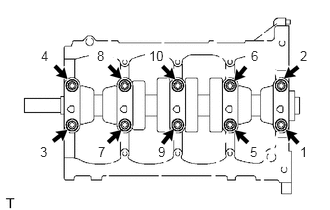
Uniformly loosen the 10 bearing cap bolts in several passes in the sequence shown in the illustration.
- HINT:
- ·
Keep the lower bearings and crankshaft bearing caps together.
·Arrange the thrust washers in the correct order.
Clean each main journal and bearing.
Check each main journal and bearing for pitting and scratches.
If the journal or bearing is damaged, replace the bearing. If necessary, grind or replace the crankshaft.
Place the crankshaft on the cylinder block.
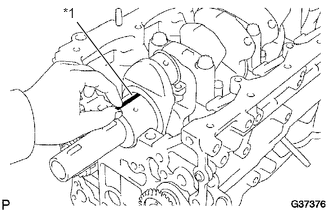
Lay a strip of plastigage across each journal.
| *1 | Plastigage |
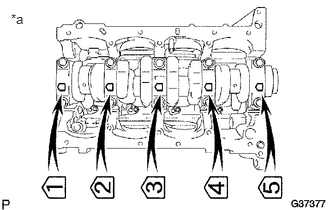
Install the 5 crankshaft bearing caps in their proper locations.
| *a | Engine Front |
- NOTICE:
-
Do not turn the crankshaft.
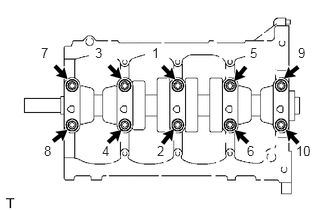
Install the crankshaft bearing cap bolts.
- HINT:
- ·
The crankshaft bearing cap bolts are tightened in 2 progressive steps.
·If any of the crankshaft bearing cap bolts are broken or deformed, replace as necessary.
Install and uniformly tighten the 10 crankshaft bearing cap bolts in the sequence shown in the illustration.
- Torque:
39 N*m (398 kgf*cm, 29 ft.*lbf)
If any crankshaft bearing cap bolt does not meet the torque specification, replace it.
Mark the front of the crankshaft bearing cap bolts with paint.
Tighten the bearing cap bolts a further 90° in the same sequence as above.
Check that the painted mark is now at a 90° angle to the front.
| *a | Paint Mark |
|
|
Engine Front |
Remove the 10 bolts and 5 crankshaft bearing caps.
Measure the plastigage at its widest point.
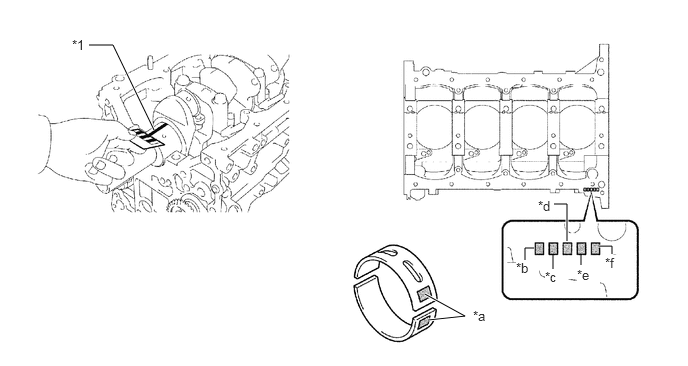
- Standard oil clearance:
Item Specified Condition No. 3 journal 0.030 to 0.055 mm (0.0012 to 0.0022 in.) Other journal 0.024 to 0.049 mm (0.0009 to 0.0019 in.)
- Maximum oil clearance:
0.10 mm (0.0039 in.)
| *1 | Plastigage | - | - |
| *a | Crankshaft bearing
Mark 1,2,3,4 ,or 5 |
*b | No. 1 journal
Mark A,B,C,D,E,F,G,H or J |
| *c | No. 2 journal
Mark A,B,C,D,E,F,G,H or J |
*d | No. 3 journal
Mark A,B,C,D,E,F,G,H or J |
| *e | No. 4 journal
Mark A,B,C,D,E,F,G,H or J |
*f | No. 5 journal
Mark A,B,C,D,E,F,G,H or J |
If the oil clearance is greater than the maximum, replace the crankshaft bearings. If necessary, replace the crankshaft.
- HINT:
- ·
If replacing the cylinder block, the bearing standard clearance should be 0.030 to 0.055 mm (0.0012 to 0.0022 in.).
·If replacing a bearing, first check the number on the cylinder block for the respective bearing journal. Then replace the bearing with one that has the same number. The standard thickness of the bearing is indicated by a 1, 2 or 3 mark on its surface.
- Cylinder block main journal bore diameter (Reference):
Mark Specified Condition A 64.004 to 64.006 mm (2.51984 to 2.51992 in.) B 64.007 to 64.008 mm (2.51996 to 2.51999 in.) C 64.009 to 64.010 mm (2.52003 to 2.52007 in.) D 64.011 to 64.012 mm (2.52011 to 2.52015 in.) E 64.013 to 64.014 mm (2.52019 to 2.52023 in.) F 64.015 to 64.016 mm (2.52027 to 2.52031 in.) G 64.017 to 64.018 mm (2.52035 to 2.52039 in.) H 64.019 to 64.020 mm (2.52043 to 2.52047 in.) J 64.021 to 64.022 mm (2.52051 to 2.52055 in.)
- Standard bearing center wall thickness (Reference):
Mark Specified Condition 1 1.987 to 1.990 mm (0.07823 to 0.07835 in.) 2 1.991 to 1.993 mm (0.07839 to 0.07846 in.) 3 1.994 to 1.996 mm (0.07850 to 0.07858 in.) 4 1.997 to 1.999 mm (0.07862 to 0.07870 in.) 5 2.000 to 2.002 mm (0.07874 to 0.07882 in.)
Completely remove the plastigage.
13411
59.REMOVE CRANKSHAFT
Lift out the crankshaft.
- HINT:
-
Keep the upper crankshaft bearings and upper thrust washers together with the cylinder block.
13101
60.REMOVE PISTON SUB-ASSEMBLY WITH PIN
Check the fit between the piston and piston pin.
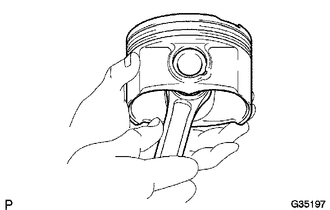
Try to move the piston back and forth on the piston pin.
If any movement is felt, replace the piston and pin as a set.
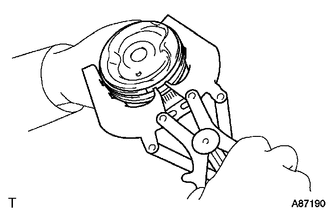
Remove the piston rings.
Using a piston ring expander, remove the 2 compression rings.
Remove the rail and expander by hand.
- HINT:
-
Arrange the piston rings in the correct order.
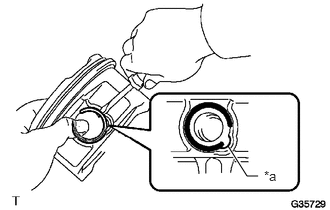
Disconnect the connecting rod from the piston.
Using a small screwdriver, pry the snap ring off the piston.
| *a | Service Hole |
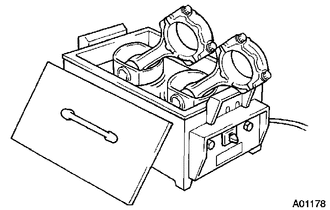
Gradually heat the piston to between 80 to 90°C (176 to 194°F).
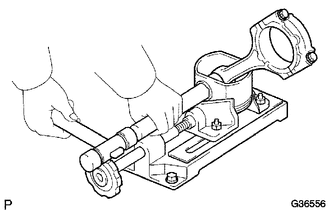
Using a brass bar and plastic-faced hammer, lightly tap out the piston pin and remove the connecting rod.
- HINT:
- ·
The piston and pin are a matched set.
·Arrange the pistons, pins, rings, connecting rods and bearings in the correct order.
11415
61.REMOVE CYLINDER BLOCK WATER DRAIN COCK SUB-ASSEMBLY
15708
62.REMOVE NO. 1 OIL NOZZLE SUB-ASSEMBLY
Using a 5 mm hexagon wrench, remove the 4 No. 1 oil nozzle sub-assemblies.
63.INSPECT BALANCESHAFT THRUST CLEARANCE
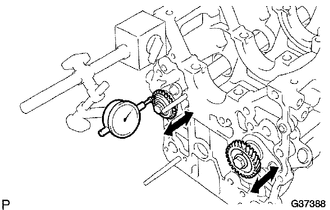
Using a dial indicator, measure the balanceshaft thrust clearance while moving the balanceshaft back and forth.
- Standard thrust clearance:
0.07 to 0.13 mm (0.0027 to 0.0051 in.)
- Maximum thrust clearance:
0.20 mm (0.0079 in)
If the thrust clearance is greater than the maximum, replace the balanceshaft thrust spacer. If necessary, replace the balanceshaft.
13621
64.REMOVE NO. 1 BALANCESHAFT
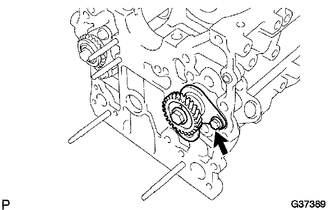
Remove the bolt.
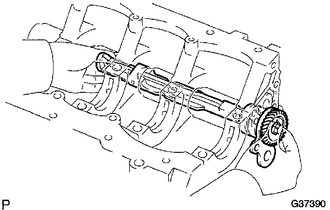
Remove the No. 1 balanceshaft from the cylinder block.
- NOTICE:
-
When removing the No. 1 balanceshaft, support the No. 1 balanceshaft with both hands and avoid scratching the balanceshaft bearing on the cylinder block.
13632
65.REMOVE NO. 1 BALANCESHAFT DRIVEN GEAR
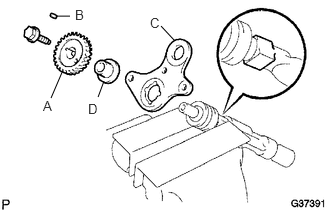
Mount the No. 1 balanceshaft head between aluminium plates in vise.
- NOTICE:
-
Be careful not to damage the balanceshaft.
Remove the bolt.
Remove the No. 1 balanceshaft driven gear (A), sliding key (B), No. 1 balanceshaft thrust plate (C) and balanceshaft thrust spacer (D).
13622
66.REMOVE NO. 2 BALANCESHAFT
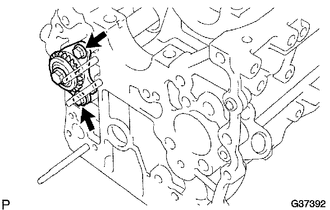
Remove the 2 bolts.
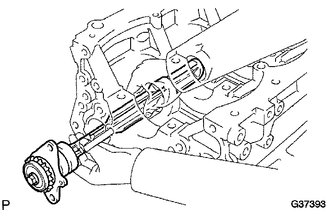
Remove the No. 2 balanceshaft from the cylinder block.
- NOTICE:
-
When removing the No. 2 balanceshaft, support the balanceshaft with both hands and avoid scratching the balanceshaft bearing on the cylinder block side.
13633
67.REMOVE NO. 2 BALANCESHAFT DRIVEN GEAR
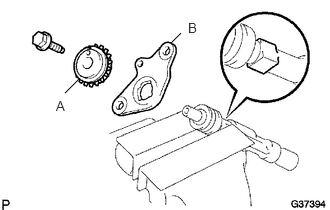
Mount the No. 2 balanceshaft head between aluminium plates in a vise.
- NOTICE:
-
Be careful not to damage the No. 2 balanceshaft.
Remove the bolt.
Remove the No. 2 balanceshaft driven gear (A) and No. 2 balanceshaft thrust plate (B).
11114A
68.REMOVE STRAIGHT PIN
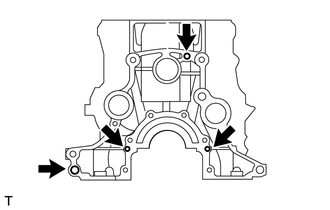
Remove the 4 straight pins.
69.REMOVE RING PIN
Remove the 7 ring pins.
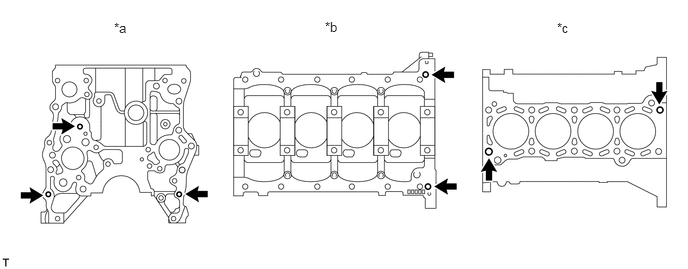
| *a | Front Side | *b | Lower Side |
| *c | Upper Side | - | - |