1BZ-FPE CHARGING CHARGING SYSTEM ON-VEHICLE INSPECTION
PROCEDURE

 1.CHECK BATTERY ELECTROLYTE LEVEL
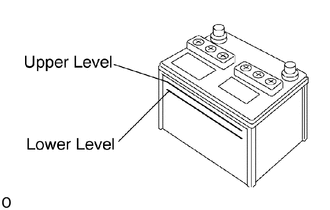
Check the electrolyte quantity of each cell.
Maintenance-free battery:
If under the lower level, replace the battery (or add distilled water if possible) and check the charging system.
Except maintenance-free battery:
If under the lower level, add distilled water.
Except maintenance-free battery:
2. BATTERY SPECIFIC GRAVITY
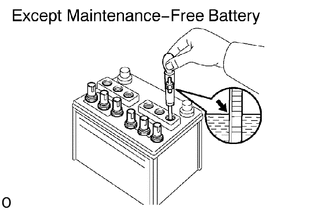
Except maintenance-free battery:
Using a battery specific gravity gauge, and check the specificgravity of each cell.
- Standard specific gravity:
1.25 - 1.29 at 20°C (68°F)
If the specific gravity is less than specification, charge the battery.
3.CHECK BATTERY VOLTAGE
After having driven the vehicle and in the case that 20 minutes have not passed after having stopped the engine, turn the ignition switch ON and turn on the electrical system (headlight, blower motor, rear defogger etc.) for 60 seconds to remove the surface charge.
Turn the ignition switch OFF and turn off the electrical systems.
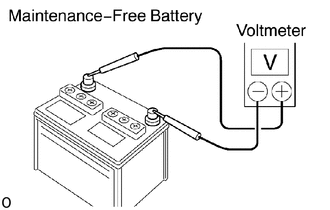
Measure the battery voltage between the negative (-) and positive (+) terminals of the battery.
- Standard voltage:
12.6 - 12.8 V at 20°C (68°F)
If the voltage is less than specification, charge the battery.
4.CHECK BATTERY TERMINALS, FUSIBLE LINK AND FUSES
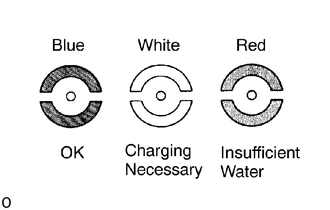
Check that the battery terminals are not loose or corroded.
Check the fusible link and fuses for continuity.
5.INSPECT DRIVE BELT
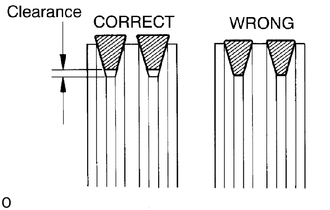
Visually check the drive belt for cracks, oiliness or wear.
Check that the belt does not touch the bottom of the pulleygroove.
If necessary, replace the drive belts as a set.
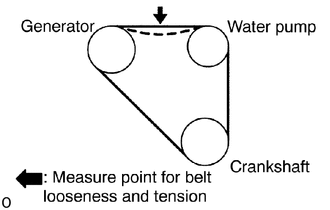
Check the drive belt deflection by pressing on the belt at the points indicated in the illustration with 98 N (10 kgf, 22 lbf) of pressure.
New belt 12.0 - 16.0 mm ( 0.47 - 0.63 in.)
Used belt 14.0 - 20.0 mm (0.55 - 0.79 in.)
- HINT:
- ·
"New belt" refers to a belt which has been used less than 5 minutes on a running engine.
·"Used belt" refers to a belt which has been used on a running engine for 5 minutes or more.
·After installing a belt, check that it fits properly in the ribbed grooves.
·Check with your hand to confirm that the belt has not slipped out of the groove on the bottom of the pulley.
·After installing a new belt, run the engine for about 5 minutes and recheck the belt tension.
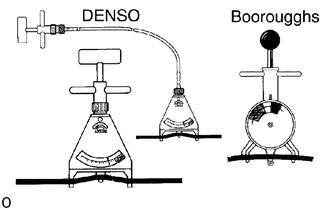
(Reference)
Using a belt tension gauge, measure the belt tension.
Belt tension gauge:
DNESO BTG-20 (95506-00020)
Borroughs No. BT-33-73F
- Drive Belt tension:
New belt 275 - 510 N ( 28 - 52 kgf)
Used belt 196 - 392 N ( 20 - 40 kgf)
If the belt tension is not as specified, adjust it.
- HINT:
-
-
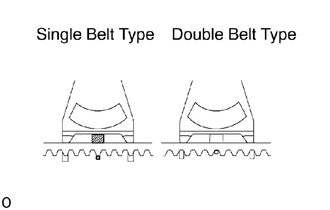
When checking the belt tension, check that the belt tension gauge tip is on the belt protrusion (single belt type) or belt groove (double belt type).
Adjust drive belt tension.
Loosen the 2 mount bolts.
Insert a bar between the alternator bracket and the generator, and pullit forward to make the adjustment.
Torque the 2 bolts.
- Torque:
Pivot bolt: 44 N*m (440 kgf*cm, 32 ft*lbf)
Adjusting lock bolt: 19 N*m (195 kgf*cm, 14 ft*lbf)
6.VISUALLY CHECK GENERATOR WIRING AND LISTEN FOR ABNORMAL NOISES
Check that the wiring is in good condition.
Check that there is no abnormal noise from the generator while the engine is running.
7.INSPECT DISCHARGE WARNING LIGHT CIRCUIT
Turn the ignition switch "ON". Check that the discharge warning light comes on.
Start the engine. Check that the light goes off.
If the light does not operate as specified, troubles shoot the discharge warning light circuit.
8.INSPECT CHARGING CIRCUIT WITHOUT LOAD
- HINT:
-
If a battery/generator teater is available, connect the tester to the charging circuit as permanufacturer's instructions.
If a tester is not available, connect a voltmeter to the charging circuit as follows:
Disconnect to the wire from terminals B of the generator and connect it to the negative (-) lead of the ammeter.
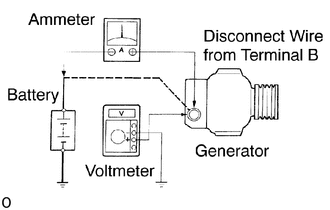
Connect the positive (+) lead of the ammeter to terminal B of the alternator.
Connect the positive (+) lead of the voltmeter to terminal B of the alternator.
Ground the negative (-) lead of the voltmeter.
Check the charging circuit as follows:
With the engine running from idle to 2,000 rpm, check the reading on the ammeter and voltmeter.
- Standard amperage:
10 A or less
- Standard voltage:
13.2 - 14.8 V
If the voltmeter reading is more than standard voltage, replace the voltage regulator.
If the voltmeter reading is less than the standard voltage, check the voltage regulator and generator as follows:
9.INSPECT CHARGING CIRCUIT WITH LOAD
With the engine running at 2,000 rpm, turn on the high beam headlights and place the heater blower switch at "HI" position.
Check the reading on the ammeter.
- Standard amperage:
30 A or more
If the ammeter reading is less than the standard amperage, repair the alternator.
- HINT:
-
If the battery is fully charged, the indication will sometimes be less than the standard amperage.