SUPPLEMENTAL RESTRAINT SYSTEMS AIRBAG SYSTEM(for 3 Connectors Type) DIAGNOSIS SYSTEM
SYMPTOM SIMULATION
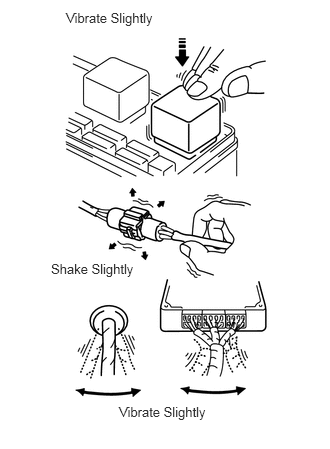
- HINT:
-
The most difficult case in troubleshooting is when no problem symptoms occur. In such a case, a thorough problem analysis must be carried out. A simulation of the same or similar conditions and environment in which the problem occurred in the customer's vehicle should be carried out. No matter how much skill or experience a technician has, troubleshooting without confirming the problem symptoms will lead to important repairs being overlooked and mistakes or delays.
Vibration method: When vibration seems to be the major cause.
- HINT:
-
Perform the simulation method only during the primary check period (for approximately 6 seconds after the ignition switch is turned to ON).
Slightly vibrate the part of the sensor considered to be the cause of the problem with your fingers and check whether the malfunction occurs.
- NOTICE:
-
Shaking the relays too strongly may result in open relays.
Slightly shake the connector vertically and horizontally.
Slightly shake the wire harness vertically and horizontally.
- HINT:
-
The connector joint and fulcrum of the vibration are the major areas to be checked thoroughly.
FUNCTION OF SRS WARNING LIGHT
Primary check.
Turn the ignition switch off. Wait at least 2 seconds, and then turn the ignition switch to ON. The SRS warning light comes on for approximately 6 seconds and diagnosis of the airbag system is performed.
- HINT:
-
If trouble is detected during the primary check, the SRS warning light remains on even after the primary check period (of approximately 6 seconds) has elapsed.
Constant check.
After the primary check, the airbag ECU assembly constantly monitors the airbag system for trouble.
- HINT:
-
If trouble is detected during the constant check, the airbag ECU assembly functions as follows: The SRS warning light comes on.
Review.
When the airbag system is normal:
The SRS warning light comes on only during the primary check period (for approximately 6 seconds after the ignition switch is turned to ON).
When the airbag system has trouble:
The SRS warning light remains on even after the primary check period has elapsed.
The SRS warning light goes off after the primary check, but comes on again during the constant check.
The SRS warning light does not come on when turning the ignition switch from off to ON.
- HINT:
-
The airbag ECU assembly functions to keep the SRS warning illuminated on if the airbag has been deployed.
CHECK SRS WARNING LIGHT
Turn the ignition switch to ON and check that the SRS warning light comes on for approximately 6 seconds (primary check).
Check that the SRS warning light goes off approximately 6 seconds after the ignition switch is turned to ON (constant check).
- HINT:
-
When any of the following symptoms occur, refer to the "Problem Symptoms Table" (Click hereVehicle Interior>SUPPLEMENTAL RESTRAINT SYSTEMS>AIRBAG SYSTEM (for 3 Connectors Type)>PROBLEM SYMPTOMS TABLE).
- ·
The SRS warning light comes on occasionally after the primary check period has elapsed.
·The SRS warning light comes on, but a DTC is not output.
·The ignition switch is turned from off to ON, but the SRS warning light does not come on.
·The SRS warning light blinks after the primary check period has elapsed.
FUNCTION OF SRS CONNECTORS
SRS connectors are located as shown in the illustration.
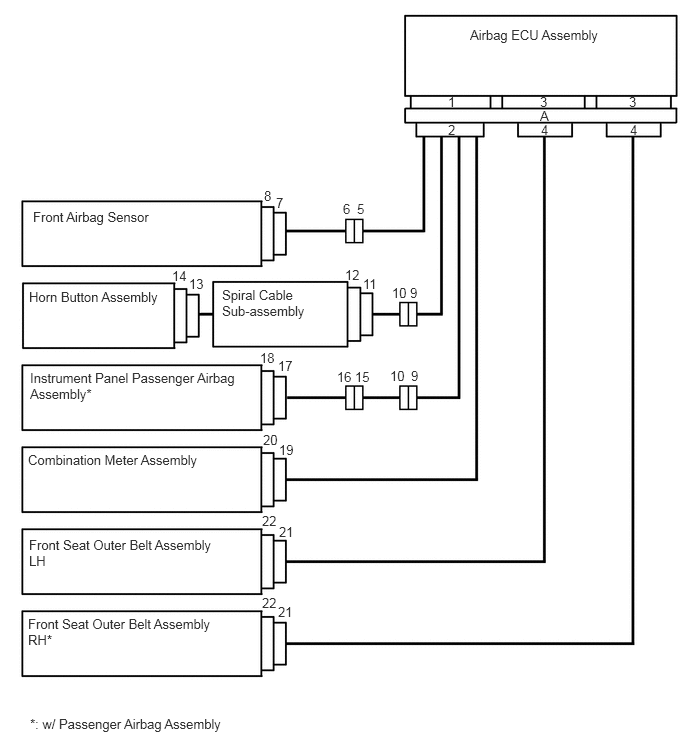
| Connector Type | Application |
|---|---|
| Terminal Twin-Lock Mechanism | Connectors 2, 4, 5, 9, 10, 11, 15 |
| Half Connection Prevention Mechanism | Connectors 5, 9 |
| Connector Position Assurance Mechanism | Connectors 7, 17, 21 |
| Activation Prevention Mechanism | Connectors 2, 4, 10, 12, 14, 16, 18, 22 |
| Connector Lock Mechanism (1) | Connectors 13, 17, 21 |
| Connector Lock Mechanism (2) | Connectors 2, 4 |
| Improper connection prevention lock mechanism | Connectors 1, 3 |
Terminal twin-lock mechanism
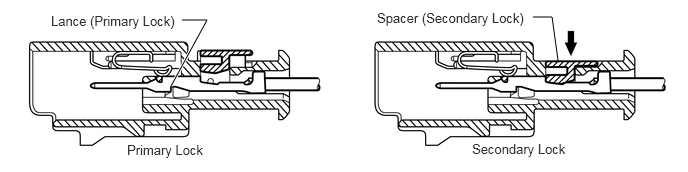
This mechanism is designed to increase the ability of the terminal to remain connected and prevents it from accidentally being disconnected.
The connector has a two-piece construction consisting of the housing and spacer to securely lock the terminal using both the lance (primary lock) and spacer (secondary lock).
Half connection prevention mechanism
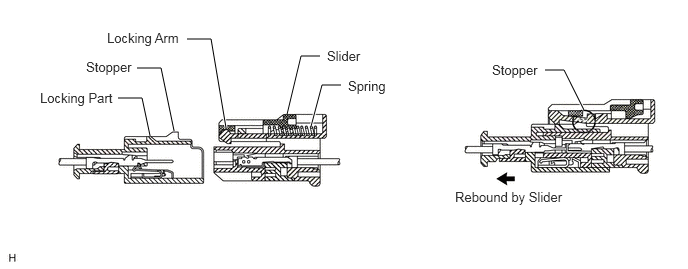
This mechanism is designed to prevent the connector from being connected only halfway.
If the connector is not completely connected, the connector is disconnected by the force of the spring so that no continuity exists.
Connector Position Assurance (CPA) mechanism
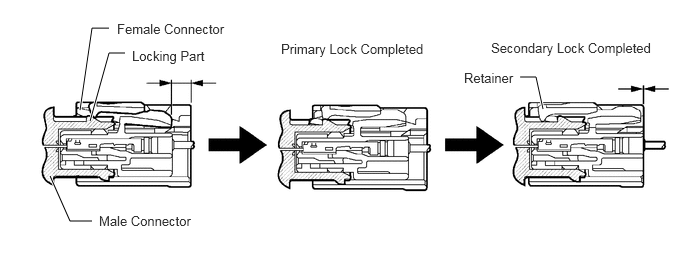
This mechanism is designed to detect when the connector is connected only halfway.
The CPA and female connector slide to the male connector side at the same time and the primary lock is completed when the female connector is engaged with the male connector. From this point, only the CPA slides to the male connector side. The secondary lock is completed when the CPA retainer is engaged with the female connector. When the CPA and female connector ends are aligned, the connectors are completely engaged.
Activation prevention mechanism
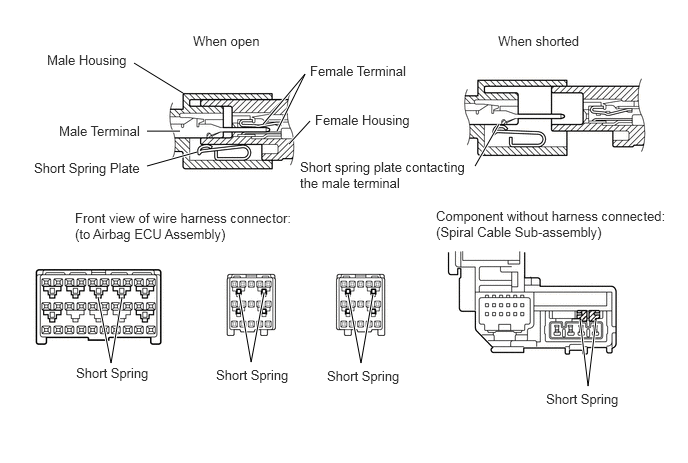
The activation prevention mechanism is designed to create a short circuit automatically between the positive (+) and negative (-) terminals of an airbag power source connector when disconnected.
The short spring plate contained in the connector creates a closed circuit on the airbag side (no potential difference can occur between both terminals), preventing accidental airbag deployment when servicing.
Connector lock mechanism (1)
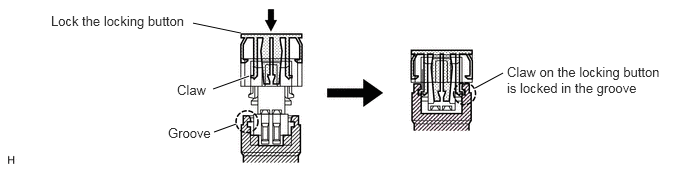
This mechanism is designed to prevent the connector from accidentally being disconnected.
Locking the connector locking button engages the locking button claw in the groove of the other connector to connect the connector securely.
Connector lock mechanism (2)
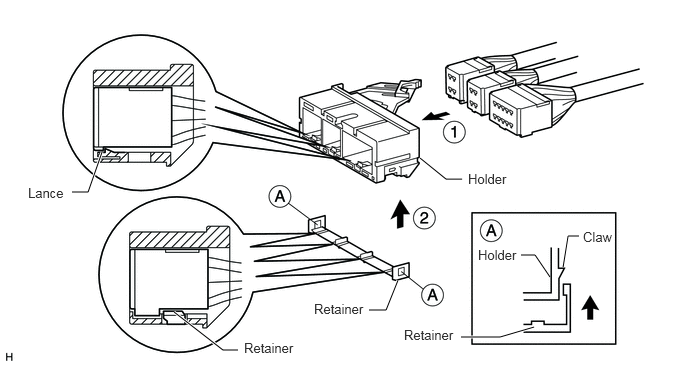
This mechanism is designed to prevent the connector from accidentally being disconnected.
Sliding the connector all the way into the holder and locking the lance completes the primary lock.
Engaging the retainer with the holder as shown in the illustration completes the secondary lock, preventing the connector from accidentally being disconnected.
Improper connection prevention lock mechanism
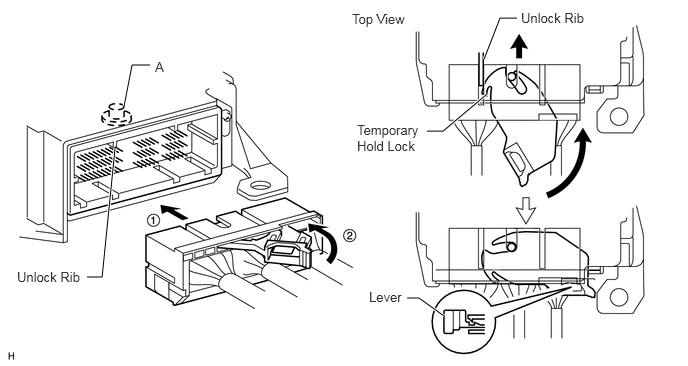
This mechanism is designed to prevent the connector from being connected only halfway.
When the holder is connected to the airbag ECU assembly, the unlock rib unlocks the temporary hold lock, allowing the lever to be pushed in by rotating around the A axis.
Locking the lever to the holder locks the holder securely.