14B FUEL FUEL INJECTION PUMP INJECTION PUMP ASSEMBLY
PROCEDURE

 1. PUMP BODY TO SST (STAND)
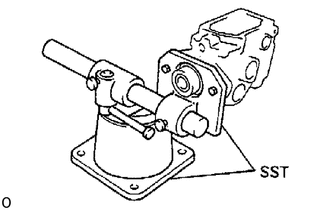
- SST
- 09241-76022
09245-54010
2.INSTALL FUEL INLET HOLLOW SCREW
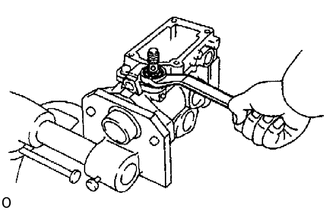
Install a new gasket and the hollow screw.
- Torque:
37 N*m (375 kgf*cm, 27 ft.*lbf)
3.INSTALL REGULATOR VALVE
Install the 2 O-rings to the regulator valve.
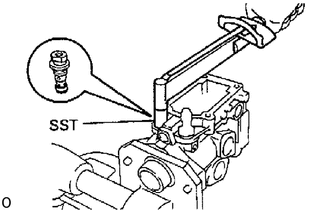
Using SST, install the regulator valve.
- SST
- 09260-54012 (09262-54020)
- Torque:
8.8 N*m (90 kgf*cm, 78 in.*lbf)
4.INSTALL FUEL FEED PUMP
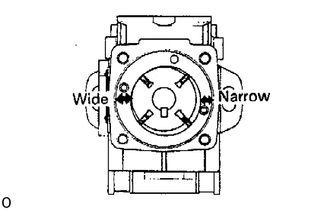
Install the liner, rotor and 4 blades.
Check that the liner and blades are facing in the correct direction, as shown.
Check that the blades move smoothly.
Align the fuel outlet holes of the cover and liner.
Install the pump cover with the 2 screws.
- Torque:
3.0 N*m (31 kgf*cm, 27 in.*lbf)
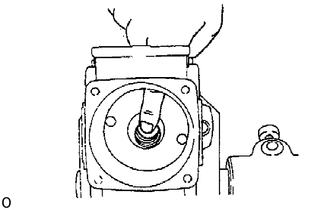
Check that the rotor moves smoothly.
5.INSTALL DRIVE SHAFT
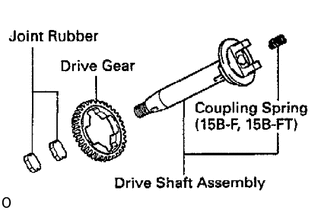
Install the drive gear on the drive shaft assembly as shown.
Install 2 new joint rubbers into the drive gear.
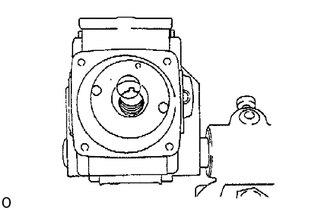
Position the key groove of the feed pump rotor upward.
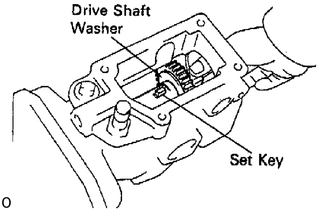
Install the set key and drive shaft washer on the drive shaft and insert the drive shaft assembly into the pump housing.
Check that the drive shaft turns without catching.
6.INSTALL TIMER PISTON
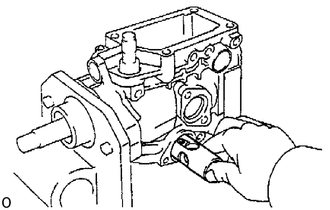
Apply grease to the timer piston.
Install the sub-piston into the timer piston.
Insert the timer piston into the pump housing.
7.INSTALL ROLLER RING
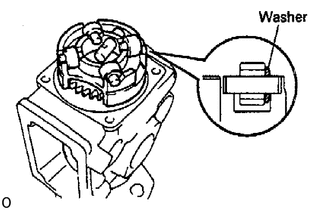
Install the slide pin, 4 rollers and washers on the roller ring.
Check that the roller is facing the flat surface of the washer.
Install the roller ring into the pump housing.
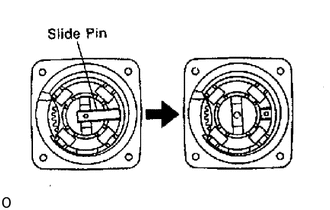
Carefully install the slide pin into the sub-piston.
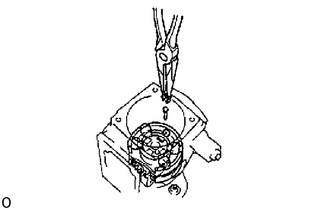
Install the stopper pin and clip.
8.INSTALL TIMER SPRING
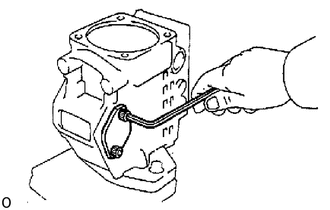
Using a 5 mm hexagon wrench, install a new O-ring and the RH timer cover with the 2 bolts.
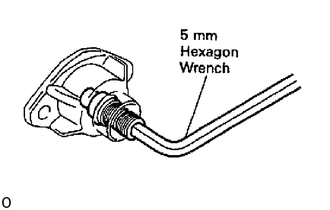
Install a new O-ring to the timer adjusting screw.
Using a 5 mm hexagon wrench, install the timer adjusting screw to the LH timer cover and temporarily install the nut.
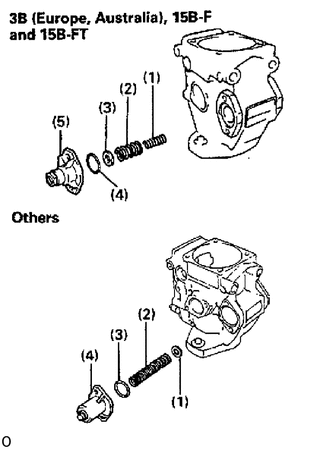
Install these parts with the 2 bolts:
3B (Europe, Australia), 15B-F and 15B-FT:
Inner spring
Outer spring
Shim
New O-ring
LH timer cover, timer adjusting screw and nut assembly
Install these parts with the 2 bolts:
Others:
Timer washer
Timer spring
New O-ring
LH timer cover, timer adjusting screw and nut assembly
9.PRESET TIMER ADJUSTING SCREW
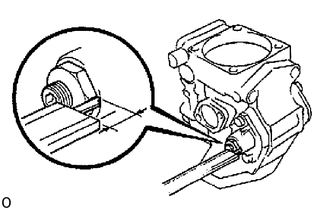
Using vernier calipers, measure the protrusion of the adjusting screw from the timer cover.
- Protrusion:
7.5 - 8.0 mm (0.295 - 0.315 in.)
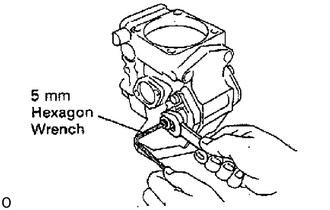
Using a 5 mm hexagon wrench, adjust the protrusion of the adjusting screw from the timer cover.
10.ADJUST PLUNGER SPRING SHIM
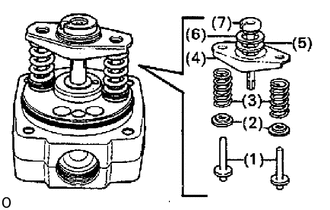
Install the following parts to the distributive head:
- HINT:
-
Do not assemble the plunger spring shims at this time.
2 plunger spring guides
2 upper spring seats
2 plunger springs
Lower spring seat
Upper plunger plate
Lower plunger plate
Pump plunger
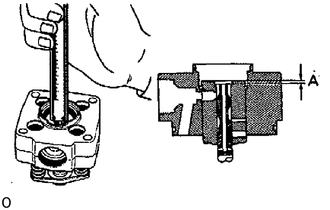
Using vernier calipers, measure clearance A indicated in the illustration.
Determine the plunger spring shim size by using the following formula and chart.
- 3B (Europe and Australia):
New plunger spring shim thickness = 6.4 - A
A ... Measured plunger position
- Plunger spring shim selection chart: mm (in.):
Measured clearance Shim thickness More than 5.9 (0.232) 0.5 (0.020) 5.6 - 5.8 (0.220 - 0.228) 0.8 (0.031) 5.4 - 5.5 (0.213 - 0.217) 1.0 (0.039) 5.2 - 5.3 (0.205 - 0.209) 1.2 (0.047) 4.9 - 5.1 (0.193 - 0.201) 1.5 (0.059) 4.6 - 4.8 (0.181 - 0.189) 1.8 (0.071) Less than 4.5 (0.177) 2.0 (0.079)
- 3B (Others):
New plunger spring shim thickness = 5.4 - A
A ... Measured plunger position
- Plunger spring shim selection chart: mm (in.):
Measured clearance Shim thickness More than 4.9 (0.193) 0.5 (0.020) 4.6 - 4.8 (0.181 - 0.189) 0.8 (0.031) 4.4 - 4.5 (0.173 - 0.177) 1.0 (0.039) 4.2 - 4.3 (0.165 - 0.169) 1.2 (0.047) 3.9 - 4,1 (0.154 - 0.161) 1.5 (0.059) 3.6 - 3.8 (0.142 - 0.150) 1.8 (0.071) Less than 3.5 (0.138) 2.0 (0.079)
- 14B:
New plunger spring shim thickness = 5.9 - A
A ... Measured plunger position
- Plunger spring shim selection chart: mm (in.):
Measured clearance Shim thickness More than 5.4 (0.213) 0.5 (0.020) 5.1 - 5.3 (0.201 - 0.209) 0.8 (0.031) 4.9 - 5.0 (0.193 - 0.197) 1.0 (0.039) 4.7 - 4.8 (0.185 - 0.189) 1.2 (0.047) 4.4 - 4.6 (0.173 - 0.181) 1.5 (0.059) 4.1 - 4.3 (0.161 - 0.169) 1.8 (0.071) Less than 4.0 (0.157) 2.0 (0.079)
- 15B-F, 15B-FT:
New plunger spring shim thickness = 7.1 - A
A ... Measured plunger position
- Plunger spring shim selection chart: mm (in.):
Measured clearance Shim thickness More than 6.6 (0.260) 0.5 (0.020) 6.3 - 6.5 (0.248 - 0.256) 0.8 (0.031) 6.2 (0.244) 0.9 (0.035) 6.1 (0.240) 1.0 (0.039) 6.0 (0.236) 1.1 (0.043) 5.9 (0.232) 1.2 (0.047) 5.8 (0.228) 1.3 (0.051) 5.7 (0.224) 1.4 (0.055) 5.6 (0.220) 1.5 (0.059) 5.3 - 5.5 (0.209 - 0.217) 1.8 (0.071) Less than 5.2 (0.205) 2.0 (0.079)
- HINT:
- ·
For a measurement between listed sizes, use the next larger size, Ex. If thickness is 1.6 mm (0.063in.) by calculation, use a 1.8 mm (0.071 in.) shim.
·Select 2 shims which have the same thickness.
11.ADJUST PLUNGER ADJUSTING SHIM
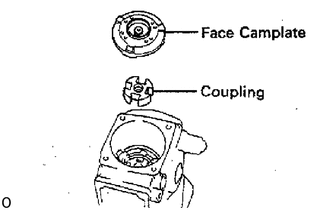
Install the coupling and face camplate.
- HINT:
-
3B, 14B:
-
Do not assemble the coupling spring.
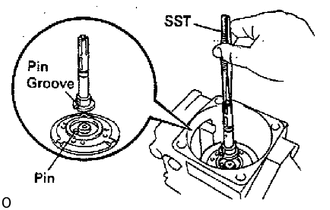
Clean the plunger adjusting shim and contacting surface area.
Align the pin groove of the pump plunger with the face camplate pin.
Using SST, install the used plunger adjusting shim and pump plunger.
- SST
- 09260-54012 (09269-54030)
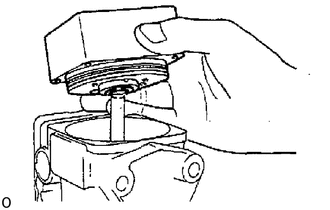
Install the distributive head with the 4 bolts.
- Torque:
12 N*m (120 kgf*cm, 9 ft.*lbf)
- NOTICE:
-
Be careful not to damage the pump plunger.
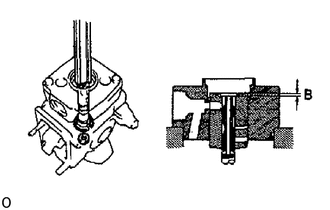
Using vernier calipers, measure dimension B indicated in the illustration.
Determine the plunger adjusting shim size by using the following formula and chart.
- 3B, 14B:
New adjusting shim thickness = T + (B - 3.3)
T ... Thickness of used shim
B ... Measured plunger position
Plunger adjusting shim selection chart
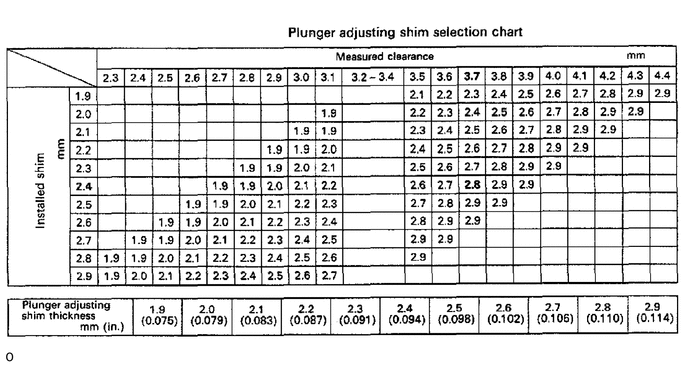
- EXAMPLE:
The 2.4 mm (0.094 in.) shim is installed and measured clearance is 3.7 mm (0.146 in,). Replace the 2.4 mm (0.094 in.) shim with a 2.8 mm (0.110 in.) shim.
- 15B-F, 15B-FT:
New adjusting shim thickness = T + (B - 3.5)
T ... Thickness of used shim
B ... Measured plunger position
Plunger adjusting shim selection chart
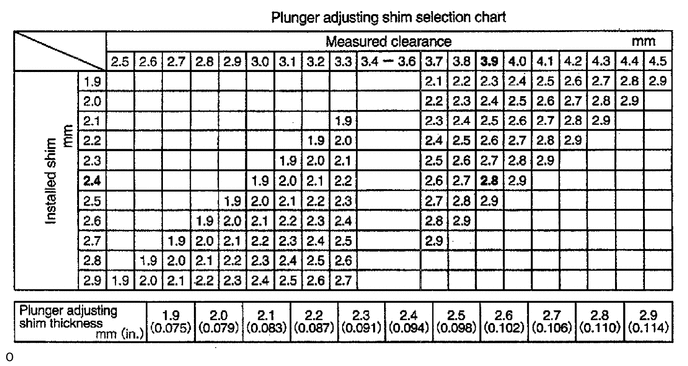
- EXAMPLE:
The 2.4 mm (0.094 In.) shim is installed and measured clearance is 3.9 mm (0.154 in.). Replace the 2.4 mm (0.094 in.) shim with a 2.8 mm (0.110 in.) shim.
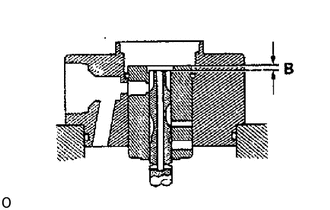
Install a new plunger adjusting shim and recheck dimension B.
- Dimension B:
- 3B, 14B:
3.2 - 3.4 mm (0.126 - 0.134 in.)
- 15B-F, 15B-FT:
3.4 - 3.6 mm (0.134 - 0.142 in.)
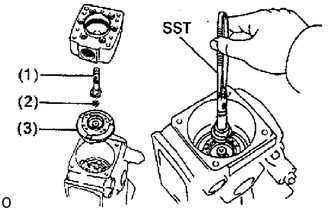
Remove the distributive head.
Using SST, remove the following parts:
Pump plunger
Plunger adjusting shim
Face camplate
- SST
- 09260-54012 (09269-54030)
12.INSTALL FACE CAMPLATE
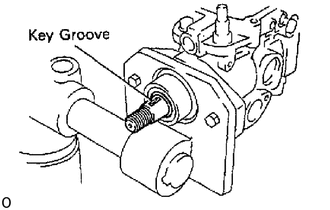
Face the drive shaft with the key groove facing upward.
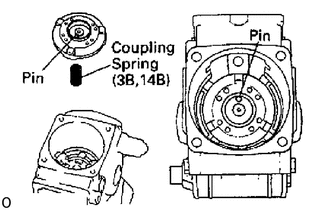
3B, 14B:
Install the coupling spring and camplate with the camplate pin facing the governor cover side.
15B-F, 15B-FT:
Install the camplate with the camplate pin facing the governor cover side.
13.INSTALL GOVERNOR LINK
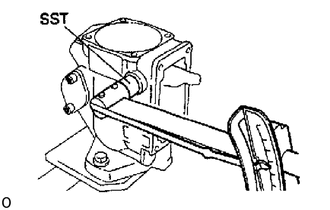
Using SST, install the governor link with 2 new gaskets and the 2 support bolts.
- Torque:
11 N*m (115 kgf*cm, 8 ft.*lbf)
- SST
- 09260-54012
09269-54040
Check that the governor link moves smoothly.
14.INSTALL PUMP PLUNGER
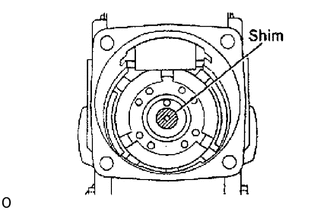
Place the selected new plunger adjusting shim on the center of the camplate.
- NOTICE:
-
Do not apply grease to the shim.
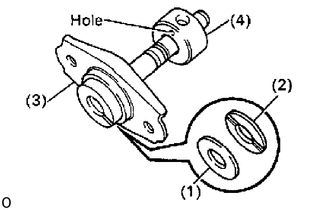
Install the following parts to the pump plunger:
- HINT:
-
Face the spill ring with the hole facing the lower spring seat.
Lower plunger plate
Upper plunger plate
Lower spring seat
Spill ring
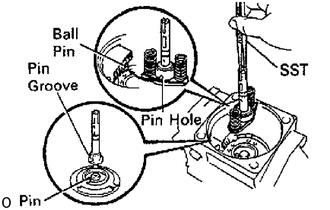
Align the pin groove of the plunger with the pin of the face camplate.
Align the ball pin of the governor link with the pin hole of the spill ring.
Using SST, install the pump plunger and 2 plunger springs.
- SST
- 09260-54012 (09269-54030)
15.INSTALL DISTRIBUTIVE HEAD
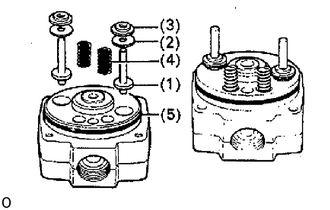
Apply grease to the following parts and install them to the distributive head:
2 plunger spring guides
2 new selected plunger spring shims
2 upper spring seats
2 lever support springs
New O-ring
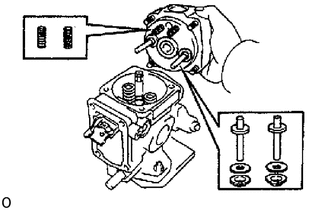
Install the distributive head.
- NOTICE:
-
Be careful not to damage the pump plunger.
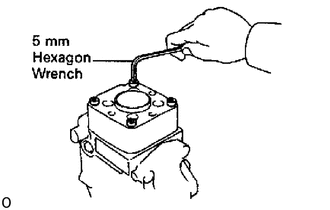
Using a 5 mm hexagon wrench, install the 4 bolts.
- Torque:
12 N*m (120 kgf*cm, 9 ft.*lbf)
- HINT:
-
Use the bolt which is 45 mm (1.77 in.) in length.
16.INSTALL DELIVERY VALVE HOLDERS (w/o CPV)
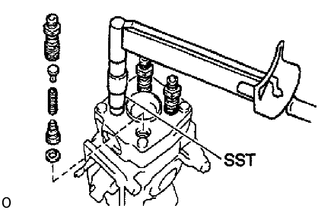
Install new gaskets and the valves into the distributive head.
Install the springs into the delivery valve holders.
Using SST, install the delivery valve holders.
- SST
- 09260-54012 (09269-54020)
- Torque:
59 N*m (600 kgf*cm, 43 ft.*lbf)
17.INSTALL DISTRIBUTIVE HEAD PLUG
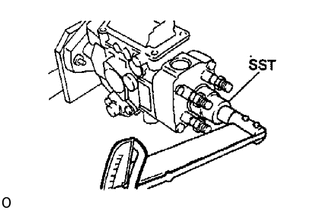
Install a new O-ring to the head plug.
Using SST, install the head plug.
- SST
- 09260-54012 (09262-54010)
- Torque:
88 N*m (900 kgf*cm, 65 ft.*lbf)
18.INSTALL GOVERNOR SHAFT AND FLYWEIGHT HOLDER
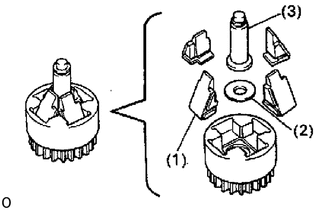
Install the following parts to the flyweight holder:
- HINT:
-
Replace the 4 flyweights as a set.
4 flyweight
No.2 flyweight washer
Governor sleeve
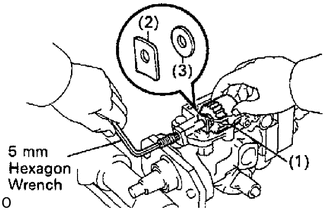
Install a new O-ring to the governor shaft.
Place the flyweight holder assembly (1) in position, and install the governor gear adjusting washer (2) and No. 1 flyweight washer (3) between the flyweight holder and pump housing.
Install the governor shaft through the governor gear adjusting washer, No. 1 flyweight washer and flyweight holder assembly.
Using a 5 mm hexagon wrench, turn the governor shaft counterclockwise.
- HINT:
-
The governor shaft has LH threads.
19.CHECK FLYWEIGHT HOLDER THRUST CLEARANCE
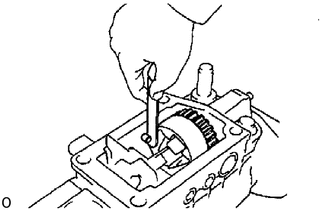
Using a thickness gauge, measure the thrust clearance between the housing pin and flyweight holder.
- Thrust clearance:
0.15 - 0.35 mm (0.0059 - 0.0138 in.)
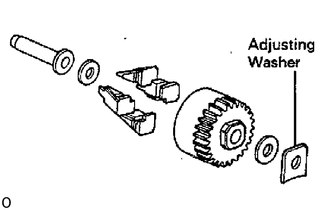
If the thrust clearance is not as specified, adjust with a governor gear adjusting washer.
1.05 mm (0.0413 in.)
1.25 mm (0.0492 in.)
1.45 mm (0.0571 in.)
1.65 mm (0.0650 in.)
1.85 mm (0.0728 in.)
20.ADJUST PROTRUSION OF GOVERNOR SHAFT
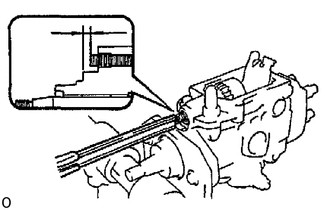
Using vernier calipers, measure the protrusion of the governor shaft.
- Protrusion:
0.5 - 2.0 mm (0.020 - 0.079 in.)
If the protrusion is not as specified, adjust by turning the governor shaft.
- HINT:
-
The governor cover shaft has LH threads.
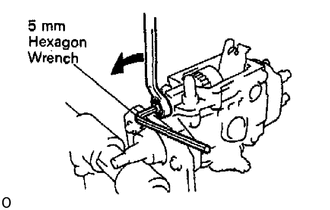
Install and tighten the nut while holding the governor shaft with a 5 mm hexagon wrench.
21.ASSEMBLE BOOST COMPENSATOR (15B-FT) OR HIGH ALTITUDE COMPENSATOR (w/ HAC)
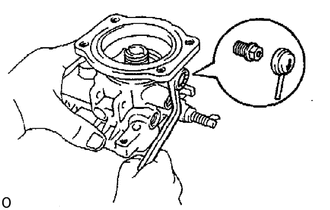
Install overflow screw
Install the overflow screw.
Install the rubber cap facing the arrow downward.
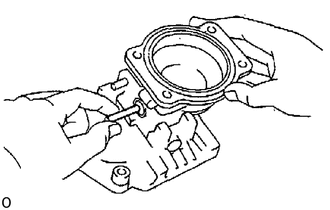
Install control lever
Insert the connecting pin into the governor cover.
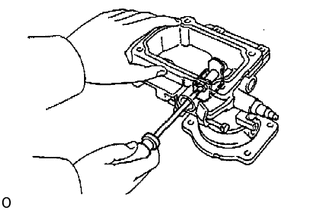
Using a small screwdriver, install the control lever with the support pin.
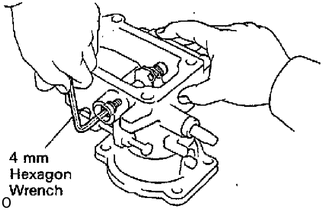
Using a 4 mm hexagon wrench, install 2 new gaskets and the 2 bolts.
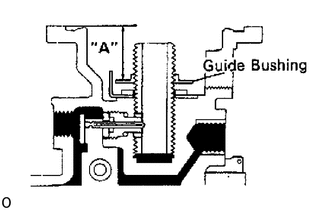
15B-FT:
Install guide bushing
Install and adjust the guide bushing to the dimension "A" as shown in the illustration.
- Dimension "A":
18.5 - 20.0 mm (0.728 - 0.787 in.)
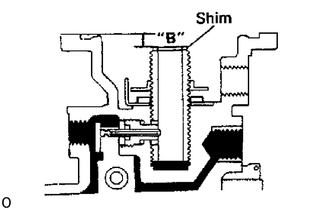
15B-FT:
Install boost compensator diaphragm
Adjust boost compensator shim(s).
Place the shim on the guide bushing.
Using vernier calipers, measure the dimension "B" as shown in the illustration.
- Dimension "B":
6.8 - 8.0 mm (0.268 - 0.315 in.)
If the dimension is not within specification, select and install the correct shim.
- HINT:
-
Shim are available in sized in increments 0.2 mm (0.008 in.), from 1.1 mm (0.043 in.) to 3.3 mm (0.130 in.).
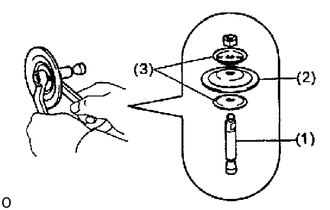
Assemble these parts with the nut.
- Torque:
7.35 N*m (75 kgf*cm, 65 in.*lbf)
(1) Push rod
(2) Diaphragm
(3) 2 spring seats
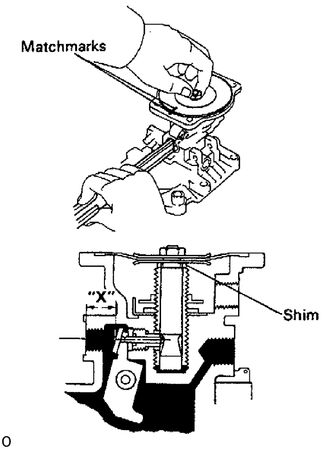
Adjust the installation direction of boost compensator diaphragm assembly.
Install the shim and diaphragm assembly.
- HINT:
-
Do not assemble the spring.
While pushing on the diaphragm, using vernier calipers, measure the dimension "X" as shown inthe illustration.
- Dimension "X":
7.7 - 7.8 mm (0.303 - 0.307 in.)
- HINT:
-
Measure at the center of the hole.
Adjust the dimension "X" by turning the diaphragm, and place matchmarks on the diaphragmand governor cover.
Remove the diaphragm assembly.
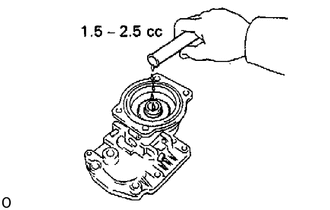
Insert 1.5 - 2.5 cc (0.09 - 0.15 cu in.) of engine oil into the bushing hole.
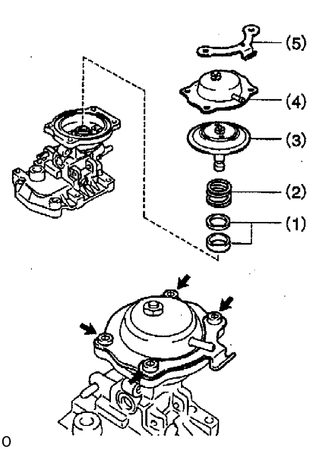
Using a 5 mm hexagon wrench, install these parts to the governor cover with the 4 bolts:
(1) Shim(s)
(2) Spring
(3) Diaphragm assembly
(4) Diaphragm cover
(5) Fuel outlet pipe clamp
w/ HAC:
Install pneumatic bellows
Insert 3 - 4 cc (0. 18 - 0.24 cu in.) of engine oil into the bushing hole.
Using a 5 mm hexagon wrench, install these parts to the governor cover with the 4 bolts:
(1) Pneumatic bellows spring
(2) Push rod
(3) Pneumatic bellows and 2 rubber caps assembly
(4) New gasket
(5) Pneumatic bellows cover
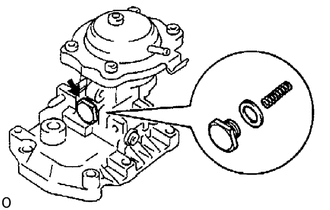
Install lever control spring
Install the lever control spring with a new gasket and the bolt.
22.INSTALL ADJUSTING LEVER SHAFT TO GOVERNOR SHAFT
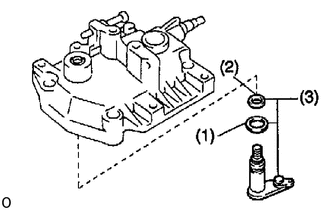
Install these parts to the governor cover:
Washer
New O-ring
Adjusting lever shaft, O-ring and plate washer assembly
23.INSTALL GOVERNOR COVER
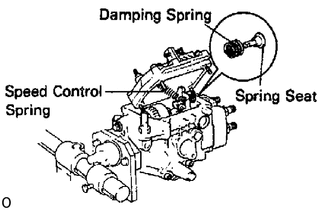
Install a new gasket to the groove of the governor cover.
Install the speed control spring to the adjusting shaft.
Install the damper spring and spring seat, and connect the speed control spring to the spring seat.
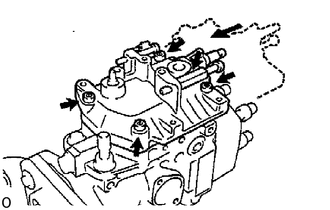
Slide the governor cover forward.
Using a 5 mm hexagon wrench, install the governor cover with the 4 bolts.
- Torque:
8.3 N*m (85 kgf*cm, 74 in.*lbf)
- HINT:
-
Use the bolt which is 35 mm (1.38 in.) length.
Install the idle speed adjusting screw with the lock nut.
24.INSTALL ADJUSTING LEVER
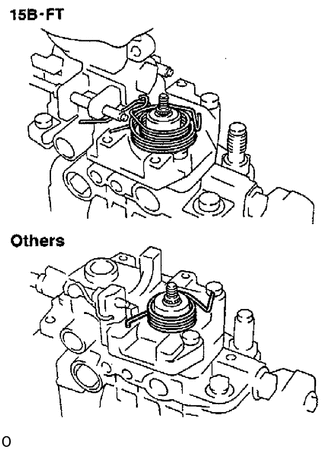
Place the 2 return springs (15B-FT) or return spring (Others) on the governor cover as shown in the illustration.
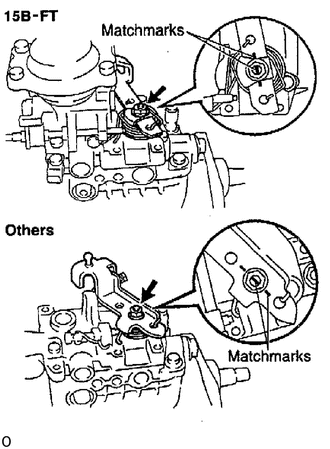
Hook the return springs to the adjusting lever, and turn and place the adjusting lever on the governor shaft as shown in the illustration.
Align the lines of the adjusting lever shaft and adjusting lever.
15B-FT:
Insert the spring guide between the return springs.
Install the nut.
- Torque:
8.3 N*m (85 kgf*cm, 74 in.*lbf)
25.INSTALL PICKUP SENSOR
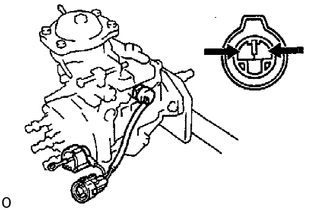
Connect the sensor lead wires to the connector.
Install a new O-ring and pickup sensor.
- Torque:
21 N*m (210 kgf*cm, 15 ft.*lbf)
26.INSTALL FUEL CUT SOLENOID
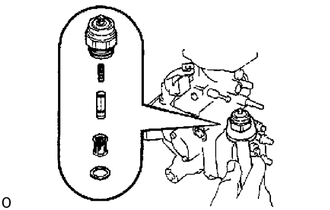
Install a new O-ring on the fuel cut solenoid.
Install the wave washer, strainer, valve, spring and fuel cut solenoid.
- Torque:
22 N*m (225 kgf*cm, 16 ft.*lbf)
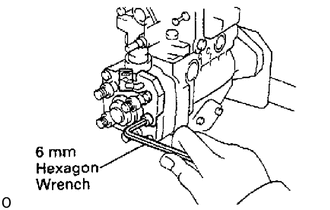
Using a 6 mm hexagon wrench, install the connector bracket with the bolt.
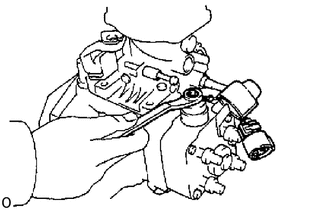
Install the lead wire to the fuel cut solenoid with the nut.
Install the dust cover to the fuel cut solenoid.
Install the lead wire connector to bracket.
27.INSTALL DASH POT
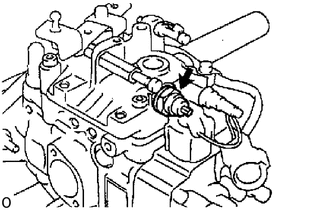
Install a new gasket and the dash pot.
- Torque:
11 N*m (115 kgf*cm, 8 ft.*lbf)
28.INSTALL THERMO WAX
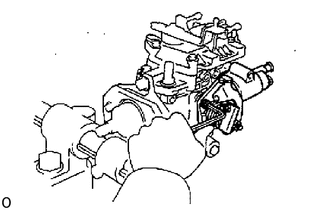
Install a new O-ring and the thermo wax with the 2 bolts.
29.INSTALL IDLE-UP ACTUATOR AND LEVER
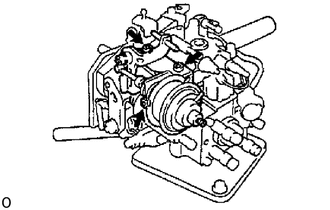
Set the adjusting lever to maximum position.
Using a 5 mm hexagon wrench, install the collar, the idle-up actuator and lever assembly with the 3 bolts. Alternately tighten the bolts in several passes.
30.REMOVE INJECTION PUMP FROM SST (STAND)
- SST
- 09241-76022
09245-54010
31.PERFORM AIR TIGHT TEST
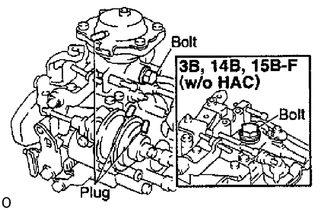
Install a bolt to the overflow port.
Install the plug to each port of the boost compensator (15B-FT) and idle-up actuator (BU).
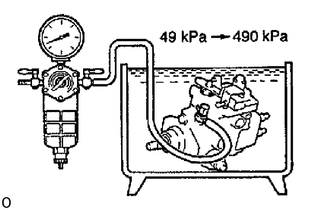
Connect an air hose to the fuel inlet pipe and place the injection pump into diesel fuel.
Apply 49 kPa (0.5 kgf/cm2, 7 psi) of pressure and confirm that there are no leaks.
Next check that there are no leaks with 490 kPa (5.0 kgf/cm2, 71 psi) of pressure applied.
32.INSTALL SET KEY OF INJECTION PUMP DRIVE PULLEY ON DRIVE SHAFT