14B FUEL FUEL INJECTION PUMP INJECTION PUMP ADJUSTMENT
PROCEDURE

 1. PRE-TEST CHECK AND PREPARATION
The specifications for test nozzle and nozzle holders are as follows.
- Test nozzle:
DN12SD12 (NIPPONDENSO)
- Test nozzle opening pressure:
14,510 - 14,910 kPa
(148 - 152 kgf/cm2, 2,105 - 2,162 psi)
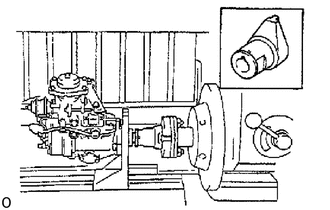
Check the accuracy of the tachometer.
- Allowable error:
+/- 40rpm
Install the angle gauge stand.
Mount the injection pump body on the pump tester.
- HINT:
-
Place a mark on the key groove portion of the coupling.
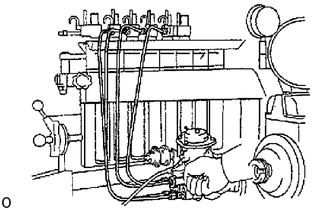
Install an injection pipe with the following specifications.
- Outer diameter:
6.0 mm (0.236 in.)
- Inner diameter:
2.0 mm (0.079 in.)
- Length:
840 mm (33.07 in.)
- Minimum banding radius:
25 mm (0.98 in.) or more
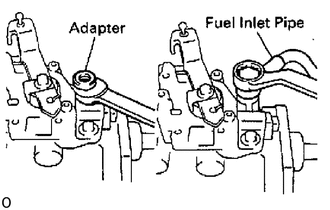
Remove the fuel inlet hollow screw.
Connect the fuel inlet pipe with an adapter.
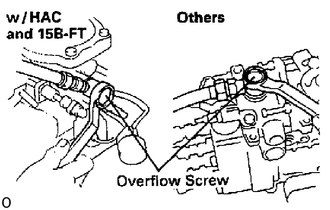
Install an overflow hose with 2 new gaskets and union bolt.
- HINT:
-
Always use the overflow screw installed on the pump to be adjusted.
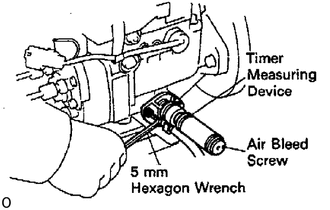
Using a 5 mm hexagon wrench, remove the 2 bolts and RH timer cover.
Install the inner pressure gauge with the timer measuring device.
Part No. 95095-10231 and 95095-10480
(NIPPON DENSO)
- HINT:
-
Bleed the air by the air bleed screw.
Connect SST (turbocharger pressure gauge) to the boost compensator.
- SST
- 09992-00242
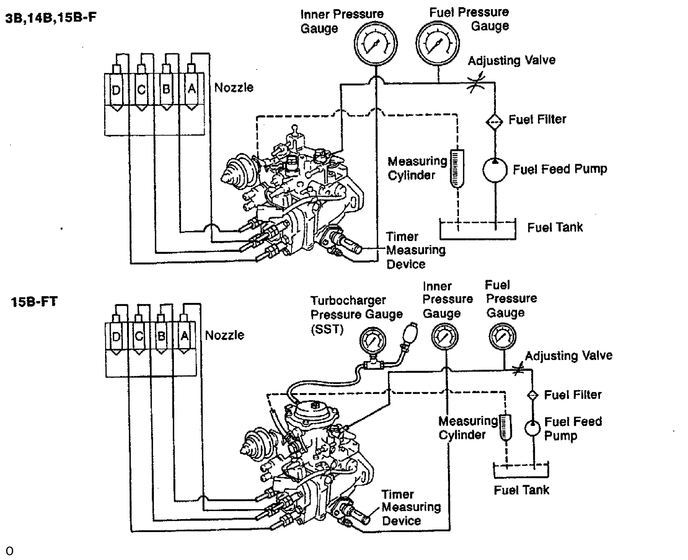
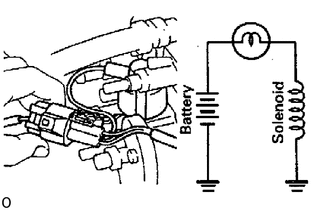
Apply about 6 or 12 volts of DC power to the fuel cut solenoid.
- NOTICE:
- ·
When applying voltage to the solenoid, position the battery as far away from the solenoid as possible so that a spark does not occur.
·When connecting the battery cable, connect the solenoid side first.
- HINT:
-
For a 12 V or 24 V battery, connect the battery through a 10 or 12 W bulb.
The pressure for feeding fuel to the injection pump should be 20 kPa (0.2 kgf/cm2, 2.8 psi). The fuel temperature for pump testing should be 40 - 45 °C (104 - 113 °F).
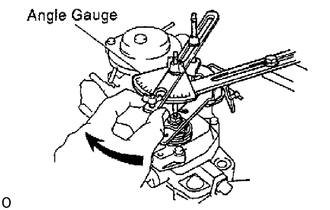
Install an angle gauge to the stand and set it to the adjusting lever.
Part No.95095 - 10360 (Stand w/ angle gauge)
Secure the adjusting lever fully on the maximum speed side.
Check the installation direction of the camplate as follows:
Disconnect the injection pipe from the position marked "C" on the distributive head.
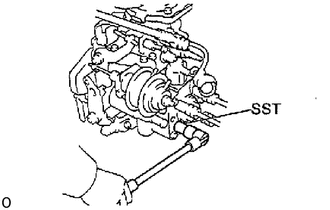
Using SST, remove the delivery valve holder.
- SST
- 09260-54012 (09269-54020)
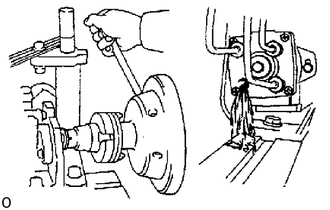
Check that fuel is flowing out when the mark is in the position shown in the illustration.
If not, it is improperly assembled.
Disassemble and change the camplate position 180° in the opposite direction.
- HINT:
-
At this time, disconnect the fuel cut solenoid wire harness.
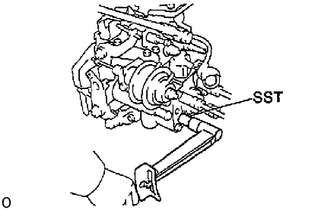
Using SST, install the delivery valve holder.
- SST
- 09260-54012 (09269-54020)
- Torque:
59 N*m (600 kgf*cm, 43 ft.*lbf)
Connect the injection pipe.
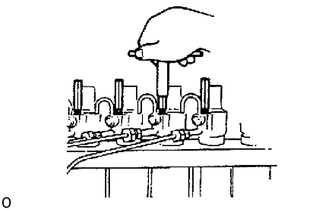
Bleed the air from the injection pipes.
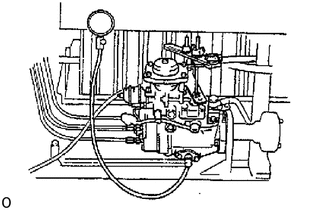
Race the injection pump for 5 minutes at 1,200 rpm.
- NOTICE:
-
Check that there is no fuel leakage or abnormal noise.
- HINT:
-
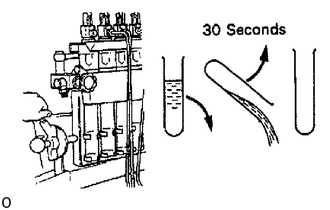
- ·
Measure the volume of each injection cylinder with a measuring cylinder.
·Before measuring the injection volume, first hold the cylinder tilted for at least 30 seconds to discard all the fuel.
2.CHECK BOOST COMPENSATOR FOR AIR TIGHTNESS (15B-FT)
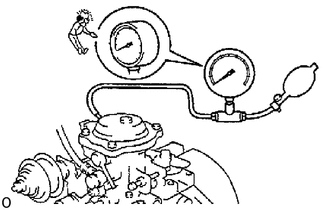
Apply 98 kPa (1.00 kgf/cm2, 14.2 psi) of pressure to the boost compensator.
Measure the time it takes for pressure to drop to 95 kPa (0.97 kgf/cm2, 13.8 psi).
- Pressure drop:
10 seconds or more
3. PRE-SET FULL LOAD INJECTION VOLUME
Set the adjusting lever to maximum position.
w/ HAC:
Apply 97.3 +/- 0.2 kPa (730 +/- 1.5 mmHg, 28.74 +/- 0.06 in.Hg) absolute pressure.
15B-FT:
Apply 33.4 kPa (0.34 kgf/cm2, 4.9 psi) of pressure to the boost compensator.
Measure the injection volume.
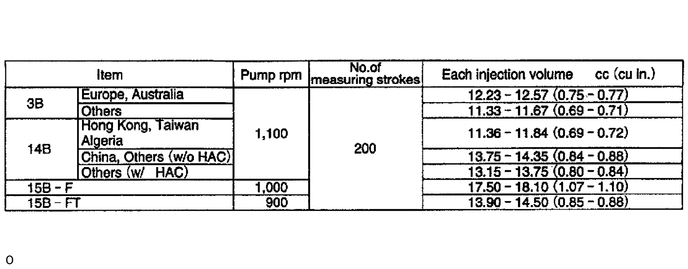
w/ Collar seal type:
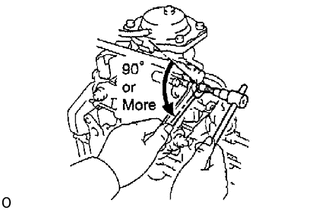
Remove the collar seal as follows:
Hold the full load set screw, and release the collar seal from the spot weld by turning the lock nut counterclockwise by 90° or more.
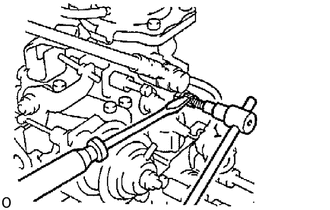
Using a screwdriver, pry out the collar seal.
w/Wire seal type:
Cut off the wire seal.
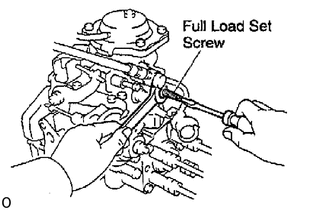
Adjust by turning the full load set screw.
- HINT:
-
The injection volume will increase about 3 cc (0.18 cu in.) with each 1/2 turn of the screw.
4. PRE-SETTING OF LOAD SENSING TIMER (Taiwan)
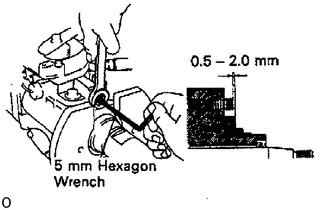
Using a 5 mm hexagon wrench, adjust the protrusion of the governor shaft.
- Protrusion:
0.5 - 2.0 mm (0.020 - 0.079 in.)
5. PRE-SET MAXIMUM SPEED
Set the adjusting lever to maximum position.
w/ HAC
Apply 97.3 +/- 0.2 kPa (730 +/- 1.5 mmHg. 28.74 +/- 0.06 in.Hg) absolute pressure.
15B-FT:
Apply 33.4 kPa (0.34 kgf/cm2, 4.9 psi) of pressure to the boost compensator.
Measure the injection volume.
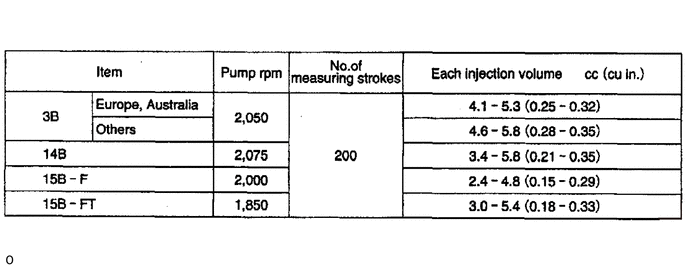
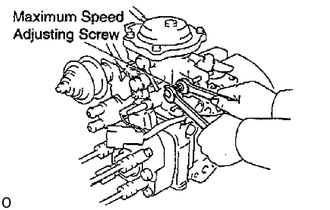
Cut off the seal wire.
Adjust the injection volume with the maximum speed adjusting screw.
6.ADJUST PUMP INNER PRESSURE
Set the adjusting lever to maximum position.
15B-FT:
Apply 33.4 kPa (0.34 kgf/cm2, 4.9 psi) of pressure to the boost compensator.
Measure the pump inner pressure at the below listed rpm.
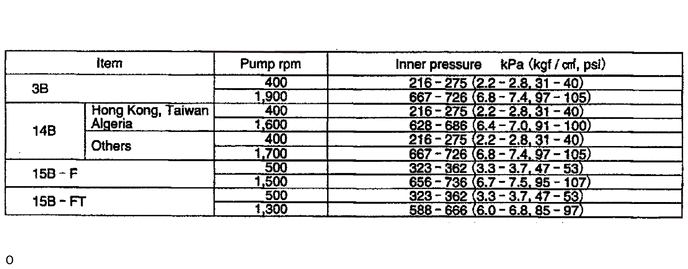
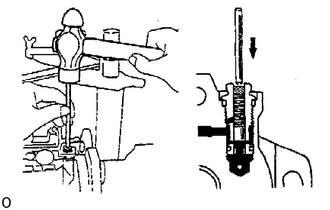
If the pressure is low, adjust by lightly tapping the regulator valve piston while watching the pressure gauge.
- HINT:
-
If the pressure is too high or if the regulator valve was tapped in too far, the regulator valve must be replaced.
7.CHECK OVERFLOW VOLUME
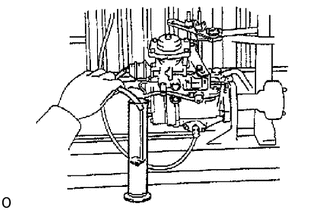
Set adjusting lever to maximum position.
Apply 33.4 kPa (0.34 kgf/cm2, 4.9 psi) of pressure to the boost compensator.
Measure the overflow volume at the below listed rpm.
- HINT:
-
Always use the overflow screw installed on the pump to be adjusted.
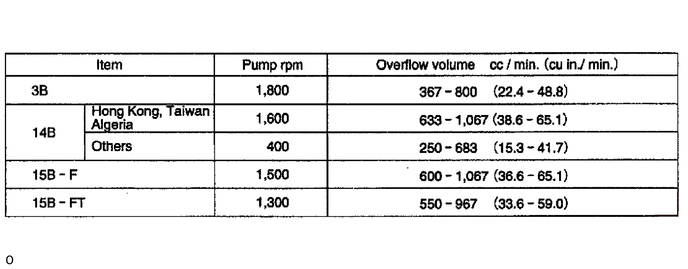
8.RELEASE COLD STARTING SYSTEM FOR NEXT INSPECTIONS (w/ ACSD)
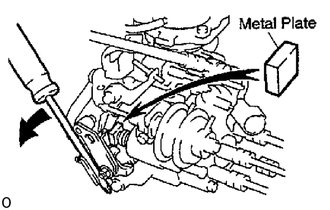
Using a screwdriver, turn the cold starting lever counterclockwise approx. 20°.
Put a metal plate (thickness of 8.5 - 10 mm (0.33 - 0.39 in.)) between the cold starting lever and thermo wax plunger.
- HINT:
-
Keep the cold starting system released until all measurements and adjustments are finished.
9.ADJUST TIMER
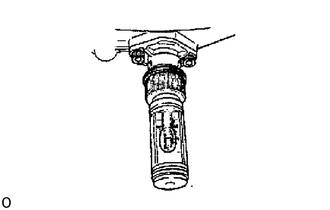
Set the timer measuring device at zero.
15B-FT:
Apply 33.4 kPa (0.34 kgf/cm2, 4.9 psi) of pressure to the boost compensator.
Measure the timer piston stroke at the below listed rpm.
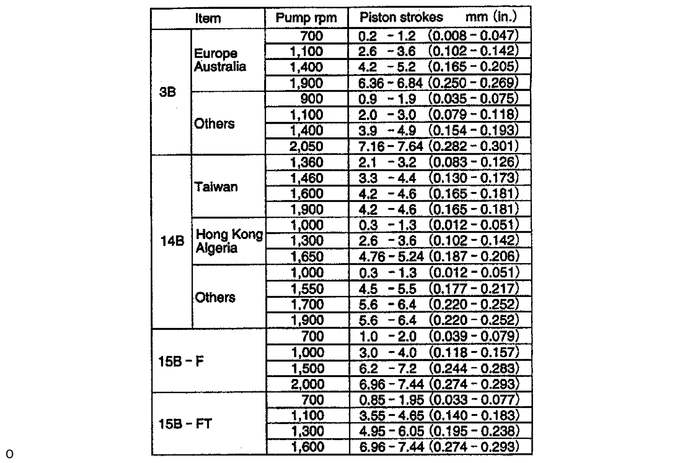
- HINT:
-
Check that the hysteresis is within 0.3 mm (0.012 in.).
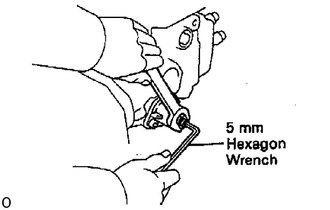
Using a 5 mm hexagon wrench. adjust by turning the timer adjusting screw.
- HINT:
-
Turn clockwise to reduce the stroke, turn counterclockwise to increase the stroke.
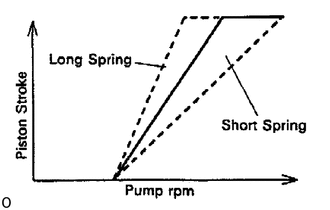
Check the timer stroke for characteristic tendency.
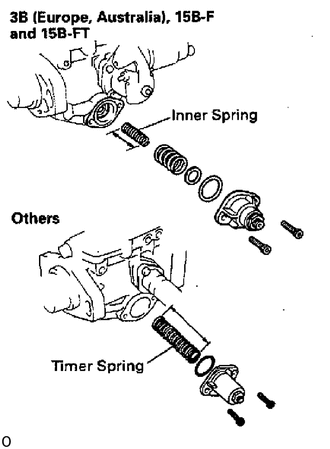
3B (Europe, Australia), 15B-F and 15B-FT:
If tendency is not as specified, select and replace the inner spring.
- Timer inner spring free length:
mm (in.)
- 3B (Europe, Australia):
32.0 (1.26) 32.3 (1.27) 33.5 (1.32)
- 15B-F:
34.4 (1.35) 34.6 (1.36) 35.1 (1.38) 34.5 (1.36) 35.0 (1.38) -
- 15B-FT:
34.6 (1.36) 35.1 (1.38) - 35.0 (1.38) 35.9 (1.41) -
Others:
If tendency is not as specified, select and replace the timer spring.
- Timer spring free length:
mm (in.)
- 3B:
35.6 (1.40) 37.9 (1.49) 38.2 (1.50)
- 14B (Taiwan):
68.25 (2.69) 69.9 (2.75) 71.8 (2.83)
- 14B (Others):
56.5 (2.22) 57.1 (2.25) 57.8 (2.28)
- HINT:
-
The timer stroke will increase with a long spring and decrease with a short spring.
10.ADJUST FULL LOAD INJECTION VOLUME
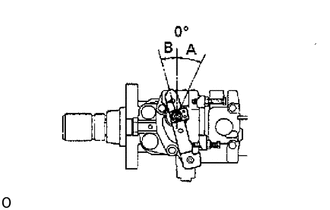
The adjusting lever angle for the adjustment below should be as shown in the illustration.
| Item | Adjusting lever angle | |
| A (Maximum speed side) | B (Idle speed side) | |
| 15B-FT | Minus 4 - Plus 6° | Minus 27 - 37° |
| Others | Plus 21 -31° | Minus 12 - 22° |
w/HAC:
Apply 97.3 +/- 0.2 kPa (730 +/- 1.5 mmHg, 28.74 +/- 0.06 in.Hg) absolute pressure.
15B-FT:
Apply 33.4 kPa (0.34 kgf/cm2, 4.9 psi) of pressure to the boost compensator.
Measure the full load injection volume.
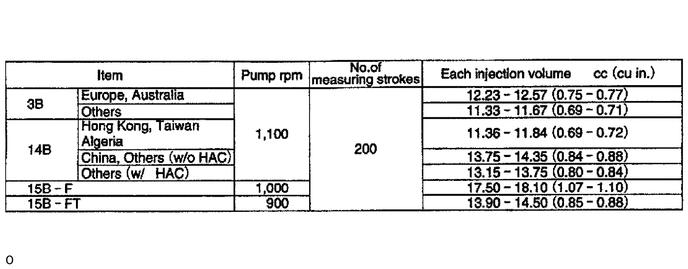
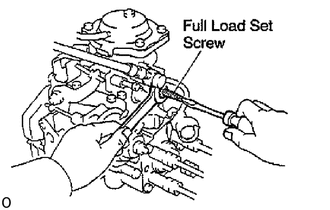
Adjust by turning the full load set screw.
- HINT:
-
The injection volume will increase about 3 cc (0.18 cu in.) with each 1/2 turn of the screw.
11.ADJUST MAXIMUM SPEED
w/ HAC:
Apply 97.3 +/- 0.2 kPa (730 +/- 1.5 mmHg, 28.74 +/- 0.06 in.Hg) absolute pressure.
15B-FT:
Apply 33.4 kPa (0.34 kgf/cm2, 4.9 psi) of pressure to the boost compensator.
Measure the injection volume at each pump rpm.
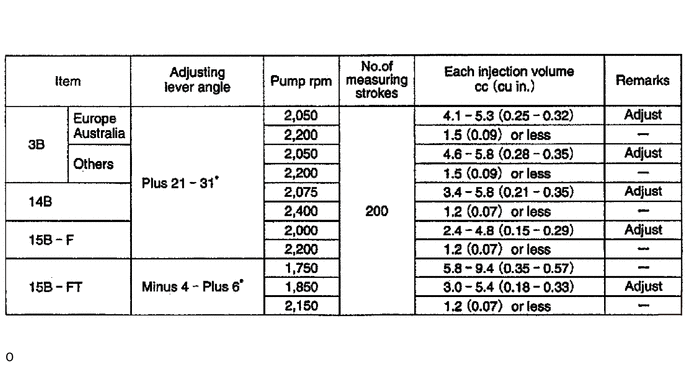
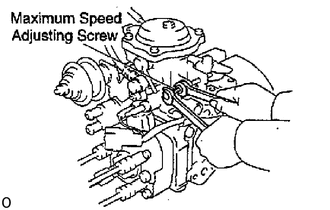
Adjust by turning the maximum speed adjusting screw.
12.CHECK INJECTION VOLUME
w/ HAC:
Apply 97.3 +/- 0.2 kPa (730 +/- 1.5 mmHg, 28.74 +/- 0.06 in.Hg) absolute pressure.
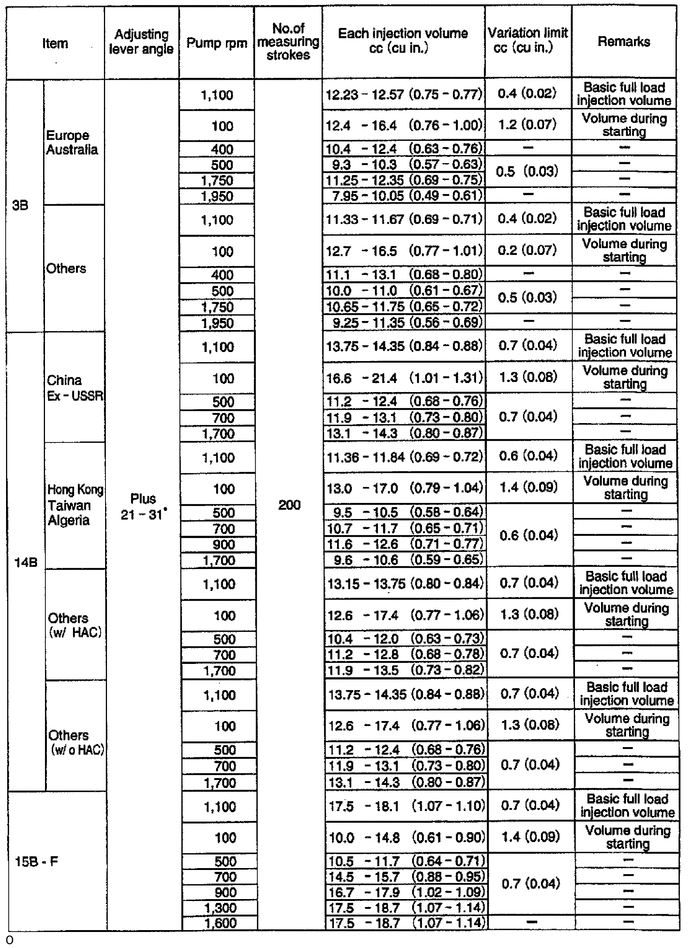
3B, 14B, 15B-F:
Measure the injection volume at each pump rpm and boost pressure.
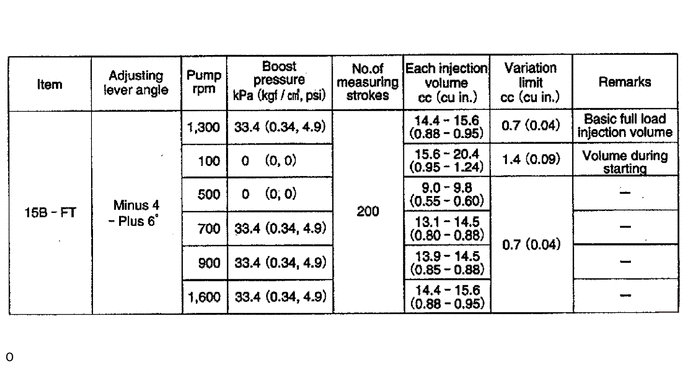
15B-FT:
Measure the injection volume at each pump rpm and boost pressure.
If the injection volume at 100 rpm is not as specified, replace the governor sleeve plug as follows:
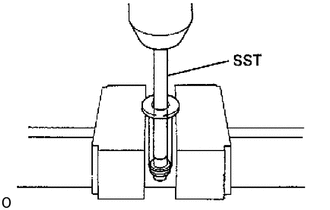
Using SST and a press, press out the sleeve plug assembly from the governor sleeve.
- SST
- 09236-00101 (09237-00070)
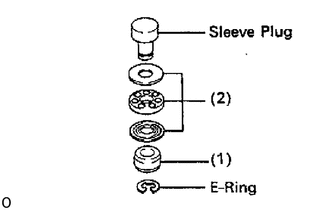
Remove the E-ring and following parts from the sleeve plug:
(1) Stop ring
(2) Bearing and 2 bearing retainers
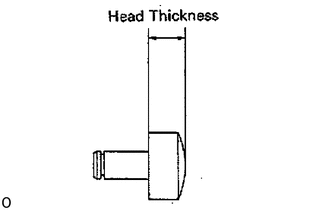
Measure the head thickness of the sleeve plug, and select a new sleeve plug.
- Governor sleeve plug head thickness:
mm (in.)
- 3B:
2.2 (0.087) 2.5 (0.098) 3.3 (0.130) 2.3 (0.091) 2.6 (0.102) 3.4 (0.134) 2.4 (0.094) 2.7 (0.106) -
- 14B:
3.0 (0.118) 3.6 (0.142) 4.2 (0.165) 3.1 (0.122) 3.7 (0.146) 4.3 (0.169) 3.2 (0.126) 3.8 (0.150) 4.5 (0.177) 3.3 (0.130) 3.9 (0.154) 4.7 (0.185) 3.4 (0.134) 4.0 (0.157) - 3.5 (0.138) 4.1 (0.161) -
- 15B-F, 15B-FT:
Sleeve plugs are available in 37 sizes in increment of 0.1 mm (0.004 in.), from 3.0 mm (0.118 in.) to 6.6 mm (0.260 in.).
- HINT:
-
Lengthening the plug by 0.1 mm (0.004 in.) will decrease injection volume by 0.6 cc (0.04 cu in.).
If the variation limit is greater than specified, replace the delivery valve.
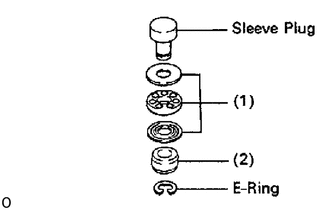
Install the following parts to the new sleeve plug with a new E-ring:
(1) Bearing and 2 retainers
(2) Stop ring
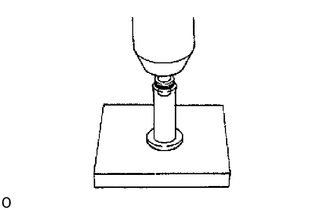
Using a press, press in the sleeve plug assembly to the governor sleeve.
13.ADJUST FULL LOAD MINIMUM INJECTION VOLUME (15B-FT)
Set the adjusting lever to maximum position.
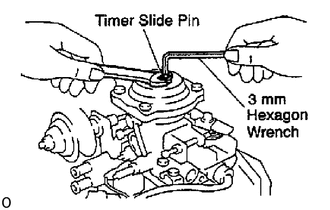
Release the pressure from the boost compensator.
Measure the injection volume.
| Pump rpm | No. of measuring strokes | Each injection volume cc (cu in.) |
| 500 | 200 | 9.0 - 9.8
(0.55 - 0.60) |
Using a 3 mm hexagon wrench, adjust by turning the timer slide pin.
14.ADJUST BOOST COMPENSATOR (15B-FT)
Adjust characteristic
Set the adjusting lever to maximum position.
Apply 19.9 kPa (0.20 kgf/cm2, 2.8 psi) of pressure to the boost compensator.
Measure the injection volume.
| Pump rpm | No. of measuring strokes | Each injection volume cc (cu in.) |
| 500 | 200 | 9.7 - 10.7
(0.59 - 0.65) |
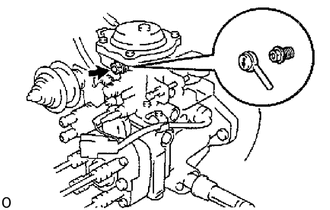
Remove the rubber cap and overflow screw.
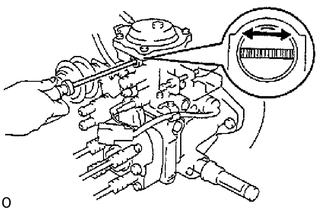
Using a screwdriver, adjust the injection volume by the guide bushing.
- HINT:
-
When the guide bushing is turned clockwise, as seen from above, the injection volume will increase.
Install the overflow screw.
Install the rubber cap facing the arrow downward.
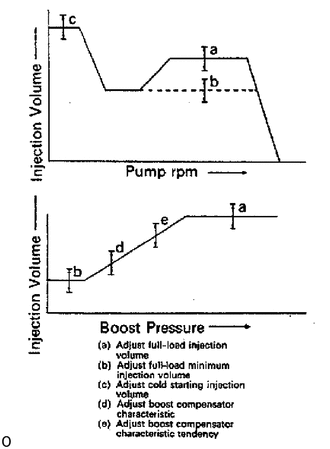
Check for characteristic tendency
Set the adjusting lever to maximum position.
Apply 26.5 kPa (0.27 kgf/cm2, 3.8 psi) of pressure to the boost compensator.
Measure the injection volume.
| Pump rpm | No. of measuring strokes | Each injection volume cc (cu in.) |
| 500 | 200 | 10.8 - 12.0
(0.66 - 0.73) |
CHECK HYSTERESIS
Compare the injection volume when the boost compensator pressure is lowered from 94 kPa (0.96 kgf/cm2, 13.7 psi) to 0 kPa (0 kgf/cm2, 0 psi), and conversely, when it is raised from zero.
- HINT:
-
Make measurements after moving the adjusting lever between idle and maximum 3 times for each lowering of the pressure.
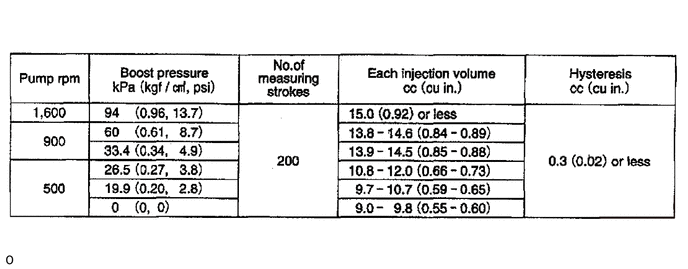
If not within standard value, check each sliding part of the boost compensator and check whether or not there is any oil.
15.ADJUST LOAD SENSING TIMER (Taiwan)
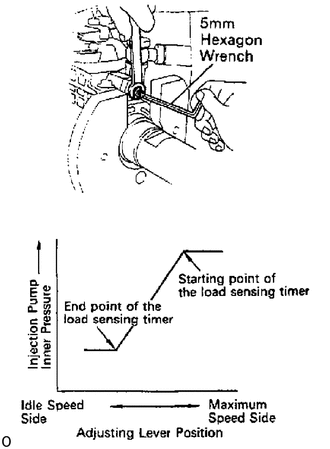
Using a 5 mm hexagon wrench, adjust the starting and end points of the load sensing timer by turning the governor shaft.
Set the adjusting lever to maximum position.
Measure the injection volume.
| Adjusting lever position | Pump rpm | No. of measuring strokes |
| Maximum speed side | 1,360 | 200 |
Slowly move the adjusting lever from the maximum speed side to the idle speed side, and secure it at the point where the pump inner pressure begins to drop.
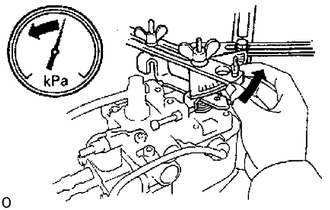
Measure the injection volume at the drop point (starting point.)
| Pump rpm | No. of measuring strokes | Each injection volume cc (cu in.) |
| 1,360 | 200 | Measured value at step (b) minus
1.0 (0.06) +/- 0.5 (0.04) |
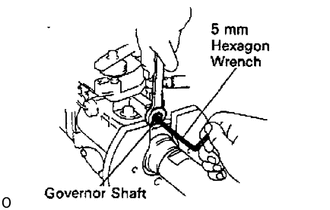
Using a 5 mm hexagon wrench, adjust the load sensing timer by turning the governor shaft, and perform the measurement again as specified.
- HINT:
-
The injection volume will increase approx. 3 cc (0.2 cu in.) with each 1/2 turn of the governor shaft.
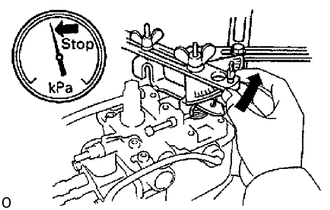
Check the end point injection volume by slowly moving the adjusting lever from the maximum speed side to the idle speed side, and secure it at the point where the pump inner pressure stops dropping.
| Pump rpm | No. of measuring strokes | Each injection volume cc (cu in.) |
| 1,360 | 200 | 11.2 - 11.6 (0.68 - 0.71) |
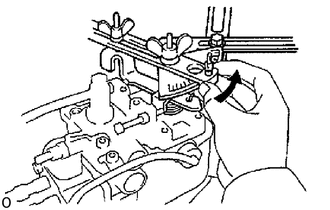
Check the timer piston fluctuation when the adjusting lever is moved from the maximum speed side to the idle speed side.
| Pump rpm | Timer piston fluctuation
mm (in.) |
| 1,360 | 0.2 - 0.3 (0.012 - 0.018) |
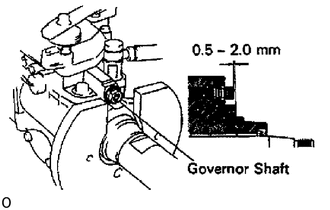
Check the protrusion of the governor shaft.
- Protrusion:
0.5 - 2.0 mm (0.020 - 0.079 in.)
16.ADJUST IDLE SPEED
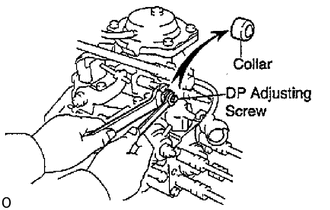
14B, 15B-F, 15B-FT:
Using pliers, remove the dash pot collar.
14B, 15B-F, 15B-FT:
Fully loosen the dash pot adjusting screw.
15B-FT:
Release the pressure from the boost compensator.
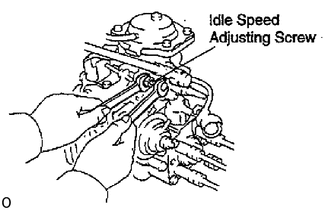
14B, 15B-F, 158-FT:
Pre-Set Idle Speed:
Adjust injection volume by turning the idle speed adjusting screw.
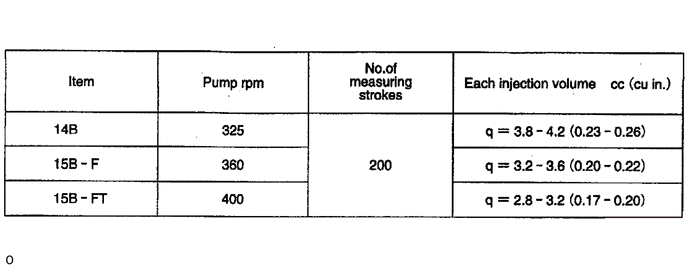
14B, 15B-F, 15B-FT:
Adjust DP Speed:
Adjust injection volume by turning the DP adjusting screw.
- HINT:
-
The stroke will decrease with turn to clockwise and increase with turn to counterclockwise.
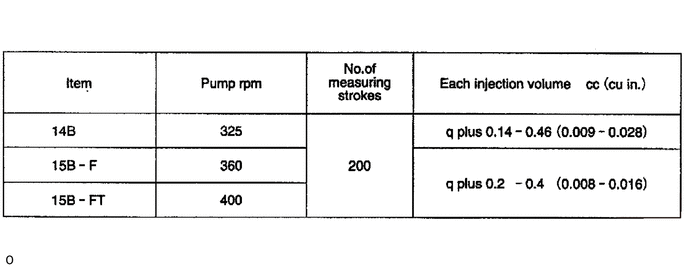
Adjust Idle Speed:
Adjust injection volume by turning the idle speed adjusting screw.
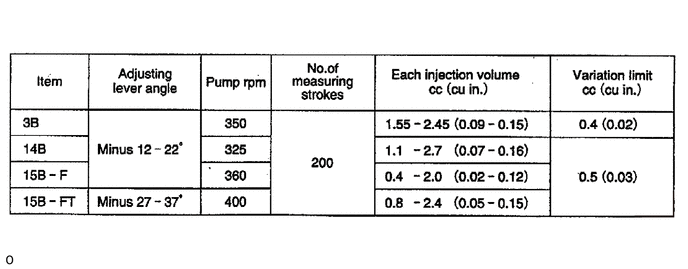
17.ADJUST COLD STARTING SYSTEM (w/ ACSD)
Remove the overflow screw and check the fuel temperature in the fuel pump.
- Fuel temperature:
15 - 35 °C (59 - 95 °F)
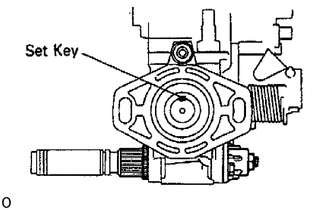
Set the set key of the pump drive shaft in a vertical or horizontal position.
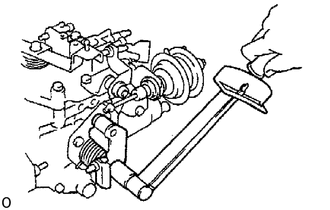
Set the scale of the timer measuring device to zero.
Check the adjusting lever opening angle and consider this angle as zero.
Remove the metal plate between the cold starting lever and thermo wax plunger.
Torque the cold starting lever clockwise to approx. 4.9 N*m (50 kgf*cm, 43 in.*lbf) and keep the lever tightened for about 10 seconds. Then release the torque.
Measure the timer piston stroke.
| Item | Pump rpm | Piston strokes
mm (in.) |
|---|---|---|
| 14B | 400 | 0.4 - 0.8
(0.016 - 0.031) |
| 15B-F | 360 | 0.8 - 1.2
(0.031 - 0.047) |
| 15B-FT | 400 | 1.5 - 1.7
(0.059 - 0.067) |
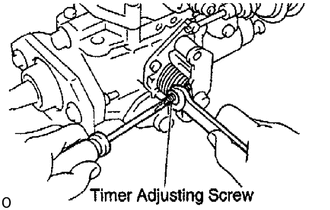
Adjust by turning the timer adjusting screw.
- HINT:
-
Screw in for stroke decrease.
18.ADJUST FAST IDLE (w/ ACSD)
Using a screwdriver, turn the cold starting lever counterclockwise approx. 20°.
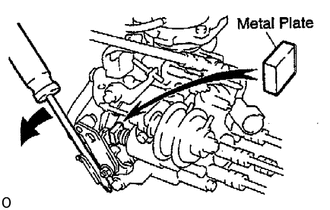
Put a metal plate (thickness of 8.5 - 10 mm (0.33 - 0.39 in.)) between the cold starting lever and thermo wax plunger.
Measure the injection volume.
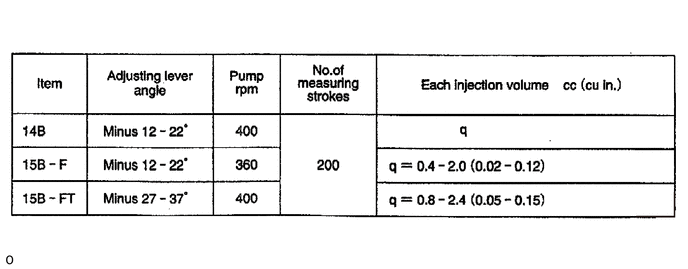
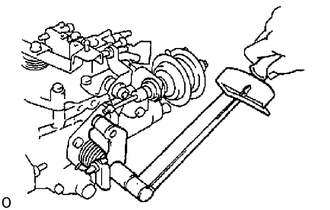
Remove the metal plate between the cold starting lever and thermo wax plunger.
Torque the cold starting lever clockwise to approx. 4.9 N*m (50 kgf*cm, 43 in.*lbf) and keep the lever tightened for about 10 seconds. Then release the torque.
Measure the injection volume.
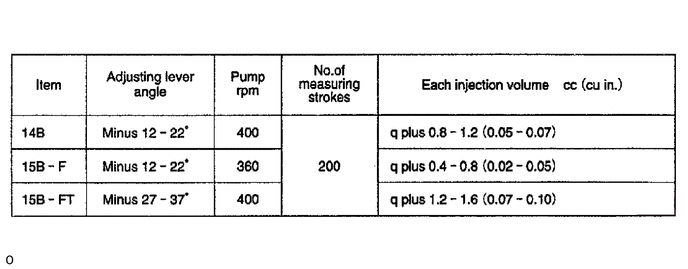
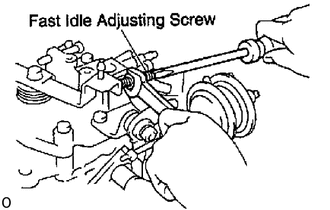
Adjust the injection volume by turning the fast idle adjusting screw.
19.ADJUST IDLE-UP SPEED (15B-F, 15B-FT)
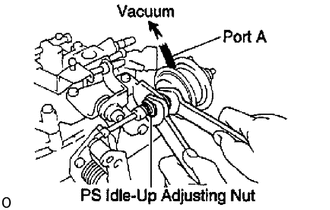
Disengage the ACSD.
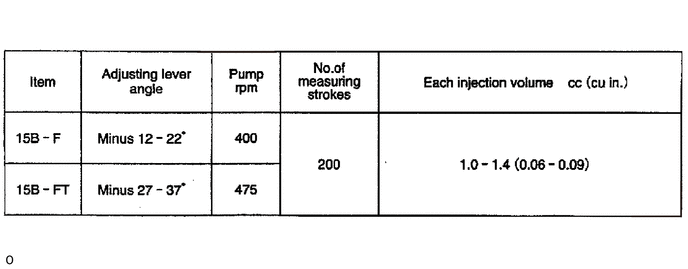
Apply 46.7 kPa (350 mmHg, 13.78 in.Hg) of vacuum to port A of the idle-up actuator.
Measure the injection volume.
Adjust the injection volume by turning the PS idle-up adjusting nut.
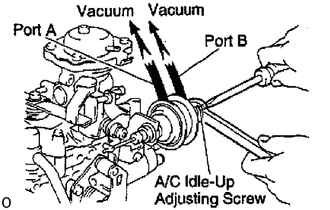
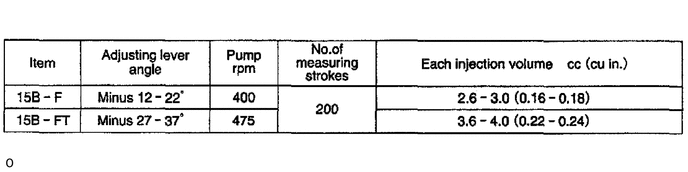
Apply 46.7 kPa (350 mmHg, 13.78 in.Hg) of vacuum to ports A and B of the idle-up actuator.
Measure the injection volume.
Adjust the injection volume by turning the A/C idle-up adjusting screw.
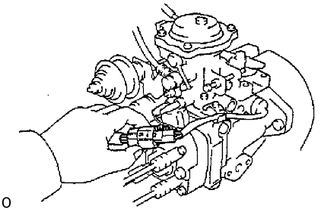
Remove the metal plate between the cold starting lever and thermo wax plunger.
20. POST ADJUSTMENT CHECK
Check that injection stops when the fuel cut solenoid harness is removed.
- Pump revolution:
100 rpm
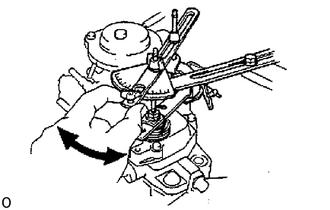
Disengage the ACSD.
Check the adjusting lever movement.
- Adjusting lever angle:
- 3B, 14B, 15B-F:
38 - 48°
- 15B-FT:
28 - 38°
21. SEAL PARTS
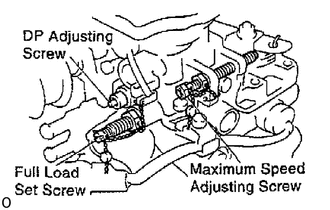
Seal the full load set screw and maximum speed adjusting screw with new lead seals.
Seal the DP adjusting screw with a new collar.
22.REMOVE INJECTION PUMP FROM PUMP TESTER
- NOTICE:
- w/ HAC and 15B-FT
-
To prevent oil spilling out from the bushing of the governor cover, do these steps (23 to 26) without tilting the injection pump 45° or more from the horizontal.
23.INSTALL CLAMP FOR FUEL INLET PIPE (BU)
Using an 8 mm hexagon wrench, install the clamp with the plate washer and bolt.
24.INSTALL FUEL INLET PIPE
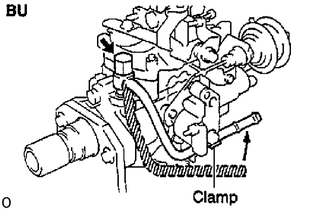
Temporarily install the inlet pipe with 2 new gaskets and the nut.
BU:
Connect the inlet pipe to the clamp.
Tighten the nut.
- Torque:
25 N*m (250 kgf*cm, 18 ft.*lbf)
25.INSTALL FUEL OUTLET PIPE
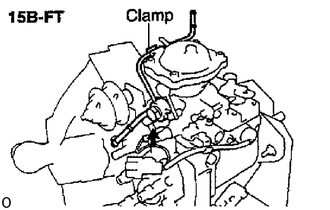
Temporarily install the outlet pipe with 2 new gaskets and the union bolt.
15B-FT:
Connect the outlet pipe to the clamp.
Tighten the union bolt.
- Torque:
25 N*m (250 kgf*cm, 18 ft.*lbf)
26.INSTALL SPLINE SHAFT
Align the set key groove of the spline shaft with the set key.
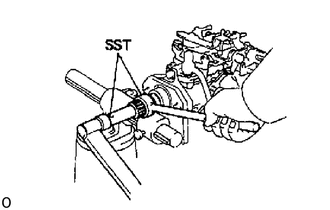
Using SST, install the spline shaft with the round nut.
- Torque:
- 3B, 14B:
54 N*m (550 kgf*cm, 40 ft.*lbf)
- 15B-F, 15B-FT:
84 N*m (860 kgf*cm, 62 ft.*lbf)