TIRE / WHEEL TIRE AND WHEEL INSTALLATION
CAUTION / NOTICE / HINT
- NOTICE:
- ·
Use an axle hub nut and stop bolt that complies with the wheel to be installed. If a non-compliant axle hub nut and stop bolt is used, the wheel nut surface may wear out or depress so that an adequate fastening force (axial force) cannot be obtained even when tightened with the specified tightening torque. As a result, the axle hub nut and stop bolt may loosen or come off.
·Check for foreign matter and rust on the axle hub nut and stop bolt and fastening surfaces (such as the wheel and brake disc installation surface, the disc brake and hub installation surface) and remove. If fastened while foreign matter and rust are still present, the foreign matter and rust might fall off while in use and decrease the fastening force (axial force). As a result, the axle hub nut and stop bolt may loosen or come off.
·When tightening the axle hub nut and stop bolt, clean the axle hub bolt and stop bolt, apply engine oil and check that the axle hub nut and stop bolt does not get stuck and rotates smoothly when rotated by hand. If it gets stuck or does not rotate smoothly, check again for foreign matter and rust and remove. If there is no improvement, replace the axle hub nut, stop bolt and axle hub bolt with new ones.
- HINT:
-
 0.188,0.094 0.5,0.292 0.313,0.198 10 false *A 0.26,0.74 0.573,0.938 0.313,0.198 10 false *a 0.177,0.438 0.49,0.635 0.313,0.198 10 false *B 0.198,2.542 0.51,2.74 0.313,0.198 10 false *C 0.26,2.833 0.573,3.031 0.313,0.198 10 false *c 1.927,2.844 2.24,3.042 0.313,0.198 10 false *d 1.896,0.75 2.208,0.948 0.313,0.198 10 false *b
 0.167,0.125 0.479,0.323 0.313,0.198 10 false *A 0.167,0.438 0.479,0.635 0.313,0.198 10 false *B 0.198,2.51 0.51,2.708 0.313,0.198 10 false *C 0.24,0.708 0.552,0.906 0.313,0.198 10 false *a 1.875,0.708 2.188,0.906 0.313,0.198 10 false *b 1.885,2.792 2.198,2.99 0.313,0.198 10 false *d 0.271,2.781 0.583,2.979 0.313,0.198 10 false *c
- ·
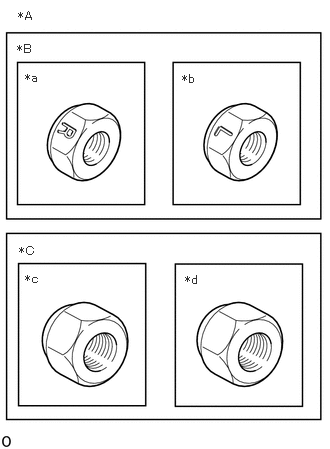
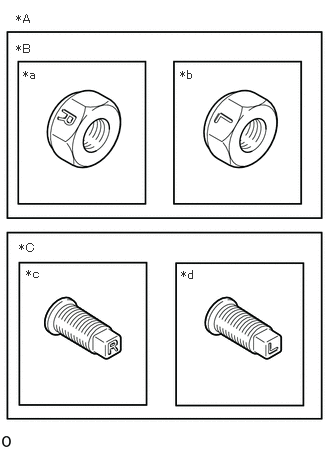
Check the table below for how to identify each axle hub nut and stop bolt.
Text in Illustration *A for Front Side *B for Alloy Wheels *C for Steel Wheels *a Axle Hub Nut (Right Side) *b Axle Hub Nut (Left Side) *c Axle Hub Nut (Right Screw) (Right Side) *d Axle Hub Nut (Left Screw) (Left Side)
Text in Illustration *A for Rear Side *B for Rear Inside Tire *C for Rear Inside Tire *a Axle Hub Nut (Right Side) *b Axle Hub Nut (Left Side) *c Stop Bolt (Right Side) *d Stop Bolt (Left Side)
- ·
Install the right and left screws carefully as the axle hub nut cannot be identified for the front side steel wheels.
PROCEDURE

 1.INSTALL WHEEL ASSEMBLY
for Rear Inside Tire:
Install the wheel assembly while bringing out the center, and tighten the stop bolts by hand.
Apply engine oil to the threads of the stop bolts.
Temporarily install the stop bolts in the order shown in the illustration.
- NOTICE:
- ·
Tighten the stop bolt by turning the right wheel assembly to the right and the left wheel assembly to the left.
·When installing the stop bolts, make sure to check the identification table at the start and ensure that the left and right parts are not installed incorrectly.
·After temporarily tightening the wheel assembly, check that there is no rattling.
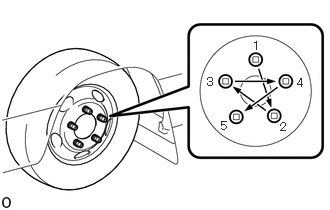
After lowering the vehicle, tighten the stop bolts in the order shown in the illustration.
- Torque:
- 515 N*m (5252 kgf*cm, 380 ft.*lbf)
except for Rear Inside Tire:
Install the wheel assembly while bringing out the center, and tighten the axle hub nut by hand.
Apply engine oil to the threads of the axle hub nuts.
Temporarily install the axle hub nuts in the order shown in the illustration.
- NOTICE:
- ·
Tighten the axle hub nut by turning the right wheel assembly to the right and the left wheel assembly to the left.
·When installing the axle hub nuts, make sure to check the identification table at the start and ensure that the left and right parts are not installed incorrectly.
·After temporarily tightening the wheel assembly, check that there is no rattling.
·When installing the rear outside wheel assembly, always install it so that the pneumatic valve of the rear inner tire is visible.
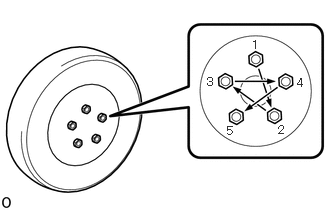
After lowering the vehicle, tighten the axle hub nuts in the order shown in the illustration.
- Torque:
- 515 N*m (5252 kgf*cm, 380 ft.*lbf)
42622
2.INSTALL WHEEL CAP HOLDER
- HINT:
-
Perform this procedure for full wheel cap type only.
Install the wheel cap holder (inside) to the vehicle with the 6 nuts.
- Torque:
- 61 N*m (622 kgf*cm, 45 ft.*lbf)
Install the wheel cap holder (outside) to the vehicle with the 3 bolts.
- Torque:
- 29 N*m (296 kgf*cm, 21 ft.*lbf)
42621
3.INSTALL WHEEL CAP (for Front Side)
for Full Wheel Cap Type:
Install the wheel cap with the 3 bolts, wave washer and 3 washers.
- Torque:
- 22 N*m (224 kgf*cm, 16 ft.*lbf)
for Semi Cap Type:
Install the wheel cap with the 3 screws.
42621
4.INSTALL WHEEL CAP (for Rear Side)
for Full Wheel Cap Type:
Install the wheel cap with the 3 bolts, wave washer and 3 washers.
- Torque:
- 29 N*m (296 kgf*cm, 21 ft.*lbf)
for Semi Cap Type:
Install the wheel cap with the 2 screws.