A861E AUTOMATIC TRANSMISSION / TRANSAXLE AUTOMATIC TRANSMISSION SYSTEM INITIALIZATION
AT INITIALIZATION
- NOTICE:
- ·
Be sure to perform AT initialization if the automatic transmission assembly or transmission control ECU assembly have been replaced.
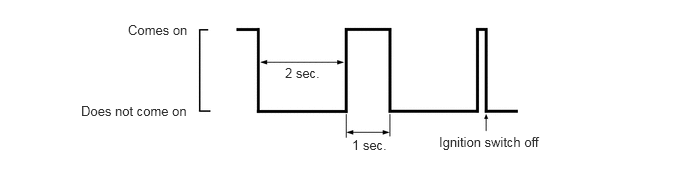
·During AT initialization mode, if the No. 1 pattern select switch assembly (first hold switch) indicator light starts blinking in a repeating pattern of 2 seconds on and then 1 second off, turn the ignition switch off, confirm that the vehicle has stopped completely, and start the AT initialization procedure again from the beginning.
- HINT:
-
The illumination status of the O/D OFF indicator light varies depending on the replaced part. Therefore, make sure to operate the transmission control switch (O/D switch).
Replacement Part Transmission Control Switch (O/D Switch) O/D OFF Indicator Light Automatic transmission assembly ON Does not come on OFF Comes on Transmission control ECU assembly ON Comes on OFF Comes on
Preparations
Turn off the air conditioner, headlights, and all other accessories that consume electricity to off.
Apply the parking brake, and place chocks under the wheels.
- NOTICE:
-
Make sure the vehicle is completely stopped.
Make sure that the ATF level is within the specified range.
Start the engine and warm it up for 5 minutes.
Move the shift lever from N to D and back to N, and repeat this for at least 5 full cycles, and then move the shift lever from N to R and back to N, and repeat this for at least full 5 cycles.
Entering AT Initialization Mode
Connect the GTS to the DLC3.
Turn the ignition switch to ON.
Confirm that the No. 1 pattern select switch assembly (first hold switch) is off.
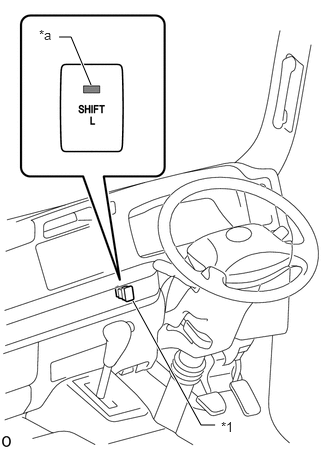
| *a | Indicator Light |
| *1 | No. 1 Pattern Select Switch Assembly (First Hold Switch) |
Confirm that the No. 1 pattern select switch assembly (first hold switch) indicator light is not illuminated.
Turn the GTS on.
Enter the following menus: Powertrain / ECT / Data List / A/T Oil Temperature 1.
Check the A/T Oil Temperature 1.
- Standard:
40 to 90°C (104 to 194°F)
Turn the GTS off.
Disconnect the GTS to the DLC3.
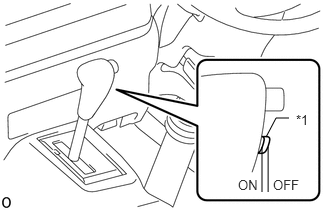
| *1 | Transmission Control Switch (O/D Switch) |
Confirm that the transmission control switch (O/D switch) of the shift lever knob sub-assembly is on (overdrive permitted).
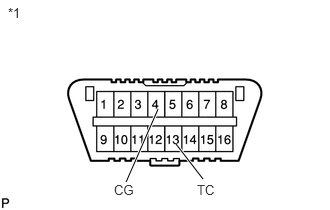
| *1 | DLC3 |
Using SST, connect terminals 4 (CG) and 13 (TC) of the DLC3.
- SST
- 09843-18040
- NOTICE:
-
Confirm the terminal numbers before connecting them. Connecting the wrong terminals can damage the engine.
Start the engine.
While holding down the brake pedal, increase the engine speed to 500 rpm or more, and within 10 seconds of connecting the DLC3 terminals, move the shift lever from D → 4 → D → 4 → D → 4 → D.
Confirm that the No. 1 pattern select switch assembly (first hold switch) indicator light is blinking rapidly at 0.2 second intervals.

- HINT:
- ·
If the No. 1 pattern select switch assembly (first hold switch) indicator light is blinking rapidly at 0.2 second intervals, this indicates that the system has entered AT initialization mode.
·If the No. 1 pattern select switch assembly (first hold switch) indicator light turns off, perform the procedure to enter AT initialization mode again.
·If the No. 1 pattern select switch assembly (first hold switch) indicator light remains illuminated, the system has failed to enter AT initialization mode, so perform the procedures again starting from Preparations.
Performing D Position Side Initialization
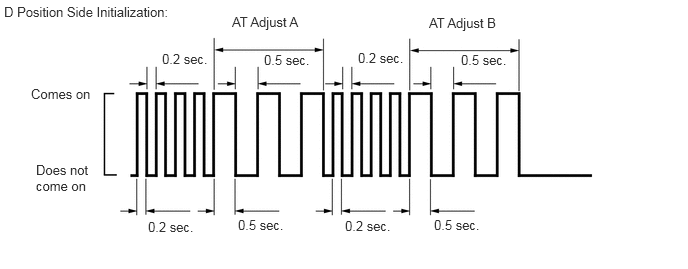
Confirm that the engine idling speed is normal and stable.
While depressing the brake pedal, move the shift lever to D.
- NOTICE:
-
While performing D position side initialization, keep the shift lever in D and keep the brake pedal depressed.
Operate the transmission control switch (O/D switch) of the shift lever knob sub-assembly from on (overdrive permitted) to off (overdrive prohibited).
Confirm that the No. 1 pattern select switch assembly (first hold switch) indicator light blinking speed changes to 0.5 second intervals.
- HINT:
-
When the No. 1 pattern select switch assembly (first hold switch) indicator light is blinking at 0.5 second intervals, this indicates that AT adjust A is being performed.
Confirm that the No. 1 pattern select switch assembly (first hold switch) indicator light blinking speed changes from 0.5 second intervals to rapid blinking at 0.2 second intervals.
- HINT:
- ·
When the No. 1 pattern select switch assembly (first hold switch) indicator light blinking speed changes to rapid blinking at 0.2 second intervals, this indicates that AT adjust A is complete.
·If the No. 1 pattern select switch assembly (first hold switch) indicator light remains illuminated, AT adjust A has failed, so perform the procedures again starting from D position side initialization.
Within 30 seconds after AT adjust A is complete (and blinking at 0.2 second intervals starts), depress the accelerator pedal and maintain the engine speed at 1000 to 1500 rpm.
- NOTICE:
- ·
While performing D position side initialization, keep the shift lever in D and keep the brake pedal depressed.
·Maintain the engine at a constant speed, and try not to change the accelerator opening angle.
Confirm that the No. 1 pattern select switch assembly (first hold switch) indicator light blinking speed changes to 0.5 second intervals.
- HINT:
-
When the No. 1 pattern select switch assembly (first hold switch) indicator light is blinking at 0.5 second intervals, this indicates that AT adjust B is being performed.
If the No. 1 pattern select switch assembly (first hold switch) indicator light turns off or remains illuminated, idle the engine.
- HINT:
- ·
When the No. 1 pattern select switch assembly (first hold switch) indicator light turns off, this indicates that AT adjust B is complete.
·If the No. 1 pattern select switch assembly (first hold switch) indicator light remains illuminated, AT adjust B has failed, so perform the procedures again starting from D position side initialization.
Operate the transmission control switch (O/D switch) of the shift lever knob sub-assembly from off (overdrive prohibited) to on (overdrive permitted).
Performing R Position Side Initialization
Confirm that the engine idling speed is normal and stable.
While depressing the brake pedal, move the shift lever to R.
- NOTICE:
-
While performing R position side initialization, keep the shift lever in R and keep the brake pedal depressed.
Operate the transmission control switch (O/D switch) of the shift lever knob sub-assembly from on (overdrive permitted) to off (overdrive prohibited).
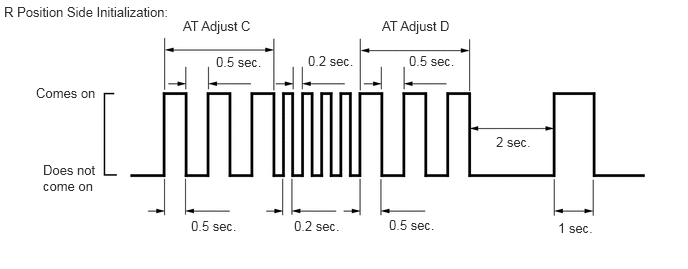
Confirm that the No. 1 pattern select switch assembly (first hold switch) indicator light blinking speed changes to 0.5 second intervals.
- HINT:
-
When the No. 1 pattern select switch assembly (first hold switch) indicator light blinking 0.5 second intervals, this indicates that AT adjust C is being performed.
Confirm that the No. 1 pattern select switch assembly (first hold switch) indicator light blinking speed changes from 0.5 second intervals to rapid blinking at 0.2 second intervals.
- HINT:
- ·
When the No. 1 pattern select switch assembly (first hold switch) indicator light blinking speed changes to rapid blinking at 0.2 second intervals, this indicates that AT adjust C is complete.
·If the No. 1 pattern select switch assembly (first hold switch) indicator light remains illuminated, AT adjust C has failed, so perform the procedures again starting from R position side initialization.
Within 30 seconds after AT adjust C is complete (and blinking at 0.2 second intervals starts), depress the accelerator pedal and maintain the engine speed at 1000 to 1500 rpm.
- NOTICE:
- ·
While performing R position side initialization, keep the shift lever in R and keep the brake pedal depressed.
·Maintain the engine at a constant speed, and try not to change the accelerator opening angle.
Confirm that the No. 1 pattern select switch assembly (first hold switch) indicator light blinking speed changes to 0.5 second intervals.
- HINT:
-
When the No. 1 pattern select switch assembly (first hold switch) indicator light is blinking at 0.5 second intervals, this indicates that AT adjust D is being performed.
When the No. 1 pattern select switch assembly (first hold switch) indicator light remains illuminated, or turns off for 2 seconds and then illuminates for 1 second, idle the engine.
- HINT:
- ·
When the No. 1 pattern select switch assembly (first hold switch) indicator light starts blinking in a repeating pattern of 2 seconds off and then 1 second on, this indicates that AT adjust D is complete.
·If the No. 1 pattern select switch assembly (first hold switch) indicator light remains illuminated, this indicates that AT adjust D has not completed, so perform the procedures again starting from R position side initialization.
Finish the AT Initialization Mode
Move the shift lever to P.
Disconnect terminals 13 (TC) and 4 (CD) of the DLC3.
Turn the ignition switch off.
- HINT:
-
The first hold switch indicator light turns off for 2 seconds then turns on for 1 second repeatedly until the ignition switch is turned off.