N04C-WA FUEL SUCTION CONTROL VALVE REMOVAL
PROCEDURE

 53712C
1.REMOVE FRONT FENDER APRON LH
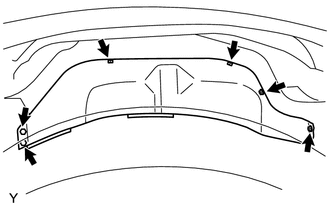
Remove the 6 bolts and front fender apron LH.
2.DISCONNECT CABLE FROM NEGATIVE BATTERY TERMINAL
17030
3.REMOVE AIR HOSE ASSEMBLY
23811G
4.DISCONNECT NO. 1 FUEL PIPE
Remove the nut and fuel pipe clamp.
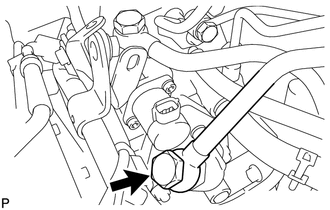
Remove the union bolt and 2 gaskets, and disconnect the No. 1 fuel pipe.
- NOTICE:
-
Be sure to prevent foreign matter or water from entering the lines.
5.CLEAN SUCTION CONTROL VALVE AND SURROUNDING AREA
Clean the area around the suction control valve assembly as well as any areas that contact other parts using a brush. After that, clean the part using cleaning spray, cloth, etc.
- NOTICE:
- ·
After cleaning with cleaning spray, do not blow air as doing so will cause any dust or sand in the surrounding area to become airborne and adhere to the cleaned area.
·Do not allow the fuel temperature sensor connector or fuel pipe to face downward while performing this step.
·Check that there is no dirt or foreign matter between the suction control valve assembly and fuel supply pump housing.
04226
6.REMOVE SUCTION CONTROL VALVE ASSEMBLY
- NOTICE:
- ·
Before replacing the suction control valve assembly, be sure to clean the surrounding area.
·When replacing the suction control valve assembly, make sure that your hands are clean and do not use gloves, etc.
·Be sure to prevent foreign matter or water from entering the lines.
Disconnect the connector from the suction control valve assembly.
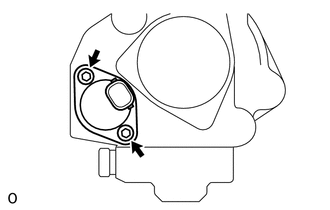
Using a 5 mm hexagon wrench, remove the 2 bolts, suction control valve assembly and O-ring from the supply pump assembly.
- NOTICE:
- ·
Do not reuse the suction control valve assembly and O-ring once they have been removed.
·Make sure that the O-ring does not remain attached to the supply pump assembly.