AIR CONDITIONING CONDENSER(except 1BZ-FPE) DISASSEMBLY
PROCEDURE

 88463A
1.REMOVE NO. 2 COOLER CONDENSER BRACKET
Remove the 3 No. 1 cooler condenser cushions, 3 No. 2 cooler condenser cushions and 3 No. 1 condenser bracket collars.
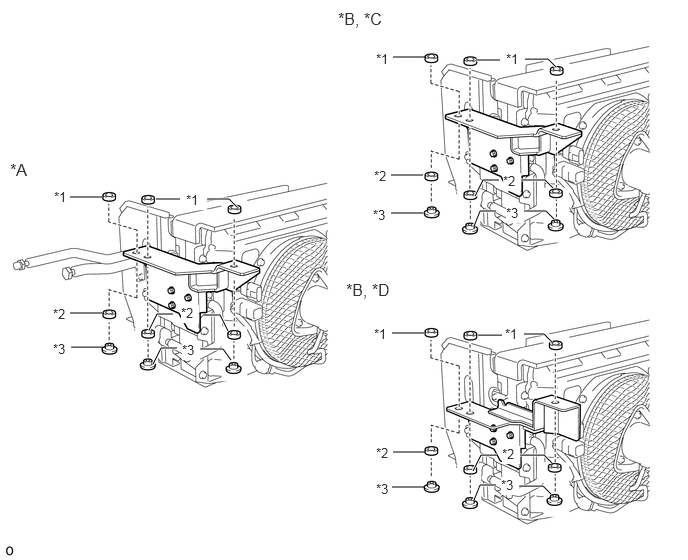
| *A | for RHD | *B | for LHD |
| *C | except Normal Body | *D | for Normal Body |
| *1 | No. 1 Cooler Condenser Cushion | *2 | No. 2 Cooler Condenser Cushion |
| *3 | No. 1 Condenser Bracket Collar | - | - |
Remove the 4 bolts and No. 2 cooler condenser bracket.
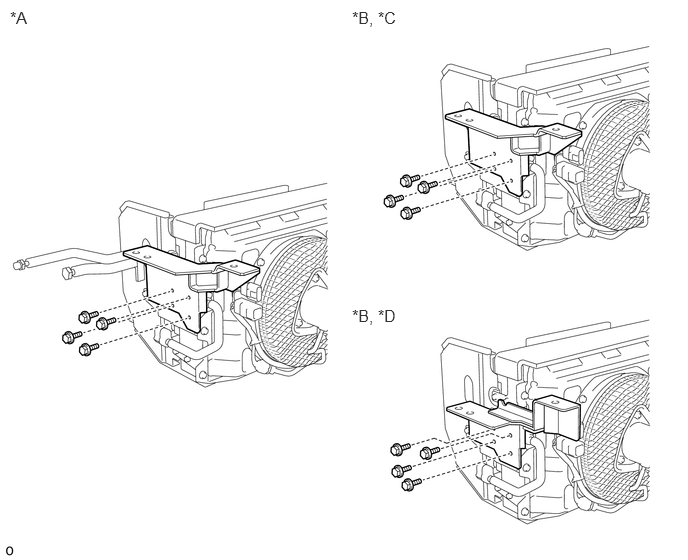
| *A | for RHD | *B | for LHD |
| *C | except Normal Body | *D | for Normal Body |
88463B
2.REMOVE NO. 3 COOLER CONDENSER BRACKET
Remove the 3 No. 1 cooler condenser cushions, 3 No. 2 cooler condenser cushions and 3 No. 1 condenser bracket collars.
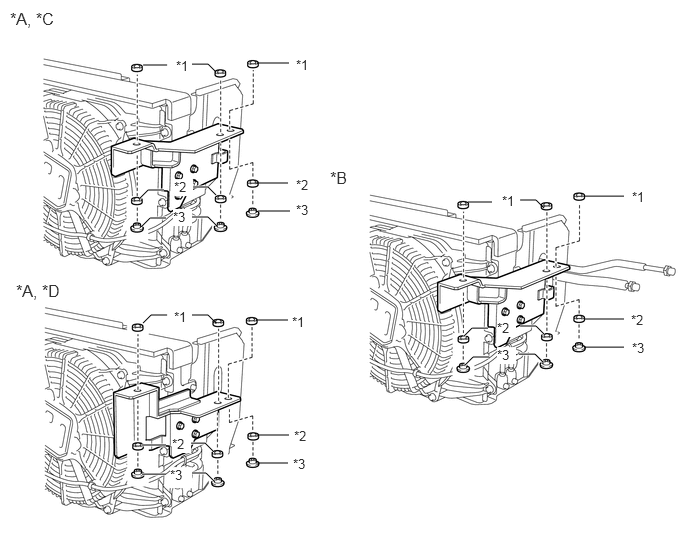
| *A | for RHD | *B | for LHD |
| *C | except Normal Body | *D | for Normal Body |
| *1 | No. 1 Cooler Condenser Cushion | *2 | No. 2 Cooler Condenser Cushion |
| *3 | No. 1 Condenser Bracket Collar | - | - |
for RHD:
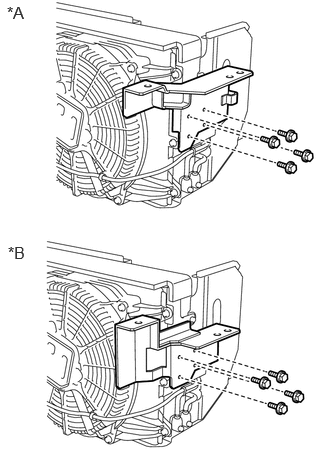
| *A | except Normal Body |
| *B | for Normal Body |
Remove the 4 bolts and No. 3 cooler condenser bracket.
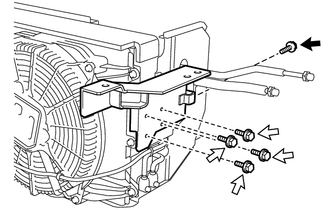
for LHD:

|
Bolt (A) |

|
Bolt (B) |
Remove the bolt (A).
Remove the 4 bolts (B) and No. 3 cooler condenser bracket.
88706
3.REMOVE LIQUID PIPE SUB-ASSEMBLY
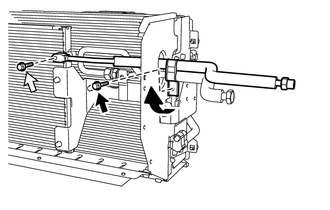
for RHD:
|
|
Bolt (A) |
|
|
Bolt (B) |
Remove the bolt (A) and move the No. 1 piping clamp as shown in the illustration and remove the No. 1 piping clamp.
Remove the bolt (B) and liquid pipe sub-assembly.
- NOTICE:
- ·
Do not apply excessive force to the liquid pipe sub-assembly.
·Seal the openings of the disconnected parts using vinyl tape to prevent entry of moisture and foreign matter.
- NOTICE:
-
Do not apply excessive force to the liquid pipe sub-assembly.
for LHD:
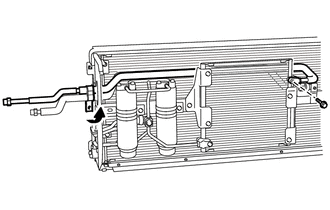
Move the No. 1 piping clamp as shown in the illustration and remove the No. 1 piping clamp.
Remove the bolt and liquid pipe sub-assembly.
- NOTICE:
- ·
Do not apply excessive force to the liquid pipe sub-assembly.
·Seal the openings of the disconnected parts using vinyl tape to prevent entry of moisture and foreign matter.
Remove the O-ring.
- NOTICE:
-
Seal the openings of the disconnected parts using vinyl tape to prevent entry of moisture and foreign matter.
88715K
4.REMOVE DISCHARGE TUBE K
Loosen the nut and remove the discharge tube K.
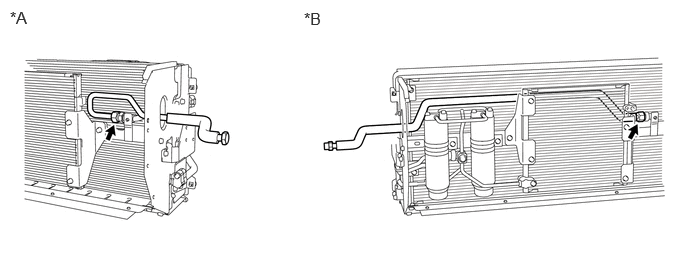
| *A | for RHD | *B | for LHD |
- NOTICE:
-
Do not apply excessive force to the discharge tube K.
Remove the O-ring.
- NOTICE:
-
Seal the openings of the disconnected parts using vinyl tape to prevent entry of moisture and foreign matter.
88716B
5.REMOVE COOLER REFRIGERANT LIQUID PIPE B
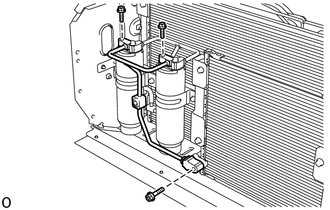
Remove the 3 bolts and cooler refrigerant liquid pipe B.
- NOTICE:
-
Do not apply excessive force to the cooler refrigerant liquid pipe B.
Remove the 3 O-rings.
- NOTICE:
-
Seal the openings of the disconnected parts using vinyl tape to prevent entry of moisture and foreign matter.
88461D
6.REMOVE NO. 3 COOLER CONDENSER CORE
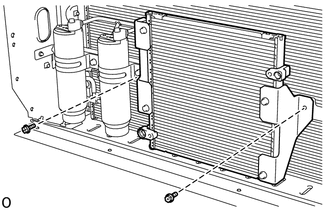
Remove the 2 bolts.
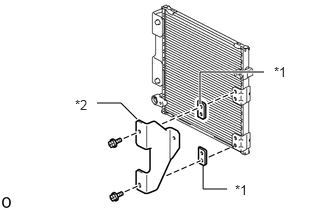
| *1 | No. 4 Cooler Condenser Bracket |
| *2 | Bracket |
Remove the 2 bolts, 2 No. 4 cooler condenser brackets and bracket from the No. 3 cooler condenser core.
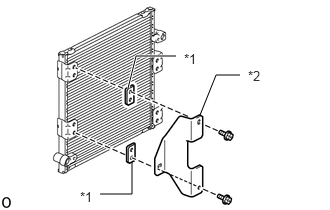
| *1 | No. 4 Cooler Condenser Bracket |
| *2 | Bracket |
Remove the 2 bolts, 2 No. 4 cooler condenser brackets and bracket from the No. 3 cooler condenser core.
88471
7.REMOVE RECEIVER AIR CONDITIONING TANK
88645H
8.REMOVE NO. 1 PRESSURE SWITCH
88716A
9.REMOVE COOLER REFRIGERANT LIQUID PIPE A
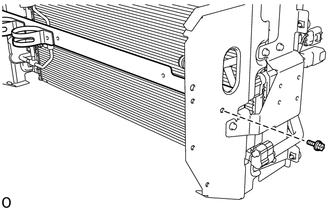
Remove the bolt.
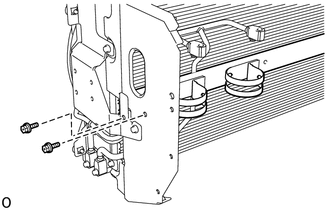
Remove the 2 bolts.
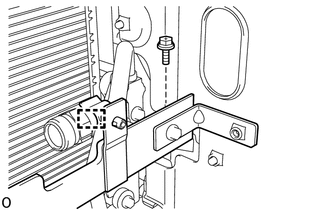
Remove the bolt.
Detach the clamp and remove the bracket sub-assembly.
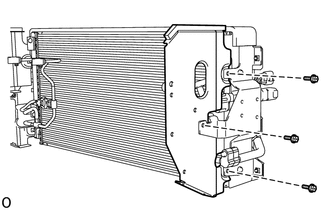
Remove the 3 bolts and dust cover.
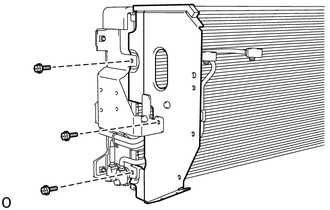
Remove the 3 bolts and dust cover.
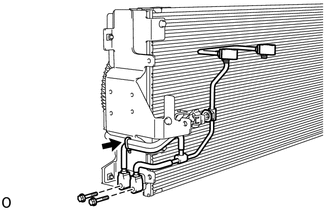
Cut and remove the strap.
Remove the 2 bolts and cooler refrigerant liquid pipe A.
- NOTICE:
-
Do not apply excessive force to the cooler refrigerant liquid pipe A.
Remove the 2 O-rings.
- NOTICE:
-
Seal the openings of the disconnected parts using vinyl tape to prevent entry of moisture and foreign matter.
10.REMOVE PIPING CLAMP
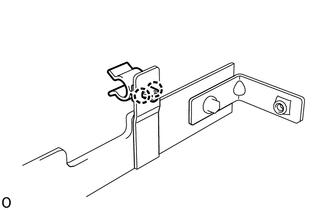
Detach the 2 claws and remove the piping clamp.
88715B
11.REMOVE COOLER REFRIGERANT DISCHARGE PIPE B
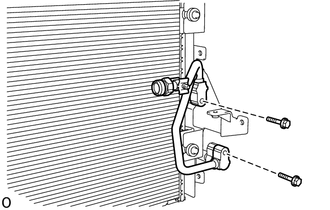
Remove the 2 bolts and cooler refrigerant discharge pipe B.
- NOTICE:
-
Do not apply excessive force to the cooler refrigerant discharge pipe B.
Remove the 2 O-rings.
- NOTICE:
-
Seal the openings of the disconnected parts using vinyl tape to prevent entry of moisture and foreign matter.
88715A
12.REMOVE COOLER REFRIGERANT DISCHARGE PIPE A
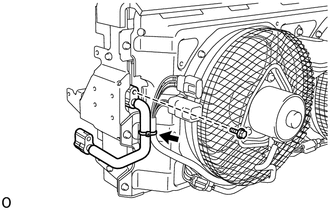
Cut and remove the strap.
Remove the bolt and cooler refrigerant discharge pipe A.
- NOTICE:
-
Do not apply excessive force to the cooler refrigerant discharge pipe A.
Remove the O-ring.
- NOTICE:
-
Seal the openings of the disconnected parts using vinyl tape to prevent entry of moisture and foreign matter.
13.REMOVE NO. 2 COOLER PACKING
- HINT:
-
When removing the No. 2 cooler packing, heat the condenser assembly and No. 2 cooler packing using a heat light.
Heat the condenser assembly and No. 2 cooler packing using a heat light.
- CAUTION:
- ·
Do not touch the heat light and heated parts.
·Touching the heat light may result in burns.
·Touching heated parts for a long time may result in burns.
- Standard:
Item Temperature No. 2 Cooler Packing 40 to 60°C (104 to 140°F) Condenser Assembly
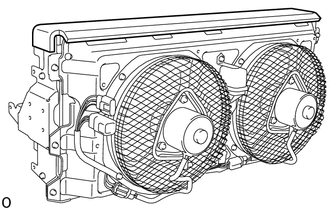
Remove the No. 2 cooler packing.
88461C
14.REMOVE NO. 2 COOLER CONDENSER CORE
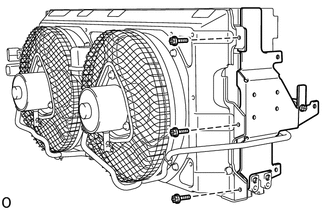
Remove the 3 bolts and bracket sub-assembly.
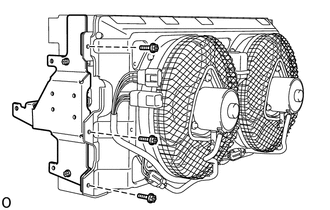
Remove the 3 bolts and fan shroud with blower assembly.
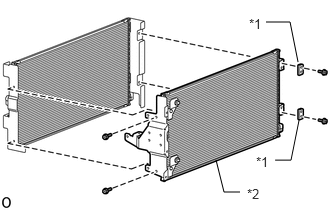
| *1 | No. 4 Cooler Condenser Bracket |
| *2 | No. 2 Cooler Condenser Core |
Remove the 4 bolts, 2 No. 4 cooler condenser brackets and No. 2 cooler condenser core.
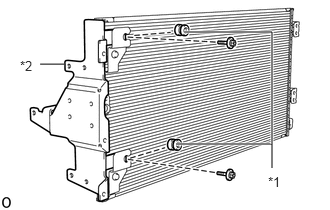
| *1 | Grommet |
| *2 | Bracket Sub-assembly |
Remove the 2 bolts, 2 grommets and the bracket sub-assembly from the No. 2 cooler condenser core.
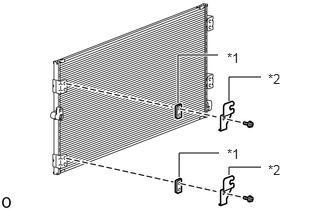
| *1 | No. 4 Cooler Condenser Bracket |
| *2 | Bracket |
Remove the 2 bolts, 2 No. 4 cooler condenser brackets and 2 brackets from the No. 2 cooler condenser core.
88461A
15.REMOVE COOLER CONDENSER CORE
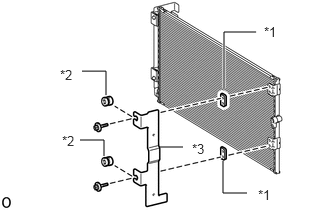
| *1 | No. 4 Cooler Condenser Bracket |
| *2 | Grommet |
| *3 | Bracket Sub-assembly |
Remove the 2 bolts, 2 grommets, bracket sub-assembly and 2 No. 4 cooler condenser brackets from the cooler condenser core.
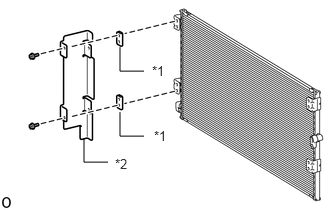
| *1 | No. 4 Cooler Condenser Bracket |
| *2 | Bracket Sub-assembly |
Remove the 2 bolts, bracket sub-assembly and 2 No. 4 cooler condenser brackets from the cooler condenser core.
88550D
16.REMOVE BLOWER MOTOR ASSEMBLY
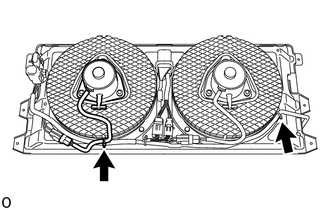
Cut and remove the 2 straps.
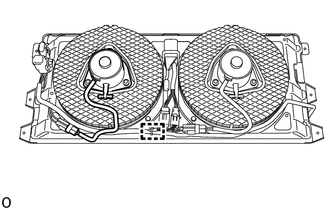
Detach the wire harness clamp.
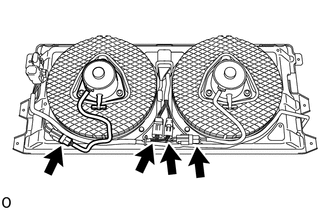
Disconnect the 4 connectors.
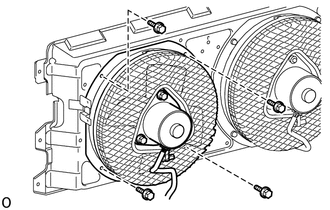
Using universal socket wernch 10 mm, remove the 4 bolts and blower motor assembly.
- HINT:
-
Use the same procedure for the other side.
88453
17.REMOVE CONDENSER COOLING FAN
88550
18.REMOVE CONDENSER BLOWER MOTOR ASSEMBLY
88454B
19.REMOVE FAN SHROUD
88605J
20.REMOVE AIR CONDITIONING WIRING HARNESS SUB-ASSEMBLY
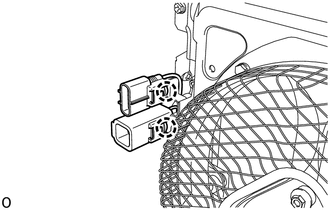
Detach the 2 claws and remove the air conditioning wiring harness sub-assembly.
21.REMOVE PIPING CLAMP
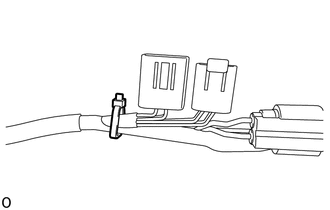
Cut the piping clamp and remove it.
88440C
22.REMOVE COOLER CONDENSER FAN RELAY ASSEMBLY
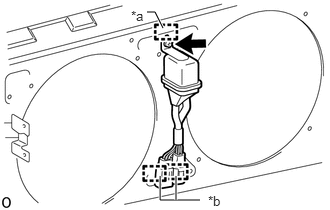
| *a | Hook |
| *b | Wire Harness Clamp |
Detach the 2 wire harness clamps.
Remove the bolt.
Detach the hook and remove the cooler condenser fan relay assembly.
23.REMOVE WIRE HARNESS CLAMP
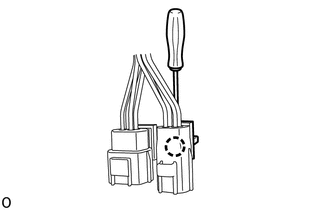
Using a thin-bladed screwdriver, detach the claw and remove the wire harness clamp from the cooler condenser fan relay assembly.
24.REMOVE WIRE HARNESS CLAMP
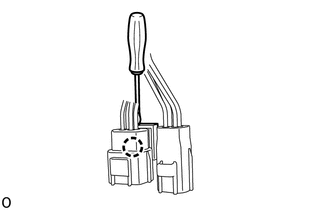
Using a thin-bladed screwdriver, detach the claw and remove the wire harness clamp from the cooler condenser fan relay assembly.