N04C-UH ENGINE MECHANICAL ENGINE UNIT DISASSEMBLY
PROCEDURE

 12180E
1.REMOVE OIL FILLER CAP SUB-ASSEMBLY
11201
2.REMOVE CYLINDER HEAD COVER SUB-ASSEMBLY
Remove the 2 bolts and the cylinder head cover sub-assembly.
11202F
3.REMOVE CYLINDER HEAD COVER CUSHION RUBBER
Remove the cylinder head cover cushion rubber from the cylinder head cover sub-assembly.
11247
4.REMOVE CYLINDER HEAD COVER STAY
Remove the 2 cylinder head cover stays from the cylinder head cover sub-assembly.
11202D
5.REMOVE NO. 2 CYLINDER HEAD COVER SUB-ASSEMBLY
Remove the 2 bolts and No. 2 cylinder head cover sub-assembly.
Remove the 2 cylinder head cover spacers from the No. 2 cylinder head cover sub-assembly.
11228
6.REMOVE CYLINDER HEAD COVER CUSHION
Remove the 2 cylinder head cover cushions from the No. 2 cylinder head cover sub-assembly.
11213
7.REMOVE CYLINDER HEAD COVER GASKET
Remove the cylinder head cover gasket from the No. 2 cylinder head cover sub-assembly.
13901
8.REMOVE NO. 1 VALVE ROCKER SHAFT SUB-ASSEMBLY
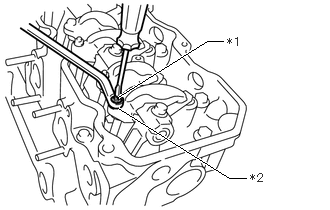
| *1 | Valve Adjusting Screw |
| *2 | Valve Lock Nut |
Loosen the valve lock nuts at the top of the rocker arms and wind up the valve adjusting screws completely.
- NOTICE:
-
If the valve adjusting screws are left unwound, the No. 1 valve rocker shaft sub-assembly may bend when the rocker arm support bolts are loosened.
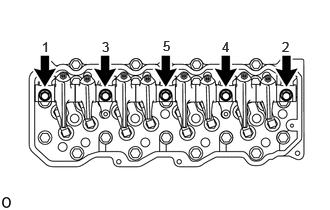
Loosen (by approximately 1/4 turn at a time) and remove the bolts in the order shown in the illustration, and remove the No. 1 valve rocker shaft sub-assembly together with the No. 1 and No. 2 valve rocker arm sub-assemblies, and the No. 1, No. 2 and No. 3 valve rocker support sub-assemblies.
13781
9.REMOVE VALVE PUSH ROD
- NOTICE:
-
Organize the parts so that each parts location can be remembered for reassembly.
13819
10.REMOVE VALVE BRIDGE
- NOTICE:
-
Keep the removed parts in the correct order so that they can be returned to their original positions when reassembled.
11101
11.REMOVE CYLINDER HEAD SUB-ASSEMBLY
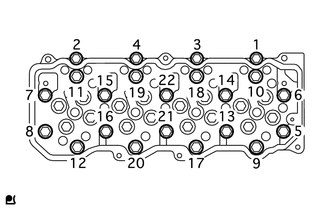
Remove the cylinder head bolts in the order shown in the illustration.
Lift and remove the cylinder head from the cylinder block.
Remove the cylinder head gasket.
13751
12.REMOVE VALVE LIFTER
- NOTICE:
-
Keep the removed parts in the correct order so that they can be returned to their original positions when reassembled.
13470
13.REMOVE CRANKSHAFT PULLEY ASSEMBLY
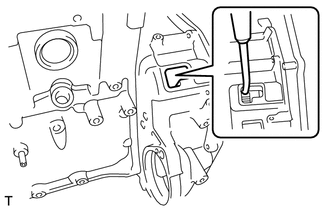
Using a 46 mm socket wrench, remove the nut, spacer and pulley.
- HINT:
-
Insert a screwdriver through the inspection hole of the flywheel housing into the ring gear of the flywheel to keep it from turning together with the crankshaft.
11351H
14.REMOVE FLYWHEEL HOUSING STAY RH
Remove the 4 bolts and the flywheel housing stay.
11351G
15.REMOVE FLYWHEEL HOUSING STAY LH
Remove the 4 bolts and the flywheel housing stay.
12311
16.REMOVE FRONT NO. 1 ENGINE MOUNTING BRACKET RH
Remove the 4 bolts and the front No. 1 engine mounting bracket.
12315
17.REMOVE FRONT NO. 1 ENGINE MOUNTING BRACKET LH
Remove the 4 bolts and the front No. 1 engine mounting bracket.
12101
18.REMOVE OIL PAN SUB-ASSEMBLY
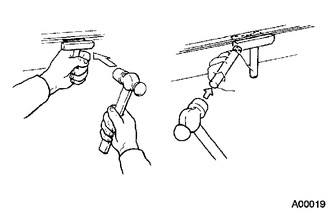
Remove the 26 bolts from the oil pan.
Insert the blade of an oil pan seal cutter between the crankcase and oil pan. Cut through the applied sealer and remove the oil pan.
- NOTICE:
-
Do not damage the contact surface of the cylinder block and oil pan.
15104
19.REMOVE OIL STRAINER SUB-ASSEMBLY
Remove the 2 bolts and strainer.
Remove the O-ring.
12270
20.REMOVE OIL SEPARATOR ASSEMBLY
Remove the 5 bolts and remove the oil separator assembly.
Remove the 3 O-rings.
21.REMOVE TIMING GEAR CASE
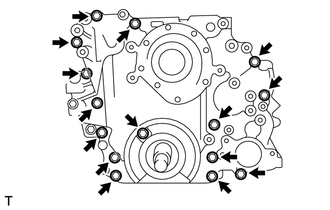
Remove the 15 bolts.
Using a screwdriver with its tip wrapped in protective tape, pry off the timing gear case.
- NOTICE:
-
Do not damage the contact surfaces of the timing gear case, cylinder block and cylinder head.
11301C
22.REMOVE TIMING CHAIN OR BELT COVER OIL SEAL
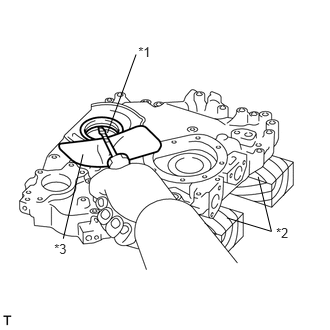
| *1 | Protective Tape |
| *2 | Wooden Block |
| *3 | Piece of Cloth |
Using a screwdriver with its tip wrapped in protective tape, pry out the oil seal.
- HINT:
-
Use wooden blocks and a piece of cloth to prevent damage to the timing gear case.
23.INSPECT NO. 2 IDLE GEAR THRUST CLEARANCE
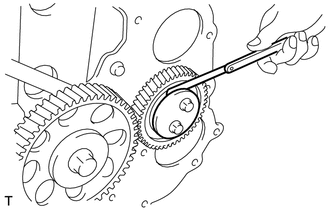
Using a feeler gauge, measure the thrust clearance between the No. 2 idle gear thrust plate and No. 2 idle gear.
- Standard Thrust Clearance:
0.103 to 0.164 mm (0.00406 to 0.00646 in.)
- Maximum Thrust Clearance:
0.30 mm (0.0118 in.)
If the thrust clearance is greater than the maximum, replace the No. 2 idle gear thrust plate and No. 2 idle gear.
24.INSPECT NO. 2 IDLE GEAR BACKLASH
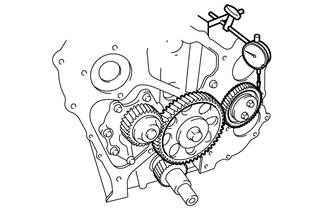
Using a dial indicator, measure the backlash between the No. 1 idle gear and No. 2 idle gear.
- Standard Backlash:
0.036 to 0.227 mm (0.00142 to 0.00894 in.)
- Maximum Backlash:
0.30 mm (0.0118 in.)
If the backlash is greater than the maximum, replace the No. 1 idle gear and No. 2 idle gear.
13572C
25.REMOVE NO. 2 IDLE GEAR THRUST PLATE
Remove the 2 bolts and No. 2 idle gear thrust plate.
13508N
26.REMOVE NO. 2 IDLE GEAR SUB-ASSEMBLY
13581C
27.REMOVE NO. 2 IDLE GEAR SHAFT
Remove the 3 bolts and No. 2 idle gear shaft.
Remove the O-ring.
13577D
28.REMOVE LOCK PLATE
Remove the 2 bolts and plate from the end plate.
29.INSPECT CAMSHAFT TIMING GEAR BACKLASH
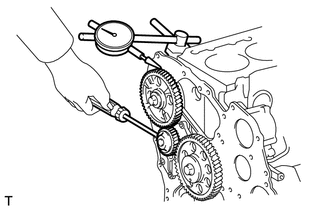
Using a dial indicator, measure the backlash between the camshaft timing gear and No. 1 idle gear.
- Standard Backlash:
0.069 to 0.203 mm (0.00272 to 0.00799 in.)
- Maximum Backlash:
0.30 mm (0.0118 in.)
If the backlash is greater than the maximum, replace the camshaft timing gear and No. 1 idle gear.
13501
30.REMOVE CAMSHAFT
Remove the 2 bolts, thrust plate and camshaft.
31.INSPECT OIL PUMP GEAR BACKLASH
Using a dial indicator, measure the backlash between the oil pump gear and No. 1 idle gear.
- Standard Backlash:
0.065 to 0.215 mm (0.00256 to 0.00846 in.)
- Maximum Backlash:
0.30 mm (0.0118 in.)
If the backlash is greater than the maximum, replace the pump and No. 1 idle gear.
32.INSPECT NO. 1 IDLE GEAR THRUST CLEARANCE
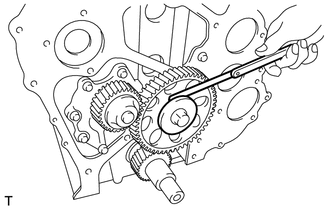
Using a feeler gauge, measure the thrust clearance between the No. 1 idle gear thrust plate and No. 1 idle gear.
- Standard Thrust Clearance:
0.103 to 0.164 mm (0.00406 to 0.00646 in.)
- Maximum Thrust Clearance:
0.30 mm (0.0118 in.)
If the thrust clearance is greater than the maximum, replace the No. 1 idle gear thrust plate and No. 1 idle gear.
33.INSPECT NO. 1 IDLE GEAR BACKLASH
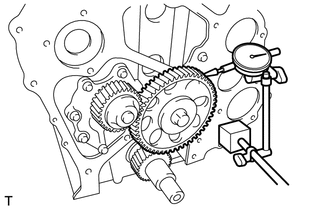
Using a dial indicator, measure the backlash between the crankshaft timing gear and No. 1 idle gear.
- Standard Backlash:
0.035 to 0.193 mm (0.00138 to 0.00760 in.)
- Maximum Backlash:
0.30 mm (0.0118 in.)
If the backlash is greater than the maximum, replace the crankshaft timing gear and No. 1 idle gear.
13581B
34.REMOVE NO. 1 IDLE GEAR SHAFT
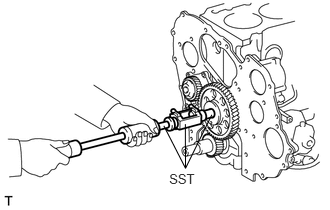
Remove the bolt.
Using SST, remove the No. 1 idle gear shaft.
- SST
- 09910-00015 (09911-00011, 09912-00010)
- NOTICE:
-
When removing the gear shaft, hold the No. 1 idle gear to prevent the No. 1 gear and No. 1 idle gear thrust plate from falling.
13508M
35.REMOVE NO. 1 IDLE GEAR SUB-ASSEMBLY
13572B
36.REMOVE NO. 1 IDLE GEAR THRUST PLATE
37.REMOVE CRANKSHAFT TIMING GEAR OR SPROCKET
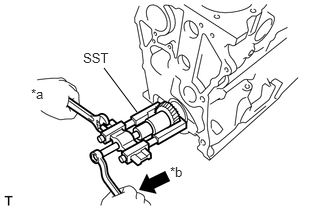
| *a | Hold |
| *b | Turn Clockwise |
Using SST, remove the crankshaft timing gear or sprocket.
- SST
- 09950-40011 (09951-04010, 09952-04010, 09953-04020, 09954-04010, 09955-04051)
15100
38.REMOVE OIL PUMP ASSEMBLY
Remove the 7 bolts and oil pump.
15119
39.REMOVE OIL PUMP COVER GASKET
Remove the gasket from the oil pump.
11311H
40.REMOVE FRONT END PLATE
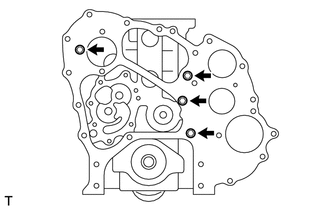
Remove the 4 bolts and front end plate.
11312
41.REMOVE FRONT END PLATE GASKET
Remove the front end plate gasket from the front end plate.
13450A
42.REMOVE FLYWHEEL SUB-ASSEMBLY
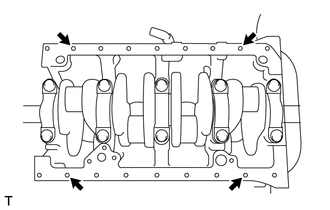
Temporarily install 4 bolts in the positions of the cylinder block shown in the illustration to prevent the wires from sliding toward the center of the block.
Attach 2 wires to the cylinder block.
- HINT:
-
The wires must be attached to the outside of the installed bolts.
Using a chain block and an engine sling device, remove the cylinder block from the engine stand.
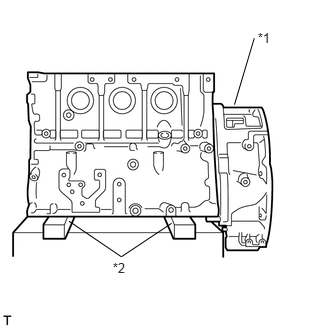
Place the cylinder block on wooden blocks on a workbench.
| *1 | Flywheel Housing |
| *2 | Wooden Block |
Remove the 4 bolts from the cylinder block.
Insert a screwdriver through the inspection hole of the flywheel housing into the ring gear of the flywheel to keep it from turning together with the crankshaft.
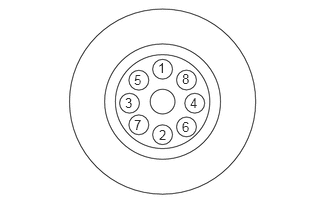
for Automatic Transmission:
Uniformly loosen and remove the 8 bolts in the order shown in the illustration.
Remove the pump impeller drive plate, drive plate spacer rear and flywheel sub-assembly.
- NOTICE:
-
The flywheel is heavy. When removing, be careful not to drop it.
for Manual Transmission:
Uniformly loosen and remove the 8 bolts in the order shown in the illustration.
Remove the flywheel sub-assembly.
- NOTICE:
-
The flywheel is heavy. When removing, be careful not to drop it.
13453
43.REMOVE FLYWHEEL RING GEAR
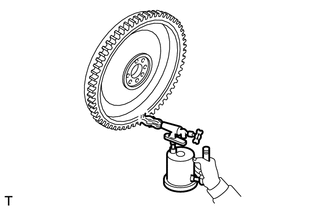
Using a torch, heat the ring gear evenly to approximately 200°C (392°F).
- NOTICE:
-
Be careful not to overheat the ring gear.
- CAUTION:
-
Do not touch the ring gear and flywheel while they are hot.
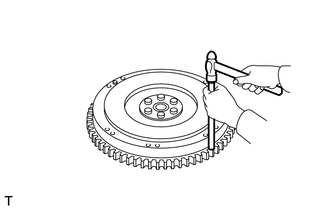
Using a brass bar and hammer, uniformly strike all around the ring gear and remove the gear.
- CAUTION:
-
After removing, allow the ring gear to cool before handling.
11351
44.REMOVE FLYWHEEL HOUSING
Remove the 14 bolts from the cylinder block.
Using a screwdriver with its tip wrapped in protective tape, pry off the flywheel housing.
11381A
45.REMOVE REAR ENGINE OIL SEAL
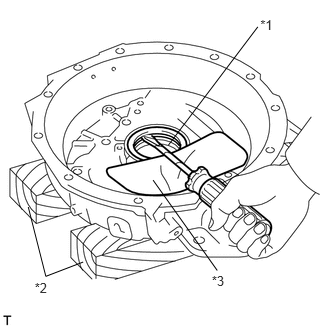
| *1 | Protective Tape |
| *2 | Wooden Block |
| *3 | Piece of Cloth |
Using a screwdriver with its tip wrapped in protective tape, pry out the rear engine oil seal.
- HINT:
-
Use wooden blocks and a piece of cloth to prevent damage to the flywheel housing.
46.INSPECT CONNECTING ROD THRUST CLEARANCE
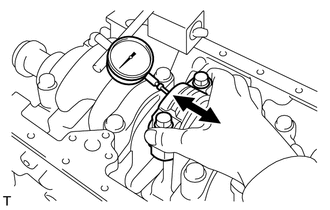
Using a dial indicator, measure the thrust clearance while moving the connecting rod back and forth.
- Standard Thrust Clearance:
0.200 to 0.520 mm (0.00787 to 0.0205 in.)
- Maximum Thrust Clearance:
0.60 mm (0.0236 in.)
If the thrust clearance is greater than the maximum, replace the connecting rod. If necessary, replace the crankshaft.
47.REMOVE PISTON WITH CONNECTING ROD
Remove the piston with connecting rod from the cylinder block.
13260
48.REMOVE CONNECTING ROD SUB-ASSEMBLY
11462
49.REMOVE CYLINDER LINER
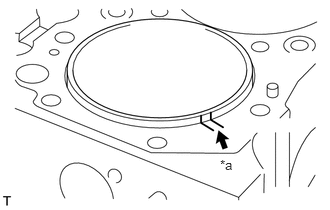
| *a | Matchmarks |
- HINT:
-
Before removing the cylinder liner, put matchmarks on the cylinder liner and cylinder block.
- NOTICE:
-
When reusing the cylinder liner, misalignment with the cylinder block may concentrate stress on the thin part of the cylinder liner and it may break.
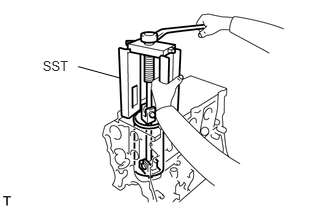
Using SST, remove the cylinder liner.
- SST
- S0942-01460
- NOTICE:
-
Keep the removed parts in the correct order so that they can be returned to their original positions when reassembled.
50.INSPECT CRANKSHAFT THRUST CLEARANCE
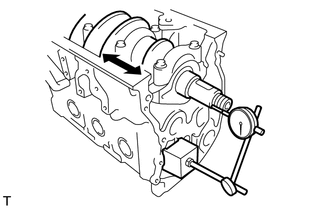
Using a dial indicator, measure the thrust clearance while prying the crankshaft back and forth with a screwdriver.
- Standard Thrust Clearance:
0.050 to 0.220 mm (0.00197 to 0.00866 in.)
- Maximum Thrust Clearance:
0.40 mm (0.0157 in.)
If the thrust clearance is greater than the maximum, replace the crankshaft or thrust washers as a set.
13411
51.REMOVE CRANKSHAFT
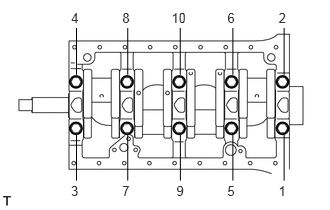
Remove the 10 bearing cap bolts in the order shown in the illustration.
Using a plastic-faced hammer, tap the bearing caps to remove them.
- NOTICE:
-
Be careful not to damage the thrust washers and bearings.
Remove the crankshaft.
11011
52.REMOVE CRANKSHAFT THRUST WASHER SET
- NOTICE:
-
Organize the parts so that each parts location can be remembered for reassembly.
11702
53.REMOVE CRANKSHAFT BEARING SET
- NOTICE:
-
Organize the parts so that each parts location can be remembered for reassembly.
15605
54.REMOVE OIL CHECK VALVE SUB-ASSEMBLY
Remove the bolt, the oil check valve and gasket.
15708
55.REMOVE NO. 1 OIL NOZZLE SUB-ASSEMBLY
Remove the bolt and the No. 1 oil nozzle.
13011
56.REMOVE PISTON RING SET
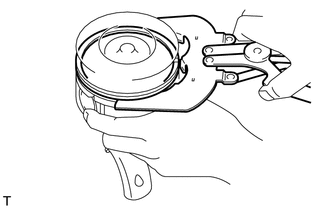
Using a piston ring expander, remove the piston rings.
- HINT:
-
Arrange the piston rings in the correct order.
13101A
57.REMOVE PISTON PIN HOLE SNAP RING
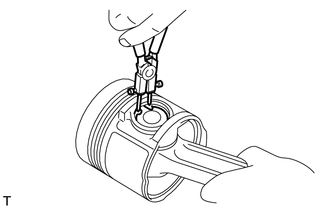
Using snap ring pliers, remove the snap rings.
58.REMOVE PISTON
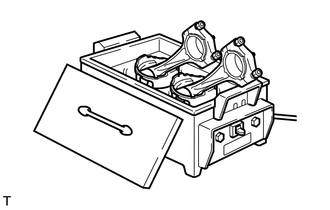
Gradually heat the piston to approximately 50°C (122°F).
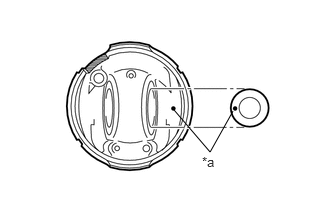
Put matchmarks on the piston and the piston pin.
| *a | Matchmark |
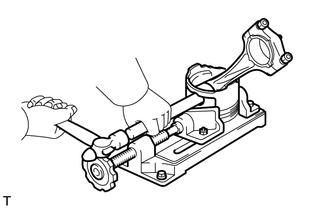
Using a plastic-faced hammer and brass bar, lightly tap out the piston pin and remove the connecting rod.
- NOTICE:
- ·
The piston and pin are a set.
·Arrange the pistons, pins, rings, connecting rods and bearings in the correct order.
59.REMOVE STUD BOLT
13201A
60.REMOVE CONNECTING ROD SMALL END BUSH
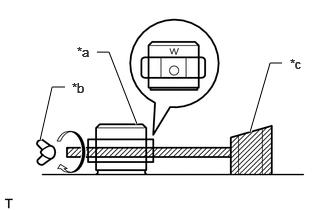
| *a | SST (Guide) |
| *b | SST (Wing Nut) |
| *c | SST (Press Sub-assembly) |
Prepare SST.
Install SST (press sub-assembly) to SST (guide) by inserting the pin of SST (press sub-assembly) into SST (guide), and then secure them together by installing SST (wing nut).
- SST
- 09222-E7010 S0948-11130 S9233-10360
- HINT:
-
Orient SST (guide) so that the letter W, which is stamped on SST (guide), is above the pin.
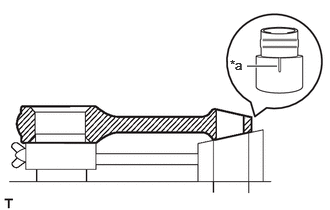
| *a | Groove |
With the connecting rod bearing removed, install the connecting rod bearing cap and place the connecting rod on SST.
- HINT:
-
Place SST so that the groove of SST (press sub-assembly) is at the center of the connecting rod.
Using SST, remove the bush.
Set the connecting rod sub-assembly without the crankshaft bearing on SST (spindle) and SST (press sub-assembly).
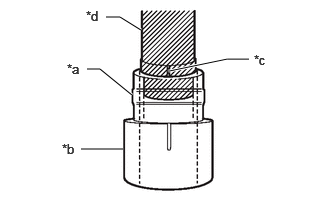
| *a | Connecting Rod Sub-assembly |
| *b | SST (Press Sub-assembly) |
| *c | Groove |
| *d | SST (Spindle) |
Install SST (spindle) to the connecting rod small end bush.
- SST
- 09222-E7020
- HINT:
-
Align the groove of SST (spindle) with the groove of SST (press sub-assembly) to install SST.
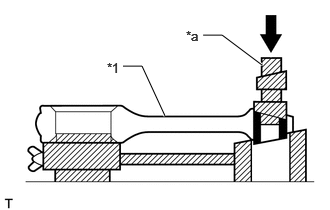
| *1 | Connecting Rod Sub-assembly |
| *a | SST (Spindle) |

|
Press |
Using SST (spindle), remove the connecting rod small end bush.
- HINT:
-
Always operate the press slowly and smoothly.
61.INSPECT PISTON PIN OIL CLEARANCE
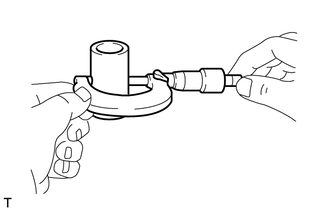
Using a micrometer, measure the piston pin diameter.
- Standard Piston Pin Diameter:
36.989 to 37.000 mm (1.4563 to 1.4567 in.)
- Minimum Piston Pin Diameter:
36.96 mm (1.4551 in.)
If the diameter is less than the minimum, replace the piston pin with a new one.
- HINT:
-
Never grind the piston pin, because the surface is coated with a special material.
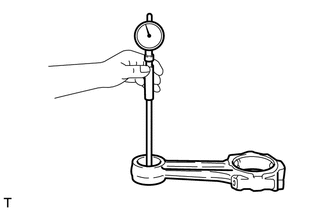
Using a cylinder gauge, measure the connecting rod bush inside diameter.
- Standard Bush Inside Diameter:
37.035 to 37.045 mm (1.4581 to 1.4585 in.)
- Maximum Bush Inside Diameter:
37.10 mm (1.4606 in.)
If the inside diameter is greater than the maximum, replace the connecting rod sub-assembly with a new one.
Subtract the diameter measurement of the piston pin from the inside diameter measurement of the connecting rod bush.
- Standard Oil Clearance:
0.035 to 0.056 mm (0.00138 to 0.00220 in.)
- Maximum Oil Clearance:
0.08 mm (0.00315 in.)
If the oil clearance is greater than the maximum, replace the piston with a new one.
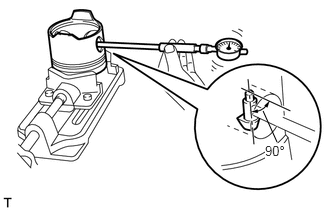
Using a cylinder gauge, measure the piston pin hole inside diameter while turning the gauge 90°.
- Standard Piston Pin Hole Inside Diameter:
36.987 to 37.003 mm (1.4562 to 1.4568 in.)
- Maximum Piston Pin Hole Inside Diameter:
37.05 mm (1.4587 in.)
If the piston pin hole inside diameter is greater than the maximum, replace the piston with a new one.
Subtract the diameter measurement of the piston pin from the inside diameter measurement of the piston pin hole.
- Standard Oil Clearance:
-0.013 to 0.014 mm (-0.000512 to 0.000551 in.)
- Maximum Oil Clearance:
0.05 mm (0.00197 in.)
If the clearance is greater than the maximum, replace the piston or piston pin.
62.INSPECT CAMSHAFT OIL CLEARANCE
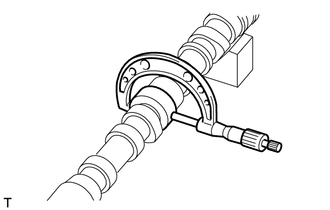
Measure the oil clearance of the camshaft journal.
Using a micrometer, measure the camshaft journal outside diameter.
- Standard Journal Outside Diameter:
Journal No. Specified Condition No. 1 56.95 to 56.97 mm (2.2421 to 2.2429 in.) No. 2 56.75 to 56.77 mm (2.2343 to 2.2350 in.) No. 3 56.55 to 56.57 mm (2.2264 to 2.2272 in.)
If the outside diameter is outside the specified range, replace the camshaft.
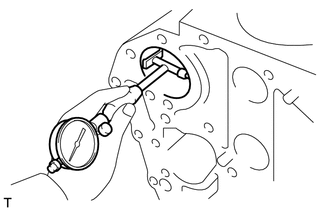
Using a cylinder gauge, measure the camshaft bearing inside diameter.
- Standard Inside Diameter:
Journal No. Specified Condition No. 1 57.035 to 57.135 mm (2.2455 to 2.2494 in.) No. 2 56.835 to 56.935 mm (2.2376 to 2.2415 in.) No. 3 56.635 to 56.735 mm (2.2297 to 2.2337 in.)
If the inside diameter is outside the specified range, replace the camshaft bearing.
Subtract the outside diameter measurement of the camshaft journal from the inside diameter measurement of the camshaft bearing.
- Standard Oil Clearance:
0.030 to 0.120 mm (0.00118 to 0.00472 in.)
- Maximum Oil Clearance:
0.15 mm (0.00591 in.)
If the oil clearance is greater than the maximum, replace the camshaft or camshaft bearing.
63.REMOVE CAMSHAFT BEARING
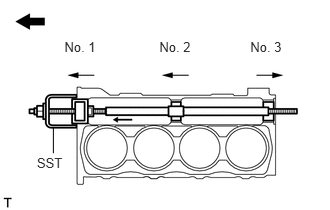
|
|
Front |
Using SST, remove the camshaft bearings in the directions indicated by the arrow marks in the illustration.
- SST
- 09215-00101 (09215-00130, 09215-00141, 09215-00150, 09215-00161)
09215-00013 (09215-00021, 09215-00461)
- NOTICE:
-
Remove the bearings No. 1, No. 2 and No. 3 in order.