LIGHTING ROOM LIGHT SWITCH REMOVAL
CAUTION / NOTICE / HINT
- HINT:
- ·
Use the same procedure for RHD and LHD vehicles.
·The procedure listed below is for LHD vehicles.
PROCEDURE

 55433B
1.REMOVE LOWER NO. 2 INSTRUMENT PANEL FINISH PANEL
33504F
2.REMOVE SHIFT LEVER KNOB SUB-ASSEMBLY (for Manual Transmission)
Remove the shift lever knob sub-assembly.
58534A
3.REMOVE TRANSMISSION COVER MAT (for Manual Transmission)
Remove the transmission cover mat from the shift and select lever support.
58286
4.REMOVE NO. 1 SHIFT AND SELECT LEVER BOOT (for Manual Transmission)
for RHD:
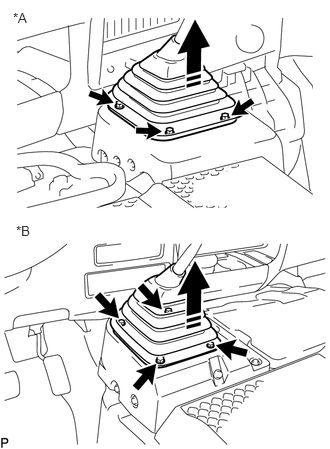
Remove the 3 bolts.
| *A | for RHD |
| *B | for LHD |

|
Removal Direction |
While sliding the shift lever, pull the No. 1 shift and select lever boot diagonally to remove it.
for LHD:
Remove the 4 bolts.
While sliding the shift lever, pull the No. 1 shift and select lever boot diagonally to remove it.
58848A
5.REMOVE SHIFT LEVER HOLE COVER (for Manual Transmission)
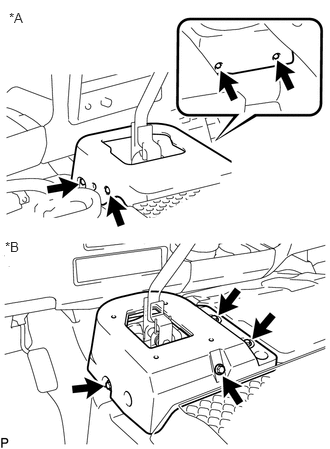
Remove the 4 bolts and shift lever hole cover.
| *A | for RHD |
| *B | for LHD |
58841A
6.REMOVE SHIFTING HOLE COVER (for Automatic Transmission)
55412D
7.REMOVE CENTER INSTRUMENT CLUSTER FINISH PANEL
55470
8.REMOVE INSTRUMENT CLUSTER FINISH PANEL GARNISH ASSEMBLY
84170A
9.REMOVE NO. 1 ROOM LIGHT SWITCH ASSEMBLY
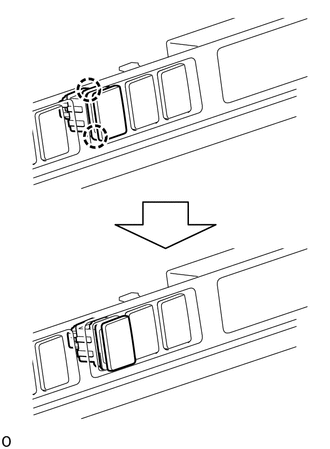
Detach the 2 claws to remove the No. 1 room light switch assembly from the instrument cluster finish panel garnish assembly.
84170B
10.REMOVE NO. 2 ROOM LIGHT SWITCH ASSEMBLY
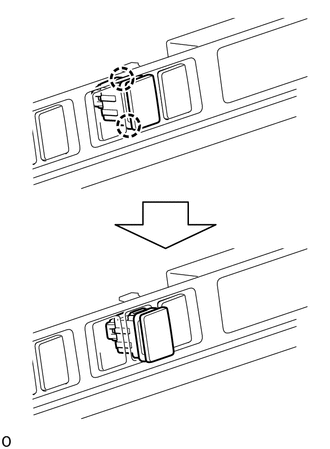
Detach the 2 claws to remove the No. 2 room light switch assembly from the instrument cluster finish panel garnish assembly.