2011-2016 FJ Cruiser · Service Manual HEATER & AIR CONDITIONING SYSTEM

INSTALLATION

Removal / installation · Vehicles built Jul 2007 – Jul 2013

Versions by build date: Jul 2007 – Jul 2013 Aug 2013 – Jul 2014 from Aug 2014


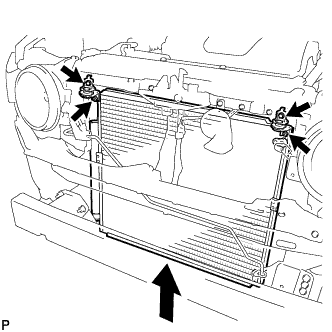
1. INSTALL COOLER CONDENSER ASSEMBLY

I102489
  1. Install the condenser into the vehicle.

    NOTICE:
    Do not damage the condenser or radiator when installing the condenser.

    HINT:
    If a new condenser is installed, add compressor oil to the condenser as follows.

    Compressor oil:
    ND-OIL8 or the equivalent. Add 40 cc (1.35 fl. oz.)

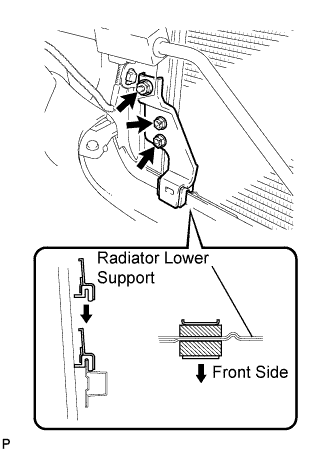
  1. Install the No.1 cooler condenser cushion with the 4 bolts.

    Torque:
    5.5 N*m{ 56 kgf*cm , 49 in.*lbf }


2. INSTALL NO. 2 COOLER CONDENSER CUSHION RH

I102485E01
  1. Install the cooler condenser cushion with the 2 bolts and nut.

    NOTICE:
    Securely insert the cooler condenser cushion into the radiator lower support.

    Torque:
    5.5 N*m{ 56 kgf*cm , 49 in.*lbf } for bolt
    5.4 N*m{ 55 kgf*cm , 48 in.*lbf } for nut


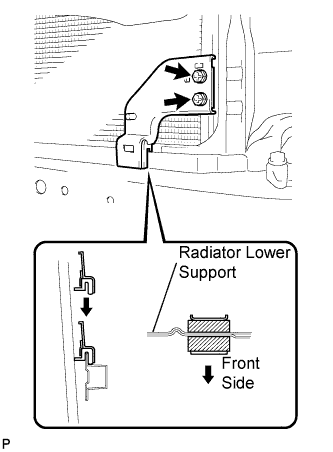
3. INSTALL NO. 2 COOLER CONDENSER CUSHION LH

I102487E01
  1. Install the cooler condenser cushion with the 2 bolts.

    NOTICE:
    Securely insert the cooler condenser cushion into the radiator lower support.

    Torque:
    5.5 N*m{ 56 kgf*cm , 49 in.*lbf }


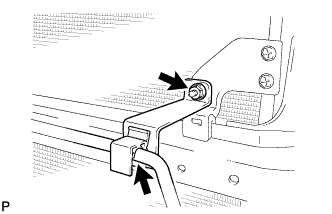
4. INSTALL COOLER BRACKET

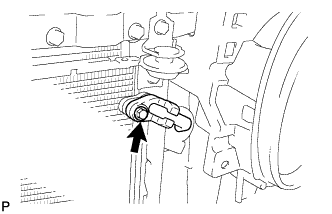
I102483
  1. Install the cooler bracket with the nut.

    Torque:
    5.4 N*m{ 55 kgf*cm , 48 in.*lbf }

  1. Engage the clamp.


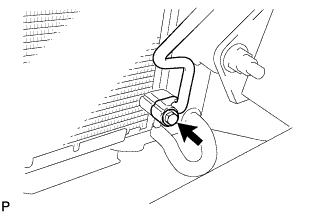
5. INSTALL AIR CONDITIONING TUBE ASSEMBLY

I102482
  1. Remove the attached vinyl tape from the pipe and the connecting part of the cooler condenser.

  1. Apply sufficient compressor oil to a new O-ring and the fitting surface of the pipe joint.

    Compressor oil:
    ND-OIL8 or the equivalent

  1. Install the O-ring onto the air conditioning tube.

  1. Install the tube onto the condenser with the bolt.

    Torque:
    5.4 N*m{ 55 kgf*cm , 48 in.*lbf }


6. INSTALL DISCHARGE HOSE SUB-ASSEMBLY

I102481
  1. Remove the attached vinyl tape from the hose and the connecting part of the cooler condenser.

  1. Apply sufficient compressor oil to a new O-ring and the fitting surface of the hose joint.

    Compressor oil:
    ND-OIL8 or the equivalent

  1. Install the O-ring onto the discharge hose.

  1. Install the discharge hose onto the condenser with the bolt.

    Torque:
    5.4 N*m{ 55 kgf*cm , 48 in.*lbf }


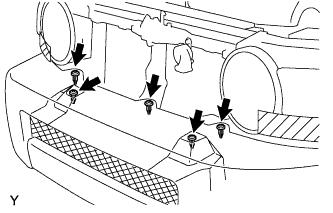
7. INSTALL FRONT BUMPER COVER

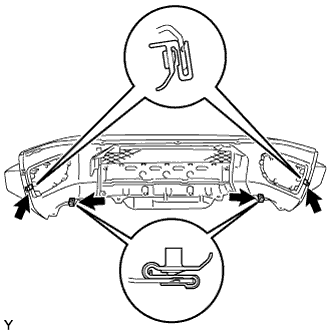
  1. B138601
    Install the 4 clips.

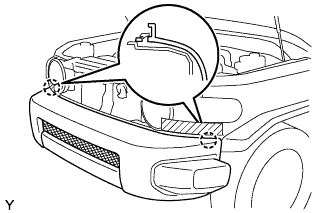
  1. B134733
    Engage the 2 claws and install the front bumper cover.

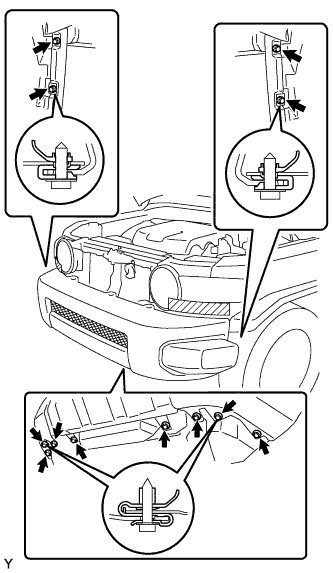
  1. B134732
    Tighten the 8 screws and the 4 bolts.

    Torque:
    3.0 N*m{ 30 kgf*cm , 27 in.*lbf } for screw
    8.0 N*m{ 80 kgf*cm , 71 in.*lbf } for bolt

  1. B138606
    Install the 5 clips.

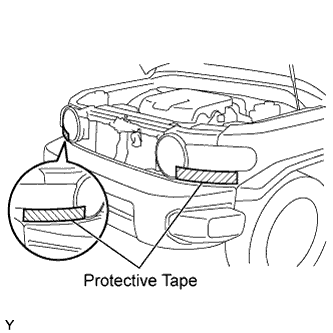
  1. B134730E01
    Remove the protective tape.


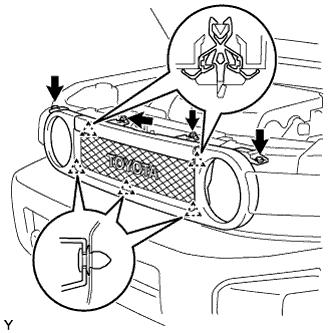
8. INSTALL RADIATOR GRILLE

  1. B134729
    Engage the 5 clips and install the radiator grille.

  1. Tighten the 2 screws.

    Torque:
    3.0 N*m{ 30 kgf*cm , 27 in.*lbf }

  1. Install the 2 clips.


9. CONNECT CABLE TO NEGATIVE BATTERY TERMINAL

Torque:
3.9 N*m{ 40 kgf*cm , 35 in.*lbf }


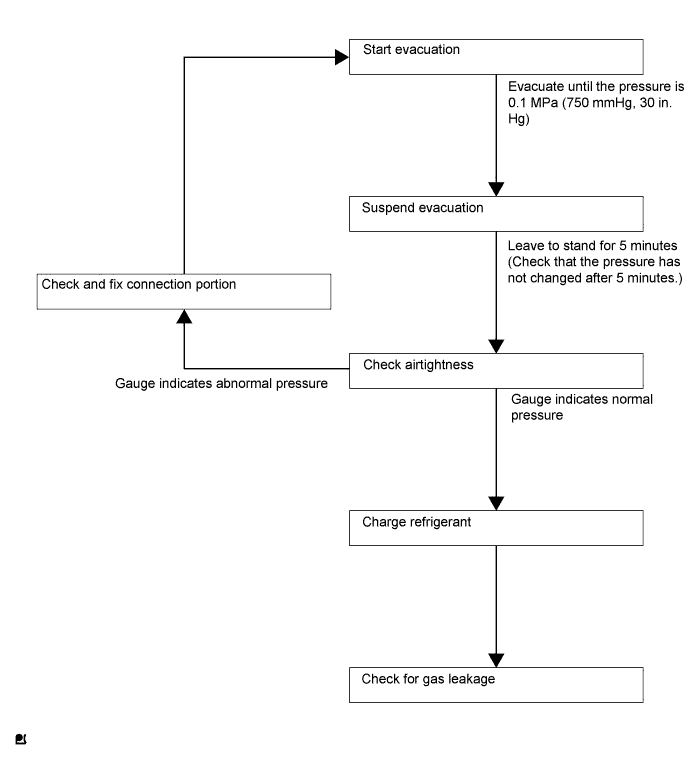
10. CHARGE REFRIGERANT

I100449E02

NOTICE:
Charge refrigerant in accordance with the equipment manual.

  1. Perform vacuum purging using a vacuum pump.

  1. Charge refrigerant HFC-134a (R134a).

    SST
    09985-20010   (09985-02010, 09985-02050, 09985-02060, 09985-02070, 09985-02080, 09985-02090, 09985-02110, 09985-02130, 09985-02140, 09985-02150)

    Standard:
    570 to 630 g (20.11 to 22.22 oz.)

    NOTICE:
    1. Do not start the engine before charging it with refrigerant as the cooler compressor doesn't work properly without sufficient refrigerant. This could cause the compressor to overheat.
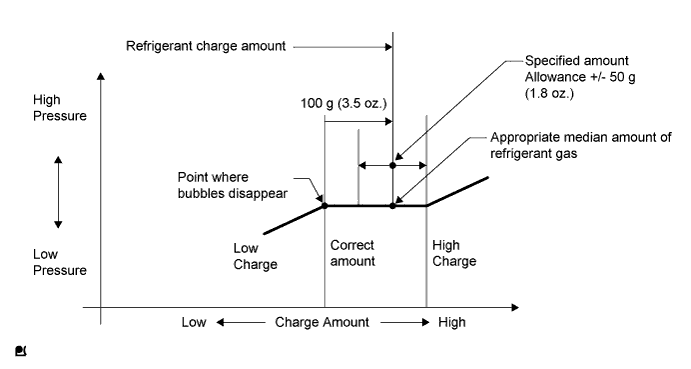
    2. Approximately 100 g (3.5 oz.) of refrigerant may need to be charged after bubbles disappear.
      The volume of refrigerant should be measured, not checked with the sight glass.

    HINT:

    1. The relationship between the refrigerant charge amount and the pressure is as follows.

      I104030E01
    2. High Charge Range:
      If the refrigerant is overcharged, the pressure rises on the high-pressure side. High-pressure cut off frequently occurs. This causes insufficient cooling performance and also insufficient compressor lubrication.
    3. Low Charge Range:
      A shortage of refrigerant causes insufficient cooling performance and low circulation of refrigerant oil, which shortens the compressor life. Operation with insufficient coolant raises the refrigerant temperature and causes heat deterioration of the rubber seals and hoses. Cracking and subsequent refrigerant leakage may occur.


    1. Install the caps onto the service valves on the refrigerant line.


11. WARM UP ENGINE

NOTICE:
Warm up the engine at less than 2,000 rpm for 1 minute or more after charging it with refrigerant.


12. CHECK FOR REFRIGERANT LEAK
  1. After recharging the refrigerant gas, check for refrigerant gas leakage using a halogen leak detector.

  1. Perform the operation as follows:

    1. Stop the engine.
    2. Secure good ventilation (the halogen leak detector may react to volatile gases other than refrigerant, such as evaporated gasoline or exhaust gas).
    3. Repeat the test 2 or 3 times.
    4. Make sure that some refrigerant remains in the refrigeration system.
      When the compressor is off: approximately 392 to 588 kPa (4 to 6 kgf*cm2, 57 to 85 psi)

    HINT:
    It is impossible for the above pressure to be maintained if there is leakage.

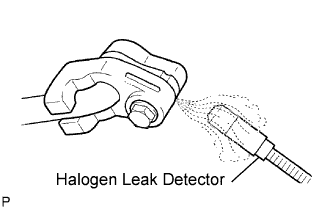
  1. I042222E14
    Using the halogen leak detector, check the refrigerant line, especially at the connection points, for leakage.

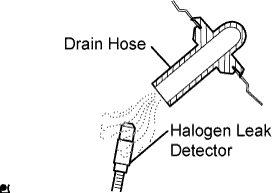
  1. I100587E03
    Bring the halogen leak detector close to the drain hose before performing the test.

    HINT:
    1. After the blower motor has stopped, leave the cooling unit for at least 15 minutes.
    2. Place the halogen leak detector sensor under the drain hose.
    3. When bringing the halogen leak detector close to the drain hose, make sure that the halogen leak detector does not react to the volatile gases.

    If such a reaction is unavoidable, the vehicle must be lifted up.

  1. If no gas leakage is detected from the drain hose, remove the blower motor from the cooling unit. Insert the halogen leak detector sensor into the unit and perform the test.

  1. Disconnect the pressure switch connector and leave it for approximately 20 minutes. Bring the halogen leak detector close to the pressure switch and perform the test.

← REASSEMBLY (from Jul 2007)INSTALLATION (Aug 2013 – Jul 2014) →