INSTALLATION
Removal / installation · Vehicles built from Aug 2014
Versions by build date: Aug 2009 – Jul 2011 Aug 2011 – Oct 2012 Nov 2012 – Jul 2014 from Aug 2014
| 1. INSTALL FLYWHEEL RING GEAR (for Manual Transmission) |

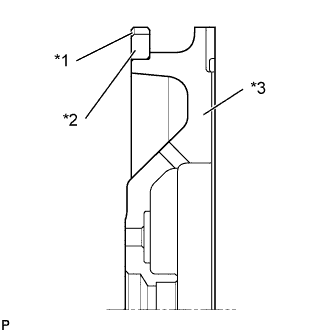  |
Using a torch, heat the ring gear evenly to approximately 200°C (392°F).
Text in Illustration *1
Chamfer
*2
Ring Gear
*3
Flywheel
- NOTICE:
- Be careful not to overheat the ring gear.
Using a brass bar, tap the ring gear onto the flywheel with its chamfered gear teeth facing the block.
- NOTICE:
- After installing, allow the ring gear to cool before handling.
| 2. INSTALL FRONT NO. 1 ENGINE MOUNTING BRACKET RH |
Install the engine mounting RH with the 4 bolts.
- Torque:
- 43 N*m{ 438 kgf*cm , 32 ft.*lbf }
| 3. INSTALL FRONT NO. 1 ENGINE MOUNTING BRACKET LH |
Install the engine mounting bracket with the 3 bolts.
- Torque:
- 43 N*m{ 438 kgf*cm , 32 ft.*lbf }
| 4. INSTALL ENGINE OIL LEVEL DIPSTICK GUIDE |
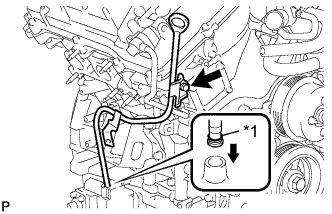 |
Install a new O-ring to the dipstick guide.
Text in Illustration *1
New O-Ring
Apply a light coat of engine oil to the O-ring.
Push the dipstick guide end into the guide hole.
Install the dipstick guide with the bolt.
- Torque:
- 10 N*m{ 102 kgf*cm , 7 ft.*lbf }
Install the dipstick.
| 5. INSTALL V-RIBBED BELT TENSIONER ASSEMBLY |
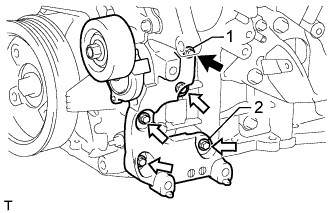 |
Temporarily install the V-ribbed belt tensioner with the 5 bolts.
Text in Illustration 
Bolt A

Bolt B
- Bolt Length:
Item
Length
A
70 mm (2.76 in.)
B
33 mm (1.30 in.)
Tighten bolts 1 and 2 in numerical order.
- Torque:
- 36 N*m{ 367 kgf*cm , 27 ft.*lbf }
Tighten the other bolts.
- Torque:
- 36 N*m{ 367 kgf*cm , 27 ft.*lbf }
| 6. INSTALL NO. 2 IDLER PULLEY SUB-ASSEMBLY |
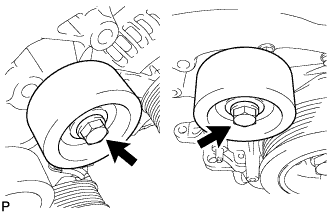 |
for Cover Separate Type:
Install the 2 idler pulley cover plates, 2 No. 2 idler pulleys and 2 No. 2 idler pulley cover plates with the 2 bolts.- Torque:
- 54 N*m{ 551 kgf*cm , 40 ft.*lbf }
for Cover Integrated Type:
Install the 2 No. 2 idler pulleys with the 2 bolts.- Torque:
- 54 N*m{ 551 kgf*cm , 40 ft.*lbf }
| 7. INSTALL NO. 1 IDLER PULLEY SUB-ASSEMBLY |
Install the No. 1 idler pulley with the bolt.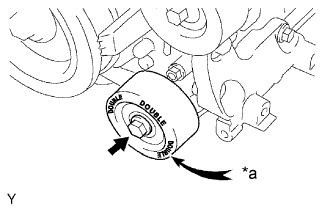
Text in Illustration *a
"DOUBLE"
- Torque:
- 54 N*m{ 551 kgf*cm , 40 ft.*lbf }
- HINT:
- "DOUBLE" is marked on the No. 1 idler pulley to distinguish it from the No. 2 idler pulley.
| 8. INSTALL WATER BY-PASS PIPE SUB-ASSEMBLY (w/ Oil Cooler) |
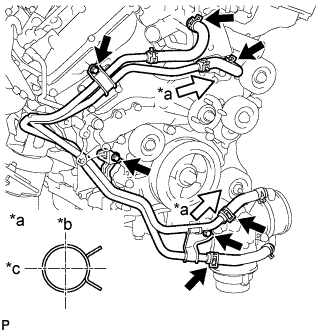 |
Install the water by-pass pipe with the 3 bolts.
- Torque:
- 10 N*m{ 102 kgf*cm , 7 ft.*lbf }
Connect the 4 hoses.
Text in Illustration *a
View A
*b
Upper
*c
Rear
- HINT:
- The direction of the hose clamp is indicated in the illustration.
| 9. INSTALL INTAKE MANIFOLD |
Install a new No. 1 intake manifold to head gasket and No. 2 intake manifold to head gasket to the cylinder head sub-assembly.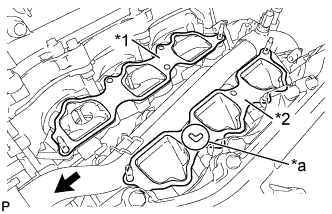
Text in Illustration *1
No. 1 Intake Manifold To Head Gasket
*2
No. 2 Intake Manifold To Head Gasket
*a
Bank 2 Identification Mark
Front of Vehicle
- NOTICE:
- When installing the No. 1 intake manifold to head gasket and No. 2 intake manifold to head gasket, pay attention to the Bank 1 and Bank 2 sides.
- Align the port holes of the gasket and cylinder head sub-assembly.
- When installing the No. 1 intake manifold to head gasket and No. 2 intake manifold to head gasket, pay attention to the Bank 1 and Bank 2 sides.
Temporarily install the intake manifold to the cylinder head sub-assembly with the 4 nuts and 6 bolts.
Install and uniformly tighten the 4 nuts and 6 bolts in several steps in the sequence shown in the illustration.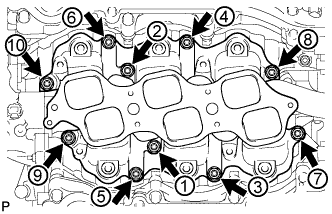
- Torque:
- 21 N*m{ 214 kgf*cm , 15 ft.*lbf }
Install the wire harness clamp bracket to the intake manifold with the bolt.
- Torque:
- 8.0 N*m{ 82 kgf*cm , 71 in.*lbf }
| 10. INSTALL FUEL INJECTOR ASSEMBLY |
Install a new insulator onto each fuel injector.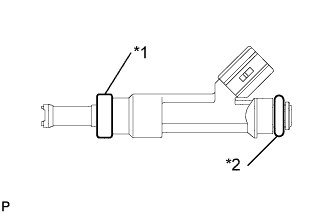
Text in Illustration *1
New Insulator
*2
New O-Ring
Apply a light coat of spindle oil or gasoline to each new O-ring and install one onto each fuel injector.
Install the 6 injectors.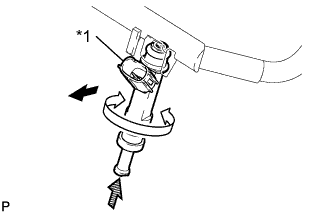
Text in Illustration *1
Connector
Outward
Turn

Push
While turning each fuel injector left and right, install it onto the fuel delivery pipe.
Position the fuel injector connectors facing outward.
| 11. INSTALL FUEL DELIVERY PIPE SUB-ASSEMBLY |
Place the fuel delivery pipe together with the 6 fuel injectors on the intake manifold.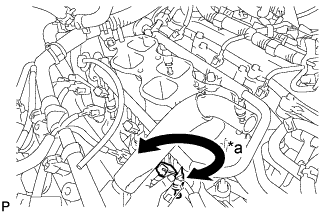
Text in Illustration *a
Turn
Temporarily install the 6 bolts, which are used to hold the fuel delivery pipe, to the intake manifold.
Check that the fuel injectors rotate smoothly.
- HINT:
- If the fuel injectors do not rotate smoothly, replace the O-ring of any injector that does not rotate smoothly.
Position the fuel injector connectors facing outward.
Tighten the 6 bolts, which are used to hold the fuel delivery pipe, to the intake manifold.
- Torque:
- 21 N*m{ 214 kgf*cm , 15 ft.*lbf }
Connect the 6 fuel injector connectors.
| 12. INSTALL FUEL PIPE SUB-ASSEMBLY |
Install the No. 1 fuel pipe and No. 2 fuel pipe with the 2 bolts.
- Torque:
- 9.0 N*m{ 92 kgf*cm , 80 in.*lbf }
Connect the 2 fuel pipes (Click here).
| 13. INSTALL REAR CYLINDER HEAD COVER |
Temporarily install the cover with the 3 bolts.
Tighten the 3 bolts in the sequence shown in the illustration.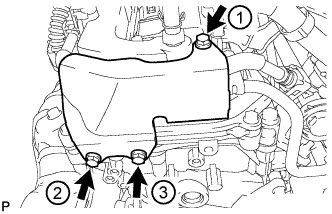
- Torque:
- 9.0 N*m{ 92 kgf*cm , 80 in.*lbf }
| 14. INSTALL IGNITION COIL ASSEMBLY |
Install the 6 ignition coils with the 6 bolts.
- Torque:
- 10 N*m{ 102 kgf*cm , 7 ft.*lbf }
| 15. INSTALL NO. 2 EMISSION CONTROL VALVE SET (w/ Secondary Air Injection System) |
Install the No. 2 emission control valve set to the cylinder head cover sub-assembly LH with the 3 nuts.
- Torque:
- 21 N*m{ 214 kgf*cm , 15 ft.*lbf }
| 16. INSTALL NO. 1 EMISSION CONTROL VALVE SET (w/ Secondary Air Injection System) |
Install the No. 1 emission control valve set to the cylinder head cover sub-assembly with the 3 nuts.
- Torque:
- 21 N*m{ 214 kgf*cm , 15 ft.*lbf }
| 17. INSTALL HEATER WATER HOSE ASSEMBLY |
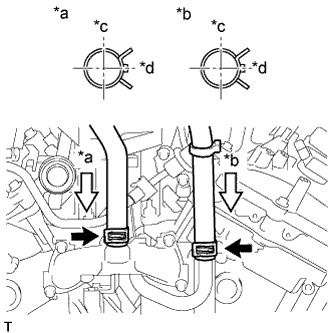 |
Install the heater water hose assembly and connect the 2 hoses.
Text in Illustration *a
View A
*b
View B
*c
RH
*d
Rear
- HINT:
- The direction of the hose clamp is indicated in the illustration.