INSTALLATION
Removal / installation · Vehicles built Aug 2009 – Jul 2014
Versions by build date: Aug 2009 – Jul 2014 from Aug 2014
| 1. INSTALL NO. 1 AIR CLEANER HOSE |

Install the union (fog air cleaner hose) tube to the No. 1 air cleaner hose.
| 2. INSTALL INTAKE AIR RESONATOR |
Align the tab on the No. 1 air cleaner hose with the groove on the intake air resonator and tighten the 2 hose clamps.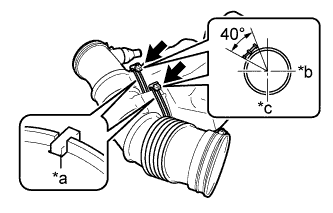

Text in Illustration *a
Protrusion
*b
RH
*c
Top
- Torque:
- 2.0 N*m{ 20 kgf*cm , 18 in.*lbf }
- HINT:
- The direction of the hose clamp is indicated in the illustration.
| 3. INSTALL AIR CLEANER CAP SUB-ASSEMBLY |
Align the tab on the air cleaner cap with the groove on the air cleaner hose and tighten the hose clamp.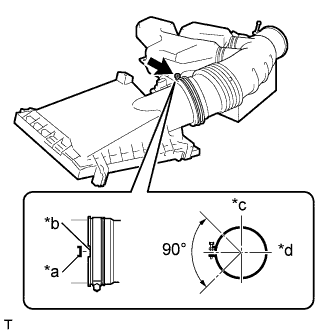
Text in Illustration *a
Protrusion
*b
Groove
*c
Top
*d
Front
- Torque:
- 5.0 N*m{ 51 kgf*cm , 44 in.*lbf }
- HINT:
- The direction of the hose clamp is indicated in the illustration.
| 4. INSTALL AIR CLEANER CASE SUB-ASSEMBLY |
Install the air cleaner case sub-assembly with the 3 bolts.
| 5. INSTALL AIR CLEANER FILTER ELEMENT SUB-ASSEMBLY |
Install the air cleaner filter element sub-assembly to the air cleaner case sub-assembly.
| 6. INSTALL AIR CLEANER CAP AND HOSE |
Install the air cleaner cap with the 4 hinges.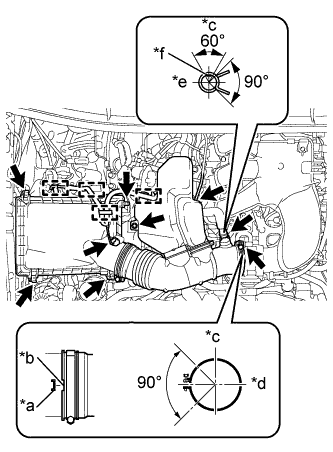
Install the No. 1 air cleaner hose with the clamp.
- Torque:
- 5.0 N*m{ 51 kgf*cm , 44 in.*lbf }
Text in Illustration *a
Protrusion
*b
Groove
*c
Top
*d
Front
*e
RH
*f
Paint mark of the hose
Install the bolt.
- Torque:
- 5.0 N*m{ 51 kgf*cm , 44 in.*lbf }
Connect the ventilation hose and vacuum hose.
- HINT:
- The direction of the hose clamp is indicated in the illustration.
Engage the 4 wire harness clamps.
Connect the MAF meter connector.
| 7. INSTALL V-BANK COVER |
Engage the 2 V-bank cover hooks to the bracket.
Align the 2 V-bank cover grommets with the 2 pins and press down on the V-bank cover to engage the pins.