Home › BODY › WINDSHIELD / WINDOWGLASS › REAR SIDE WINDOW GLASS

REAR SIDE WINDOW GLASS > INSTALLATION

for Preparation Click here


1. CLEAN REAR DOOR GLASS


BO04421E01
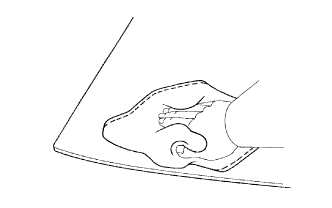
  1. Clean the outer circumference of the glass with a non-residue solvent.

    NOTICE:
    1. Do not touch the glass surface after cleaning it.
    2. Even if using a new glass, clean the glass with a non-residue solvent.


2. CLEAN VEHICLE BODY


    B073084E02
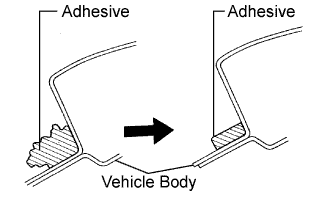
  1. Clean and shape the contact surface of the vehicle body.

    1. Using a knife, cut away any rough adhesive on the contact surface of the vehicle body to ensure the appropriate surface shape.

      NOTICE:
      Do not damage the vehicle body.

      HINT:
      Leave as much adhesive on the vehicle body as possible.

    2. Clean the contact surface of the vehicle body with a shop rag or piece of cloth saturated with cleaner.

      HINT:
      Clean the vehicle body even if all the adhesive has been removed.


3. INSTALL REAR DOOR GLASS


H002865E01
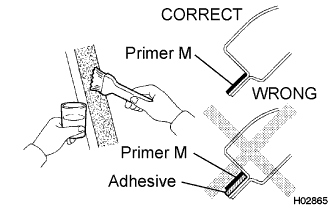
  1. Using a brush, apply Primer M to the exposed part of the vehicle body.
    NOTICE:
    1. Allow the primer to dry for 3 minutes or more.
    2. Do not apply Primer M to the adhesive.
    3. Throw away any leftover Primer M.
    4. Do not apply too much Primer M.


    B139401E01
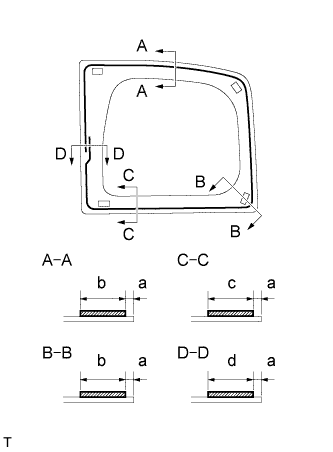
  1. Using a brush or sponge, apply Primer G to the edge of the rear door glass and contact surface.

    Specification:
    Area
    Measurement
    a
    5.0 mm (0.197 in.)
    b
    20 mm (0.787 in.)
    c
    15 mm (0.591 in.)
    d
    26 mm (1.024 in.)

    NOTICE:
    1. Allow the primer to dry for 3 minutes or more.
    2. Throw away any leftover Primer G.
    3. Do not apply too much Primer G.

    HINT:
    If Primer G is applied to any areas other than those specified, wipe off the primer with a clean shop rag or piece of cloth before it dries.


    B139402E01
  1. Apply adhesive.

    Adhesive:
    Toyota Genuine Windshield Glass Adhesive or the equivalent


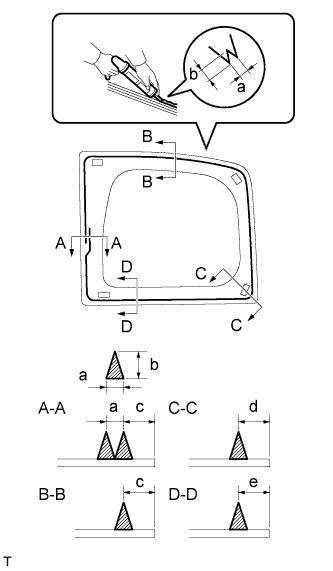
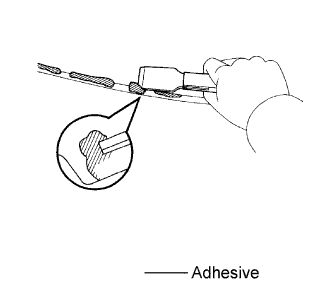
    1. Cut the tip off the cartridge nozzle, as shown in the illustration.

      HINT:
      After cutting off the tip, use all adhesive within the time indicated in the table below.

      Usage time frame:
      Temperature
      Usage Time Frame
      35°C (95°F)
      15 minutes
      20°C (68°F)
      1 hour 40 minutes
      5°C (41°F)
      8 hours

    2. Load the sealer gun with the cartridge.

    3. Apply adhesive to the rear door glass as shown in the illustration.

      Specification:
      Area
      Measurement
      a
      8 mm (0.315 in.)
      b
      12 mm (0.472 in.)
      c
      13 mm (0.512 in.)
      d
      14.2 mm (0.559 in.)
      e
      11.6 mm (0.457 in.)


  1. Install the rear door glass onto the body.

    1. Hold the quarter window glass in place securely with protective tape or the equivalent until the adhesive hardens.

      NOTICE:
      1. Allow the primer coating to dry for 3 minutes or more.
      2. Check that the pins are attached to the body correctly.
      3. Check the clearance between the body and glass.

    2. Lightly press the front surface of the glass to ensure a close fit.


    3. B073131E02
    4. Using a scraper, remove any excessive or protruding adhesive.

      HINT:
      Apply adhesive to the rear door glass rim.

      NOTICE:
      Do not drive the vehicle within the time indicated in the table below.

      Minimum time:
      Temperature
      Minimum time prior to driving vehicle
      35°C (95°F)
      1 hour 30 minutes
      20°C (68°F)
      5 hours
      5°C (41°F)
      24 hours


4. CHECK FOR LEAKAGE AND REPAIR
  1. Conduct a leak test by applying water to the adhesive portions after the adhesive has completely hardened.

  1. Seal any leakage with auto glass sealer.


5. INSTALL ACCESS DOOR GLASS OUTER WEATHERSTRIP

HINT:
Use the same procedure as for the RH side .


6. INSTALL REAR DOOR OPENING TRIM

HINT:
Use the same procedure as for the RH side .


7. INSTALL CENTER PILLAR UPPER GARNISH

HINT:
Use the same procedure as for the RH side .


8. INSTALL REAR DOOR TRIM BOARD SUB-ASSEMBLY

HINT:
Use the same procedure as for the RH side .


9. INSTALL NO. 1 CUP HOLDER

HINT:
Use the same procedure as for the RH side .


10. INSTALL REAR DOOR INSIDE HANDLE SUB-ASSEMBLY

HINT:
Use the same procedure as for the RH side .


11. INSTALL LAP BELT OUTER ANCHOR COVER

HINT:
Use the same procedure as for the RH side .


12. INSTALL ACCESS PANEL REAR WEATHERSTRIP

HINT:
Use the same procedure as for the RH side .