Home › TRANSMISSION ยท CLUTCH › CLUTCH RELEASE CYLINDER

CLUTCH RELEASE CYLINDER > INSTALLATION

for Preparation Click here


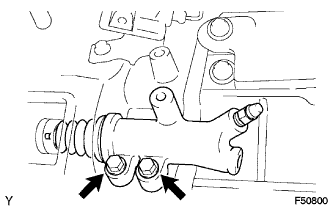
1. INSTALL CLUTCH RELEASE CYLINDER ASSEMBLY


F050800
  1. Install the clutch release cylinder with the 2 bolts.

    Torque:
    12 N*m{ 120 kgf*cm , 9 ft.*lbf }


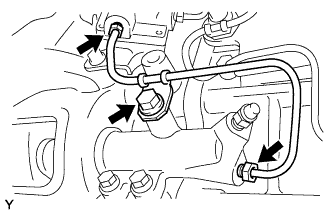
2. CONNECT CLUTCH RELEASE CYLINDER TO FLEXIBLE HOSE TUBE


C133797
  1. Using a union nut wrench, connect the flexible hose tube.

    Torque:
    without union nut wrench:
    15 N*m{ 155 kgf*cm , 11 ft.*lbf }
    with union nut wrench:
    14 N*m{ 144 kgf*cm , 10 ft.*lbf }

    NOTICE:
    1. This torque value can be obtained by using a torque wrench with a fulcrum length of 300 mm (11.8 in.) and a union nut wrench with a fulcrum length of 22 mm (0.886 in.) (Click here).
    2. This torque value is effective when union nut wrench is parallel to a torque wrench

  1. Install the clutch line bracket.

    Torque:
    12 N*m{ 120 kgf*cm , 9 ft.*lbf }


3. BLEED CLUTCH PIPE LINE
  1. Fill the brake reservoir tank with brake fluid and bleed the clutch system.

    Torque:
    11 N*m{ 110 kgf*cm , 8 ft.*lbf }


4. CHECK FOR CLUTCH FLUID LEAKAGE


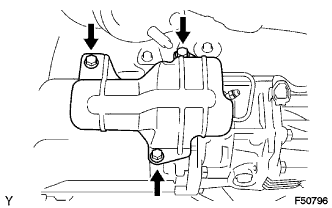
5. INSTALL NO. 1 CLUTCH HOUSING COVER


F050796
  1. Install the No. 1 clutch housing cover with the 3 bolts.

    Torque:
    12 N*m{ 120 kgf*cm , 9 ft.*lbf }


6. CHECK FLUID LEVEL IN RESERVOIR