Home › MAINTENANCE › MAINTENANCE › ENGINE

ENGINE > GENERAL MAINTENANCE


HINT:
Inspect these items when the engine is cold.


1. INSPECT TIMING CHAIN
  1. Check the camshaft timing marks.

    NOTICE:
    1. Check each timing mark from a viewpoint directly inline with the center of the camshaft and the timing mark on each camshaft timing gear.
    2. If the timing marks are checked from any other viewpoint, the valve timing may appear misaligned.


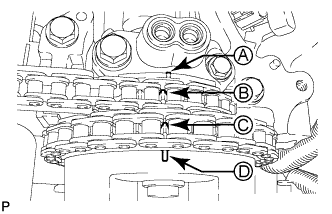
  1. Check that each camshaft timing mark is positioned as shown in the illustration.
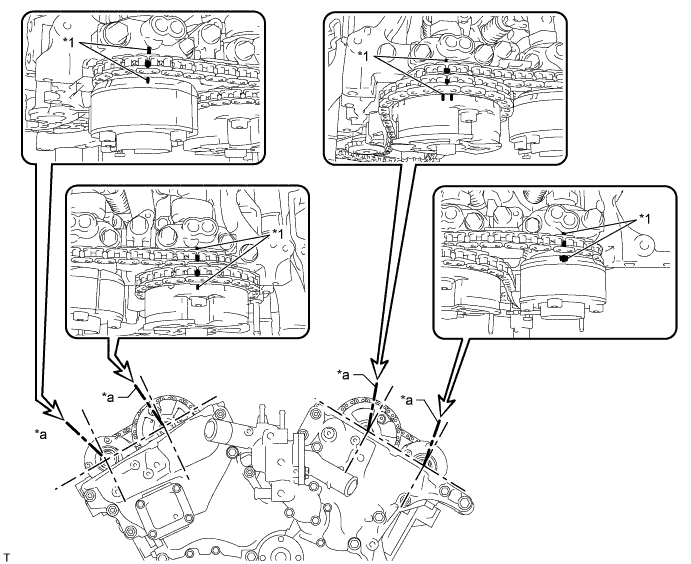

    A224753E02


    Text in Illustration 
    *1
    Timing Mark
    -
    -
    *a
    Viewpoint
    -
    -

    HINT:
    A182780E01
    for the intake camshaft:
    Be sure to check mark A at the point when marks B, C, and D are positioned in line. If the marks are checked from any other viewpoint, they cannot be checked correctly.
  1. If the valve timing is misaligned, reinstall the timing chain sub-assembly.

  1. Turn the crankshaft 2 revolutions, set the No. 1 cylinder to TDC/compression and check the timing marks again.


2. INSPECT DRIVE BELT


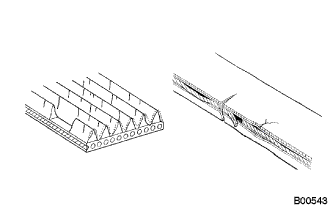
B000543
  1. Check the belt for wear, cracks or other signs of damage.
    If any of the following defects is found, replace the fan and generator V belt.

    1. The belt is cracked.
    1. The belt is worn out to the extent that the cords are exposed.
    1. The belt has chunks missing from the ribs.


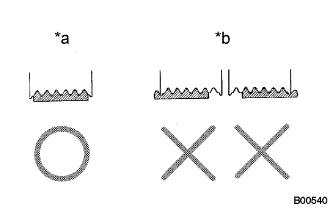
    B000540E10
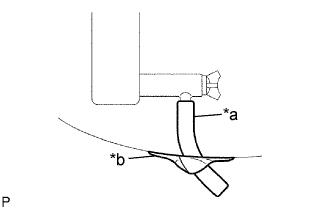
  1. Check that the belt fits properly in the ribbed grooves.
    Text in Illustration 
    *a
    CORRECT
    *b
    INCORRECT

    HINT:
    Check with your hand to confirm that the belt has not slipped out of the grooves on the bottom of the pulley. If it has slipped out, replace the fan and generator V belt. Install a new fan and generator V belt correctly.


3. REPLACE ENGINE OIL AND OIL FILTER
  1. Remove the oil filler cap.

  1. Remove the oil pan drain plug and drain the engine oil into a container.

  1. Install a new gasket and the oil pan drain plug.

    Torque:
    40 N*m{ 408 kgf*cm , 30 ft.*lbf }


4. REPLACE ENGINE COOLANT

CAUTION:
Do not remove the radiator cap sub-assembly while the engine and radiator assembly are still hot. Pressurized, hot engine coolant and steam may be released and cause serious burns.

  1. Remove the service hole cover from the engine under cover.


    A070279E03
  1. Install a vinyl hose to the radiator drain cock on the radiator assembly side.
    Text in Illustration 
    *a
    Vinyl Hose
    *b
    Tape


  1. Fix the vinyl hose with tape.


    A307922E01


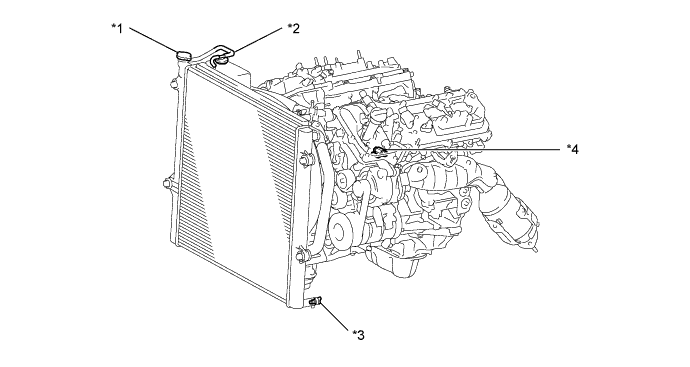
    Text in Illustration 
    *1
    Radiator Cap Sub-assembly
    *2
    Radiator Reserve Tank Cap Sub-assembly
    *3
    Radiator Drain Cock Plug
    *4
    Cylinder Block Drain Cock Plug

  1. Loosen the radiator drain cock plug.

  1. Remove the radiator cap sub-assembly and drain the engine coolant.

    HINT:
    Collect the engine coolant in a container and dispose of it according to the regulations in your area.

  1. Loosen the cylinder block drain cock plug and drain the engine coolant from the engine.

    NOTICE:
    If engine coolant is not drained from the radiator drain cock plug, cylinder block drain cock plug and radiator reservoir, clogging in the radiator assembly or engine coolant leakage from the seal of water pump may result.


5. INSPECT EXHAUST PIPES AND MOUNTINGS
  1. Visually inspect the pipes, hangers and connections for severe corrosion, leaks or damage.


6. INSPECT AIR CLEANER FILTER
  1. Remove the air cleaner case and air cleaner filter.

  1. Visually check that the air cleaner filter is not excessively damaged or oily.
    If necessary, replace the air cleaner filter with a new one.

  1. Clean the filter with compressed. First blow from the inside thoroughly, then blow off the outside of the filter.

  1. Reinstall the air cleaner filter and air cleaner case.


7. INSPECT FUEL LINES, CONNECTIONS AND FUEL TANK VAPOR VENT SYSTEM HOSES AND FUEL TANK BAND
  1. Visually inspect the fuel lines for cracks, leakage loose connections, deformation or tank band looseness.


8. INSPECT GASKET IN FUEL TANK CAP
  1. Visually check if the cap and / or gasket are deformed or damaged.
    If necessary, repair or replace the cap.


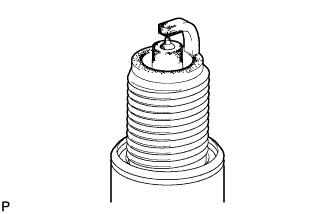
9. REPLACE SPARK PLUGS

NOTICE:
  1. Do not use a wire brush for cleaning.
  2. Do not attempt to adjust the electrode gap of a used spark plug.


    I039522E32
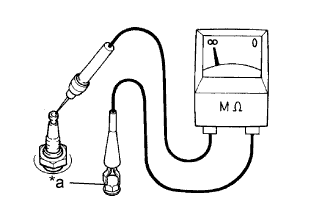
  1. Check the electrode.
    Text in Illustration 
    *a
    Ground

    1. Using a megohmmeter, measure the insulation resistance.

      Standard Insulation Resistance:
      Tester Connection
      Condition
      Specified Condition
      Spark Plug (terminal part) - Ground
      Always
      10 MΩ or higher

      HINT:
      1. If the result is not as specified, clean the spark plug with a spark plug cleaner and measure the resistance again.
      2. If a megohmmeter is not available, perform the following simple inspection instead.


  1. Alternative inspection method:

    1. Start the engine.

    2. Quickly accelerate the engine to 4000 rpm 5 times.

    3. Remove the 6 spark plugs.


    4. A126881
    5. Visually check the spark plug.
      If the electrode is dry, the spark plug is functioning properly. If the electrode is damp, proceed to the next step.

  1. Check the spark plug for any damage on its threads and insulator.
    If there is any damage, replace the spark plug.

    Recommended Spark Plug:
    Manufacturer
    Product
    DENSO made
    SK16HR11


  1. Reference:


      A227070E01
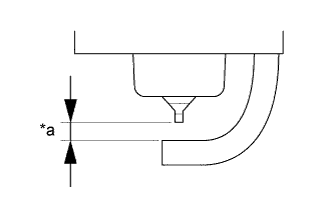
    1. Check the spark plug electrode gap.
      Text in Illustration 
      *a
      Spark Plug Electrode Gap

      Maximum electrode gap for used spark plug:
      1.3 mm (0.0512 in.)

      If the gap is more than the maximum, replace the spark plug.

      Electrode gap for new spark plug:
      1.0 to 1.1 mm (0.0394 to 0.0433 in.)

      NOTICE:
      Never attempt to adjust the electrode gap of a used spark plug.


    B062019E01
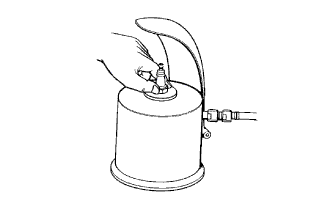
  1. Clean the spark plugs.
    If the electrode has traces of wet carbon, clean the electrode with a spark plug cleaner and then dry it.

    Standard air pressure:
    588 kPa (6 kgf/cm2, 85 psi)

    Standard duration:
    20 seconds or less

    HINT:
    Only use the spark plug cleaner when the electrode is free of oil. If the electrode has traces of oil, use gasoline to clean off the oil before using the spark plug cleaner.


10. INSPECT CHARCOAL CANISTER

HINT:
For vehicles registered in California, Massachusetts and New York only.

  1. Check the canister for cracks or damage .