 |
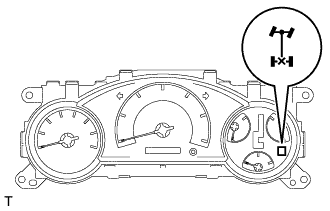
Inspect the indicator light.
Check that the indicator light lights up for approximately 1 second when the ignition switch is turned ON.
DIFFERENTIAL SYSTEM > INSPECTION |
| 1. INSPECT DIFFERENTIAL LOCK SYSTEM |
|
Inspect the indicator light.
Check that the indicator light lights up for approximately 1 second when the ignition switch is turned ON.
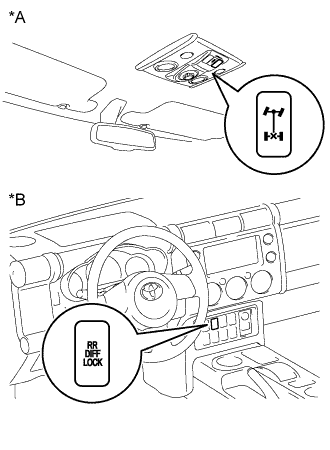 |
Inspect the differential lock operation.
| *A | w/ CRAWL |
| *B | w/o CRAWL |
Jack up the vehicle then start the engine.
Move the transfer shift lever to L. (for 4WD)
When the differential lock switch is turned on, check that the indicator light turns on. The differential lock is applied to the rear wheel at this time.
When the differential lock switch is turned off, the indicator light goes off. The differential lock is released to the rear wheel at this time.
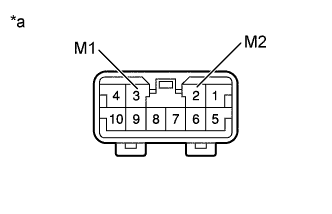 |
Check the voltage between the terminals of the four wheel drive control ECU when switching the differential control on, with the speedometer registering approximately 5 mph (8 km/h) or more.
| *a | Component with harness connected (Four Wheel Drive Control ECU) |
| Tester Connection | Switch Condition | Specified Condition |
| 3 (M1) - 2 (M2) | ON | 0.5 V or less (No change) |
Return the differential lock switch to off.
Stop the engine and lower the vehicle.
| 2. INSPECT WIRE HARNESS AND CONNECTOR |
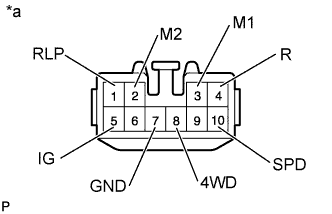 |
Inspect the system circuit with the connector disconnected.
| *a | Front view of wire harness connector (to Four Wheel Drive Control ECU) |
Inspect the connector according to the value(s) in the table below.
| Tester Connection | Condition | Specified Condition |
| 3 (M1) - 2 (M2) | Always | Less than 100 Ω |
| 7 (GND) - Body ground | Always | Below 1 Ω |
| 10 (SPD) - Body ground | Vehicle moves slowly | 1 pulse generation per 40 cm (15.75 in.) |
| 5 (IG) - Body ground | Ignition switch ON | 11 to 14 V |
| 1 (RLP) - Body ground | Ignition switch ON with indicator light ON | Approximately 0 V |
| Ignition switch ON with indicator light OFF | 11 to 14 V | |
| 8 (4WD) - Body ground | Ignition switch ON with transfer shift lever except L | Approximately 0 V |
| Ignition switch ON with transfer shift lever L | 11 to 14 V | |
| 4 (R) - Body ground | Ignition switch ON with differential lock switch ON | 11 to 14 V |
| Ignition switch ON with differential lock switch OFF | Approximately 0 V |
| 3. INSPECT FOUR WHEEL DRIVE CONTROL ECU |
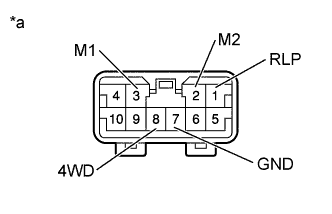 |
Inspect the system circuit with the connector connected.
| *a | Component with harness connected (Four Wheel Drive Control ECU) |
Turn the ignition switch to ON.
Move the transfer shift lever to L. (for 4WD)
Measure the voltage according to the value(s) in the table below.
| Tester Connection | Switch Condition | Specified Condition |
| 8 (4WD) - 7 (GND) | - | 0.5 V or less |
| 1 (RLP) - 7 (GND) | ON*
| 0.5 V or less |
| 2 (M2) - 3 (M1) | OFF → ON | 0.5 V or less → 11 to 14 V (Approximately 1 second) → 0.5 V or less |
| 2 (M2) - 3 (M1) | ON → OFF |
| 4. INSPECT DIFFERENTIAL LOCK COMPONENTS |
Inspect the differential lock shift actuator operation.
Jack up the vehicle.
Use a known good heater relay and connect it as shown below.
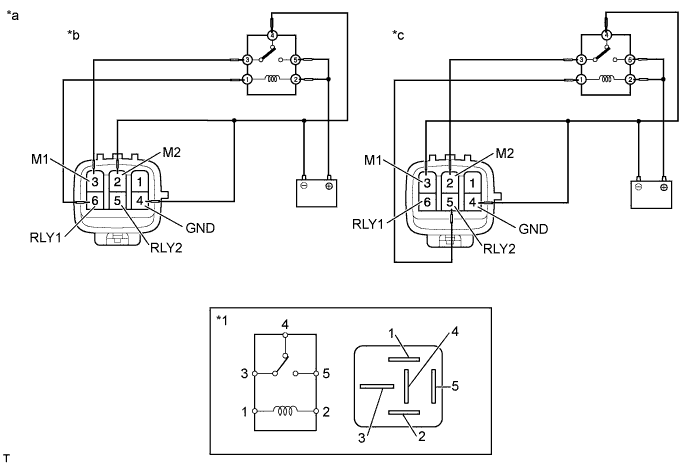
| *1 | Heater Relay | - | - |
| *a | Component without harness connected (Differential Lock Shift Actuator) | *b | Free → Lock |
| *c | Lock → Free | - | - |
Rotate the tire and check that the differential locks.
| 5. INSPECT DIFFERENTIAL LOCK SWITCH (w/ CRAWL) |
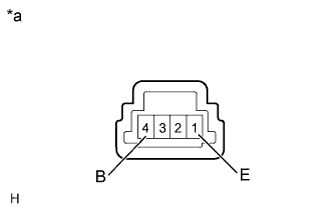 |
Measure the resistance according to the value(s) in the table below.
| *a | Component without harness connected (Differential lock switch) |
| Tester Connection | Switch Condition | Specified Condition |
| 1 (E) - 4 (B) | Pressed | Below 1 Ω |
| Not pressed | 10 kΩ or higher |
| 6. INSPECT DIFFERENTIAL LOCK SWITCH (w/o CRAWL) |
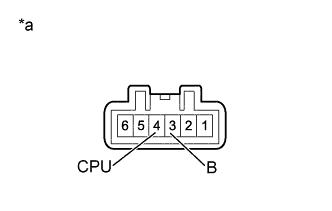 |
Measure the resistance according to the value(s) in the table below.
| *a | Component without harness connected (Differential lock switch) |
| Tester Connection | Switch Condition | Specified Condition |
| 3 (B) - 4 (CPU) | Pressed | Below 1 Ω |
| Not pressed | 10 kΩ or higher |
| 7. INSPECT REAR DIFFERENTIAL LOCK INDICATOR SWITCH |
Inspect the rear differential lock indicator switch.
Remove the rear differential lock indicator switch .
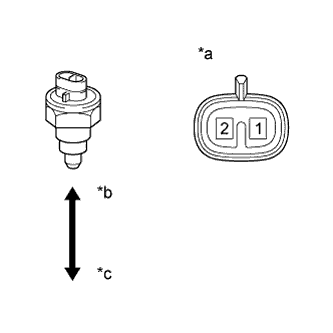 |
Measure the resistance according to the value(s) in the table below.
| *a | Component without harness connected (Rear Differential Lock Indicator Switch) |
| *b | Pushed |
| *c | Released |
| Tester Connection | Switch Condition | Specified Condition |
| 2 - 1 | Pushed | Below 1 Ω |
| Released | 10 kΩ or higher |