 |
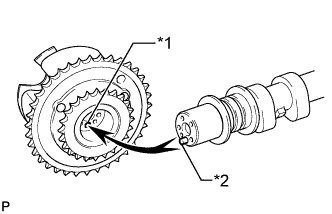
Put the camshaft timing gear assembly and camshaft together by aligning the key groove and straight pin.
| *1 | Pin Hole |
| *2 | Straight Pin |
CAMSHAFT > INSTALLATION |
| 1. INSPECT CAMSHAFT TIMING GEAR ASSEMBLY |
Fix the camshaft place.
|
Put the camshaft timing gear assembly and camshaft together by aligning the key groove and straight pin.
| *1 | Pin Hole |
| *2 | Straight Pin |
Lightly press and turn the camshaft timing gear assembly against the camshaft, and press harder after the pin enters the hole.
Check that there is no clearance between the camshaft timing gear assembly flange and the camshaft.
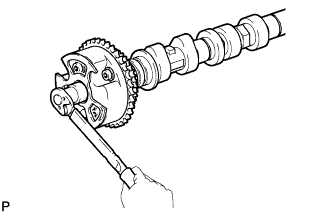 |
Tighten the flange bolt while holding the camshaft.
Check the lock of the camshaft timing gear assembly.
Fix the camshaft in place, and confirm that the camshaft timing gear assembly is locked.
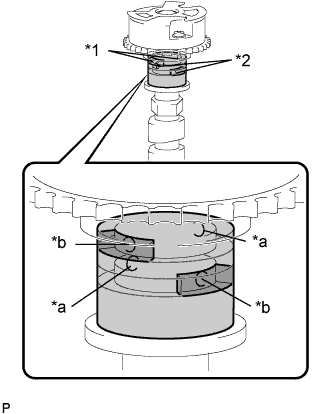 |
Release the lock pin.
| *1 | Advance Side Path |
| *2 | Retard Side Path |
| *a | Open |
| *b | Close |
 | Rubber |
 | Vinyl Tape |
Cover the 4 oil paths of the cam journal with vinyl tape as shown in the illustration.
Break through the tape on the advance side path and the retard side path on the opposite side of the hole of the advance side path, as shown in the illustration.
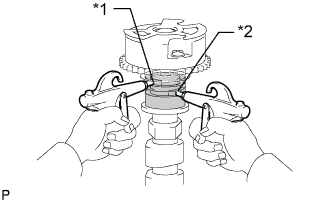 |
Apply approximately 200 kPa (2.0 kgf/cm2, 28 psi) of air pressure to the 2 opened paths.
| *1 | Advance Side Path |
| *2 | Retard Side Path |
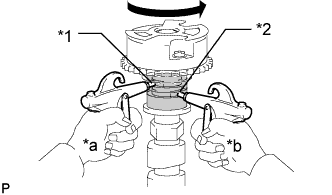 |
Check that the camshaft timing gear assembly rotates in the advance direction when reducing the air pressure applied to the retard side path.
| *1 | Advance Side Path |
| *2 | Retard Side Path |
| *a | Hold Pressure |
| *b | Decompress |
When the camshaft timing gear assembly reaches the most advanced position, release the air pressure first from the retard side path and next from advance side path.
Check for smooth rotation.
Turn the camshaft timing gear assembly within its movable range (21°) 2 or 3 times, but do not turn it to the most retarded position. Make sure that the gear turns smoothly.
Check the lock in the most retarded position.
Confirm that the camshaft timing gear assembly locks at the most retarded position.
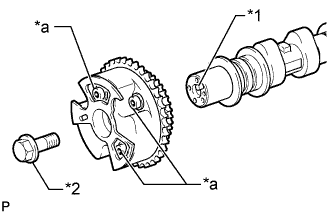 |
Remove the flange bolt and camshaft timing gear assembly.
| *1 | Straight Pin |
| *2 | Flange Bolt |
| *a | Do Not Remove |
| 2. INSPECT CAMSHAFT TIMING EXHAUST GEAR ASSEMBLY |
Fix the camshaft in place.
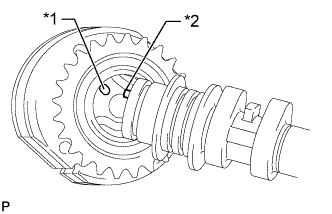 |
Put the camshaft timing exhaust gear assembly and camshaft together by aligning the key groove and straight pin.
| *1 | Pin Hole |
| *2 | Straight Pin |
Lightly press and turn the camshaft timing gear assembly against the camshaft, and press harder after the pin enters the hole.
Check that there is no clearance between the gear flange and the camshaft.
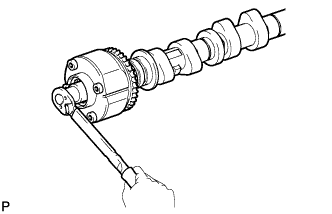 |
Tighten the flange bolt while holding the camshaft.
Check the camshaft timing exhaust gear assembly lock.
Make sure that the camshaft timing exhaust gear assembly locks.
 |
Release the lock pin.
| *1 | Advance Side Path |
| *2 | Retard Side Path |
| *a | Open |
| *b | Close |
| Rubber |
| Vinyl Tape |
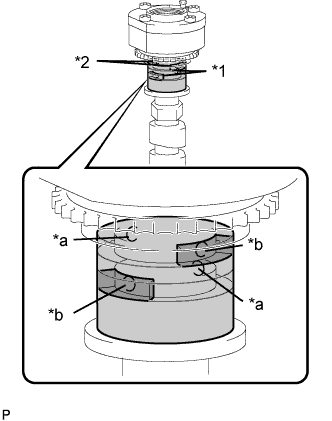
Cover the 4 oil paths of the cam journal with vinyl tape as shown in the illustration.
Break through the tape on the advance side path and the retard side path on the opposite side of the hole of the advance side path, as shown in the illustration.
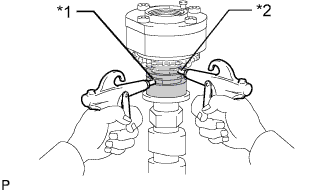 |
Apply approximately 200 kPa (2.0 kgf/cm2, 28 psi) of air pressure to the 2 opened paths (the advance side path and the retard side path).
| *1 | Advance Side Path |
| *2 | Retard Side Path |
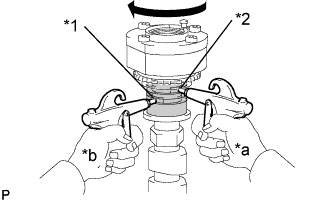 |
Make sure that the camshaft timing exhaust gear assembly rotates in the retard direction when reducing the air pressure applied to the advance side path.
| *1 | Advance Side Path |
| *2 | Retard Side Path |
| *a | Hold Pressure |
| *b | Decompress |
When the camshaft timing exhaust gear assembly moves to the most retarded position, release the air pressure first from the advance side path, and then release the air pressure from the retard side path.
Check for smooth rotation.
Turn the camshaft timing exhaust gear assembly within its movable range (18.5°) 2 or 3 times, but do not turn it to the most advanced position. Make sure that the gear assembly turns smoothly.
Check the lock at the most advanced position.
Make sure that the camshaft timing exhaust gear assembly locks at the most advanced position.
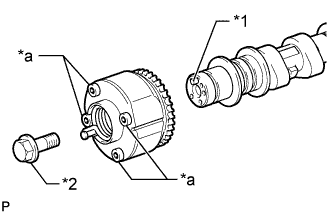 |
Remove the flange bolt and camshaft timing exhaust gear assembly.
| *1 | Straight Pin |
| *2 | Flange Bolt |
| *a | Do Not Remove |
| 3. INSTALL CAMSHAFT TIMING GEAR ASSEMBLY |
Fix the camshaft in place.
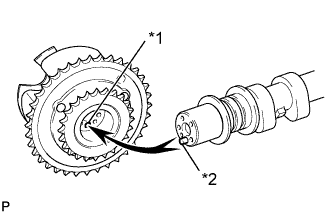 |
Put the camshaft timing gear assembly and camshaft together by aligning the pin hole and straight pin.
| *1 | Pin Hole |
| *2 | Straight Pin |
Lightly press and turn the camshaft timing gear assembly against the camshaft, and press harder after the pin enters the hole.
Check that there is no clearance between the camshaft timing gear assembly flange and the camshaft.
|
Tighten the flange bolt while holding the camshaft.
Check the lock of the camshaft timing gear assembly.
Fix the camshaft in place and confirm that the camshaft timing gear assembly is locked.
| 4. INSTALL CAMSHAFT TIMING EXHAUST GEAR ASSEMBLY |
Fix the camshaft in place.
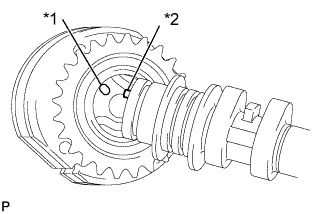 |
Put the camshaft timing exhaust gear assembly and camshaft together by aligning the pin hole and straight pin.
| *1 | Pin Hole |
| *2 | Straight Pin |
Lightly press and turn the camshaft timing gear assembly against the camshaft, and press harder after the pin enters the hole.
Check that there is no clearance between the gear flange and the camshaft.
|
Tighten the flange bolt while holding the camshaft.
Check the camshaft timing exhaust gear assembly lock.
Make sure that the camshaft timing exhaust gear assembly locks.
| 5. INSTALL NO. 3 CAMSHAFT SUB-ASSEMBLY |
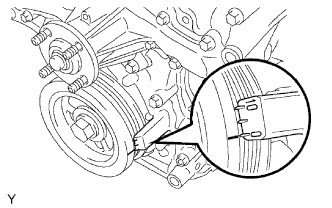 |
Check that the notch is aligned with the "0" timing mark of the timing chain cover sub-assembly.
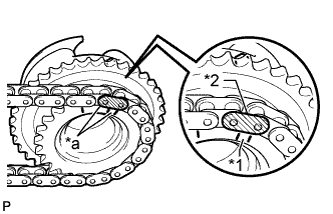 |
Align the mark plate (yellow) with the timing mark of the camshaft timing gear assembly as shown in the illustration and install the No. 2 chain sub-assembly to the camshaft timing gear assembly.
| *1 | Timing Mark |
| *2 | Mark Plate (yellow) |
| *a | Align |
Clean the camshaft housing sub-assembly LH and camshaft journals and apply engine oil to them.
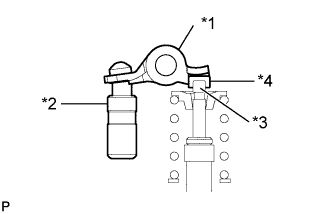 |
Make sure that the No. 1 valve rocker arm sub-assembly is installed as shown in the illustration.
| *1 | No. 1 Valve Rocker Arm Sub-assembly |
| *2 | Valve Lash Adjuster Assembly |
| *3 | Valve Stem |
| *4 | Valve Stem Cap |
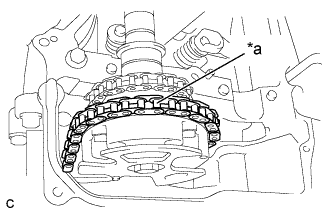 |
Install the chain sub-assembly to the No. 3 camshaft sub-assembly, and then install the camshaft to the camshaft housing sub-assembly LH.
| *a | Place on camshaft timing gear assembly |
| 6. INSTALL NO. 4 CAMSHAFT SUB-ASSEMBLY |
Clean the camshaft housing sub-assembly LH and camshaft journals and apply engine oil to them.
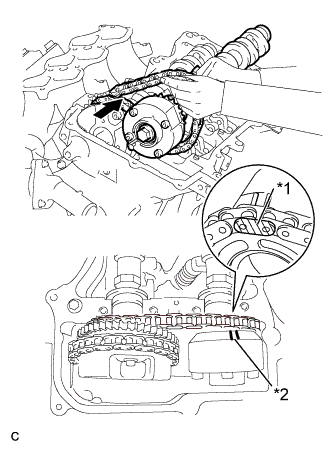 |
Pass the No. 4 camshaft sub-assembly through the No. 2 chain sub-assembly from the front of the vehicle, align the mark plate (yellow) with the timing mark and install the No. 2 chain sub-assembly to the camshaft timing exhaust gear assembly LH.
| *1 | Mark Plate (yellow) |
| *2 | Timing Mark |
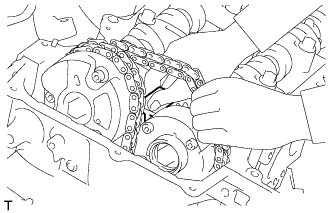 |
While lifting up the No. 4 camshaft sub-assembly, pass the No. 3 chain tensioner assembly through the No. 2 chain sub-assembly and set it in place.
Install the No. 4 camshaft sub-assembly to the camshaft housing sub-assembly LH, and then install the No. 3 chain tensioner assembly with the bolt.
| 7. INSTALL CAMSHAFT BEARING CAP (for Bank 2) |
Clean the camshaft bearing caps and apply engine oil to them.
|
Make sure that the No. 1 valve rocker arm sub-assembly is installed as shown in the illustration.
| *1 | No. 1 Valve Rocker Arm Sub-assembly |
| *2 | Valve Lash Adjuster Assembly |
| *3 | Valve Stem |
| *4 | Valve Stem Cap |
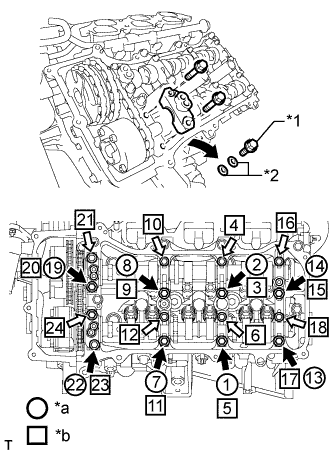 |
Check the marks and numbers on the camshaft bearing caps, and then remove the replacement bolts and washers in the order shown in the illustration. Immediately after removing the replacement bolts and washers in the location for a bearing cap, install the bearing cap with the bolts in the order shown in the illustration.
| *1 | Bolt |
| *2 | Washer |
| *a | Replacement Bolts and Washers Removal |
| *b | Part Installation |
 | Bolt A |
 | Bolt B |
Check the torque of each bolt again.
| 8. CONNECT CHAIN SUB-ASSEMBLY (for Bank 2) |
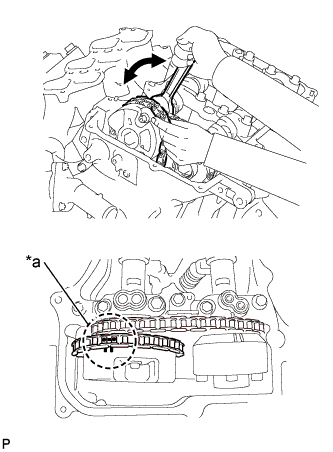 |
Align the paint marks on the camshaft timing gear sub-assembly and chain sub-assembly and install the chain sub-assembly to the camshaft timing gear assembly.
| *a | Paint Mark |
| 9. INSTALL CAMSHAFT |
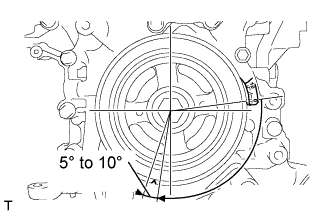 |
Turn the crankshaft clockwise until it is in the position shown in the illustration so that the chain sub-assembly can be removed easily.
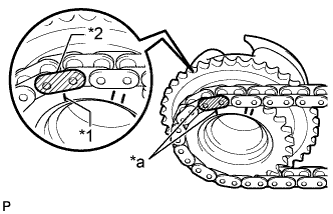 |
Align the mark plate (yellow) with the timing mark of the camshaft timing gear assembly as shown in the illustration and install the No. 2 chain to the camshaft timing gear assembly.
| *1 | Timing Mark |
| *2 | Mark Plate (yellow) |
| *a | Align |
Clean the camshaft housing sub-assembly RH and camshaft journals and apply engine oil to them.
|
Make sure that the No. 1 valve rocker arm sub-assembly is installed as shown in the illustration.
| *1 | No. 1 Valve Rocker Arm Sub-assembly |
| *2 | Valve Lash Adjuster Assembly |
| *3 | Valve Stem |
| *4 | Valve Stem Cap |
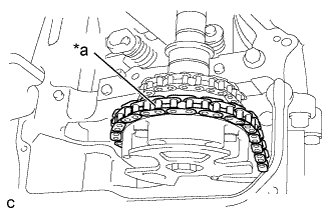 |
Install the chain sub-assembly to the camshaft, and then install the camshaft to the camshaft housing sub-assembly RH.
| *a | Place on camshaft timing gear assembly |
| 10. INSTALL NO. 2 CAMSHAFT |
Clean the camshaft housing sub-assembly RH and camshaft journals and apply engine oil to them.
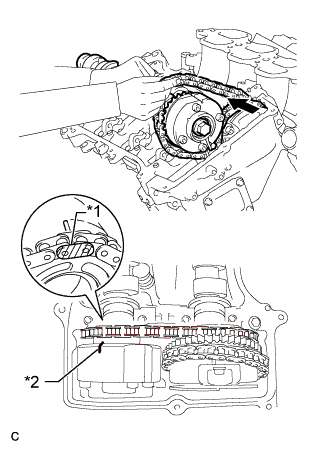 |
Pass the No. 2 camshaft through the No. 2 chain sub-assembly from the front of the vehicle, align the mark plate (yellow) with the timing mark and install the No. 2 chain sub-assembly to the camshaft timing exhaust gear assembly.
| *1 | Mark Plate (yellow) |
| *2 | Timing Mark |
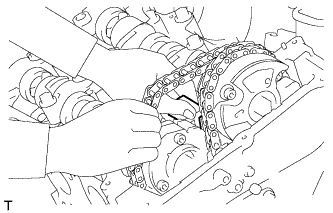 |
While lifting up the No. 2 camshaft, pass the No. 2 chain tensioner assembly through the No. 2 chain sub-assembly and set it in place.
Install the No. 2 camshaft to the camshaft housing sub-assembly RH, and then install the No. 2 chain tensioner assembly with the bolt.
| 11. INSTALL CAMSHAFT BEARING CAP (for Bank 1) |
Clean the camshaft bearing caps and apply engine oil to them.
|
Make sure that the No. 1 valve rocker arm sub-assembly is installed as shown in the illustration.
| *1 | No. 1 Valve Rocker Arm Sub-assembly |
| *2 | Valve Lash Adjuster Assembly |
| *3 | Valve Stem |
| *4 | Valve Stem Cap |
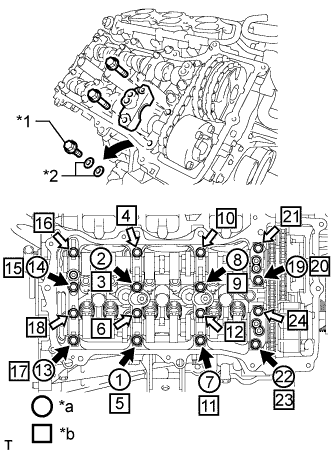 |
Check the marks and numbers on the camshaft bearing caps, and then remove the replacement bolts and washers in the order shown in the illustration. Immediately after removing the replacement bolts and washers in the location for a bearing cap, install the bearing cap with the bolts in the order shown in the illustration.
| *1 | Bolt |
| *2 | Washer |
| *a | Replacement Bolts and Washers Removal |
| *b | Part Installation |
| Bolt A |
| Bolt B |
Check the torque of each bolt again.
| 12. CONNECT CHAIN SUB-ASSEMBLY (for Bank 1) |
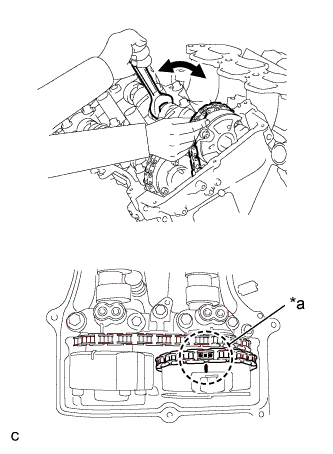 |
Align the paint marks on the camshaft timing gear assembly and chain sub-assembly and install the chain sub-assembly to the camshaft timing gear.
| *a | Paint Mark |
| 13. INSTALL NO. 1 CHAIN TENSIONER ASSEMBLY |
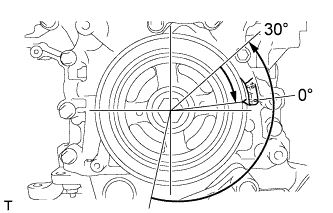 |
Turn the crankshaft counterclockwise 30° past the "0" timing mark, and then turn it clockwise to align the notch with the "0" timing mark.
Turn the crankshaft slightly to eliminate the slack in the chain sub-assembly.
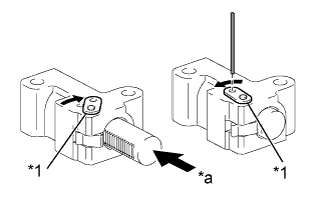 |
While turning the stopper plate of the No. 1 chain tensioner assembly clockwise, push in the plunger of the No. 1 chain tensioner assembly as shown in the illustration.
| *1 | Stopper Plate |
| *a | Push |
While turning the stopper plate of the No. 1 chain tensioner assembly counterclockwise, insert a pin of φ1.27 mm (0.0500 in.) into the holes on the stopper plate and No. 1 chain tensioner assembly to fix the stopper plate in place.
Install the No. 1 chain tensioner assembly to the cylinder head sub-assembly with the 2 bolts.
Remove the pin from the No. 1 chain tensioner.
| 14. INSPECT VALVE TIMING |
Check the camshaft timing marks.
Check that each camshaft timing mark is positioned as shown in the illustration.
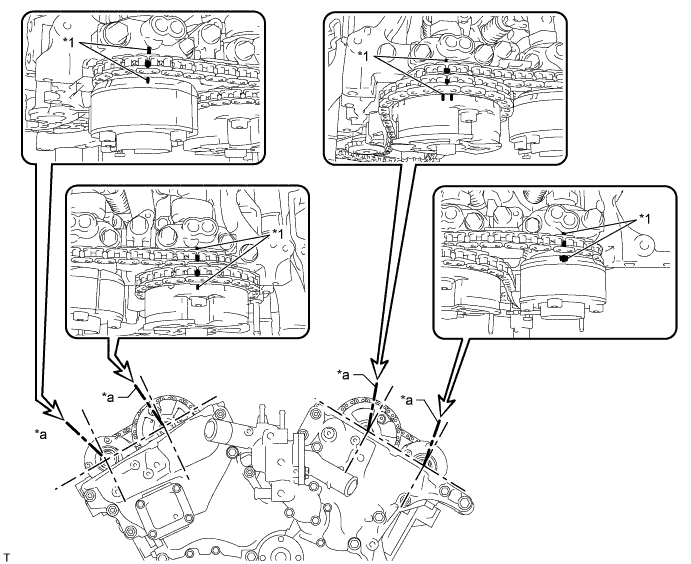
| *1 | Timing Mark | - | - |
| *a | Viewpoint | - | - |
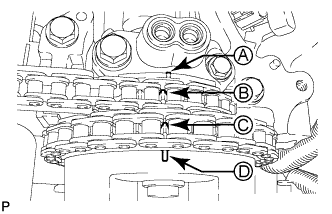 |
If the valve timing is misaligned, reinstall the timing chain sub-assembly.
Turn the crankshaft 2 revolutions, set the No. 1 cylinder to TDC/compression and check the timing marks again.
| 15. INSTALL TIMING CHAIN COVER PLATE |
Install a new gasket and the timing chain cover plate to the timing chain cover sub-assembly with the 4 bolts.
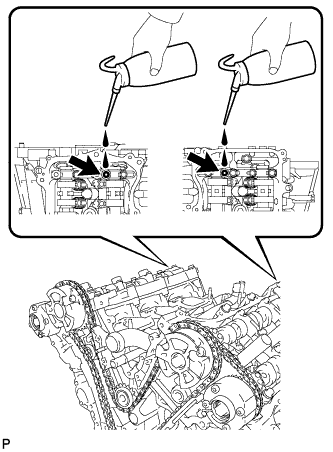
| 16. POUR ENGINE OIL |
 |
| 17. INSTALL CYLINDER HEAD COVER SUB-ASSEMBLY |
Remove any old packing (FIPG) material and be careful not to drop any oil on the contact surfaces of the cylinder head sub-assembly, timing chain cover sub-assembly or cylinder head cover sub-assembly.
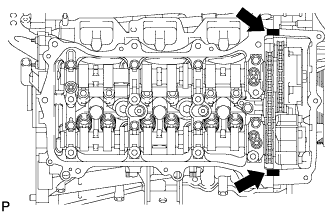 |
Apply seal packing as shown in the illustration.
| Seal Packing |
Install 3 new gaskets to the camshaft bearing cap.
Install a new gasket to the cylinder head cover sub-assembly.
Install a new seal washer to the bolt.
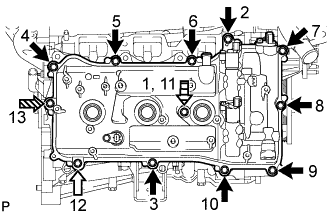 |
Temporarily install the cylinder head cover sub-assembly with the 12 bolts. Tighten the bolts uniformly in several steps.
| Bolt A |
| Bolt B |
 | Bolt C |
 | Bolt D |
| Item | Length |
| A | 25 mm (0.984 in.) |
| B | 35 mm (1.38 in.) |
| C | 65 mm (2.56 in.) |
| D | 60 mm (2.36 in.) |
| 18. INSTALL CYLINDER HEAD COVER SUB-ASSEMBLY LH |
Remove any old packing (FIPG) material and be careful not to drop any oil on the contact surfaces of the cylinder head sub-assembly, timing chain cover sub-assembly or cylinder head cover sub-assembly LH.
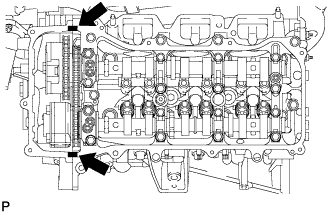 |
Apply seal packing as shown in the illustration.
| Seal Packing |
Install 3 new gaskets to the camshaft bearing cap.
Install a new gasket to the cylinder head cover sub-assembly LH.
Install a new seal washer to the bolt.
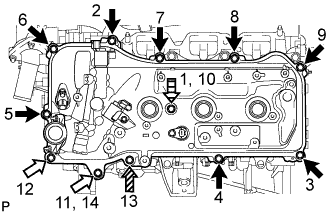 |
Temporarily install the cylinder head cover sub-assembly LH with the 12 bolts. Tighten the bolts uniformly in several steps.
| Bolt A |
| Bolt B |
| Bolt C |
| Bolt D |
| Item | Length |
| A | 25 mm (0.984 in.) |
| B | 35 mm (1.38 in.) |
| C | 70 mm (2.76 in.) |
| D | 60 mm (2.36 in.) |
| 19. CONNECT FUEL PIPE SUB-ASSEMBLY |
Connect the fuel pipe to the cylinder head cover sub-assembly LH with the 2 bolts.
| 20. INSTALL REAR CYLINDER HEAD COVER |
Temporarily install the cover with the 3 bolts.
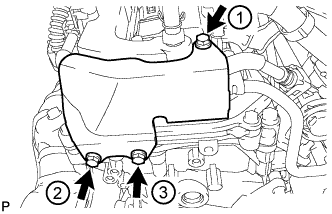 |
Tighten the 3 bolts in the sequence shown in the illustration.
| 21. INSTALL NO. 2 OIL PIPE |
Make sure that there is no foreign matter on the mesh of the oil control valve filter RH.
Install a new gasket and temporarily install the No. 2 oil pipe (on the cylinder head side) with the oil pipe union.
Install the oil control valve filter RH to the oil pipe union. Install new gaskets and temporarily install the oil pipe (on the head cover side).
Tighten the oil pipe union (on the cylinder head side).
Tighten the oil pipe union (on the head cover side).
| 22. INSTALL NO. 1 OIL PIPE |
Make sure that there is no foreign matter on the mesh of the oil control valve filter LH.
Install a new gasket and temporarily install the No. 1 oil pipe (on the cylinder head side) with the oil pipe union.
Install the oil control valve filter LH to the oil pipe union. Install new gaskets and temporarily install the oil pipe (on the head cover side).
Tighten the oil pipe union (on the cylinder head side).
Tighten the oil pipe union (on the head cover side).
| 23. INSTALL ENGINE OIL LEVEL DIPSTICK GUIDE |
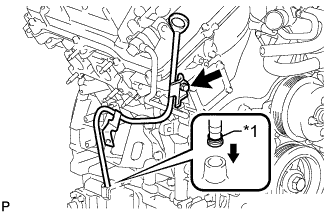 |
Install a new O-ring to the engine oil level dipstick guide.
| *1 | New O-Ring |
Apply a light coat of engine oil to the O-ring.
Push the engine oil level dipstick guide end into the guide hole.
Install the engine oil level dipstick guide to the timing chain cover sub-assembly with the bolt.
Install the engine oil level dipstick to the engine oil level dipstick guide.
| 24. INSTALL GENERATOR ASSEMBLY |
Install the generator bracket to the generator with the bolt.
Install the generator with the 2 bolts.
Install the generator bracket with the bolt.
Attach the wire harness clamp.
Install the wire harness with the 2 bolts.
Connect the generator connector to the generator.
Install the generator wire with the nut.
Close the terminal cap.
| 25. INSTALL NO. 2 EXHAUST MANIFOLD HEAT INSULATOR |
Install the No. 2 exhaust manifold heat insulator to the exhaust manifold sub-assembly LH with the 3 bolts.
| 26. INSTALL WIRING HARNESS CLAMP BRACKET |
Install the wiring harness clamp bracket with the bolt.
Connect the clamp.
| 27. INSTALL VANE PUMP ASSEMBLY |
Install the vane pump with the 2 bolts.
Connect the 2 clamps and vane pump connector.
| 28. INSTALL IGNITION COIL ASSEMBLY |
Install the 6 ignition coil assemblies to the cylinder head cover sub-assembly with the 6 bolts.
Connect the 6 ignition coil assembly connectors.
| 29. INSTALL NO. 2 EMISSION CONTROL VALVE SET (w/ Secondary Air Injection System) |
Install the No. 2 emission control valve set to the cylinder head cover sub-assembly LH with the 3 nuts.
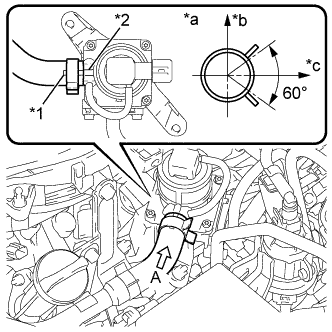 |
Connect the air hose assembly to the No. 2 emission control valve set with the hose clamp as shown in the illustration.
| *1 | Paint Mark of Air Hose Assembly |
| *2 | Protrusion of No. 2 Emission Control Valve Set |
| *a | View A |
| *b | Upper of Vehicle |
| *c | LH Side of Vehicle |
Connect the No. 2 emission control valve set connector.
| 30. INSTALL EMISSION CONTROL VALVE SET (w/ Secondary Air Injection System) |
Install the emission control valve set to the cylinder head cover sub-assembly with the 3 nuts.
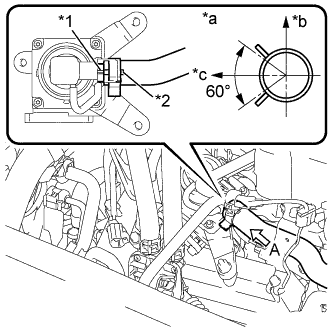 |
Connect the air hose assembly to the emission control valve set with the hose clamp as shown in the illustration.
| *1 | Protrusion of Emission Control Valve Set |
| *2 | Paint Mark of No. 1 Air Injection System Hose |
| *a | View A |
| *b | Upper of Vehicle |
| *c | RH Side of Vehicle |
Connect the emission control valve set connector.
| 31. INSTALL NO. 2 AIR TUBE (w/ Secondary Air Injection System) |
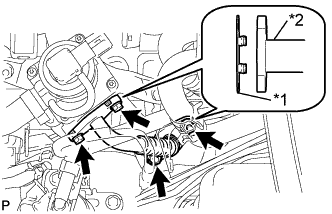 |
Install 2 new gaskets to the No. 2 air tube.
| *1 | New Gasket |
| *2 | No. 2 Air Tube |
Install the No. 2 air tube to the No. 2 emission control valve set and exhaust manifold sub-assembly LH with the 2 bolts and 2 nuts.
| 32. INSTALL AIR TUBE (w/ Secondary Air Injection System) |
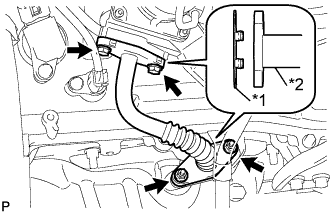 |
Install 2 new gaskets to the air tube.
| *1 | New Gasket |
| *2 | Air Tube |
Install the air tube to the emission control valve set and exhaust manifold sub-assembly RH with the 2 bolts and 2 nuts.
| 33. INSTALL INTAKE AIR SURGE TANK |
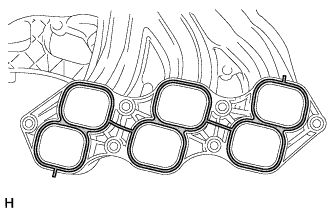 |
Install a new air surge tank to intake manifold gasket to the intake air surge tank.
Using an 8 mm socket hexagon wrench, temporarily install the intake air surge tank to the intake manifold with the 4 bolts and 2 nuts.
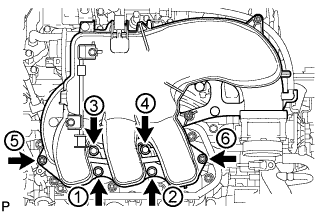 |
Using an 8 mm socket hexagon wrench, install and uniformly tighten the 4 bolts and 2 nuts in several steps in the sequence shown in the illustration.
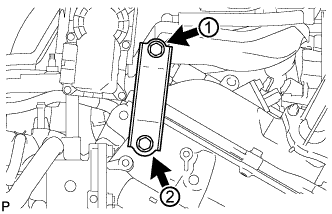 |
Install the throttle body bracket to the intake air surge tank with the 2 bolts in the order shown in the illustration.
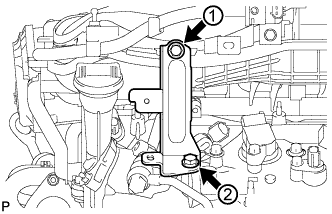 |
Install the No. 1 surge tank stay to the intake air surge tank with the 2 bolts in the order shown in the illustration.
Engage the clamp and connect the wire harness to the No. 1 surge tank stay.
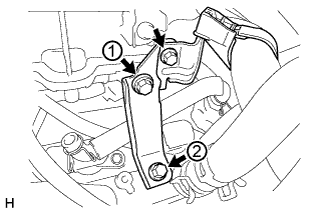 |
Install the No. 2 surge tank stay to the intake air surge tank with the 2 bolts in the order shown in the illustration.
Connect the wire harness clamp bracket to the No. 2 surge tank stay with the bolt.
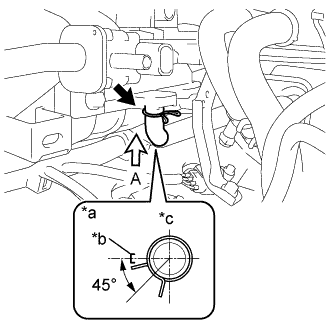 |
Connect the No. 1 ventilation hose to the intake air surge tank with the hose clip.
| *a | View A |
| *b | Hose Paint Mark |
| *c | Front of Vehicle |
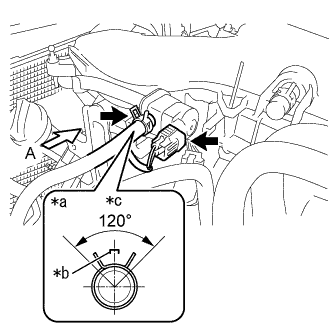 |
Connect the No. 1 fuel vapor feed hose to the vacuum switching valve with the hose clip.
| *a | View A |
| *b | Hose Paint Mark |
| *c | Upper of Vehicle |
Connect the No. 1 vacuum switching valve connector.
Connect the 2 clamps of the heater water hose to the intake air surge tank.
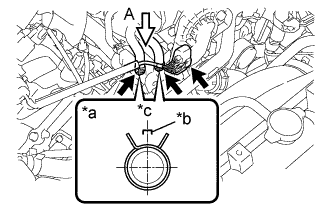 |
Connect the No. 4 water by-pass hose and No. 5 water by-pass hose to the water inlet housing with the 2 clips.
| *a | View A |
| *b | Hose Paint Mark |
| *c | Front of Vehicle |
Connect the throttle with motor body assembly connector.
| 34. INSTALL AIR HOSE ASSEMBLY (w/ Secondary Air Injection System) |
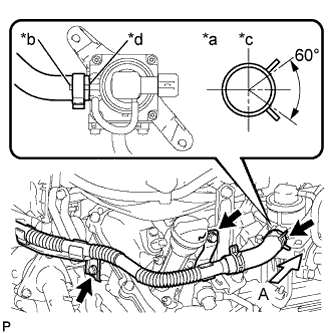 |
Install the air hose assembly to the No. 2 emission control valve set with the hose clip.
| *a | View A |
| *b | Hose Paint Mark |
| *c | Upper of Vehicle |
| *d | Protrusion of No. 2 Emission Control Valve Set |
Connect the air hose assembly to the timing chain cover sub-assembly and No. 1 surge tank stay with the 2 bolts.
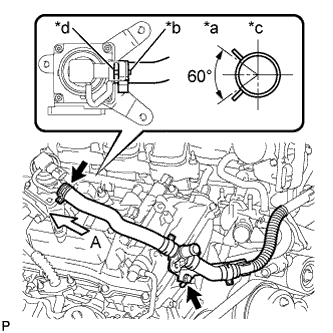 |
Connect the air hose assembly to the No. 1 emission control valve set with the hose clip.
| *a | View A |
| *b | Hose Paint Mark |
| *c | Upper of Vehicle |
| *d | Protrusion of No. 1 Emission Control Valve Set |
Connect the air hose assembly to the timing chain cover sub-assembly with the bolt.
| 35. CONNECT NO. 1 AIR INJECTION SYSTEM HOSE (w/ Secondary Air Injection System) |
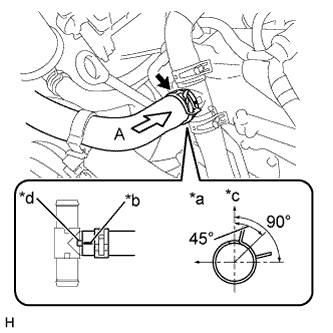 |
Connect the No. 1 air injection system hose to the air hose assembly with the hose clip.
| *a | View A |
| *b | Hose Paint Mark |
| *c | Upper of Vehicle |
| *d | Protrusion of Air Hose Assembly |
| 36. INSTALL FAN SHROUD |
Install the fan pulley to the engine water pump assembly.
Place the fan shroud together with the fan and fluid coupling assembly between the radiator assembly and engine.
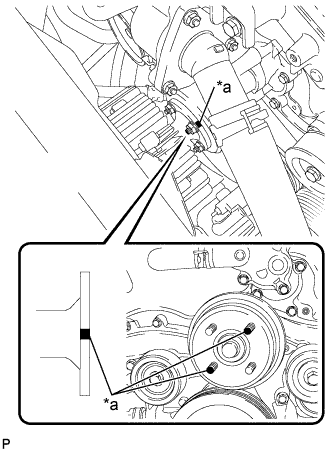 |
Align the paint marks of the same color (pink to pink and black to black) on the stud bolts of the engine water pump assembly and the outer flange of the fan and fluid coupling assembly, and assemble the parts.
| *a | Paint Mark |
Temporarily install the fan and fluid coupling assembly to the engine water pump assembly with the 4 nuts. Tighten the nuts as much as possible by hand.
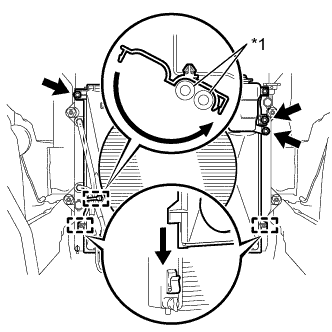 |
Engage the 2 guides of the fan shroud to the radiator assembly as shown in the illustration.
Install the fan shroud to the radiator assembly with the 2 bolts.
Install the radiator reserve tank assembly to the radiator assembly with the bolt.
Connect the 2 oil cooler hoses to the hose clamp and engage the clamp.
| *1 | Oil Cooler Hose |
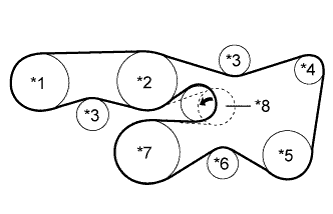 |
Set the fan and generator V belt onto every part.
| *1 | Vane Pump Assembly |
| *2 | Engine Water Pump Assembly |
| *3 | No. 2 Idler Pulley Sub-Assembly |
| *4 | Generator Assembly |
| *5 | Cooler Compressor Assembly |
| *6 | No. 1 Idler Pulley Sub-Assembly |
| *7 | Crankshaft Pulley |
| *8 | V-ribbed Belt Tensioner Assembly |
While turning the V-ribbed belt tensioner assembly counterclockwise, remove the pin.
Check that the belt fits properly in the ribbed grooves.
Tighten the 4 nuts of the fan and fluid coupling assembly.
Connect the radiator reserve tank hose to the radiator assembly.
| 37. INSTALL UPPER RADIATOR SUPPORT SEAL |
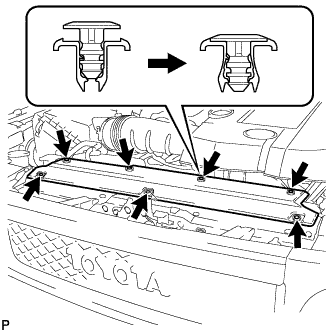 |
Engage the 7 clips and install the upper radiator support seal to the fan shroud.
| 38. INSTALL AIR CLEANER CASE SUB-ASSEMBLY |
Install the air cleaner case sub-assembly with the 3 bolts.
| 39. INSTALL AIR CLEANER FILTER ELEMENT SUB-ASSEMBLY |
Install the air cleaner filter element sub-assembly to the air cleaner case sub-assembly.
| 40. INSTALL AIR CLEANER CAP AND HOSE |
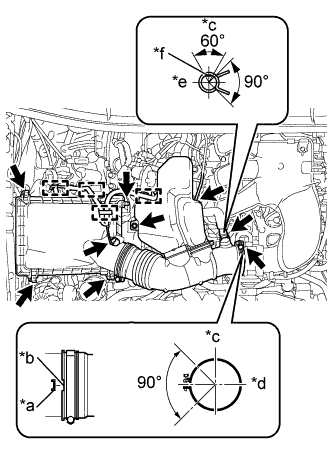 |
Install the air cleaner cap with the 4 hinges.
Install the No. 1 air cleaner hose with the clamp.
| *a | Protrusion |
| *b | Groove |
| *c | Top |
| *d | Front |
| *e | RH |
| *f | Paint mark of the hose |
Install the bolt.
Connect the ventilation hose and vacuum hose.
Engage the 4 wire harness clamps.
Connect the MAF meter connector.
| 41. INSTALL BATTERY TRAY |
| 42. INSTALL BATTERY |
| 43. INSTALL BATTERY HOLD DOWN CLAMP |
Install the battery hold down clamp and tighten the 2 nuts.
| 44. CONNECT CABLE TO NEGATIVE BATTERY TERMINAL |
| 45. ADD ENGINE COOLANT |
Tighten the cylinder block drain cock plug.
Tighten the radiator drain cock plug by hand.
Remove the vinyl hose from the radiator drain cock of the radiator assembly.
Add engine coolant.
| Item | Specified Condition |
| for Automatic Transmission | 9.8 liters (10.4 US qts, 8.6 Imp. qts) |
| for Manual Transmission | 9.4 liters (9.9 US qts, 8.3 Imp. qts) |
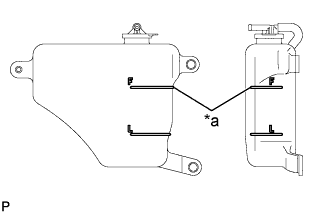 |
Slowly pour engine coolant into the radiator reservoir until it reaches the Full line.
| *a | Full Line |
Install the radiator reserve tank cap sub-assembly.
Install the radiator cap sub-assembly.*1
Start the engine and stop it immediately.*2
Allow approximately 10 seconds to pass, and then remove the radiator cap sub-assembly and check the engine coolant level. If the engine coolant level has decreased, add engine coolant.*3
Repeat steps *1, *2 and *3 until the engine coolant level does not decrease.
Install the radiator cap sub-assembly.*4
Set the air conditioning as follows.*5
| Item | Condition |
| Fan speed | Any setting except off |
| Temperature | Toward WARM |
| Air conditioning switch | Off |
Start the engine, warm it up until the thermostat opens, and then continue to run the engine for several minutes to circulate the engine coolant.*6
Stop the engine, wait until the engine coolant cools down to ambient temperature, and then remove the radiator cap sub-assembly and check the engine coolant level.*7
If the engine coolant level has decreased, add engine coolant and warm up the engine until the thermostat opens.*8
|
If the engine coolant level has not decreased, check that the engine coolant level in the radiator reservoir is at the Full line.
If the engine coolant level is below the Full line, repeat steps *4 through *8.
If the engine coolant level is above the Full line, drain engine coolant until the engine coolant level reaches the Full line.
| *a | Full Line |
Install the service hole cover to the engine under cover.
| 46. ADD ENGINE OIL |
Add fresh oil.
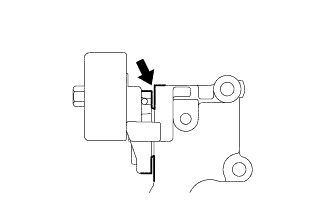 |
| Oil grade | Oil Viscosity (SAE) |
| ILSAC GF-5 multigrade engine oil | 0W-20 |
| Oil grade | Oil Viscosity (SAE) |
| API grade SL "Energy- Conserving", SM "Energy- Conserving", SN "Resource-Conserving", or ILSAC multigrade engine oil | 0W-20 5W-20 5W-30 10W-30 |
| API grade SL, SM or SN multigrade engine oil | 15W-40 20W-50 |
| Item | Specified Condition |
| Drain and refill without oil filter change | 5.7 liters (6.0 US qts, 5.0 Imp. qts) |
| Drain and refill with oil filter change | 6.1 liters (6.4 US qts, 5.4 Imp. qts) |
| Dry fill | 6.9 liters (7.3 US qts, 6.1 Imp. qts) |
Install the oil filler cap.
| 47. INSPECT FOR COOLANT LEAK |
Fill the radiator with engine coolant, and then attach a radiator cap tester.
Warm up the engine.
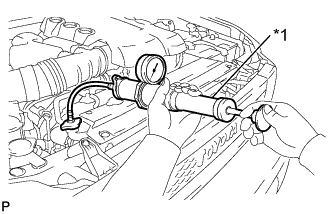 |
Using the radiator cap tester, increase the pressure inside the radiator to 123 kPa (1.3 kgf/cm2, 18 psi), and then check that the pressure does not drop.
If the pressure drops, check the hoses, radiator and water pump for leakage. If there are no signs or traces of external engine coolant leakage, check the heater core, cylinder block and head.
| *1 | Radiator Cap Tester |
| 48. INSPECT FOR ENGINE OIL LEAK |
Start the engine. Make sure that there are no oil leaks from the area that was worked on.
| 49. INSTALL V-BANK COVER |
Engage the 2 hooks and install the V-bank cover to the No. 1 V-bank cover bracket.
Align the 2 V-bank cover grommets with the 2 pins and press down on the V-bank cover to engage the pins.
| 50. INSTALL FRONT FENDER APRON SEAL LH |
Install the front fender apron seal LH to the front fender apron sub-assembly LH with the 5 clips.
| 51. INSTALL NO. 1 ENGINE UNDER COVER SUB-ASSEMBLY |
Hook the No. 1 engine under cover sub-assembly to the frame.
Install the 4 bolts to the No. 1 engine under cover sub-assembly.
| 52. INSPECT IGNITION TIMING |
Warm up the engine.
When using the intelligent tester:
Connect the intelligent tester to the DLC3.
Enter the following menus: Powertrain / Engine and ECT / Data List / All Data / IGN Advance.
Inspect the ignition timing during idling.
Check that the ignition timing advances immediately when the engine speed is increased.
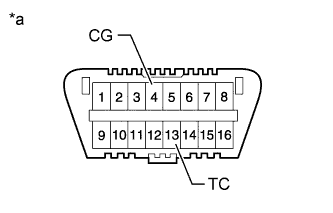 |
When not using the intelligent tester:
| *a | Front view of DLC3: |
Using SST, connect terminals 13 (TC) and 4 (CG) of the DLC3.
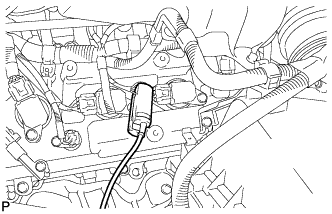 |
Connect the tester probe of a timing light to the wire of the ignition coil connector for the No. 1 cylinder.
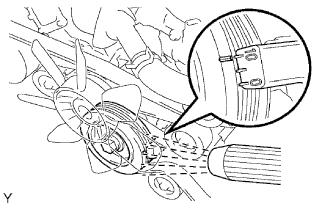 |
Inspect the ignition timing during idling.
Remove SST from the DLC3.
Inspect the ignition timing during idling.
Disconnect the timing light from the engine.