 |
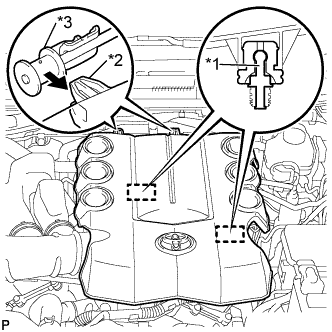
Raise the front of the V-bank cover to disengage the 2 pins.
| *1 | Pin |
| *2 | Hook |
| *3 | No. 1 V-bank Cover Bracket |
EXHAUST MANIFOLD > REMOVAL |
| 1. REMOVE V-BANK COVER |
|
Raise the front of the V-bank cover to disengage the 2 pins.
| *1 | Pin |
| *2 | Hook |
| *3 | No. 1 V-bank Cover Bracket |
Disengage the 2 hooks and remove the V-bank cover from the No. 1 V-bank cover bracket.
| 2. REMOVE AIR CLEANER CAP SUB-ASSEMBLY AND AIR CLEANER HOSE ASSEMBLY |
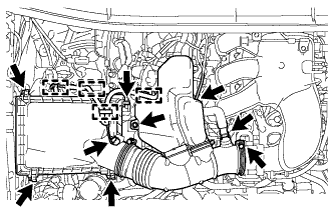 |
Disconnect the MAF meter connector.
Disengage the 4 wire harness clamps.
Disconnect the ventilation hose and vacuum hose.
Remove the bolt.
Loosen the No. 1 air cleaner hose clamp.
Release the 4 hinges.
Remove the air cleaner cap and hose.
| 3. REMOVE AIR CLEANER FILTER ELEMENT SUB-ASSEMBLY |
Remove the air cleaner filter element sub-assembly from the air cleaner case sub-assembly.
| 4. REMOVE AIR CLEANER CASE SUB-ASSEMBLY |
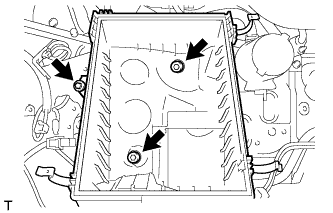 |
Remove the 3 bolts and the air cleaner case sub-assembly.
| 5. REMOVE FRONT FENDER APRON SEAL LH |
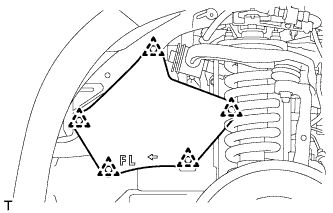 |
Remove the 5 clips and front fender apron seal LH from the front fender apron sub-assembly LH.
| 6. REMOVE FRONT FENDER REAR SPLASH SHIELD LH |
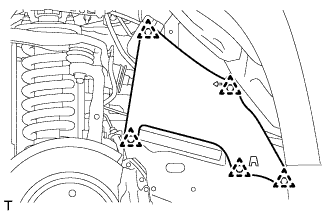 |
Remove the 5 clips and front fender rear splash shield LH from the front fender apron sub-assembly LH.
| 7. REMOVE FRONT FENDER APRON SEAL RH |
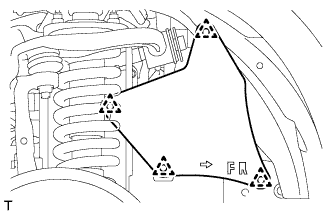 |
Remove the 4 clips and front fender apron seal RH from the front fender apron sub-assembly RH.
| 8. REMOVE FRONT FENDER REAR SPLASH SHIELD RH |
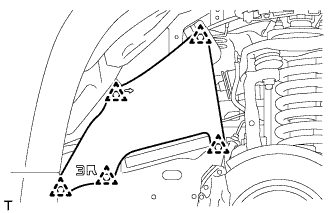 |
Remove the 5 clips and front fender rear splash shield RH from the front fender apron sub-assembly RH.
| 9. REMOVE EXHAUST PIPE STOPPER BRACKET (for 4WD) |
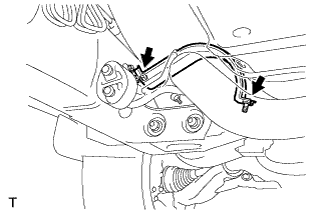 |
Remove the 2 bolts and exhaust pipe stopper bracket from the frame sub-assembly.
| 10. REMOVE FRONT NO. 2 EXHAUST PIPE ASSEMBLY |
Disconnect the heated oxygen sensor connector.
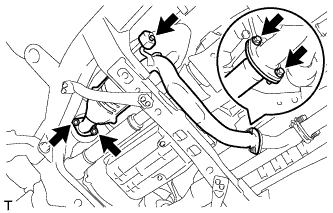 |
Remove the 2 bolts and disconnect the front No. 2 exhaust pipe assembly from the front exhaust pipe assembly.
Remove the 2 nuts and disconnect the front No. 2 exhaust pipe assembly from the exhaust manifold sub-assembly LH.
Disconnect the exhaust pipe support and remove the front No. 2 exhaust pipe assembly.
Remove the 2 gaskets from the front No. 2 exhaust pipe assembly.
| 11. REMOVE FRONT EXHAUST PIPE ASSEMBLY |
Disconnect the heated oxygen sensor connector.
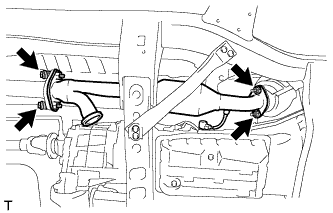 |
Remove the 2 bolts and 2 compression springs and disconnect the front exhaust pipe assembly from the center exhaust pipe assembly.
Remove the 2 nuts and front exhaust pipe assembly from the exhaust manifold sub-assembly RH.
Remove the 2 gaskets from the front exhaust pipe assembly.
| 12. REMOVE MANIFOLD STAY |
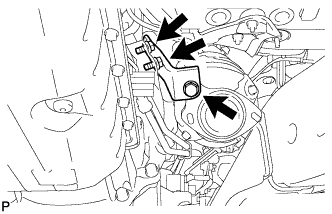 |
Remove the 3 bolts and manifold stay from the exhaust manifold sub-assembly RH.
| 13. REMOVE NO. 1 EXHAUST MANIFOLD HEAT INSULATOR |
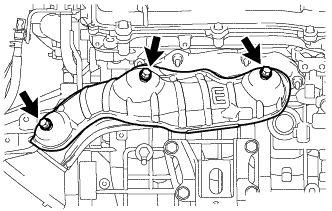 |
Remove the 3 bolts and No. 1 exhaust manifold heat insulator from the exhaust manifold sub-assembly RH.
| 14. REMOVE AIR TUBE (w/ Secondary Air Injection System) |
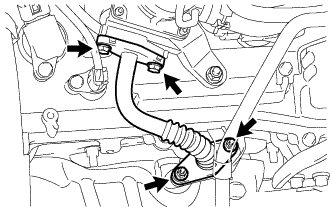 |
Remove the 2 bolts, 2 nuts and the air tube from the emission control valve set and exhaust manifold sub-assembly RH.
Remove the 2 gaskets from the air tube.
| 15. REMOVE EXHAUST MANIFOLD SUB-ASSEMBLY RH (w/ Secondary Air Injection System) |
Disconnect the air fuel ratio sensor connector.
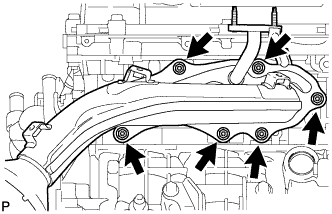 |
Remove the 6 nuts and exhaust manifold sub-assembly RH from the cylinder head sub-assembly.
| 16. REMOVE EXHAUST MANIFOLD SUB-ASSEMBLY RH (w/o Secondary Air Injection System) |
Disconnect the air fuel ratio sensor connector.
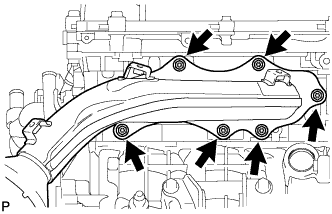 |
Remove the 6 nuts and exhaust manifold sub-assembly RH from the cylinder head sub-assembly.
| 17. REMOVE EXHAUST MANIFOLD TO HEAD GASKET RH |
Remove the exhaust manifold to head gasket RH from the cylinder head sub-assembly.
| 18. REMOVE AIR FUEL RATIO SENSOR (for Bank 1 Sensor 1) |
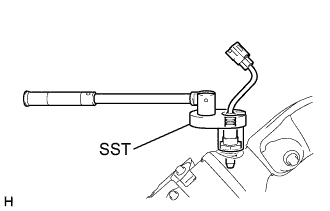 |
Using SST, remove the air fuel ratio sensor from the exhaust manifold sub-assembly RH.
| 19. REMOVE NO. 2 MANIFOLD STAY |
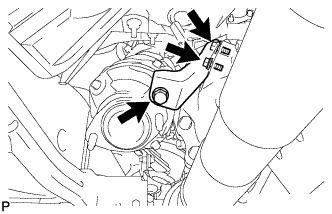 |
Remove the 3 bolts and No. 2 manifold stay from the exhaust manifold sub-assembly LH.
| 20. REMOVE NO. 2 EXHAUST MANIFOLD HEAT INSULATOR |
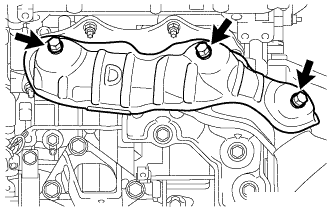 |
Remove the 3 bolts and No. 2 exhaust manifold heat insulator from the exhaust manifold sub-assembly LH.
| 21. REMOVE NO. 2 AIR TUBE (w/ Secondary Air Injection System) |
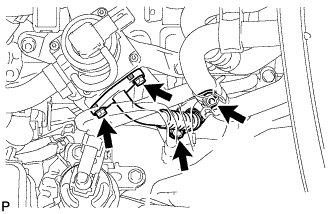 |
Remove the 2 bolts, 2 nuts and the No. 2 air tube from the No. 2 emission control valve set and exhaust manifold sub-assembly LH.
Remove the 2 gaskets from the No. 2 air tube.
| 22. REMOVE EXHAUST MANIFOLD SUB-ASSEMBLY LH (w/ Secondary Air Injection System) |
Disconnect the air fuel ratio sensor connector.
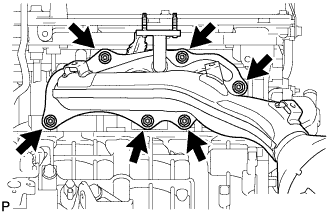 |
Remove the 6 nuts and exhaust manifold sub-assembly LH from the cylinder head sub-assembly.
| 23. REMOVE EXHAUST MANIFOLD SUB-ASSEMBLY LH (w/o Secondary Air Injection System) |
Disconnect the air fuel ratio sensor connector.
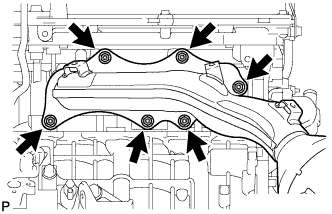 |
Remove the 6 nuts and exhaust manifold sub-assembly LH from the cylinder head sub-assembly.
| 24. REMOVE EXHAUST MANIFOLD TO HEAD GASKET LH |
Remove the exhaust manifold to head gasket LH from the cylinder head sub-assembly.
| 25. REMOVE AIR FUEL RATIO SENSOR (for Bank 2 Sensor 1) |
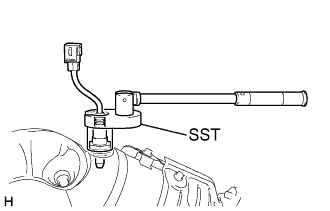 |
Using SST, remove the air fuel ratio sensor from the exhaust manifold sub-assembly LH.
| 26. REMOVE STUD BOLT (w/ Secondary Air Injection System) |
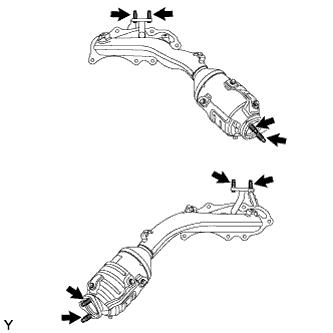 |
Using "Torx" socket wrench E6 and E10, remove the 8 stud bolts from the exhaust manifold sub-assembly RH and LH.
| 27. REMOVE STUD BOLT (w/o Secondary Air Injection System) |
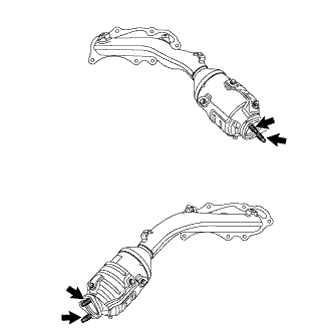 |
Using "Torx" socket wrench E10, remove the 4 stud bolts from the exhaust manifold sub-assembly RH and LH.