Home › TRANSMISSION ยท R351 MANUAL TRANSMISSION › 2KD-FTV MANUAL TRANSMISSION ASSEMBLY

2KD-FTV MANUAL TRANSMISSION ASSEMBLY > INSTALLATION

for Preparation Click here


1. INSTALL REAR ENGINE MOUNTING INSULATOR ASSEMBLY


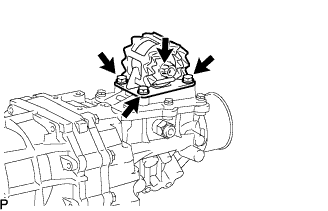
    C103476
  1. Install the rear engine mounting insulator assembly with the 4 bolts.

    Torque:
    29 N*m{ 296 kgf*cm , 21 ft.*lbf }


2. INSTALL MANUAL TRANSMISSION UNIT ASSEMBLY


    C102610E01
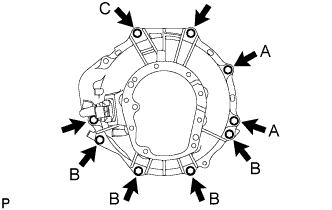
  1. Install the manual transmission unit assembly with the 9 bolts.
    Torque:
    72 N*m{ 729 kgf*cm , 53 ft.*lbf }

    HINT:
    1. The A bolts in the illustration tighten the control cable bracket together.
    1. The B bolts in the illustration tighten the rear end plate together.
    1. Bolt C in the illustration tightens the harness clamp bracket together.


    C102222
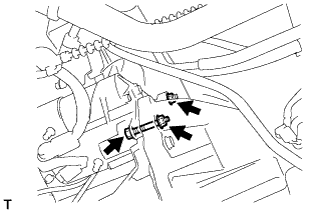
  1. Install the transmission unit assembly to the frame with the bolt, nut, and 2 washers.

    Torque:
    98 N*m{ 999 kgf*cm , 72 ft.*lbf }

    NOTICE:
    1. Insert the bolt from the left side of the vehicle.
    2. Tighten the nut while holding the bolt.


3. INSTALL STARTER ASSEMBLY (for 2.0kW Type)


    A115883E01
  1. Install the starter with the bolt and 2 nuts.
    Torque:
    68 N*m{ 693 kgf*cm , 50 ft.*lbf }


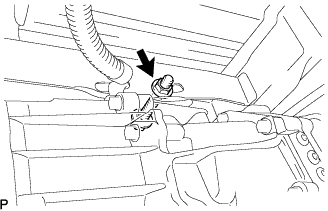
    A115882E01
  1. Connect the wire harness to terminal 30 and install the nut.

    Torque:
    9.8 N*m{ 100 kgf*cm , 87 in.*lbf }

  1. Close the terminal cap.

  1. Connect the terminal 50 connector to the starter assembly.
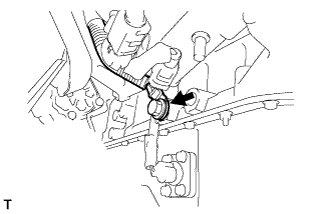


    A113410E01
  1. Install the ground cable with the bolt.

    Torque:
    25 N*m{ 250 kgf*cm , 18 ft.*lbf }


4. INSTALL STARTER ASSEMBLY (for 2.7kW Type)


    A115883E01
  1. Install the starter with the bolt and 2 nuts.

    Torque:
    68 N*m{ 693 kgf*cm , 50 ft.*lbf }


    A115882E01
  1. Connect the wire harness to terminal 30 and install the nut.

    Torque:
    21 N*m{ 215 kgf*cm , 16 ft.*lbf }

  1. Close the terminal cap.

  1. Connect the terminal 50 connector to the starter assembly.


    A113410E01
  1. Install the wire ground cable with the bolt.

    Torque:
    25 N*m{ 250 kgf*cm , 18 ft.*lbf }


5. INSTALL CLUTCH RELEASE CYLINDER ASSEMBLY


    C102217
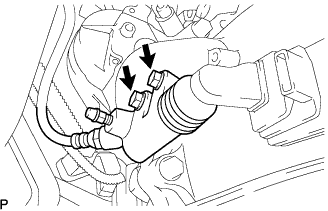
  1. Install the clutch release cylinder with the 2 bolts.

    Torque:
    12 N*m{ 120 kgf*cm , 9 ft.*lbf }


6. INSTALL WIRE HARNESS


    C112961
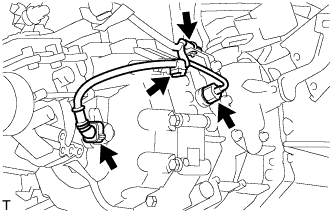
  1. Connect the 2 connectors and clamps.


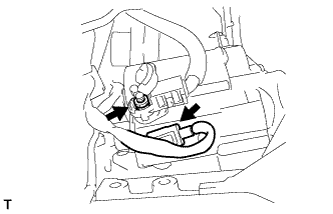
    C103903
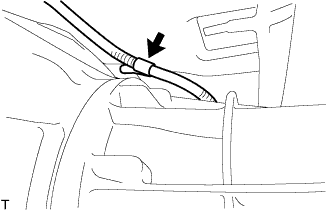
  1. Install the wire harness clamp to the manual transmission.

  1. Install the ground cable with the 2 bolts.

    Torque:
    13 N*m{ 130 kgf*cm , 10 ft.*lbf }


7. INSTALL TRANSMISSION CONTROL CABLE ASSEMBLY


    C102659E01
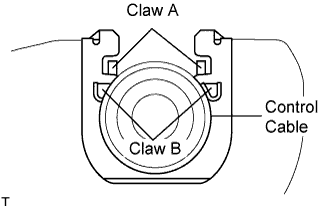
  1. Install 2 new clips to the transmission control cable bracket No.1.

  1. Install the transmission control cable assembly to the transmission control cable bracket No.1.

    NOTICE:
    1. Be sure that A claws of the clips are firmly engaged into the bracket grooves.
    2. Be sure the cable is set in the clip with both B claws erected to prevent slippage of the cable in the opposite direction.

  1. Align the matchmarks on the control cable assembly and the outer lever.
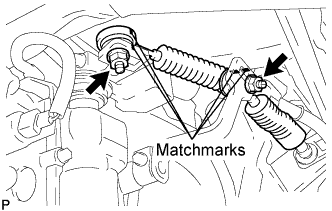


    C102206E01
  1. Install the transmission control cable assembly to the outer levers with the 2 nuts.

    Torque:
    37 N*m{ 377 kgf*cm , 27 ft.*lbf }


8. INSTALL PROPELLER SHAFT ASSEMBLY (for Long Wheelbase)


    C102186E01
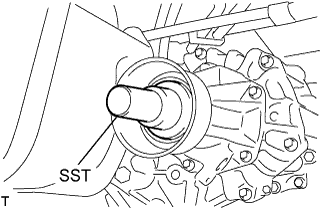
  1. Remove the SST from the extension housing.

  1. Install the propeller shaft assembly in the extension housing.

  1. Align the matchmarks on the propeller shaft flange and differential flange.
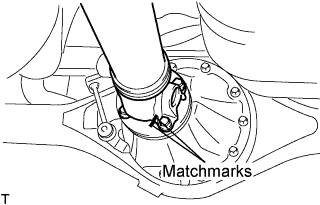


    C102185E01
  1. Install the propeller shaft assembly with the 4 nuts, 4 bolts and 4 washers.

    Torque:
    74 N*m{ 755 kgf*cm , 54 ft.*lbf }


9. INSTALL PROPELLER WITH CENTER BEARING SHAFT ASSEMBLY (for Super Long Wheelbase)


    C102186E01
  1. Remove the SST from the extension housing.

  1. Install the propeller with center bearing shaft assembly in the extension housing.
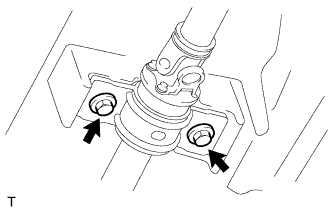


    C107214
  1. Install the center support bearing assembly No.1, and temporarily tighten the 2 bolts.


    C102185E01
  1. Align the matchmarks on the propeller shaft flange and differential flange.

  1. Install the propeller shaft assy with the 4 nuts, 4 bolts and 4 washers.
    Torque:
    74 N*m{ 755 kgf*cm , 54 ft.*lbf }


    C107213E01
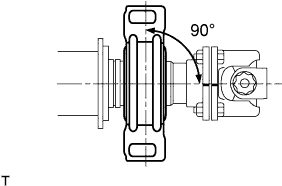
  1. Check that the center line of the bracket is at right angles to the shaft axial direction.


    C115777E01
  1. Adjust the center support bearing assembly No.1.

    HINT:
    1. With the vehicle unladen, adjust the center support bearing No.1 to maintain the angles, as shown.
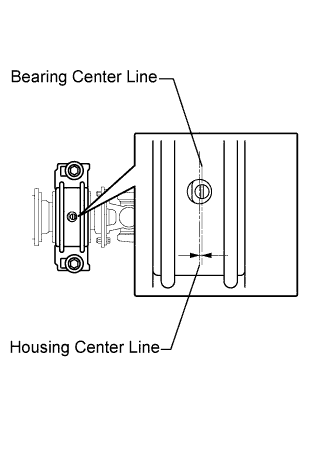
    2. In the same conditions, check the center line in the axial direction. Adjust the bearing if necessary.
    3. The center bearing center line and center bearing housing center line must be adjusted to within -1.0 to 1.0 mm (-0.0394 to 0.0394 in.) of each other in the vehicle's longitudinal direction with the vehicle unladen.

  1. Tighten the 2 bolts.

    Torque:
    36 N*m{ 369 kgf*cm , 27 ft.*lbf }


10. INSTALL EXHAUST PIPE ASSEMBLY FRONT (for Long Wheelbase)


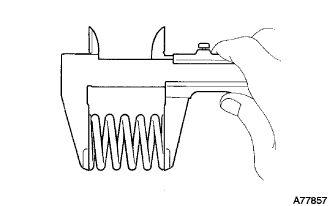
  1. Inspect the compression spring.


      A077857
    1. Using vernier calipers, measure the free length of the compression springs.
      Minimum length:
      40.5mm (1.594 in.)

      HINT:
      If the free length is less than the minimum, replace the compression spring.


    A102062E03
  1. Install the gasket.

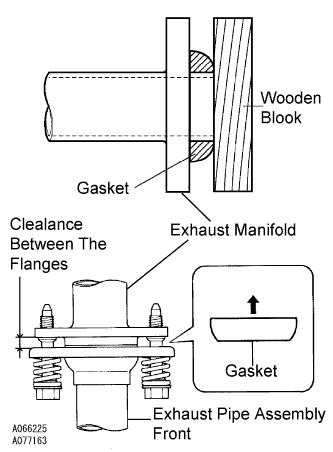
    1. Fully insert a new gasket to the exhaust manifold by hand.

    2. Using a wooden block, uniformly strike the gasket so that the gasket and exhaust manifold are properly fit.

      NOTICE:
      1. Be careful with the installation direction of the gasket.
      2. Do not reuse the gasket.
      3. Do not damage the gasket.
      4. To ensure a proper seal, do not use the exhaust pipe assembly front to force the gasket onto the front exhaust manifold.

  1. Connect the exhaust pipe support, and install the exhaust pipe assembly front with the 4 bolts, 2 compression springs and 2 nuts.

    Torque:
    exhaust manifold side:
    43 N*m{ 438 kgf*cm , 32 ft.*lbf }
    exhaust pipe assembly front side:
    48 N*m{ 489 kgf*cm , 35 ft.*lbf }

    NOTICE:
    After installation, check that the clearance is almost same at any point between the flanges of the exhaust manifold and exhaust pipe assembly front.


11. INSTALL EXHAUST PIPE ASSEMBLY FRONT (for Super Long Wheelbase)


  1. Inspect the compression spring.


      A077857
    1. Using vernier calipers, measure the free length of the compression springs.

      Minimum length:
      40.5mm(1.594 in.)

      HINT:
      If the free length is less than the minimum, replace the compression spring.


    A102062E03
  1. Install the gasket.

    1. Fully insert a new gasket to the exhaust manifold by hand.

    2. Using a wooden block, uniformly strike the gasket so that the gasket and exhaust manifold are properly fit.

      NOTICE:
      1. Be careful with the installation direction of the gasket.
      2. Do not reuse the gasket.
      3. Do not damage the gasket.
      4. To ensure a proper seal, do not use the exhaust pipe assembly front to force the gasket onto the front exhaust manifold.

  1. Connect the exhaust pipe support, and install the exhaust pipe assembly front and a new gasket with the 4 bolts, 2 compression springs and 2nuts.

    Torque:
    Exhaust manifold side:
    43 N*m{ 438 kgf*cm , 32 ft.*lbf }
    Exhaust pipe assembly center side:
    48 N*m{ 489 kgf*cm , 35 ft.*lbf }

    NOTICE:
    After installation, check that the clearance is almost same at any point between the flanges of the exhaust manifold and exhaust pipe assembly front .


12. ADD MANUAL TRANSMISSION OIL


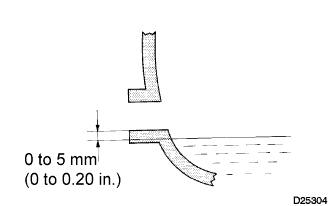
    D025304E01
  1. Park the vehicle in a level place.

  1. Remove the transmission filler plug and gasket.

  1. Check that the oil surface is within 5 mm (0.20 in.) below the lowest point of the transmission filler plug opening.

    Oil grade:
    GL-4 or GL-5
    Viscosity:
    SAE 75W-90
    Capacity:
    2.6 liters (2.7 US qts, 2.3 lmp.qts)

    NOTICE:
    1. Problems may occur when the oil level is too high or too low.
    2. After replacing the oil, drive the vehicle and check the oil level again.

  1. Check for oil leakage if the oil level is low.

  1. Install the transmission filler plug and a new gasket.

    Torque:
    37 N*m{ 377 kgf*cm , 27 ft.*lbf }


13. CONNECT CABLE TO NEGATIVE BATTERY TERMINAL


14. CHECK FOR EXHAUST GAS LEAKS


15. PERFORM INITIALIZATION
Some systems need initialization after reconnecting the cable to the negative battery terminal. (Click here)