 |
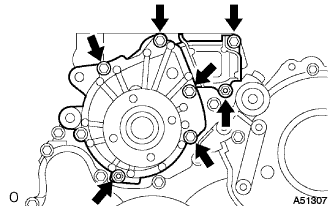
Install a new gasket and the water pump with the 5 bolts and 2 nuts.
- Torque:
- 13 N*m{ 133 kgf*cm , 10 ft.*lbf }
WATER PUMP > INSTALLATION |
| 1. INSTALL WATER PUMP ASSEMBLY |
|
Install a new gasket and the water pump with the 5 bolts and 2 nuts.
| 2. INSTALL TIMING BELT NO.2 COVER |
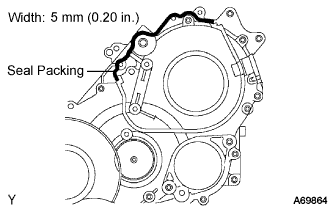 |
Remove old seal packing (FIPG) from the timing gear case.
Apply seal packing to the specific places shown in the illustration.
Fix the timing belt cover No.2 with the 4 bolts and nuts.
| 3. INSTALL TIMING BELT IDLER SUB-ASSEMBLY NO.1 |
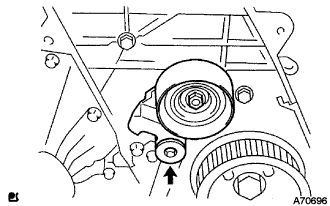 |
Using a 10 mm socket hexagon wrench, install the new plate washer and timing belt idler No.1.
| 4. INSTALL CAMSHAFT TIMING PULLEY |
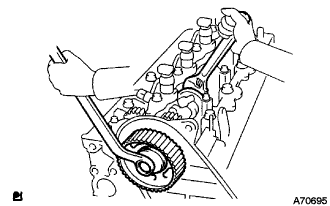 |
Install the camshaft timing pulley.
Tighten the bolt for the camshaft timing pulley while holding the camshaft with a monkey wrench.
| 5. INSTALL CYLINDER HEAD COVER SUB-ASSEMBLY |
Remove old seal packing (FIPG) from the cylinder head.
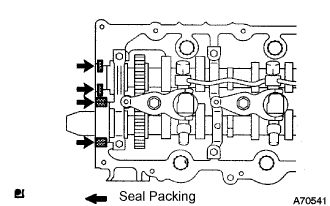 |
Apply a seal packing to the specific places described in the illustration.
Install the cylinder head cover with 10 bolts and 2 nuts.
Connect the ventilation hose.
Install a new nozzle holder seal.
| 6. INSTALL FUEL INLET PIPE SUB-ASSEMBLY |
Temporarily install the fuel inlet pipe.
Using SST, tighten the injection pipe on the common rail side.
Using SST, tighten the injection pipe on the supply pump side.
| 7. INSTALL INJECTION PIPE |
Install the injection pipes.
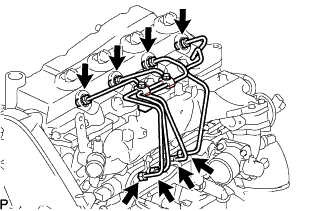 |
Temporarily install the 4 injection pipes.
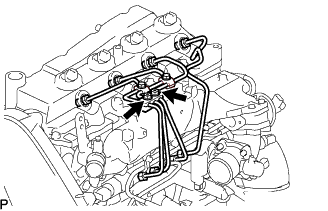 |
Install the injection pipe clamp No.3 in 2 nuts.
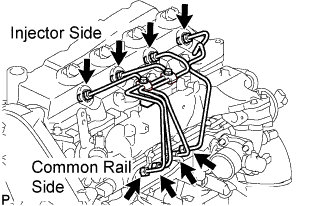 |
Fasten the union sequentially, from the injection pipe common rail to the injector, using SST.
| 8. INSTALL OIL LEVEL GAGE GUIDE |
Install a new O-ring to the oil level gauge guide.
Apply a light coat of engine oil to the O-ring.
Install the oil level gauge guide with the bolt.
Install the oil level gauge.
| 9. INSTALL INTAKE AIR CONNECTOR (w/o EGR Valve) |
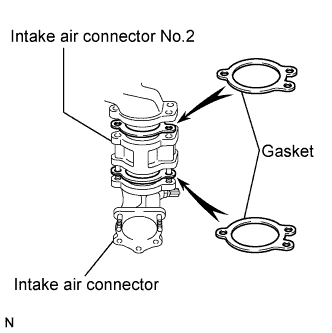 |
Temporarily install 2 new gaskets and intake air connector No.2 to the intake air connector.
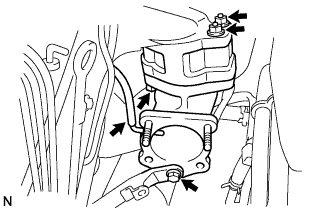 |
Temporarily tighten the intake air connector assembly with the bolt and 2 nuts.
Tighten the manifold stay with the bolt.
Tighten the intake air connector with the bolt and 2 nuts.
Install the vacuum hose to the intake air connector.
| 10. TEMPORARILY TIGHTEN ELECTRIC EGR CONTROL VALVE ASSEMBLY (w/ EGR Valve) |
Temporarily tighten the EGR valve assembly with the sensor.
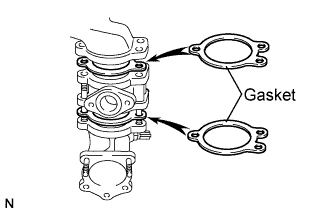 |
Install 2 new gaskets and the EGR valve to the intake air connector as shown in the illustration.
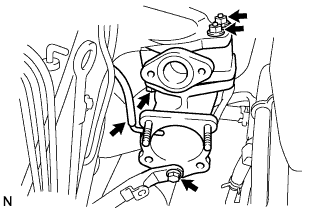 |
Temporarily tighten the intake air connector with EGR valve assembly to the intake manifold with the bolt and the 2 nuts.
Install the vacuum hose to the intake air connector.
Temporarily tighten the manifold stay with the bolt.
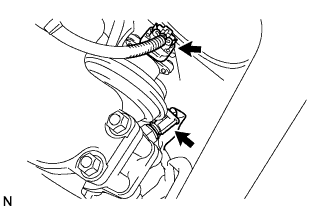 |
Connect the EGR valve position sensor connector.
Connect the intake air temperature sensor connector.
Install the vacuum regulating valve.
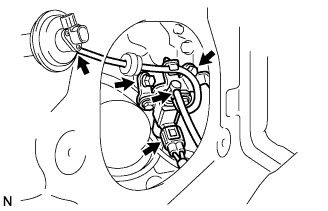 |
Install the vacuum regulating valve with the 2 bolts.
Connect the 2 vacuum hoses and the regulating valve connector.
| 11. INSTALL EGR PIPE SUB-ASSEMBLY NO.1 (w/ EGR Valve) |
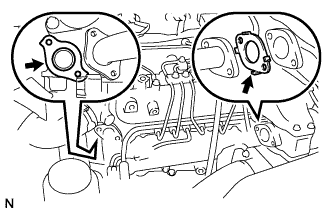 |
Install the 2 gaskets to the cylinder head and EGR pipe sub-assembly as shown in the illustration.
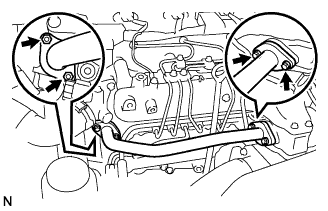 |
Install the EGR pipe sub-assembly with the 2 bolts and 2 nuts.
Tighten the intake air connector with the bolt and the 2 nuts.
Tighten the manifold stay.
| 12. REMOVE EGR PIPE SUB-ASSEMBLY NO.1 (w/ EGR Valve) |
Remove the 3 bolts, the 2 nuts, and the EGR pipe sub-assembly.
Remove the 2 gaskets.
| 13. INSTALL ENGINE SERVICE HOLE COVER NO.2 |
Install the engine service hole cover No.2 with the 3 bolts.
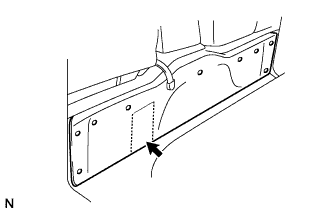 |
Return the carpet.
| 14. INSTALL DIESEL THROTTLE BODY ASSEMBLY |
Install a new gasket to intake air connector.
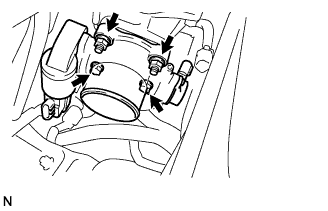 |
Install the throttle body with the 2 bolts and the 2 nuts.
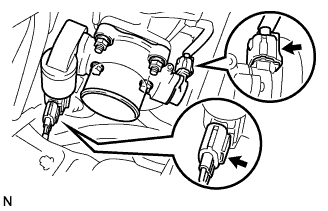 |
Connect the 2 throttle body connectors.
| 15. INSTALL AIR HOSE NO.4 |
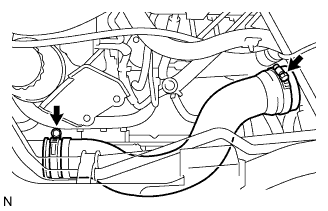 |
Install the air hose No.4 with the 2 clamps.
| 16. INSTALL EGR PIPE SUB-ASSEMBLY NO.1 (w/ EGR Valve) |
|
Install 2 new gaskets to the cylinder head and the EGR pipe sub-assembly No.1 as shown in the illustration.
|
Install the EGR pipe with the 2 bolts and the 2 nuts.
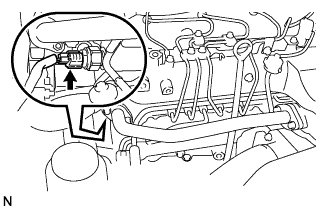 |
Connect the fuel pressure sensor connector.
| 17. INSTALL OIL RETURN HOSE (w/ Intercooler) |
| 18. INSTALL VANE PUMP OIL RESERVOIR ASSEMBLY |
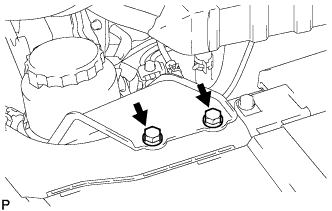 |
Install the vane pump oil reservoir assembly with the 2 bolts.
| 19. INSTALL TIMING BELT |
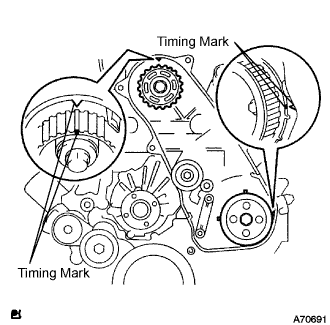 |
Check that the timing marks are aligned as shown in the illustration.
Install the timing belt to pump drive shaft pulley, camshaft timing pulley and timing belt idler No.1 in sequence.
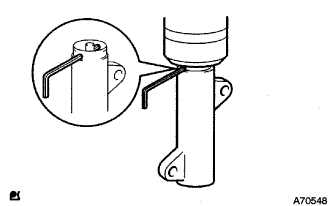 |
Set the tensioner to the press upright.
Using a press, slowly apply 981 to 9,807 N (100 to 1,000 kgf, 220 to 2,205 lbf) of force to the push rod.
Align the holes of push rod and housing, pass a 1.27 mm hexagon wrench through the holes to keep the setting position of the push rod.
Temporarily install the timing belt tensioner with the 2 bolts while pushing the idler pulley toward the timing belt.
Tighten the 2 bolts.
Remove the 1.5 mm hexagon wrench from the tensioner.
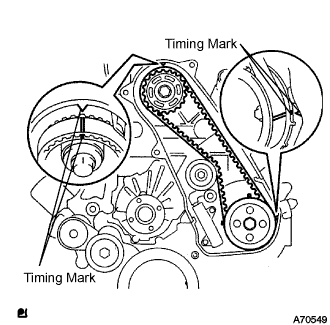 |
Turn the crankshaft in the clockwise direction twice, check that the timing marks are aligned as shown in the illustration.
| 20. INSTALL TIMING BELT NO.1 COVER |
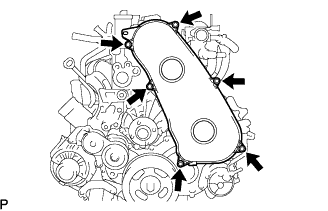 |
Install the timing belt No.1 cover with the 6 bolts.
Install the wire harness clamp.
| 21. INSTALL FAN PULLEY |
Install the fan pulley with the 4 bolts.
| 22. INSTALL V-RIBBED BELT TENSIONER ASSEMBLY |
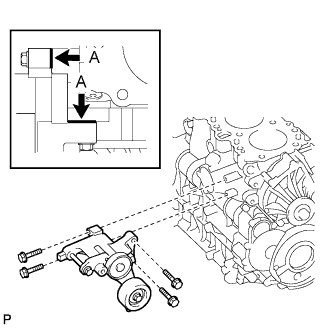 |
Temporarily install the V-ribbed belt tensioner with the 4 bolts.
Tighten the V-ribbed belt tensioner with the 4 bolts.
| 23. INSTALL GENERATOR ASSEMBLY |
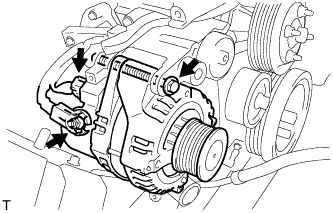 |
Install the generator assembly with the bolt.
Install the generator wire to terminal B with the nut.
Install the terminal cap.
Connect the generator connector.
| 24. INSTALL GENERATOR BRACKET |
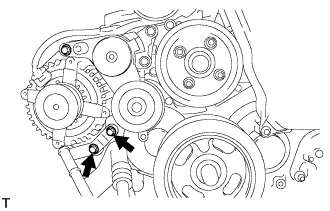 |
Install the generator bracket with the 2 bolts.
| 25. INSTALL IDLE PULLEY ASSEMBLY (w/ Air Conditioning) |
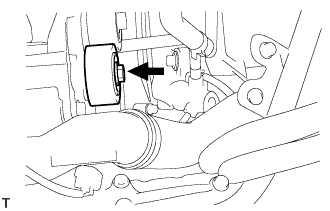 |
Install the idle No.2 pulley assembly and washer with the bolt.
| 26. INSTALL COMPRESSOR OUTLET ELBOW |
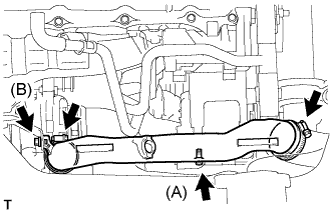 |
Install the compressor outlet elbow with the 2 bolts and 2 clamps.
| 27. INSTALL AIR CLEANER HOSE ASSEMBLY |
Install the air cleaner hose assembly with the clamp.
| 28. INSTALL AIR TUBE ASSEMBLY |
Install the air tube assembly with the 2 clamps and 2 bolts.
| 29. INSTALL COMPRESSOR AND MAGNETIC CLUTCH (w/ Air Conditioning) |
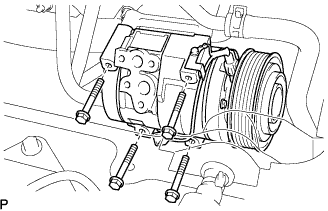 |
Install the compressor and magnetic clutch with the 4 bolts.
| 30. INSTALL FAN AND GENERATOR V BELT |
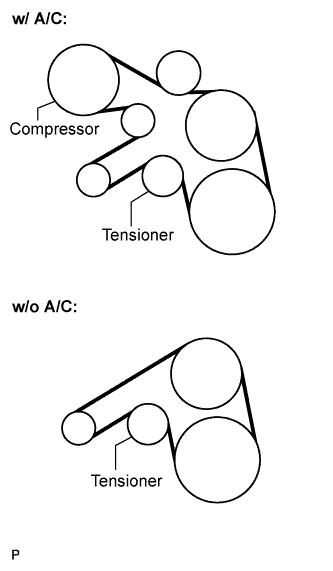 |
Install the drive belt by rotating the tensioner pulley in clockwise direction with the pulley set bolt of the tensioner.
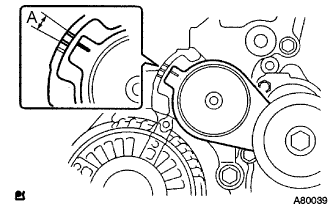 |
Make sure that the indicator mark of the tensioner is within range A.
| 31. INSTALL FENDER APRON MUDGUARD SEAL RH |
| 32. INSTALL ENGINE SERVICE HOLE SUB COVER SUB-ASSEMBLY |
Install the engine service hole sub cover with the 5 bolts.
| 33. CONNECT BATTERY NEGATIVE CABLE |
| 34. INSTALL FRONT SEAT ASSEMBLY RH (for Hi-back Seat Type) |
| 35. INSTALL FRONT SEAT ASSEMBLY RH (for Low-back Seat Type) |
| 36. INSTALL FRONT DOOR SCUFF PLATE RH |
| 37. ADD ENGINE COOLANT |
Firmly tighten the drain plugs and fill the radiator reserve tank assembly with coolant to the top of the inlet.
Loosen the bleeder plug of outlet housing.
When air is bled and the coolant drains out, firmly install the bleeder plug.
Add coolant up to the B line mark in the radiator reserve tank assembly and install the radiator cap.
| Condition | Capacity |
| w/ rear heater | 17.0 liters (18.0 US qts, 15.0 imp. qts) |
| w/o rear heater | 15.0 liters (15.9 US qts, 13.2 imp. qts) |
Warm up the engine.
After the engine cools down check that the coolant level is between the LOW and FULL level marks.
| 38. CHECK FOR ENGINE COOLANT LEAKAGE |
Fill the radiator with coolant and attach a radiator cap tester to the radiator.
Warm up the engine.
Using a radiator cap tester, increase the pressure inside the radiator to 137 kPa (1.4 kgf/cm2, 19.9 psi), and check that the pressure does not drop.
| 39. INSTALL ENGINE UNDER COVER NO.1 |