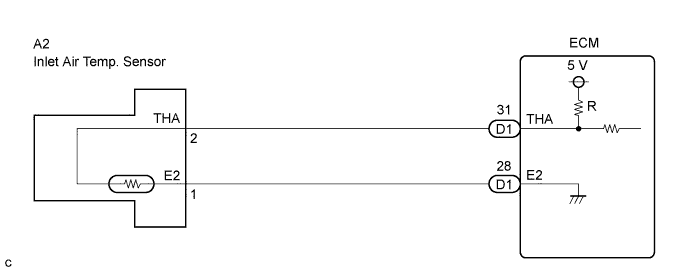
DTC P0110/24 Intake Air Temperature Circuit |
DTC P0112/24 Intake Air Temperature Circuit Low Input |
DTC P0113/24 Intake Air Temperature Circuit High Input |
| DTC No. | DTC Detection Condition | Trouble Area |
| P0110/24 | Open or short in IAT sensor circuit for 0.5 seconds (1 trip detection logic) |
|
| P0112/24 | Short in IAT sensor circuit for 0.5 seconds (1 trip detection logic) |
|
| P0113/24 | Open in IAT sensor circuit for 0.5 seconds (1 trip detection logic) |
|
| Temperature Displayed | Malfunction |
| -40°C (-40°F) | Open circuit |
| 140°C (284°F) or more | Short circuit |
| 1.READ VALUE OF INTAKE AIR TEMPERATURE SENSOR |
Connect the intelligent tester to the DLC3.
Turn the ignition switch ON and turn the intelligent tester ON.
Enter the following menus: Powertrain / ECD / Data List / Intake Air.
Read the values.
| Temperature Displayed | Proceed to |
| -40°C (-40°F) | A |
| 140°C (284°F) or more | B |
| OK (same as air temperature near intake manifold) | C |
|
| ||||
|
| ||||
| A | |
 |
| 2.CHECK HARNESS AND CONNECTOR (OPEN IN WIRE HARNESS) |
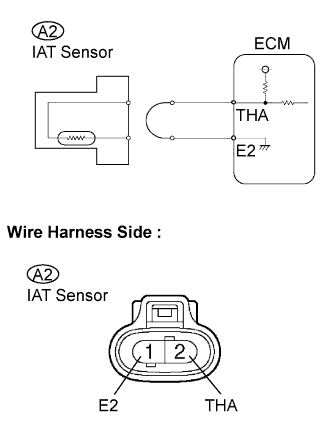 |
Disconnect the A2 IAT sensor connector.
Connect terminals 1 and 2 of the IAT sensor wire harness side connector.
Connect the intelligent tester to the DLC3.
Turn the ignition switch ON and turn the intelligent tester ON.
Enter the following menus: Powertrain / ECD / Data List / Intake Air.
Read the values.
|
| ||||
| NG | |
|
| 3.CHECK ECM (OPEN IN ECM) |
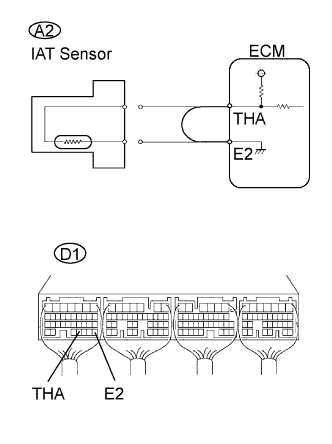 |
Disconnect the A2 IAT sensor connector.
Connect terminals THA and E2 of the D1 ECM connector.
Connect the intelligent tester to the DLC3.
Turn the ignition switch ON and turn the intelligent tester ON.
Enter the following menus: Powertrain / ECD / Data List / Intake Air.
Read the values.
|
| ||||
| NG | ||
 | ||
| ||
| 4.CHECK HARNESS AND CONNECTOR (SHORT IN WIRE HARNESS) |
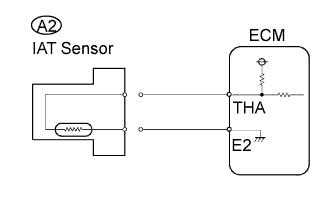 |
Disconnect the A2 IAT sensor.
Connect the intelligent tester to the DLC3.
Turn the ignition switch ON and turn the intelligent tester ON.
Enter the following menus: Powertrain / ECD / Data List / Intake Air.
Read the values.
|
| ||||
| NG | |
|
| 5.CHECK ECM (SHORT IN ECM) |
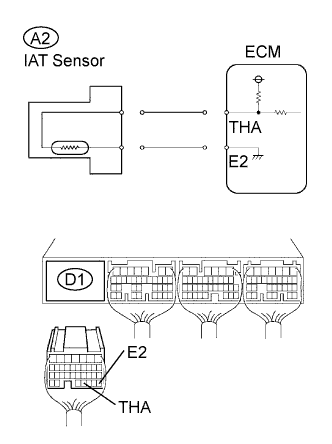 |
Disconnect the A2 IAT sensor.
Disconnect the D1 ECM connector.
Connect the intelligent tester to the DLC3.
Turn the ignition switch ON and turn the intelligent tester ON.
Enter the following menus: Powertrain / ECD / Data List / Intake Air.
Read the values.
|
| ||||
| NG | ||
| ||
| ||
| 1.CHECK ECM TERMINAL VOLTAGE (THA TERMINAL) |
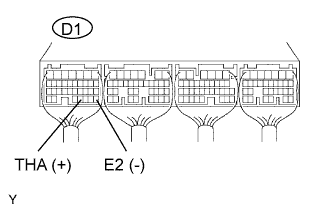 |
Start engine.
Measure the voltage of the ECM connector.
| Tester Connection | Condition | Specified Condition |
| D1-31 (THA) - D1-28 (E2) | Idling, IAT at 20°C (68°F) | 0.5 to 3.4 V |
|
| ||||
| NG | |
|
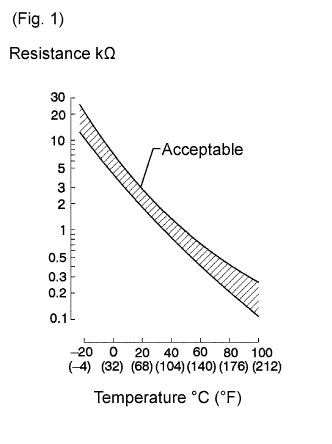
| 2.INSPECT INTAKE AIR TEMPERATURE SENSOR |
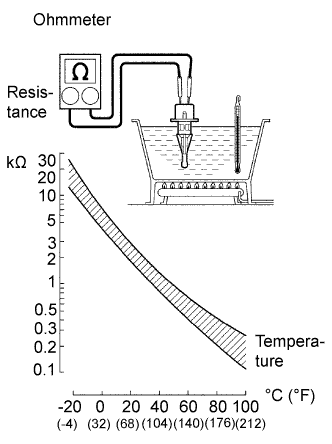 |
Remove the sensor.
Measure the resistance of the sensor.
| Tester Connection | Condition | Specified Condition |
| 1 - 2 | 20°C (68°F) | 2.21 to 2.69 kΩ |
|
| ||||
| OK | |
|
| 3.CHECK HARNESS AND CONNECTOR (INTAKE AIR TEMPERATURE SENSOR - ECM) |
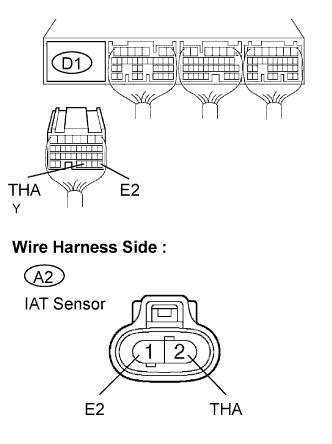 |
Disconnect the D1 ECM connector.
Disconnect the A2 sensor connector.
Measure the resistance of the wire harness side connectors.
| Tester Connection | Specified Condition |
| D1-31 (THA) - A2-2 (THA) | Below 1 Ω |
| D1-28 (E2) - A2-1 (E2) | Below 1 Ω |
| D1-31 (THA) or A2-2 (THA) - Body ground | 10 kΩ or higher |
| D1-28 (E2) or A2-1 (E2) - Body ground | 10 kΩ or higher |
|
| ||||
| OK | ||
| ||
| ||

