Home › BRAKE › BRAKE › BRAKE BOOSTER

BRAKE BOOSTER > INSTALLATION

for Preparation Click here


1. INSTALL MASTER CYLINDER PUSH ROD CLEVIS
  1. Temporarily install the push rod clevis with the lock nut.


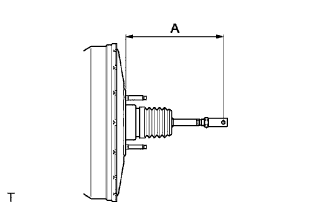
    C113674
  1. Turn the push rod clevis and adjust length "A" shown in the illustration.

    Length "A":
    163.6 to 173.6 mm (6.441 in. to 6.835 in.)

  1. Tighten the push rod lock nut.

    Torque:
    26 N*m{ 265 kgf*cm , 19 ft.*lbf }


2. INSTALL BRAKE VACUUM CHECK VALVE ASSEMBLY
  1. Install the grommet and check valve assembly.


3. INSTALL VACUUM WARNING SWITCH ASSEMBLY
  1. Clean the vacuum warning switch assembly.

  1. Apply seal packing black to 2 or 3 threads of the bolts.

    Seal packing:
    Part No.08826-00080, seal packing black or equivalent

  1. Install the warning switch assembly to the brake booster.

    Torque:
    13.7 N*m{ 140 kgf*cm , 19 ft.*lbf }


4. INSTALL BRAKE BOOSTER GASKET
  1. Install a new brake booster gasket to the brake booster.


5. INSTALL BRAKE BOOSTER ASSEMBLY


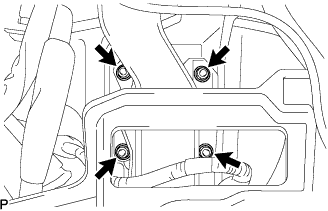
    C102541
  1. Install the brake booster assembly with the 4 nuts.
    Torque:
    14 N*m{ 145 kgf*cm , 10 ft.*lbf }


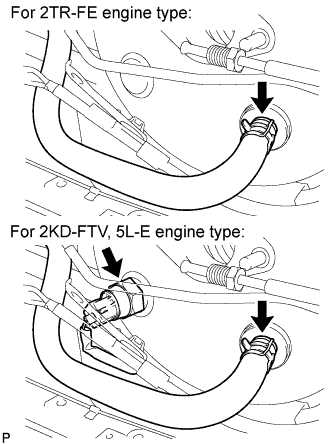
    C106100E01
  1. Connect the vacuum hose with the clip.

  1. Fro 2KD-FTV, 5L-E engine type:

    1. Connect the vacuum warning switch connector to the brake booster assembly.


6. INSTALL BRAKE TUBE
  1. Automatic transmission:

    1. Connect the 2 tubes to the clamp.


  1. Manual transmission:


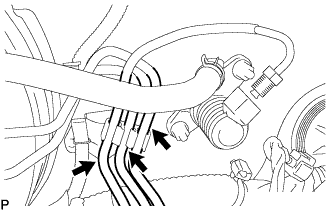
      C106102
    1. Connect the 3 tubes to the clamp.


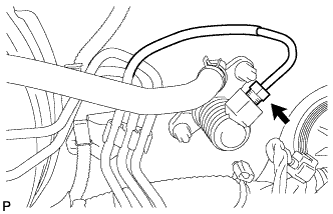
    2. C113662
    3. Using SST, connect the clutch tube to the clutch master cylinder.

      SST
      09023-00101  

      Torque:
      15 N*m{ 155 kgf*cm , 11 ft.*lbf }


7. INSTALL MASTER CYLINDER PUSH ROD CLEVIS


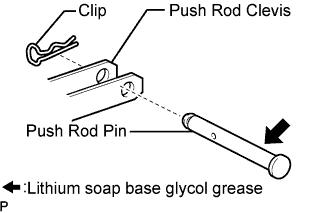
    C105607E01
  1. Apply lithium soap base glycol grease to the clevis pin.

  1. Install the push rod clevis to the brake pedal support assembly with the clevis pin and a new clip.


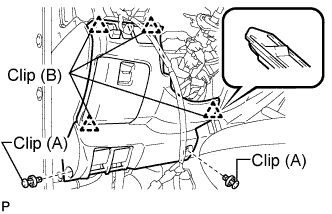
8. INSTALL INSTRUMENT PANEL FINISH PANEL LOWER


    B102827E01
  1. Engage the 4 clips (B).

  1. Install the instrument panel finish panel lower with the 2 clips (A).


9. INSTALL HEADLIGHT ASSEMBLY RH (RHD (NARROW BODY TYPE))
Install of the headlight assembly is the same as the headlight assembly LH.


10. INSTALL HEADLIGHT ASSEMBLY RH (RHD (WIDE BODY TYPE))
Install of the headlight assembly is the same as the headlight assembly LH.


11. INSTALL FRONT BUMPER SIDE SUPPORT LH (RHD (WIDE BODY TYPE))


12. INSTALL FRONT BUMPER COVER (RHD (WIDE BODY TYPE))


13. INSTALL STEP PLATE COVER LH (RHD (WIDE BODY TYPE))


14. INSTALL STEP PLATE COVER RH (RHD (WIDE BODY TYPE))


15. INSTALL WINDSHIELD WASHER JAR ASSEMBLY (for LHD)


16. INSTALL RADIATOR GRILLE


17. INSTALL BRAKE MASTER CYLINDER


    C106097
  1. Install the brake master cylinder and harness clamp bracket to the booster with the 2 nuts.

    Torque:
    12.7 N*m{ 130 kgf*cm , 9 ft.*lbf }

    NOTICE:
    Check that the stopper of the harness clamp bracket is securely holding on the brake master cylinder assembly.


  1. Manual Transmission:


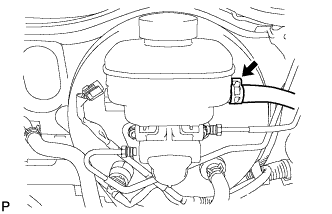
      C112532
    1. Install the clutch reservoir tube with the clip.
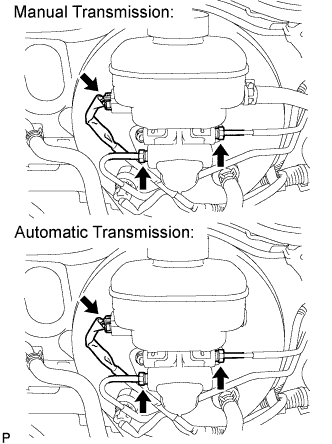


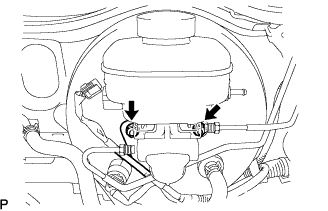
    C106096E01
  1. Using SST, connect the 2 brake tubes to the master cylinder.

    SST
    09023-00101  

    Torque:
    15 N*m{ 155 kgf*cm , 11 ft.*lbf }

  1. Connect the level warning light switch connector.


18. ADD BRAKE FLUID


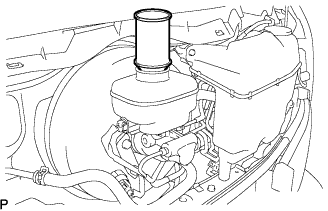
C106088

Fluid:
SAE J1704 or FMVSS No. 116 DOT3 or equivalent


19. BLEED BRAKE MASTER CYLINDER

HINT:
If the master cylinder has been disassembled or if the reservoir becomes empty, bleed the air from the master cylinder.


    C106089
  1. Using SST, disconnect the brake lines from the master cylinder.

    SST
    09023-00101  

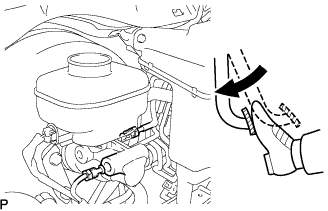
  1. Slowly depress the brake pedal and hold it there.
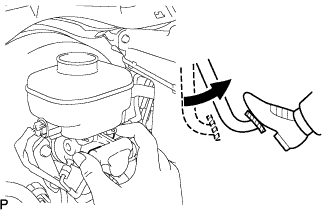


    C106090
  1. Block the outer holes with your fingers, and release the brake pedal.

  1. Remove your fingers. Slowly depress the brake pedal and hold it again. Block the outer holes with your fingers and release the brake pedal. Repeat this procedure 3 or 4 times.

  1. Using SST, connect the brake lines to the master cylinder.

    SST
    09023-00101  

    Torque:
    15 N*m{ 155 kgf*cm , 11 ft.*lbf }


20. BLEED BRAKE LINE
  1. Connect the vinyl tube to the bleeder plug.

  1. Depress the brake pedal several times and loosen the bleeder plug with the pedal held down.

  1. At the point where the fluid stops coming out, tighten the bleeder plug and release the brake pedal.

  1. Repeat this procedure until the air in the brake fluid is completely bled out.

  1. Tighten the bleeder plug.

    1. Front bleeder plug:

      Torque:
      10.8 N*m{ 110 kgf*cm , 8 ft.*lbf }

    2. Rear bleeder plug:

      Torque:
      11.0 N*m{ 112 kgf*cm , 8 ft.*lbf }

  1. Repeat the above procedure to bleed the air out of the brake line for each wheel.


21. INSPECT BRAKE FLUID LEVEL
  1. Check the fluid level and add fluid if necessary.

    Fluid:
    SAE J1704 or FMVSS No.116 DOT3 or equivalent


22. CHECK BRAKE FLUID LEAKAGE


23. VEHICLE PREPARATION FOR HEADLIGHT AIM ADJUSTMENT
  1. Prepare the vehicle:

    1. Ensure that there is no damage or deformation to the body around the headlights.
    2. Fill the fuel tank.
    3. Make sure that the oil is filled to the specified level.
    4. Make sure that the coolant is filled to the specified level.
    5. Inflate the tires to the appropriate pressure.
    6. Place the spare tire, tools, and jack in their original positions.
    7. Unload the trunk.
    8. Sit a person of average weight (75 kg, 165 lb) in the driver's seat.


24. PREPARATION FOR HEADLIGHT AIMING (USING A SCREEN)


E108090E01
  1. Prepare the vehicle according to the following conditions:

    1. Place the vehicle in a location that is dark enough to clearly observe the cutoff line. The cutoff line is a distinct line, below which light from the headlights can be observed and above which it cannot.
    2. Place the vehicle at a 90° angle to the wall.
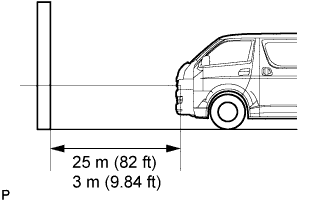
    3. Create a 25 m (82 ft) distance between the vehicle (headlight bulb center) and the wall.
    4. Place the vehicle on a level surface.
    5. Bounce the vehicle up and down to settle the suspension.

    NOTICE:
    A distance of 25 m (82 ft) between the vehicle (headlight bulb center) and the wall is necessary for proper aim adjustment. If unavailable, secure a distance of exactly 3 m (9.84 ft) for check and adjustment. (The target zone will change with the distance so follow the instructions in the illustration.)

  1. Prepare a piece of thick white paper (approximately 2 m (6.6 ft) (height) x 4 m (13.1 ft) (width)) to use as a screen.

  1. Draw a vertical line down the center of the screen (V line).


  1. Set the screen as shown in the illustration.
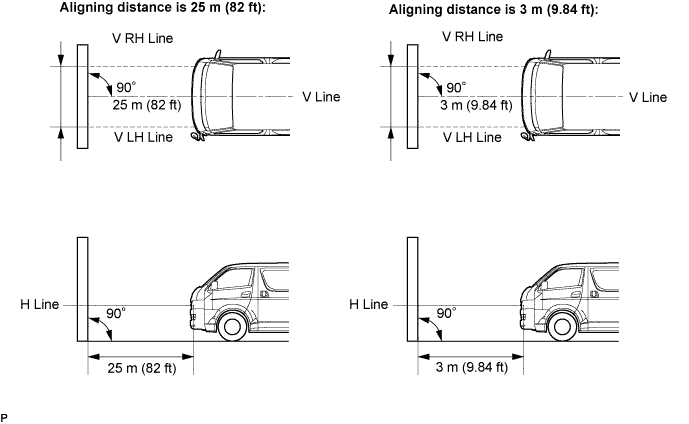
    HINT:
    1. Stand the screen perpendicular to the ground.
    2. Align the V line on the screen with the center of the vehicle.


    E108091E01


    I033423E06
  1. Draw base lines (H line, V LH, V RH lines) on the screen as shown in the illustration.
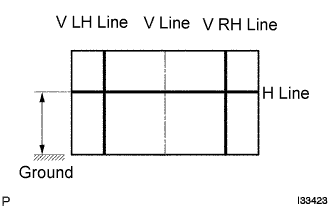
    HINT:
    1. The base lines differ for "low-beam inspection" and "high-beam inspection".
    2. Make the headlight bulb center marks on the screen. If the center mark cannot be observed on the headlight, use the center of the headlight bulb or the manufacturer's name marked on the headlight as the center mark.


    1. H Line (Headlight height):

      1. Draw a horizontal line across the screen so that it passes through the center marks. The H line should be at the same height as the headlight bulb center marks of the low-beam headlights.

    2. V LH Line, V RH Line (Center mark position of left-hand (LH) and right-hand (RH) headlights):

      1. Draw two vertical lines so that they intersect the H line at each center mark (aligned with the center of the low-beam headlight bulbs).


25. HEADLIGHT AIMING INSPECTION
  1. Cover or disconnect the connector of the headlight on the opposite side to prevent light from the headlight not being inspected from affecting headlight aiming inspection.

    NOTICE:
    Do not keep the headlight covered for more than 3 minutes. The headlight lens is made of synthetic resin, and may easily melt or be damaged due to heat.

    HINT:
    When checking the aim of the high-beam, cover the low-beam or disconnect the connector.

  1. Start the engine.

    NOTICE:
    Engine rpm must be 1,500 or more.

  1. With headlight leveling switch:

    1. Set the headlight leveling switch to 0 (zero).


  1. Turn on the headlight and make sure that the cutoff line falls within the specified area, as shown in the illustration.
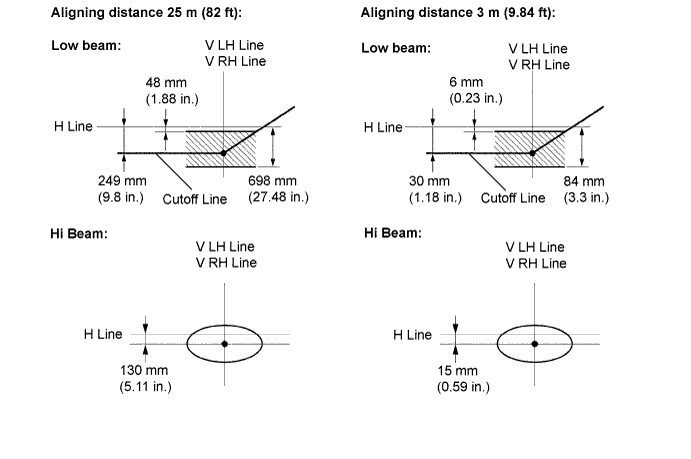

    I041708E03

    HINT:
    1. Alignment distance is 25 m (82 ft):
      1. The cutoff line is 48 mm (1.88 in.) to 698 mm (27.48 in.) below the H line on low-beams (ECE Reg.48).
    2. Alignment distance is 3 m (9.84 ft):
      1. The cutoff line is 6 mm (0.23 in.) to 84 mm (3.3 in.) below the H line on low-beams (ECE Reg.48).
    3. Alignment distance is 25 m (82 ft):
      1. The cutoff line is 249 mm (9.8 in.) below the H line on low-beams.
    4. Alignment distance is 3 m (9.84 ft):
      1. The cutoff line is 30 mm (1.18 in.) below the H line on low-beams.
    5. Since the low-beam light and the high-beam light are a unit, if the aim on one is correct, the other should also be correct. However, check both beams just to make sure.


26. ADJUST HEADLIGHT AIMING


E108092E01
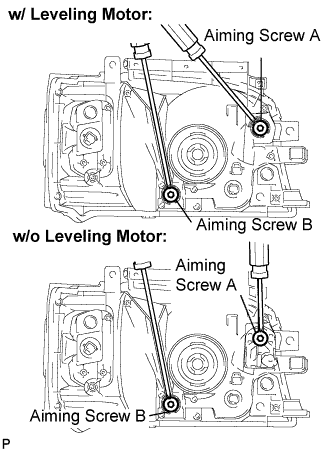
  1. Adjust the aim vertically:

    1. Adjust the headlight aim into the specified range by turning aiming screw A with a screwdriver.

    NOTICE:
    The final turn of the aiming screw should be made in the clockwise direction. If the screw is tightened excessively, loosen it and then retighten it, so that the final turn of the screw is in the clockwise direction.

    HINT:
    1. Perform low-beam aim adjustment.
    2. The headlight aim moves up when turning the aiming screw clockwise, and moves down when turning the aiming screw counterclockwise.

  1. Adjust the aim horizontally:

    1. Adjust the headlight aim into the specified range by turning aiming screw B with a screwdriver.

    NOTICE:
    The final turn of the aiming screw should be made in the clockwise direction. If the screw is tightened excessively, loosen it and then retighten it, so that the final turn of the screw is in the clockwise direction.

    HINT:
    Perform low-beam aim adjustment.


27. INSPECT BRAKE PEDAL HEIGHT


    C102528E01
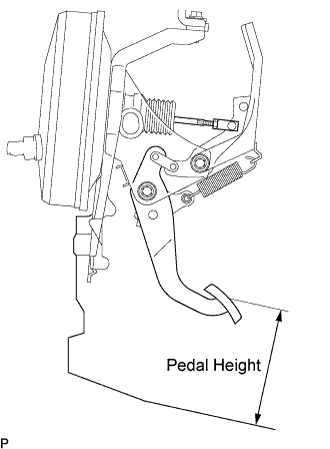
  1. Check brake pedal height.

    Pedal height from floor:
    151 to 161 mm (5.945 to 6.339 in.) for left hand drive
    154 to 164 mm (6.063 to 6.457 in.) for right hand drive