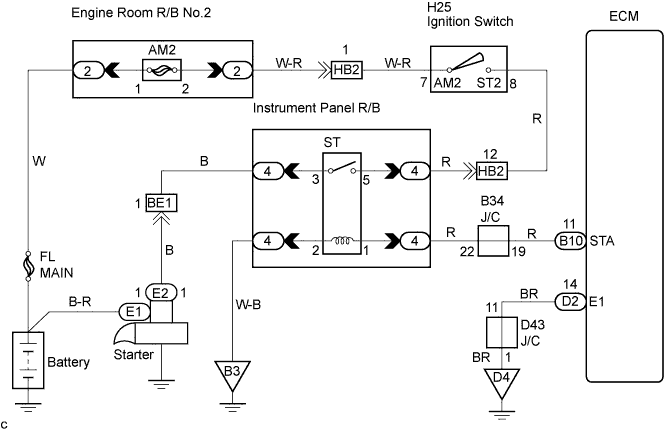
ECD SYSTEM > Starter Signal Circuit |
| 1.READ VALUE OF INTELLIGENT TESTER (STA SIGNAL) |
Connect the intelligent tester to the DLC3.
Turn the ignition switch ON.
Select the item "Powertrain/Engine and ECT/Data List/Starter SIG".
Read STA signal on the intelligent tester while the starter operates.
| Ignition Switch Position | LOCK, ACC, ON | STA |
| STA Signal | OFF | ON |
|
| ||||
| OK | ||
 | ||
| ||
| 2.CHECK HARNESS AND CONNECTOR (ECM - STARTER RELAY) |
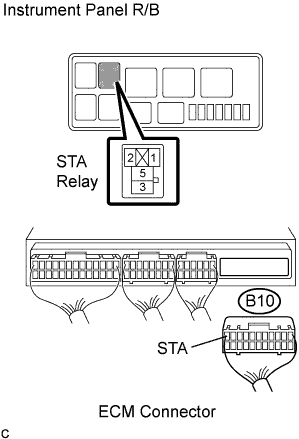 |
Disconnect the ECM B10 connector.
Remove the starter relay from the instrument panel R/B.
Measure the resistance according to the value(s) in the table below.
| Tester Connection | Specified Condition |
| (Starter relay terminal 1 of R/B) - STA (B10-11) | Below 1 Ω |
| (Starter relay terminal 2 of R/B) - Body ground | Below 1 Ω |
|
| ||||
| OK | |
 |
| 3.INSPECT STARTER RELAY |
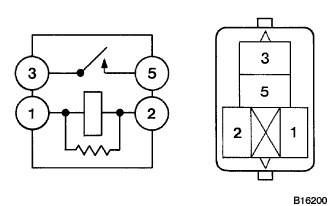 |
Remove the starter relay from the instrument panel R/B.
Check the starter relay resistance.
| Tester Connection | Specified Condition |
| 3 - 5 | 10 kΩ or higher |
| 3 - 5 | Below 1 Ω (when battery voltage applied to terminals 1 and 2) |
|
| ||||
| OK | ||
| ||
| ||
| 1.INSPECT ECM (CHECK VOLTAGE) |
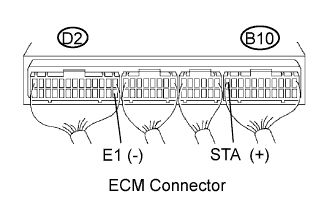 |
Turn the ignition switch ON.
Measure the voltage according to the value(s) in the table below.
| Tester Connection | Connection | Specified Condition |
| STA (B10-11) - E1 (D2-14) | Cranking | 6.0 V or more |
|
| ||||
| OK | ||
| ||
| ||
| 2.CHECK HARNESS AND CONNECTOR (ECM - STARTER RELAY) |
|
Disconnect the ECM B10 connector.
Remove the starter relay from the instrument panel R/B.
Measure the resistance according to the value(s) in the table below.
| Tester Connection | Specified Condition |
| (Starter relay terminal 1 of R/B) - STA (B10-11) | Below 1 Ω |
| (Starter relay terminal 2 of R/B) - STA (B10-11) | Below 1 Ω |
|
| ||||
| OK | |
|
| 3.INSPECT STARTER RELAY |
|
Remove the starter relay from the instrument panel R/B.
Check the starter relay resistance.
| Tester Connection | Specified Condition |
| 3 - 5 | 10 kΩ or higher |
| 3 - 5 | Below 1 Ω (when battery voltage applied to terminals 1 and 2) |
|
| ||||
| OK | ||
| ||
| ||

