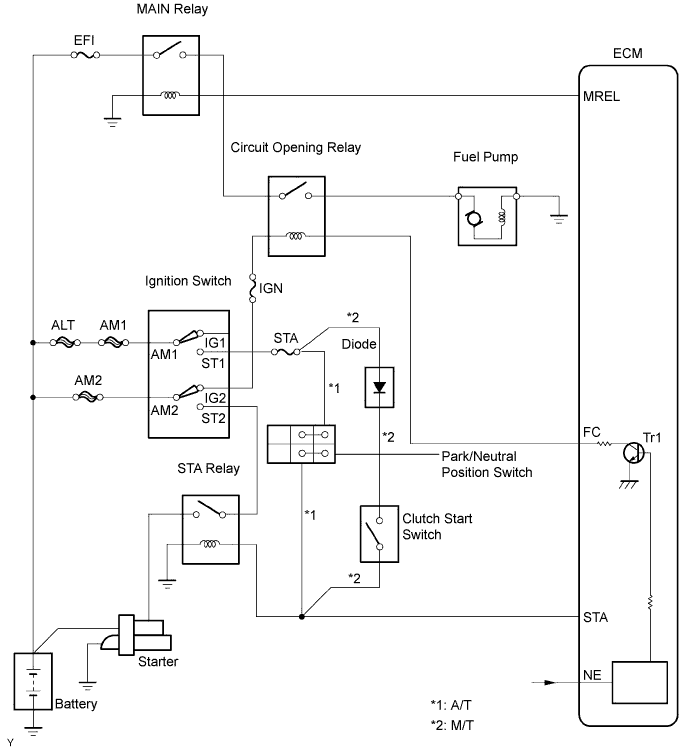
SFI SYSTEM (w/o Secondary Air Injection System) > Fuel Pump Control Circuit |
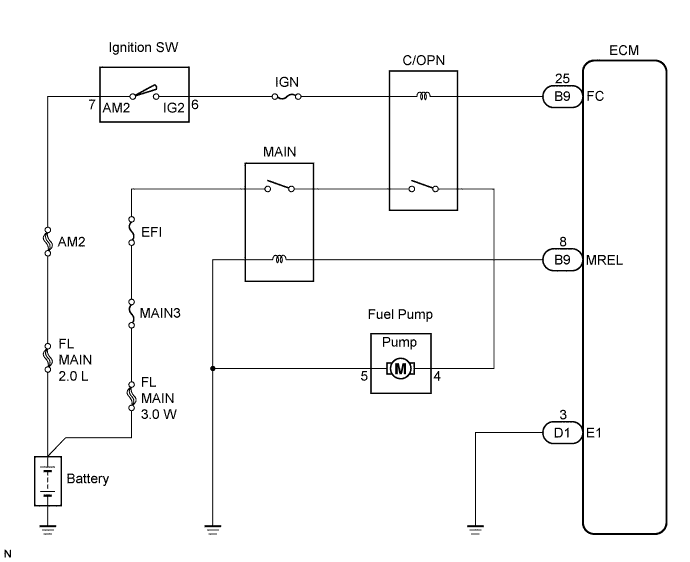
| 1.PERFORM ACTIVE TEST BY INTELLIGENT TESTER |
Connect an intelligent tester to the DLC3.
Turn the ignition switch to the ON position and turn the tester ON.
Select the following menu items: Powertrain / Engine and ECT / Active Test / Fuel Pump / Spd.
Check whether the relay operating sounds can be heard while operating the relay using the tester.
|
| ||||
| NG | |
 |
| 2.INSPECT ECM POWER SOURCE CIRCUIT |
|
| ||||
| OK | |
|
| 3.INSPECT INTEGRATION RELAY (CIRCUIT OPENING RELAY) |
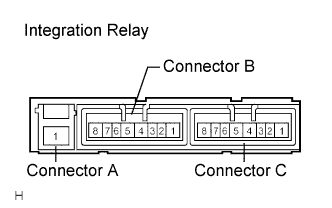 |
Remove the integration relay from the engine room R/B No.1.
Check the Integration relay (CIRCUIT OPENING RELAY).
| Tester Connection | Specified Conditions |
| B4 - B8 | 10 kΩ or higher |
| B4 - B8 | Below 1 Ω (When battery voltage applied to terminals B6 and B7) |
Reinstall the integration relay.
|
| ||||
| OK | |
|
| 4.INSPECT ECM (FC VOLTAGE) |
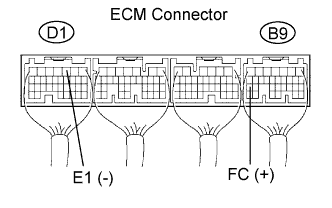 |
Turn the ignition switch to the ON position.
Measure the voltage between the terminals of the ECM connectors.
| Tester Connections | Specified Conditions |
| FC (B9-25) - E1 (D1-3) | 9 to 14 V |
|
| ||||
| NG | |
|
| 5.CHECK HARNESS AND CONNECTOR (ECM - INTEGRATION RELAY) |
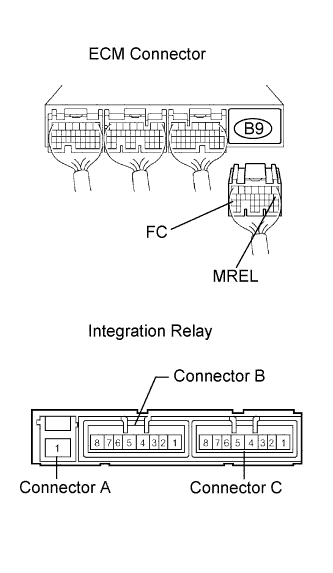 |
Remove the integration relay from the engine room R/B No.1.
Disconnect the B9 ECM connector.
Measure the resistance according to the value(s) in the table below.
| Tester Connection | Specified Condition |
| Integration relay (B2) - MREL (B9-8) | Below 1 Ω |
| Integration relay (B7) - FC (B9-25) | Below 1 Ω |
| Tester Connection | Specified Condition |
| Integration relay (B2) or MREL (B9-8) - Body ground | 10 kΩ or higher |
| Integration relay (B7) or FC (B9-25) - Body ground | 10 kΩ or higher |
Reinstall the ECM connector.
Reinstall the integration relay.
|
| ||||
| OK | ||
 | ||
| ||
| 6.INSPECT FUEL PUMP ASSEMBLY |
|
| ||||
| OK | |
|
| 7.CHECK HARNESS AND CONNECTOR (INTEGRATION RELAY - FUEL PUMP, FUEL PUMP - BODY GROUND) |
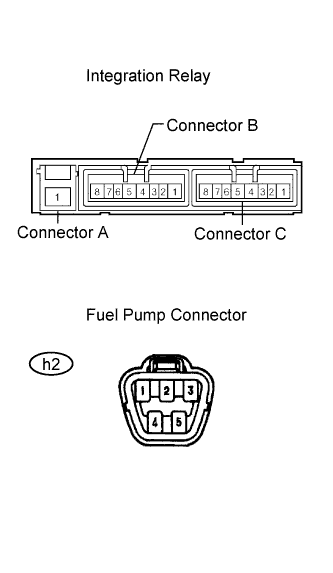 |
Remove the integration relay from the engine room R/B No.1.
Disconnect the fuel pump connector.
Measure the resistance according to the value(s) in the table below.
| Tester Connection | Specified Condition |
| Integration relay (B8) - Fuel pump (4) | Below 1 Ω |
| Fuel pump (5) - Body ground | Below 1 Ω |
| Tester Connection | Specified Condition |
| Integration relay (B8) or Fuel pump (4) - Body ground | 10 kΩ or higher |
Reinstall the integration relay.
Reconnect the fuel pump connector.
|
| ||||
| OK | ||
| ||
| ||

