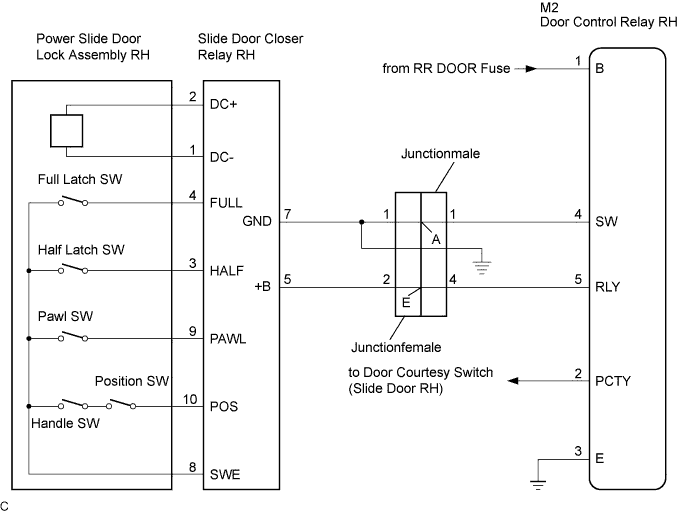
SLIDE DOOR CLOSER SYSTEM > Slide Door Closer Motor RH Circuit |
| 1.INSPECT POWER SLIDE DOOR LOCK ASSEMBLY RH |
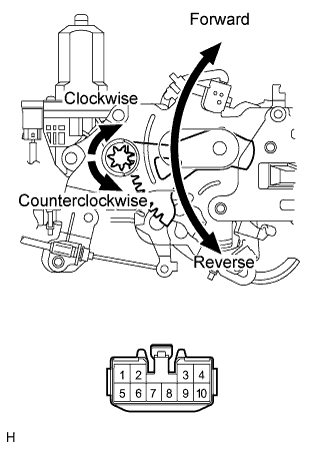 |
Inspect the slide door closer motor.
Apply battery voltage and check operation of the slide door closer motor.
| Measurement Condition | Specified Condition |
| Battery positive (+) → Terminal 2 Battery negative (-) → Terminal 1 | Close (Forward) |
| Battery positive (+) → Terminal 1 Battery negative (-) → Terminal 2 | Open (Reverse) |
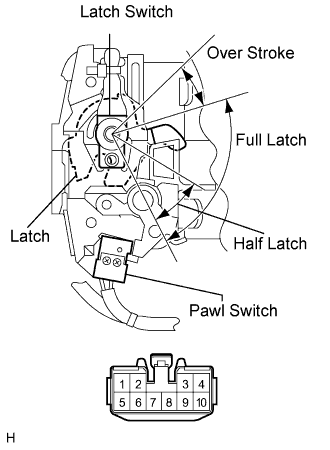 |
Inspect the pawl switch and latch switch.
Measure the resistance when the switch is operated according to the value(s) in the table below.
| Tester Connection | Condition | Specified Condition |
| 8 - 9 |
| 10 kΩ or higher |
| 8 - 9 | Unlatched | Below 1 Ω |
| Tester Connection | Condition | Specified Condition |
| 3 - 4, 4- 8 | Open | Below 1 Ω |
| 4 - 8 | Half latch | Below 1 Ω |
| 3 - 4, 4- 8 | Full latch | 10 kΩ or higher |
| - | Over stroke | 10 kΩ or higher |
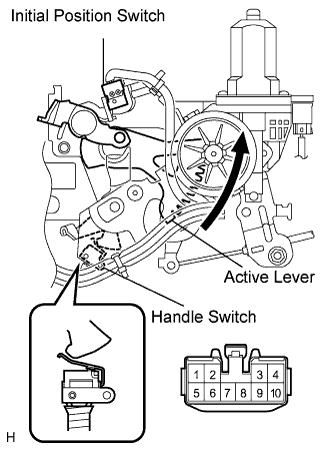 |
Inspect the initial position switch and handle switch.
Measure the resistance of the switch when the switch is operated.
| Tester Connection | Condition | Specified Condition |
| 8 - 10 |
| 10 kΩ or higher |
| 8 - 10 |
| 10 kΩ or higher |
| 8 - 10 |
| Below 1 Ω |
| 8 - 10 |
| 10 kΩ or higher |
|
| ||||
| OK | |
 |
| 2.INSPECT SLIDE DOOR CONTROL JUNCTIONFEMALE |
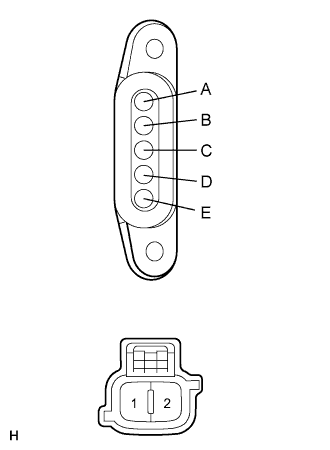 |
Inspect the slide door control junctionfemale.
Measure the resistance when the switch is operated according to the value(s) in the table below.
| Tester Connection | Condition | Specified Condition |
| A - 1 | Always | Below 1 Ω |
| E - 2 | Always | Below 1 Ω |
|
| ||||
| OK | |
|
| 3.INSPECT SLIDE DOOR CONTROL JUNCTIONMALE |
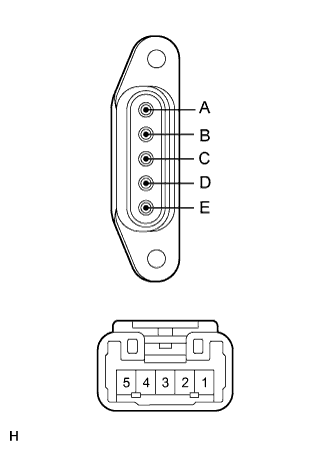 |
Inspect the slide door control junctionmale.
Measure the resistance when the switch is operated according to the value(s) in the table below.
| Tester Connection | Condition | Specified Condition |
| A - 1 | Always | Below 1 Ω |
| E - 4 | Always | Below 1 Ω |
|
| ||||
| OK | |
|
| 4.CHECK WIRE HARNESS (SLIDE DOOR CLOSER RELAY RH - DOOR CONTROL RELAY RH) |
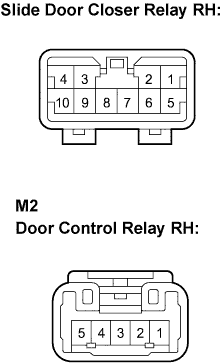 |
Disconnect the M2 and slide door closer relay connectors.
Measure the resistance according to the value(s) in the table below.
| Tester Connection | Condition | Specified Condition |
| M2-4 (SW) - 7 (GND) | Slide door CLOSE | Below 1 Ω |
| M2-5 (RLY) - 5 (+B) | Slide door CLOSE | Below 1 Ω |
| M2-4 (SW) - Body ground | Slide door OPEN | 10 kΩ or higher |
| M2-5 (RLY) - Body ground | Slide door OPEN | 10 kΩ or higher |
|
| ||||
| OK | ||
 | ||
| ||
