 |
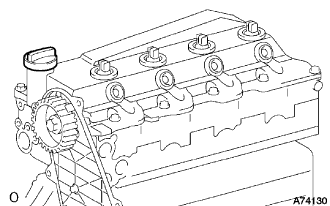
Remove the oil filler cap from the cylinder head cover.
ENGINE UNIT > DISASSEMBLY |
| 1. REMOVE OIL FILLER CAP SUB-ASSEMBLY |
|
Remove the oil filler cap from the cylinder head cover.
| 2. REMOVE NOZZLE HOLDER SEAL |
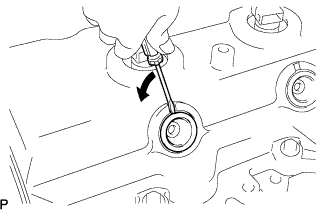 |
Using a screwdriver, remove the holder seals by prying the portion between the holder seal and the cutout part of the cylinder head.
| 3. REMOVE CYLINDER HEAD COVER SUB-ASSEMBLY |
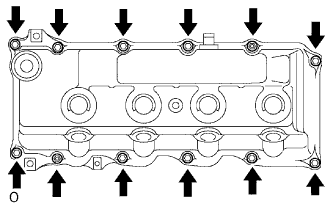 |
Remove the 10 bolts, 2 nuts, cylinder head cover and gasket.
| 4. REMOVE NOZZLE HOLDER CLAMP |
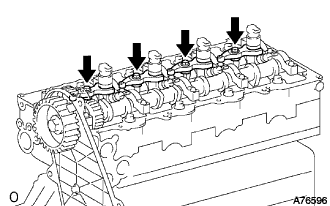 |
Remove the 4 bolts, 4 washers and 4 nozzle holder clamps.
| 5. REMOVE NOZZLE LEAKAGE PIPE ASSEMBLY |
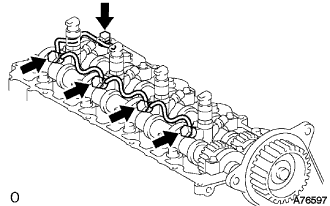 |
Remove the union bolt, 4 hollow screws, nozzle leakage pipe and 5 gaskets from the cylinder head and injector.
| 6. REMOVE INJECTOR ASSEMBLY |
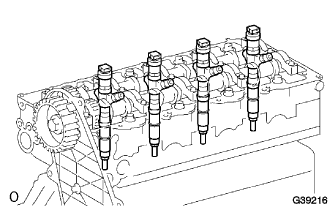 |
Remove the 4 injectors from the cylinder head.
| 7. REMOVE CAMSHAFT TIMING PULLEY |
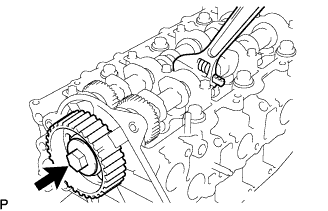 |
Remove the bolt for the camshaft timing pulley by holding the camshaft with a wrench.
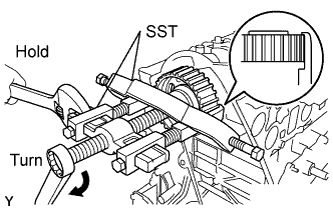 |
Using SST, remove the camshaft timing pulley and set key.
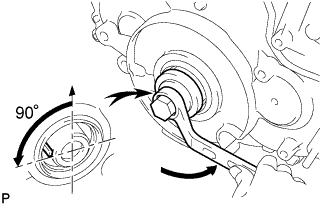 |
Rotate the crankshaft about 90° counterclockwise from the TDC position to lower the piston.
| 8. REMOVE TIMING BELT NO.2 COVER |
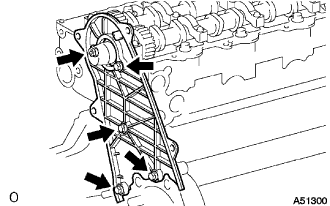 |
Remove the nut, 4 bolts and timing belt No.2 cover.
| 9. REMOVE NO.2 CAMSHAFT |
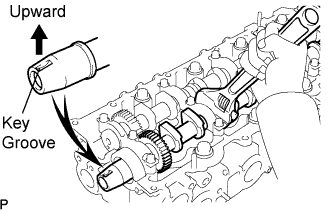 |
Face the key groove of the camshaft upward by turning the camshaft with a wrench.
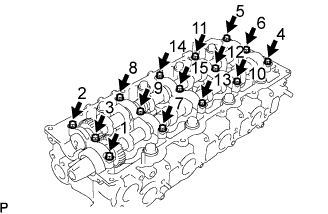 |
Uniformly loosen the 15 bearing cap bolts in several steps in the sequence shown in the illustration.
Remove the 5 bearing caps.
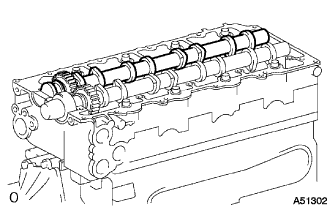 |
Remove the No.2 camshaft.
| 10. REMOVE CAMSHAFT |
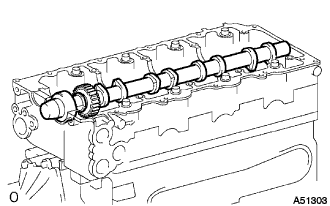 |
Remove the camshaft.
| 11. REMOVE CAMSHAFT SETTING OIL SEAL |
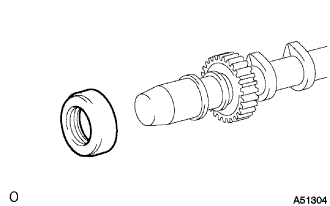 |
Remove the oil seal from the camshaft.
| 12. REMOVE CYLINDER HEAD SUB-ASSEMBLY |
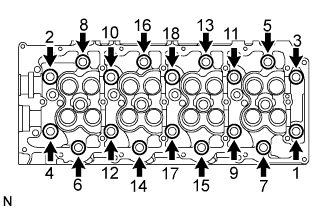 |
Uniformly loosen and remove the 18 cylinder head bolts in several steps in the sequence shown in the illustration.
Lift the cylinder head from the dowels on the cylinder block, and place the cylinder head on wooden blocks on a bench.
Remove the cylinder head gasket from the cylinder block.
| 13. REMOVE WATER PUMP ASSEMBLY |
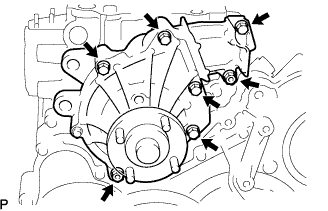 |
Remove the 5 bolts, 2 nuts, water pump and gasket.
| 14. REMOVE TIMING GEAR CASE |
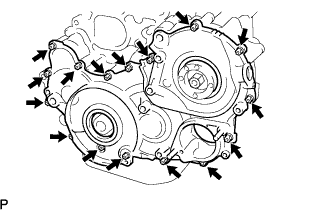 |
Remove the 14 bolts and 2 nuts.
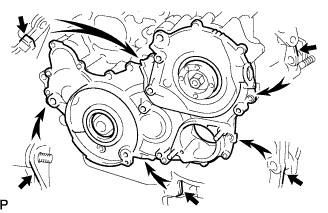 |
Pry the gear case in the location shown in the illustration.
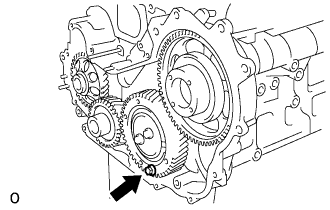 |
Secure the idler sub-gears to the idler gear with a service bolt.
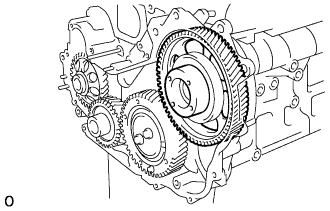 |
Remove the supply pump gear.
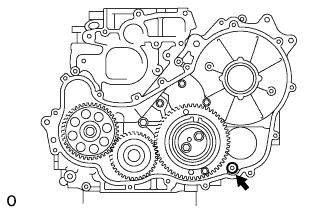 |
Remove the O-ring.
| 15. INSPECT BACKLASH OF OIL PUMP GEAR TO CRANKSHAFT TIMING GEAR |
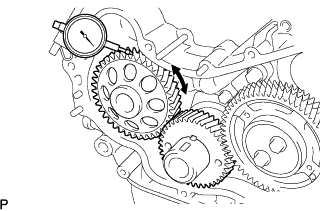 |
Using a dial indicator, measure the backlash.
| 16. INSPECT IDLE GEAR NO.1 THRUST CLEARANCE |
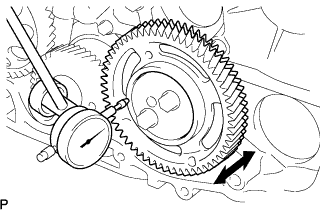 |
Using a dial indicator, measure the thrust clearance.
| 17. REMOVE CRANKSHAFT POSITION SENSOR PLATE NO.1 |
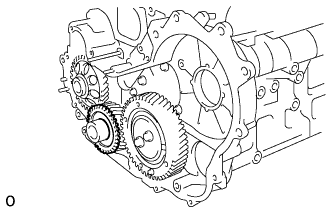 |
Remove the crankshaft position sensor plate.
| 18. INSPECT BACKLASH OF CRANKSHAFT TIMING GEAR TO IDLE GEAR NO.1 |
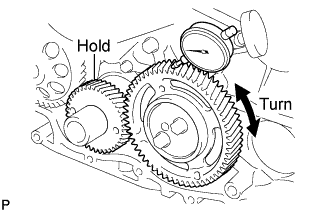 |
Using a dial indicator, measure the backlash.
| 19. REMOVE CRANKSHAFT TIMING GEAR |
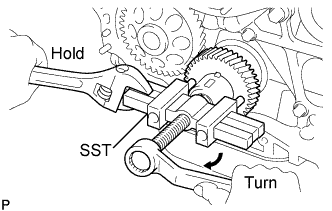 |
Using SST, remove the crankshaft timing gear.
| 20. INSPECT BACKLASH OF SUPPLY PUMP GEAR TO IDLE GEAR NO.1. |
Install the supply pump with the 2 nuts.
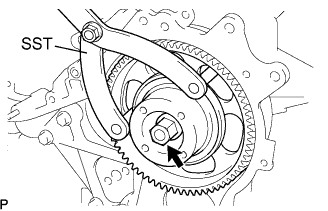 |
Using SST, install the supply pump gear with the nut.
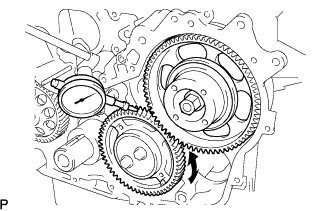 |
Using a dial indicator, measure the backlash.
|
Using SST, remove the nut.
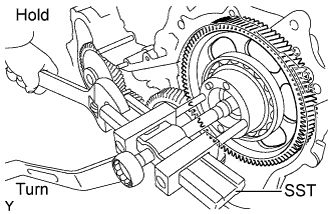 |
Using SST, remove the supply pump gear.
Remove the 2 nuts and supply pump.
| 21. REMOVE IDLE GEAR THRUST PLATE |
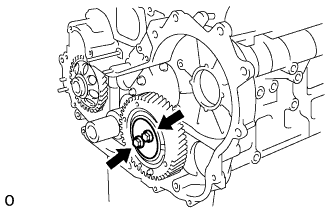 |
Remove the 2 bolts and thrust plate.
| 22. REMOVE IDLE GEAR NO.1 |
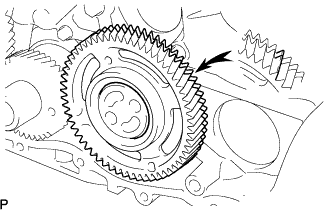 |
Turn the sub gear and align the gear teeth of the idle main gear and sub gear.
Remove the idle gear and sub gear.
| 23. REMOVE IDLE GEAR SHAFT NO.1 |
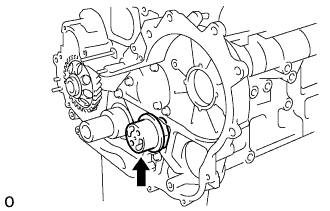 |
Remove the idle gear shaft.
| 24. REMOVE TIMING GEAR CASE OR TIMING CHAIN CASE OIL SEAL |
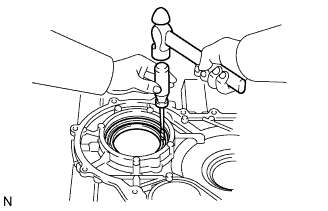 |
Using a screwdriver and hammer, tap out the oil seal.
| 25. REMOVE TIMING CHAIN OR BELT COVER OIL SEAL |
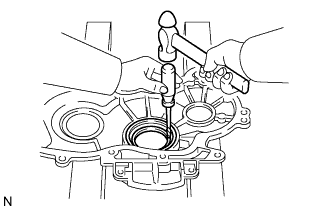 |
Using a screwdriver and hammer, tap out the oil seal.
| 26. INSPECT IDLE GEAR NO.1 |
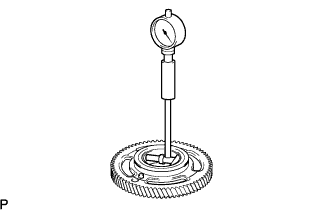 |
Using a cylinder gauge, measure the inside diameter of the idle gear.
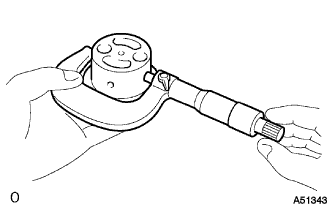 |
Using a micrometer, measure the diameter of the idle gear shaft.
Subtract the idle gear shaft diameter measurement from the idle gear inside diameter measurement.
| 27. REMOVE IDLE SUB GEAR NO.2 |
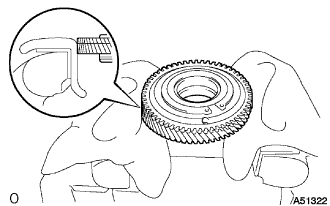 |
Mount the idler gear in a vise as shown in the illustration.
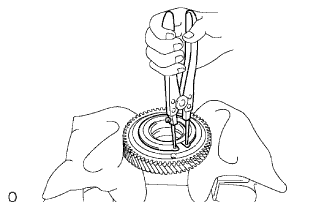 |
Using snap ring pliers, remove the snap ring.
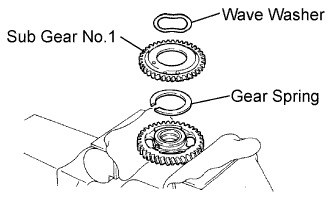 |
Remove the wave washer, sub gear and gear spring.
Remove the idle gear No.1 from the vise.
| 28. REMOVE OIL PAN SUB-ASSEMBLY |
Remove the drain plug and gasket.
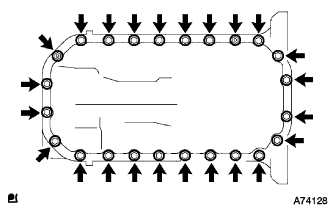 |
Remove the 22 bolts and 2 nuts.
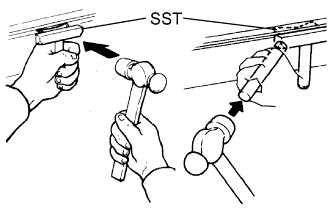 |
Insert the blade of SST between the oil pan and cylinder block, cut through the applied sealer and remove the oil pan.
| 29. REMOVE OIL STRAINER SUB-ASSEMBLY |
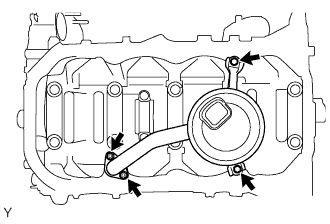 |
Remove the 2 bolts, 2 nuts, oil strainer and gasket.
| 30. REMOVE TIMING GEAR CASE ASSEMBLY |
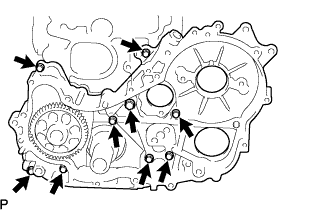 |
Remove the union bolt and 8 bolts.
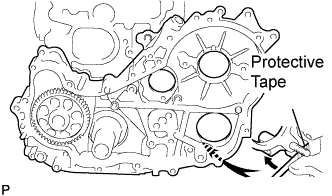 |
Pry the gear case in the location shown in the illustration, and remove the gear case.
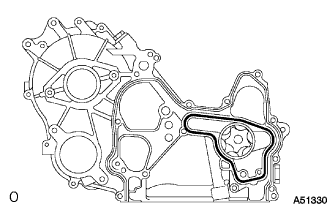 |
Remove the driven rotor and gasket.
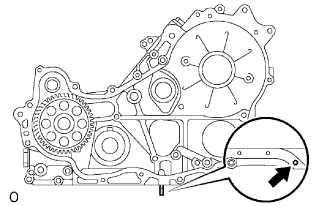 |
Remove the stud bolt.
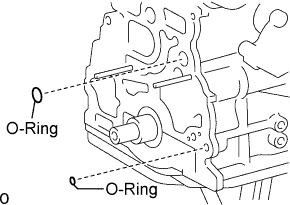 |
Remove the 2 O-rings.
| 31. REMOVE ENGINE REAR OIL SEAL RETAINER |
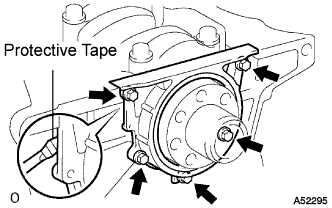 |
Remove the 5 bolts.
Using a screwdriver, remove the oil seal retainer by prying the portions between the oil seal retainer and cylinder block.
| 32. REMOVE ENGINE REAR OIL SEAL |
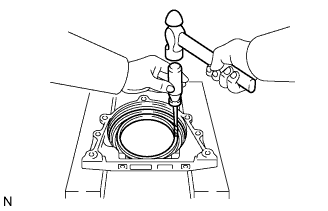 |
Using a screwdriver and hammer, tap out the oil seal.
| 33. INSPECT CYLINDER HEAD SET BOLT |
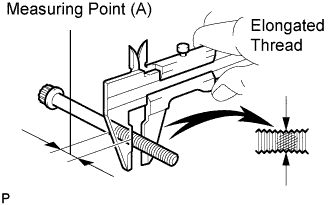 |
Using vernier calipers, measure the minimum outer diameter of the compressed thread at the measuring point (A).
Check for damage to the threads of the cylinder head bolt.
Check for damage to the threads of the cylinder block.
Check that the 18 cylinder head bolts are installed to the cylinder block smoothly.
| 34. INSPECT SUPPLY PUMP GEAR BEARING |
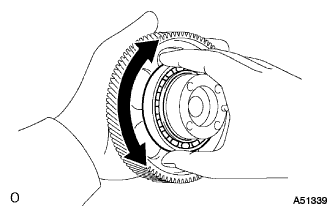 |
Check that the bearing is not rough or worn.
If necessary, replace the bearing.
| 35. REMOVE SUPPLY PUMP GEAR BEARING |
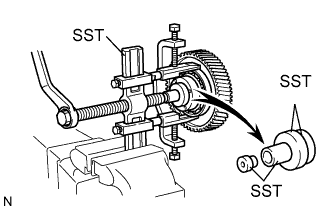 |
Using SST, remove the bearing.
| 36. REMOVE VALVE LIFTER |
Remove the valve lifters.
| 37. REMOVE INTAKE VALVE |
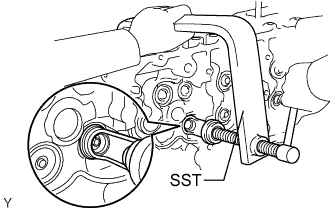 |
Using SST, compress the compression spring and remove the 2 keepers.
Remove the spring retainer, compression spring, valve and spring seat.
| 38. REMOVE EXHAUST VALVE |
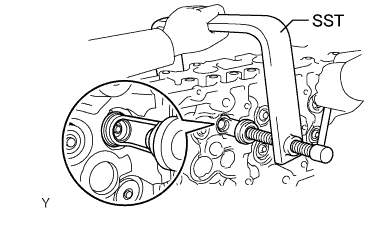 |
Using SST, compress the compression spring and remove the 2 keepers.
Remove the spring retainer, compression spring, valve and spring seat.
| 39. REMOVE VALVE STEM OIL SEAL |
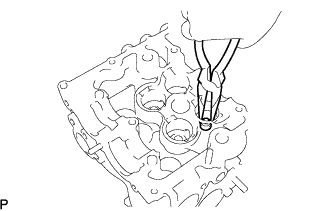 |
Using needle-nose pliers, remove the oil seals.
| 40. REMOVE VALVE SPRING SEAT PLATE WASHER |
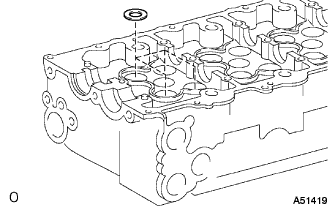 |
Remove the spring seats from the cylinder head.
| 41. REMOVE SEMICIRCULAR PLUG |
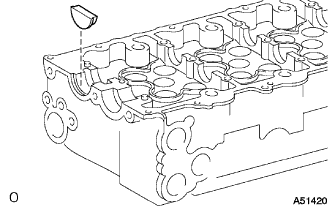 |
Remove the semicircular plug from the cylinder head.
| 42. REMOVE STRAIGHT SCREW PLUG NO.1 |
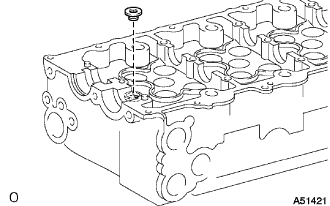 |
Using a 6 mm hexagon wrench, remove the screw plug.
| 43. REMOVE STUD BOLT |
Remove the stud bolts from the cylinder head.
| 44. REMOVE RING PIN |
Remove the ring pins from the cylinder head.
| 45. REMOVE TIGHT PLUG |
Remove the tight plugs from the cylinder head.
| 46. CLEAN CYLINDER HEAD ASSEMBLY |
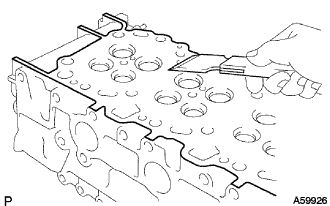 |
Using a gasket scraper, remove all the gasket material from the cylinder block contact surface.
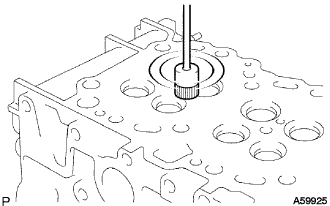 |
Using a wire brush, remove all the carbon from the combustion chambers.
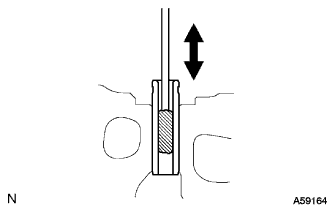 |
Using a brush and solvent, clean all the guide bushes.
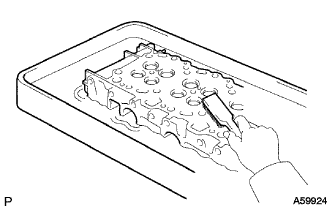 |
Using a soft brush and solvent, thoroughly clean the cylinder head.
| 47. INSPECT CYLINDER HEAD ASSEMBLY |
Inspect the cylinder head warpage.
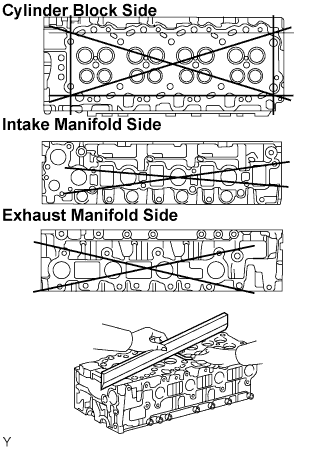 |
Using a precision straight edge and feeler gauge, measure the warpage on the surfaces contacting the cylinder block and the manifolds.
Inspect the cylinder head for cracks.
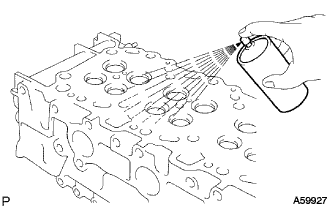 |
Using a dye penetrant, check the combustion chamber, intake ports, exhaust ports and cylinder block surface for cracks.
If cracked, replace the cylinder head.
| 48. INSPECT INTAKE VALVE SEATS |
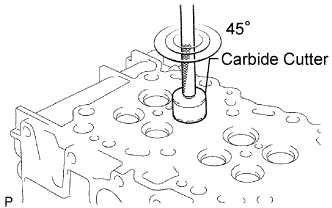 |
Using a 45° carbide cutter, resurface the valve seats. Clean metal filings from the seats.
Check the valve seating position.
Apply a light coat of prussian blue (or white lead) to the valve face.
Lightly press the valve against the seat. Do not rotate valve.
Check the valve face and seat for the following:
If prussian blue appears around the entire face, the valve is centered. If not, replace the valve.
If prussian blue appears around the entire valve seat, the guide and face are centered. If not, resurface the seat.
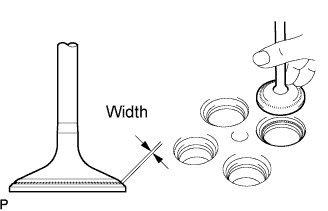 |
Check that the seat contact is in the middle of the valve face with the width below.
| 49. INSPECT EXHAUST VALVE SEATS |
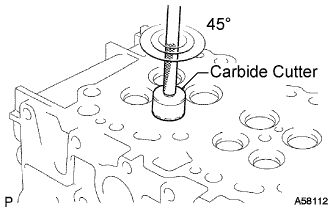 |
Using a 45° carbide cutter, resurface the valve seats. Clean metal filings from the seats.
Check the valve seating position.
Apply a light coat of prussian blue (or white lead) to the valve face.
Lightly press the valve against the seat. Do not rotate valve.
Check the valve face and seat for the following:
If prussian blue appears around the entire face, the valve is centered. If not, replace the valve.
If prussian blue appears around the entire valve seat, the guide and face are centered. If not, resurface the seat.
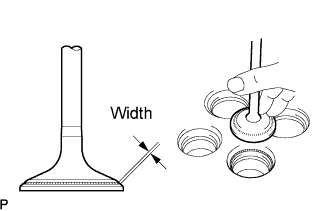 |
Check that the seat contact is in the middle of the valve face with the width below.
| 50. REPAIR INTAKE VALVE SEATS |
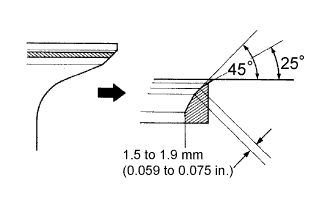 |
If the seating is too high on the valve face, use 25° and 45° cutters to correct the seat.
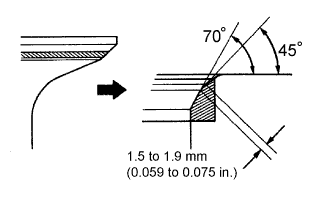 |
If the seating is too low on the valve face, use 70° and 45° cutters to correct the seat.
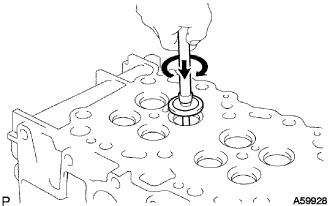 |
Handrub the valve and valve seat with an abrasive compound.
After handrubbing, clean the valve and valve seat.
| 51. REPAIR EXHAUST VALVE SEATS |
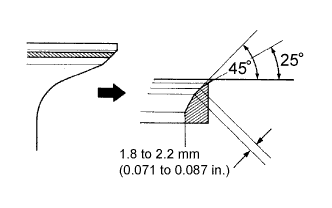 |
If the seating is too high on the valve face, use 25° and 45° cutters to correct the seat.
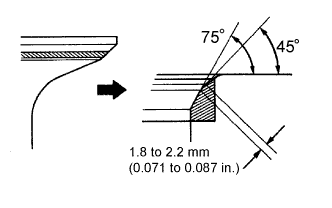 |
If the seating is too low on the valve face, use 75° and 45° cutters to correct the seat.
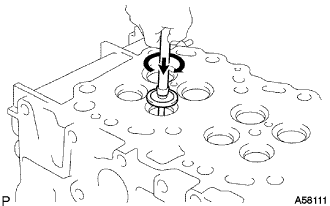 |
Handrub the valve and valve seat with an abrasive compound.
After handrubbing, clean the valve and valve seat.
| 52. INSPECT CAMSHAFT |
Inspect the circle runout.
Place the camshaft on V-blocks.
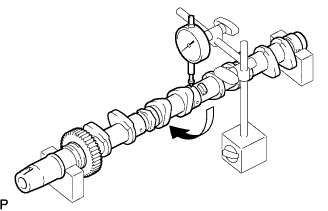 |
Using a dial indicator, measure the circle runout at the center journal.
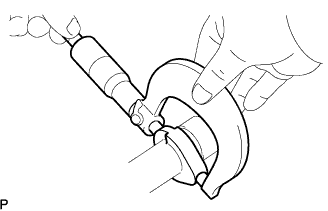 |
Using a micrometer, measure the cam lobe height.
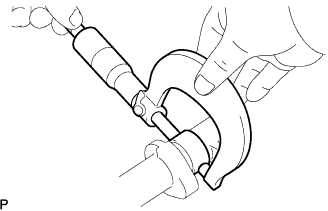 |
Inspect the journal diameter of the camshaft.
Using a micrometer, measure the journal diameter of the camshaft for the camshaft bearing.
Check the oil clearance.
Clean the bearing caps and journals.
Check the bearings for flaking and scoring.
If the bearings are damaged, replace the bearing caps and cylinder head as a set.
Install the bearings to the bearing caps and cylinder head.
Place the camshaft on the cylinder head.
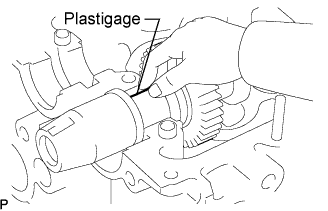 |
Lay a strip of Plastigage across each of the journals.
Install the bearing caps (see reassembly, step 43).
Remove the bearing caps.
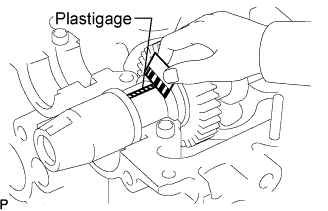 |
Measure the Plastigage at its widest point.
Completely remove the Plastigage.
Remove the camshaft.
Check the thrust clearance.
Install the camshaft (see reassembly, step 43).
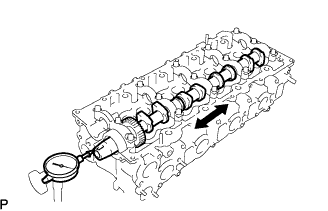 |
Using a dial indicator, measure the thrust clearance while moving the camshaft back and forth.
| 53. INSPECT NO.2 CAMSHAFT |
Inspect the circle runout.
Place the camshaft on V-blocks.
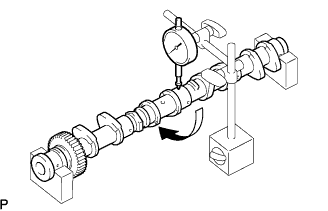 |
Using a dial indicator, measure the circle runout at the center journal.
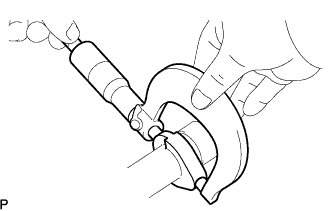 |
Using a micrometer, measure the cam lobe height.
Inspect the journal diameter of the camshaft.
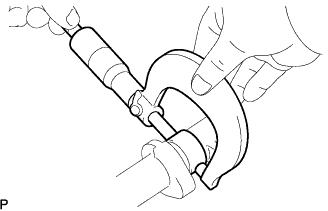 |
Using a micrometer, measure the journal diameter of the camshaft for the camshaft bearing.
Check the oil clearance.
Clean the bearing caps and journals.
Check the bearings for flaking and scoring.
If the bearings are damaged, replace the bearing caps and cylinder head as a set.
Install the bearings to the bearing caps and cylinder head.
Place the camshaft on the cylinder head.
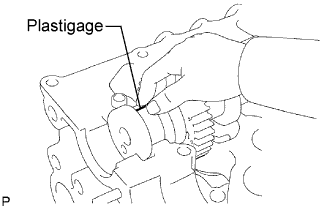 |
Lay a strip of Plastigage across each of the journals.
Install the bearing caps (see reassembly, step 43).
Remove the bearing caps.
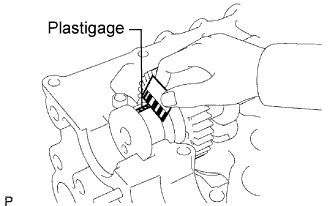 |
Measure the Plastigage at its widest point.
Completely remove the Plastigage.
Remove the camshaft.
Check the thrust clearance.
Install the camshaft (see reassembly, step 43).
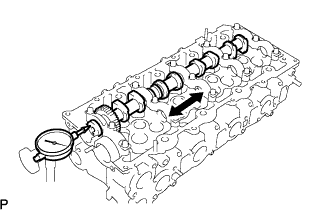 |
Using a dial indicator, measure the thrust clearance while moving the camshaft back and forth.
| 54. INSPECT INNER COMPRESSION SPRING |
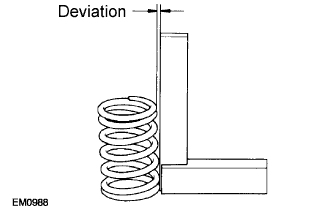 |
Using a steel square, measure the deviation of the spring.
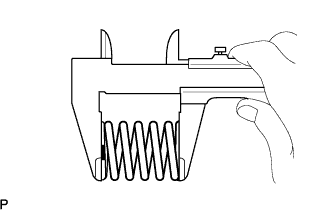 |
Using vernier calipers, measure the free length of the spring.
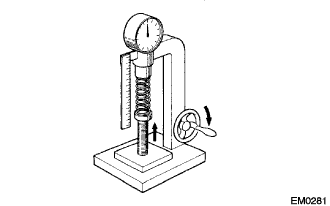 |
Using a spring tester, measure the tension of the valve spring at the specified installed length.
| 55. CLEAN INTAKE VALVE |
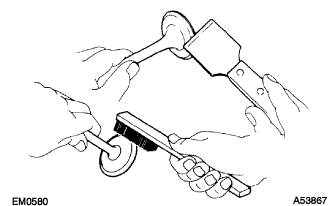 |
Using a gasket scraper, chip off any carbon from the valve heads.
Using a wire brush, thoroughly clean the valves.
| 56. INSPECT INTAKE VALVE |
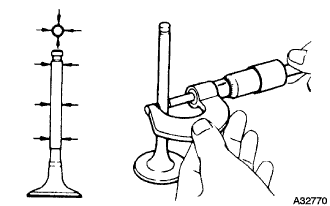 |
Using a micrometer, measure the diameter of the valve stem.
Grind the valve enough to remove pits and carbon.
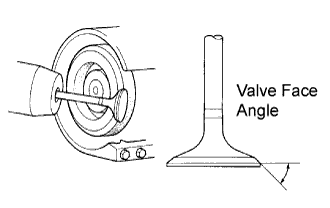 |
Check that the valve is ground to the correct valve face angle.
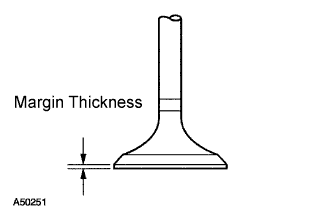 |
Check the valve head margin thickness.
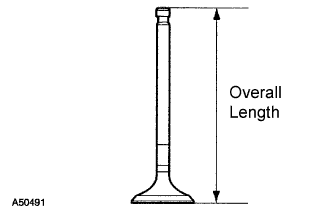 |
Check the valve overall length.
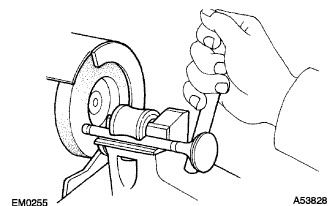 |
Check the surface of the valve stem tip for wear.
| 57. CLEAN EXHAUST VALVE |
|
Using a gasket scraper, chip off any carbon from the valve heads.
Using a wire brush, thoroughly clean the valves.
| 58. INSPECT EXHAUST VALVE |
|
Using a micrometer, measure the diameter of the valve stem.
Check the valve face angle.
|
Grind the valve enough to remove pits and carbon.
Check that the valve is ground to the correct valve face angle.
|
Check the valve head margin thickness.
|
Check the valve overall length.
|
Check the surface of the valve stem tip for wear.
| 59. INSPECT VALVE GUIDE BUSH OIL CLEARANCE |
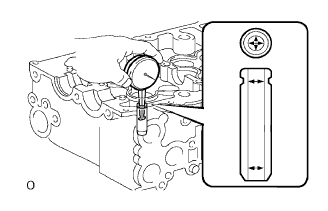 |
Using a caliper gauge, measure the inside diameter of the guide bush.
Subtract the valve stem diameter measurement (see steps 56 and 58) from the guide bush inside diameter measurement.
| Clearance | |
| Intake | 0.025 to 0.060 mm (0.0010 to 0.0024 in.) |
| Exhaust | 0.035 to 0.070 mm (0.0014 to 0.0028 in.) |
| Clearance | |
| Intake | 0.08 mm (0.0031 in.) |
| Exhaust | 0.10 mm (0.0039 in.) |
| 60. REMOVE INTAKE VALVE GUIDE BUSH |
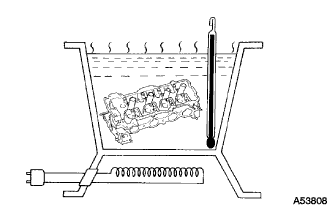 |
Gradually heat the cylinder head to approximately 80 to 100°C (176 to 212°F).
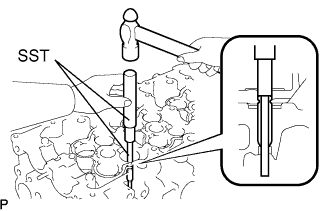 |
Using SST and a hammer, tap out the valve guide bush.
| 61. REMOVE EXHAUST VALVE GUIDE BUSH |
|
Gradually heat the cylinder head to approximately 80 to 100°C (176 to 212°F)
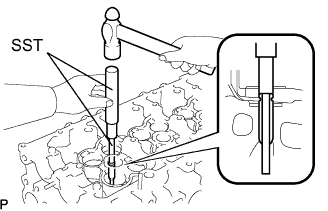 |
Using SST and a hammer, tap out the valve guide bush.
| 62. INSTALL INTAKE VALVE GUIDE BUSH |
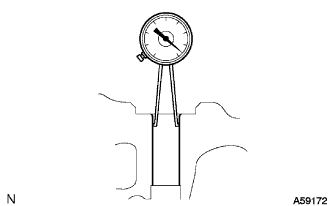 |
Using a caliper gauge, measure the bush bore diameter of the cylinder head.
Select a new guide bush (STD or O/S 0.05).
| Bush size | Bush bore diameter |
| Use STD | 10.985 to 11.006 mm (0.4325 to 0.4333 in.) |
| Use O/S 0.05 | 11.035 to 11.056 mm (0.4344 to 0.4353 in.) |
Gradually heat the cylinder head to approximately 80 to 100°C (176 to 212°F).
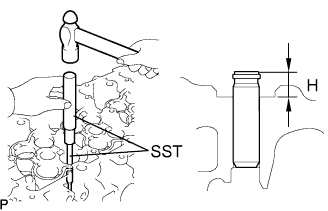 |
Using SST and a hammer, tap in a new guide bush to the specified protrusion height.
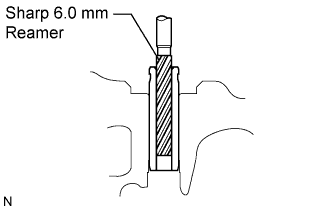 |
Using a sharp 6.0 mm reamer, ream the guide bush to obtain the standard specified clearance (see step 59) between the guide bush and valve stem.
| 63. INSTALL EXHAUST VALVE GUIDE BUSH |
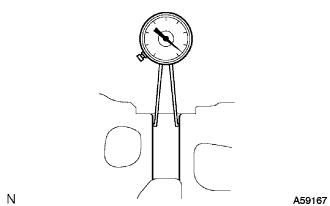 |
Using a caliper gauge, measure the bush bore diameter of the cylinder head.
Select a new guide bush (STD or O/S 0.05).
| Bush size | Bush bore diameter |
| Use STD | 10.985 to 11.006 mm (0.4325 to 0.4333 in.) |
| Use O/S 0.05 | 11.035 to 11.056 mm (0.4344 to 0.4353 in.) |
Gradually heat the cylinder head to approximately 80 to 100°C (176 to 212°F).
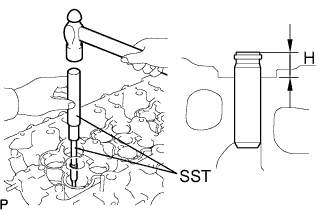 |
Using SST and a hammer, tap in a new guide bush to the specified protrusion height.
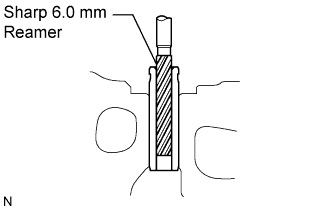 |
Using a sharp 6.0 mm reamer, ream the guide bush to obtain the standard specified clearance (see step 59) between the guide bush and valve stem.
| 64. INSPECT VALVE LIFTER |
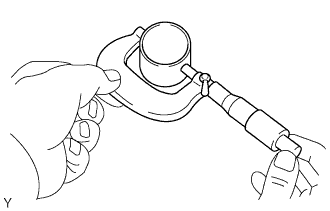 |
Using a micrometer, measure the lifter diameter.
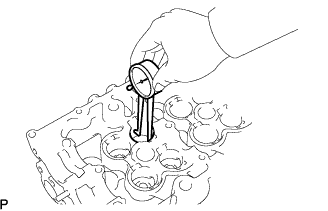 |
Using a caliper gauge, measure the lifter bore diameter of the cylinder head.
Subtract the lifter diameter measurement from the lifter bore diameter measurement.
| 65. REMOVE CYLINDER BLOCK OIL ORIFICE |
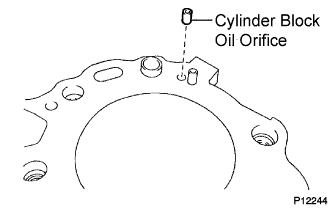 |
Remove the cylinder block oil orifice from the cylinder block.
| 66. INSPECT CYLINDER BLOCK OIL ORIFICE |
Check the oil orifice for damage or clogging.
If necessary, replace the oil orifice.
| 67. INSPECT CONNECTING ROD THRUST CLEARANCE |
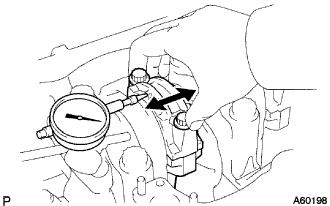 |
Using a dial indicator, measure the thrust clearance while moving the connecting rod back and forth.
| 68. INSPECT CONNECTING ROD OIL CLEARANCE |
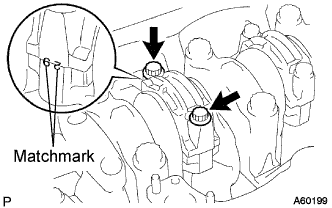 |
Check the matchmarks on the connecting rod and cap to ensure correct reassembly.
Remove the 2 connecting road cap bolts.
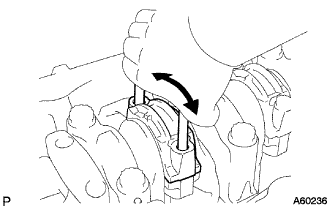 |
Using the 2 removed connecting rod bolts, pry the connecting rod cap back and forth, and remove the connecting cap.
Clean the crank pin and bearing.
Check the crank pin and bearing for pitting and scratches.
If the crank pin or bearing is damaged, replace the bearings. If necessary, grind or replace the crankshaft.
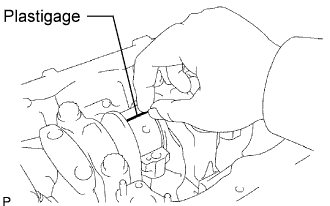 |
Lay a strip of Plastigage across the crank pin.
Install the connecting rod cap with the 2 bolts (see reassembly, step 13).
Remove the 2 bolts, connecting rod cap and lower bearing (see steps (b) and (c) above).
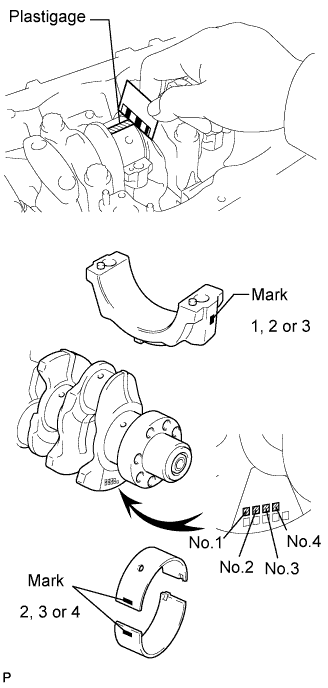 |
Measure the Plastigage at its widest point.
| Size | Clearance |
| STD | 0.036 to 0.054 mm (0.0014 to 0.0021 in.) |
| U/S 0.25, U/S 0.50 | 0.037 to 0.077 mm (0.0015 to 0.0030 in.) |
| Mark | Diameter |
| 1 | 62.014 to 62.020 mm (2.4415 to 2.4417 in.) |
| 2 | 62.020 to 62.026 mm (2.4417 to 2.4420 in.) |
| 3 | 62.026 to 62.032 mm (2.4420 to 2.4422 in.) |
| Mark | Diameter |
| 1 | 58.994 to 59.000 mm (2.3226 to 2.3228 in.) |
| 2 | 58.988 to 58.994 mm (2.3224 to 2.3226 in.) |
| 3 | 58.982 to 58.988 mm (2.3221 to 2.3224 in.) |
| Mark | Bearing center wall thickness |
| 2 | 1.486 to 1.489 mm (0.0585 to 0.0586 in.) |
| 3 | 1.489 to 1.492 mm (0.0586 to 0.0587 in.) |
| 4 | 1.492 to 1.495 mm (0.0587 to 0.0589 in.) |
| 5 | 1.495 to 1.498 mm (0.0589 to 0.0590 in.) |
| 6 | 1.498 to 1.501 mm (0.0590 to 0.0591 in.) |
Completely remove the Plastigage.
| 69. REMOVE CONNECTING ROD BEARING |
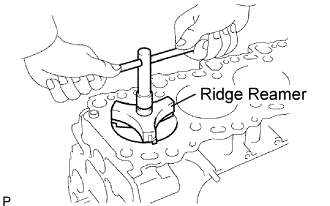 |
Using a ridge reamer, remove all the carbon from the top of the cylinder.
Push the piston, connecting rod assembly and upper bearing through the top of the cylinder block.
| 70. INSPECT PISTON W/CONNECTING ROD |
Check the fitting condition between the piston and piston pin.
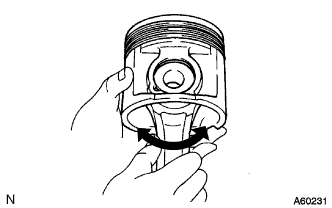 |
Try to move the piston back and forth on the piston pin.
If any movement is felt, replace the piston and pin with a new piston and pin as a set.
| 71. REMOVE PISTON RING SET |
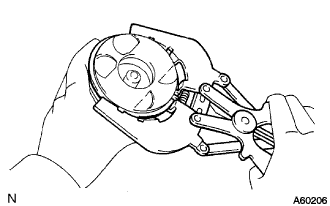 |
Using a piston ring expander, remove the 2 compression rings.
Remove the coil and oil ring by hand.
| 72. REMOVE PISTON SUB-ASSEMBLY W/PIN |
Disconnect the connecting rod from the piston.
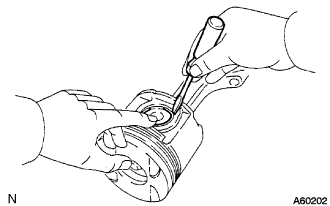 |
Using a screwdriver, pry off the 2 snap rings from the piston.
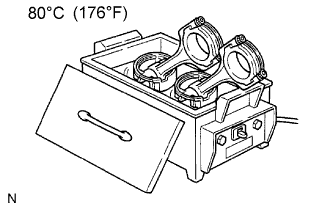 |
Gradually heat the piston to approximately 80°C (176°F).
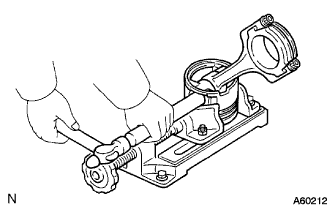 |
Using a plastic hammer and brass bar, lightly tap out the piston pin and pin. Then remove the connecting rod.
| 73. INSPECT CRANKSHAFT THRUST CLEARANCE |
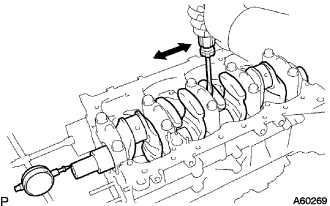 |
Using a dial indicator, measure the thrust clearance while prying the crankshaft back and forth with a screwdriver.
| Size | Thickness |
| STD | 2.430 to 2.480 mm (0.0957 to 0.0976 in.) |
| O/S 0.125 | 2.555 to 2.605 mm (0.1005 to 0.1025 in.) |
| O/S 0.250 | 2.680 to 2.730 mm (0.1055 to 0.1074 in.) |
| 74. INSPECT CRANKSHAFT OIL CLEARANCE |
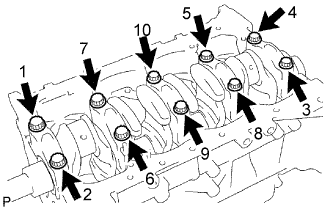 |
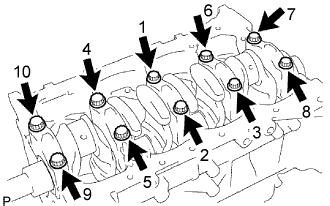
Uniformly loosen and remove the 10 crankshaft bearing cap bolts in several steps, in the sequence shown in the illustration.
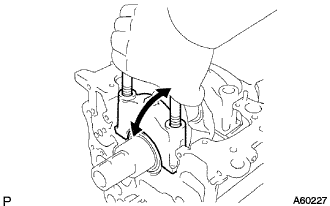 |
Using the removed crankshaft bearing cap bolts, pry the cap back and forth, and remove the crankshaft bearing caps, lower crankshaft bearings and lower thrust washers (No. 5 crankshaft bearing cap only).
Lift out the crankshaft.
Clean each crankshaft journal and bearing.
Check each crankshaft journal and bearing for pitting and scratches.
If the journal or bearing is damaged, replace the bearings. If necessary, grind or replace the crankshaft.
Place the crankshaft on the cylinder block.
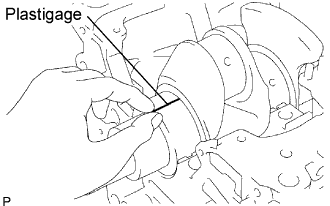 |
Lay a strip of Plastigage across each journal.
 |
Install the 5 crankshaft bearing caps with the 10 bolts (see reassembly, step 12).
Remove the 10 bolts and 5 crankshaft bearing caps (see steps (a) and (b) above).
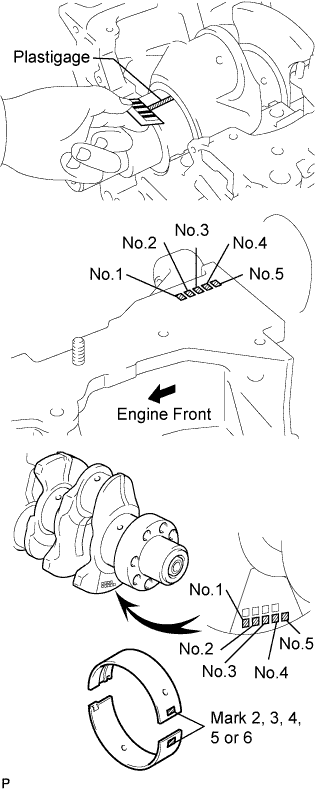 |
Measure the Plastigage at its widest point.
| Size | Oil clearance |
| STD | 0.030 to 0.048 mm (0.0012 to 0.0019 in.) |
| O/S 0.25, O/S 0.50 | 0.037 to 0.077 mm (0.0015 to 0.0030 in.) |
| Mark | Diameter |
| 1 | 75.000 to 75.006 mm (2.9528 to 2.9530 in.) |
| 2 | 75.006 to 75.012 mm (2.9530 to 2.9532 in.) |
| 3 | 75.012 to 75. 018 mm (2.9532 to 2.9535 in.) |
| Mark | Diameter |
| 1 | 69.994 to 70.000 mm (2.7557 to 2.7559 in.) |
| 2 | 69.988 to 69.994 mm (2.7554 to 2.7557 in.) |
| 3 | 69.982 to 69.988 mm (2.7552 to 2.7554 in.) |
| Mark | Bearing center wall thickness |
| 2 | 2.482 to 2.485 mm (0.0977 to 0.0978 in.) |
| 3 | 2.485 to 2.488 mm (0.0978 to 0.0980 in.) |
| 4 | 2.488 to 2.491 mm (0.0980 to 0.0981 in.) |
| 5 | 2.491 to 2.494 mm (0.0981 to 0.0982 in.) |
| 6 | 2.494 to 2.497 mm (0.0982 to 0.0983 in.) |
Completely remove the Plastigage.
| 75. REMOVE CRANKSHAFT |
Lift out the crankshaft.
Remove the upper bearings and upper thrust washers from the cylinder block.
| 76. REMOVE OIL NOZZLE NO.1 SUB-ASSEMBLY |
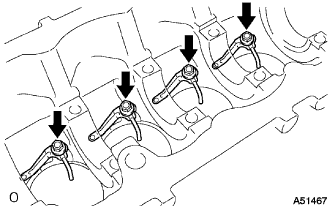 |
Remove the 4 check valves and oil nozzles.
| 77. INSPECT OIL CHECK VALVE SUB-ASSEMBLY |
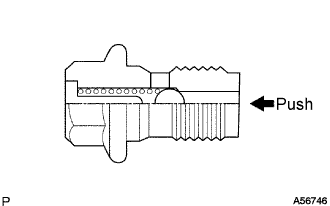 |
Push the valve with a wooden stick to check if it is stuck.
| 78. REMOVE SCREW PLUG |
Remove the screw plug and gasket.
| 79. CLEAN CYLINDER BLOCK ASSEMBLY |
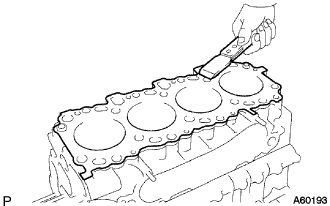 |
Using a gasket scraper, remove all the gasket material from the top surface of the cylinder block.
Using a soft brush and solvent, thoroughly clean the cylinder block.
| 80. INSPECT CYLINDER BLOCK ASSEMBLY |
Inspect for warpage.
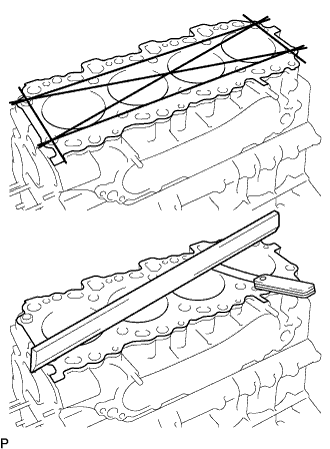 |
Using a precision straight edge and feeler gauge, measure the warpage on the surface contacting the cylinder head cap.
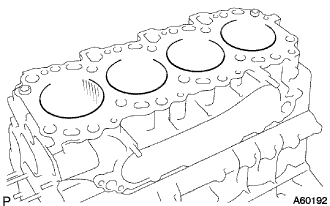 |
Visually check the cylinder for vertical scratches.
If deep scratches are present, rebore all the 4 cylinders. If necessary, replace the cylinder block.
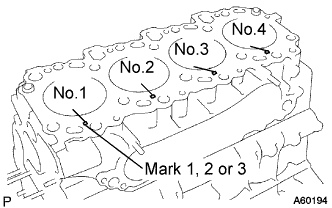 |
Inspect the cylinder bore diameter.
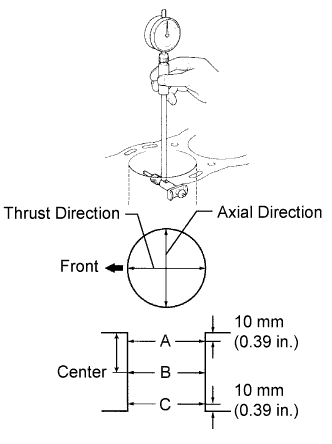 |
Using a cylinder gauge, measure the cylinder bore diameter at positions A, B and C in the thrust and axial directions.
| Mark | Diameter |
| 1 | 92.000 to 92.010 mm (3.6220 to 3.6224 in.) |
| 2 | 92.010 to 92.020 mm (3.6224 to 3.6228 in.) |
| 3 | 92.020 to 92.030 mm (3.6228 to 3.6232 in.) |
|
Inspect the cylinder ridge.
| 81. CLEAN PISTON |
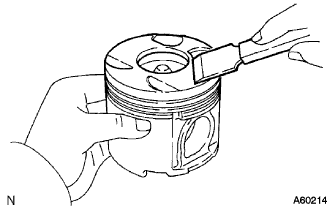 |
Using a gasket scraper, remove the carbon from the piston top.
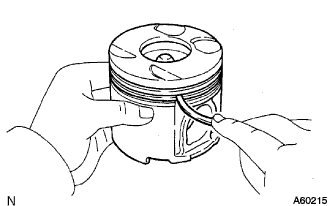 |
Using a groove cleaning tool or broken ring, clean the piston ring grooves.
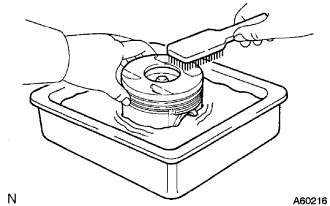 |
Using solvent and a brush, thoroughly clean the piston.
| 82. INSPECT PISTON SUB-ASSEMBLY W/PIN |
Inspect the piston oil clearance.
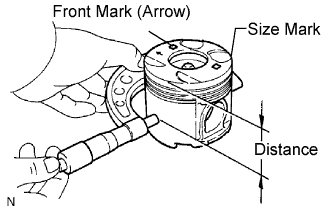 |
Using a micrometer, measure the piston diameter at right angles to the piston center line, the indicated distance from the piston head.
| - | - | Diameter |
| STD | Mark 1 | 91.920 to 91.930 mm (3.6189 to 3.6193 in.) |
| STD | Mark 2 | 91.931 to 91.940 mm (3.6193 to 3.6197 in.) |
| STD | Mark 3 | 91.941 to 91.950 mm (3.6197 to 3.6201 in.) |
| STD | O/S 0.50 | 92.42 to 92.45 mm (3.6386 to 3.6398 in.) |
Measure the cylinder bore diameter in the thrust directions (see step 80).
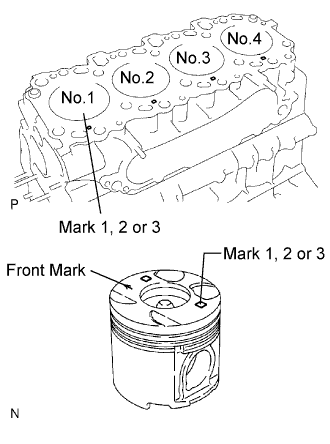 |
Subtract the piston diameter measurement from the cylinder bore diameter measurement.
Prepare 4 new O/S pistons.
|
Using a micrometer, measure the piston diameter at right angles to the piston center line, the indicated distance from the piston head.
Calculate the amount each cylinder is to be rebored as follows:
| P | Piston diameter |
| C | Piston clearance: 0.070 to 0.090 mm (0.0028 to 0.0035 in.) |
| H | Allowance for honing: 0.02 mm (0.0008 in.) or less |
Bore and hone the cylinders to calculated dimensions.
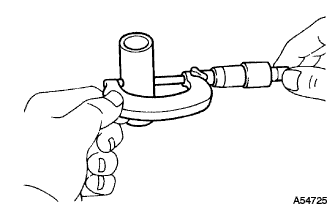 |
Using a micrometer, measure the piston pin diameter.
| Mark | Diameter |
| A | 33.996 to 34.000 mm (1.3384 to 1.3385 in.) |
| B | 34.001 to 34.004 mm (1.3385 to 1.3387 in.) |
| C | 34.005 to 34.008 mm (1.3387 to 1.3388 in.) |
Inspect the piston pin fit.
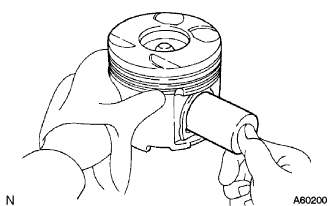 |
Heat the piston to 80°C (176°F), and push the piston pin into the piston pin hole with your thumb.
If the pin can be installed at a lower temperature, replace the piston and pin as a set.
| 83. INSPECT PISTON RING SET |
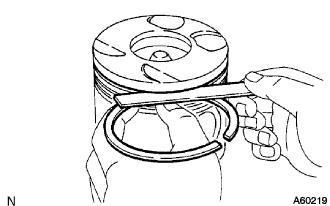 |
Inspect the piston ring groove clearance.
Using a feeler gauge, measure the clearance between a new piston ring and the wall of the ring groove.
| Ring | Groove clearance |
| No. 1 | 0.060 to 0.100 mm (0.0024 to 0.0039 in.) |
| No. 2 | 0.050 to 0.090 mm (0.0020 to 0.0035 in.) |
| Oil | 0.030 to 0.075 mm (0.0012 to 0.0030 in.) |
Inspect the piston ring end gap.
Insert the piston ring into the cylinder bore.
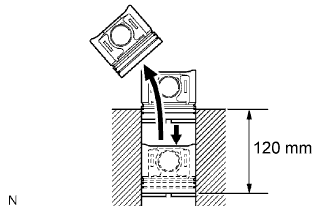 |
Using a piston, push the piston ring a little beyond the bottom of the ring travel, 120 mm (4.72 in.) from the top of the cylinder block.
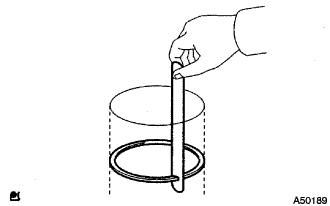 |
Using a feeler gauge, measure the end gap.
| Ring | End gap |
| No. 1 | 0.390 to 0.510 mm (0.0106 to 0.0154 in.) |
| No. 2 | 0.470 to 0.620 mm (0.0185 to 0.0244 in.) |
| Oil | 0.200 to 0.400 mm (0.0079 to 0.0157 in.) |
| Ring | End gap |
| No. 1 | 1.21 mm (0.0476 in.) |
| No. 2 | 1.44 mm (0.0567 in.) |
| Oil | 1.22 mm (0.0480 in.) |
| 84. INSPECT CONNECTING ROD SUB-ASSEMBLY |
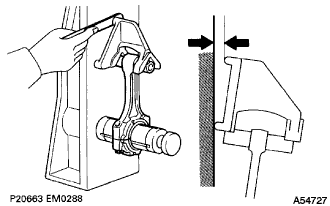 |
Using a rod aligner and feeler gauge, check the connecting rod alignment.
Check if the rod is bent.
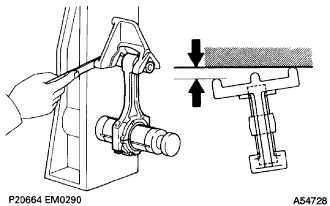 |
Check if the rod is twisted.
| 85. INSPECT PISTON PIN OIL CLEARANCE |
Inspect the piston pin oil clearance.
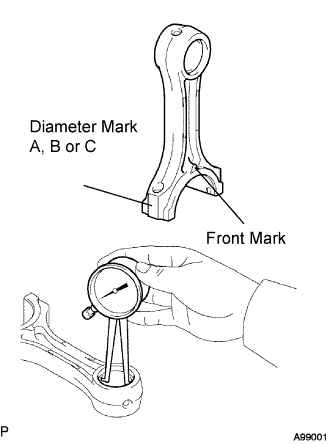 |
Using a caliper gauge, measure the inside diameter of the connecting rod bush.
| Mark | Diameter |
| A | 34.012 to 34.016 mm (1.3390 to 1.3392 in.) |
| B | 34.017 to 34.020 mm (1.3392 to 1.3393 in.) |
| C | 34.021 to 34.024 mm (1.3394 to 1.3395 in.) |
Subtract the piston pin diameter measurement (see step 82) from the bush inside diameter measurement.
| 86. REMOVE CONNECTING ROD SMALL END BUSH |
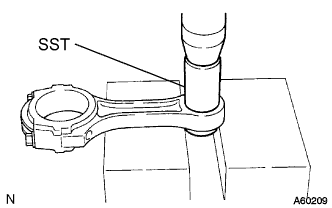 |
Using SST and a press, press out the bush.
| 87. INSPECT CONNECTING ROD BOLT |
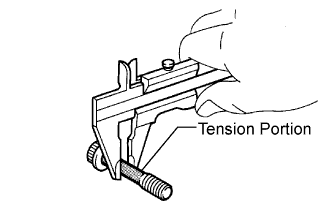 |
Using vernier calipers, measure the diameter of the tension portion of the connecting rod bolt.
| 88. INSPECT CRANKSHAFT |
Inspect for circle runout.
Place the crankshaft on V-blocks.
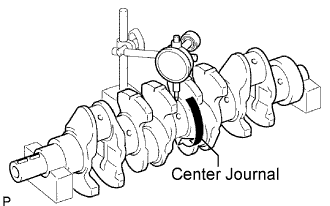 |
Using a dial indicator, measure the circle runout at the center journal.
Inspect the main journals and crank pins.
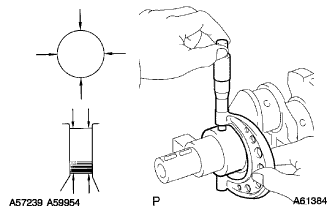 |
Using a micrometer, measure the diameter of each main journal and crank pin.
| Size | Diameter |
| STD | 69.982 to 70.000 mm (2.7552 to 2.7559 in.) |
| U/S 0.25 | 69.745 to 69.755 mm (2.7459 to 2.7463 in.) |
| U/S 0.50 | 69.495 to 69.505 mm (2.7360 to 2.7364 in.) |
| Size | Diameter |
| STD | 58.982 to 59.000 mm (2.3221 to 2.3228 in.) |
| U/S 0.25 | 58.745 to 58.755 mm (2.3128 to 2.3132 in.) |
| U/S 0.50 | 58.495 to 58.505 mm (2.3029 to 2.3033 in.) |
Check each main journal and crank pin for taper and out-of-round as shown.
If necessary, grind and hone the main journals and/or crank pins.
Grind and hone the main journals and/or crank pins to the finished undersized diameter (see procedure (b) above).
Install new main journal and/or crankshaft pin undersized bearing.
| 89. INSPECT CRANKSHAFT BEARING CAP BOLT |
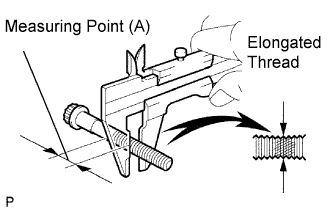 |
Using vernier calipers, measure the minimum diameter of the compressed thread at the measuring point (A).