 |
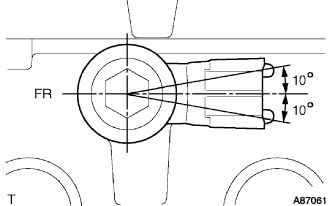
Install the bolt and knock control sensor as shown in the illustration.
- Torque:
- 20 N*m{ 204 kgf*cm , 15 ft.*lbf }
KNOCK SENSOR > INSTALLATION |
| 1. INSTALL KNOCK CONTROL SENSOR |
|
Install the bolt and knock control sensor as shown in the illustration.
Connect the knock control sensor connector.
| 2. INSTALL INTAKE MANIFOLD |
Install a new gasket onto the intake manifold.
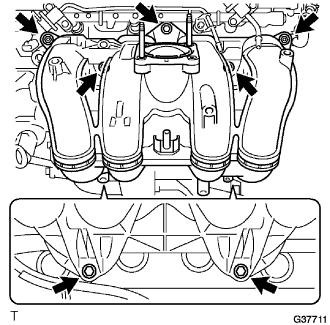 |
Install the 5 bolts, 2 nuts, and intake manifold.
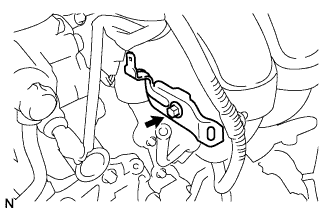 |
Install the bolt and wire harness bracket to the intake manifold.
Connect the brake booster hose and the fuel vapor feed hose with the 2 clips.
Connect the ventilation hose No.3 from the intake manifold.
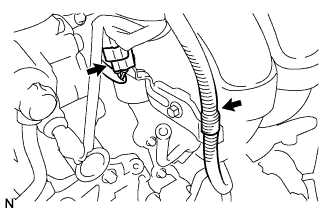 |
Connect the 2 wire harness clamps.
Connect the vacuum hose and connector to the VSV.
| 3. INSTALL TRANSMISSION OIL FILLER TUBE SUB-ASSEMBLY (for Automatic Transmission) |
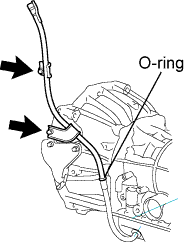 |
Coat a new O-ring with ATF and install the oil filler tube.
Install the oil filler tube with 2 bolts.
| 4. INSTALL FUEL INJECTOR ASSEMBLY |
Apply a light coat of grease or gasoline to new O-rings and install them to the injector spacers.
Install the injection spacers.
Apply a light coat of grease or gasoline to the place where the delivery pipe touches the O-ring.
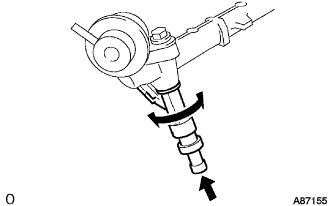 |
To install the fuel injector into the fuel delivery pipe, push the fuel injector while twisting it right and left.
| 5. INSTALL FUEL DELIVERY PIPE SUB-ASSEMBLY |
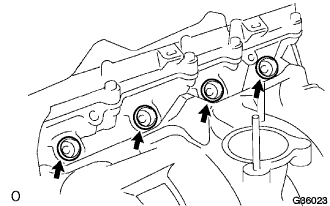 |
Install the 4 spacers to the cylinder head.
Install the delivery pipe spacers.
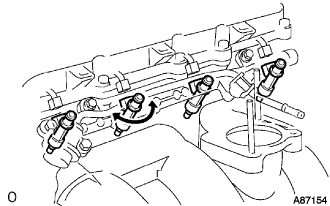 |
Temporarily install the 2 bolts and fuel delivery pipe together with the 4 injectors.
Fully tighten the 2 bolts.
Apply a light coat of grease or gasoline to the place where the delivery pipe touches the O-ring.
Install the 2 bolts and pressure pulsation damper assembly.
Connect the 2 fuel hoses.
| 6. INSTALL FUEL HOSE |
Align the connector and pipe. Push on the connector until the retainer locks with a click sound. (Click here)
Pull the connector to check that the connector is securely connected. (Click here)
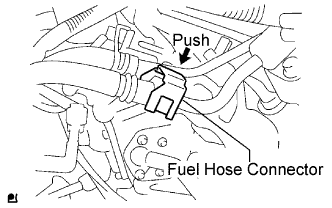 |
Install the connector and lock it with the fuel hose connector cover. (Click here)
| 7. INSTALL THROTTLE BODY ASSEMBLY |
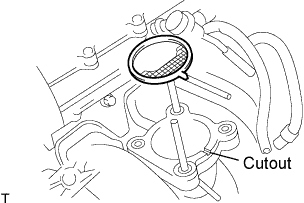 |
Install a new gasket onto the intake manifold.
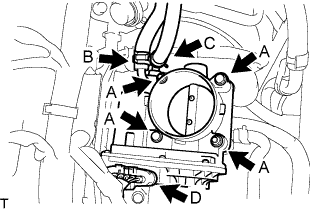 |
Install the throttle body assembly with the 2 bolts and 2 nuts. (A)
Connect the water by-pass hose. (B)
Connect the water by-pass hose No.2. (C)
Connect the throttle motor connector. (D)
| 8. INSTALL INTAKE AIR CONNECTOR |
Temporarily install the intake air connector to the throttle body assembly.
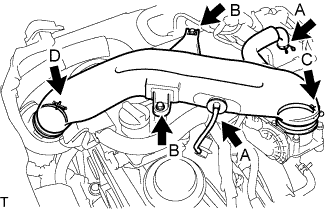 |
Connect the ventilation hose No.2 and the vacuum hose. (A)
Install the intake air connector with the 2 bolts. (B)
Tighten the 2 hose clamp bolts. (C)
Tighten the 2 hose clamp bolts. (D)
| 9. INSTALL ENGINE SERVICE HOLE SUB COVER SUB-ASSEMBLY |
Install the engine service hole sub cover with the 5 bolts.
| 10. INSTALL FRONT DOOR SCUFF PLATE RH |
| 11. INSTALL FRONT SEAT ASSEMBLY RH (for Hi-back Seat Type) |
Perform the same procedure as above on the opposite side.
| 12. INSTALL FRONT SEAT ASSEMBLY RH (for Low-back Seat Type) |
Perform the same procedure as above on the opposite side.
| 13. ADD ENGINE COOLANT |
Firmly tighten the drain plugs and fill the reservoir tank with coolant to the top of the inlet.
Remove the 2-way that is located near the throttle body.
When air is bled and the coolant drains out, firmly install the 2-way.
Add coolant up to the B line mark in the reservoir tank and install the radiator cap.
| Condition | Capacity |
| w/ rear heater | 15.0 liters (15.8 US qts, 13.2 lmp. qts) |
| w/o rear heater | 13.0 liters (13.7 US qts, 11.4 lmp. qts) |
Warm up the engine.
After the engine cools down, check that the coolant level is between the LOW and FULL level marks.
| 14. CONNECT CABLE TO NEGATIVE BATTERY TERMINAL |
| 15. CHECK FOR ENGINE COOLANT LEAKS |
| 16. INSTALL ENGINE UNDER COVER NO.2 (w/ Engine Under Cover No.2) |
Install the engine under cover No.2 together with the engine side under cover LH and engine side under cover RH (for Wide Body).
| 17. INSTALL ENGINE UNDER COVER NO.1 (w/ Engine Under Cover No.1) |