 |
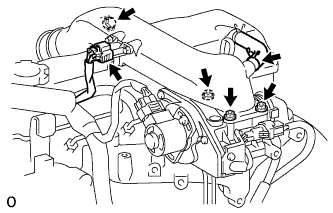
Remove the bolt, 3 nuts, intake air connector and gasket.
VALVE CLEARANCE > ADJUSTMENT |
| 1. REMOVE AIR CLEANER HOSE NO.2 |
Loosen the bolt, and disconnect the air cleaner hose No.2.
| 2. REMOVE INTAKE AIR CONNECTOR SUB-ASSEMBLY |
Disconnect the ventilation hose.
Disconnect the turbo pressure sensor connector.
|
Remove the bolt, 3 nuts, intake air connector and gasket.
| 3. REMOVE CYLINDER HEAD COVER SUB-ASSEMBLY |
Disconnect the ventilation hose.
Remove the 9 bolts, nut, cylinder head cover and gasket.
| 4. SET NO.1 CYLINDER TO TDC/ COMPRESSION |
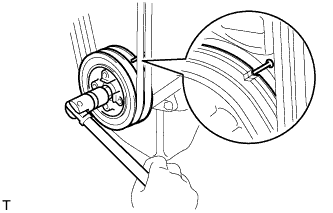 |
Turn the crankshaft pulley and align its groove with the timing pointer.
Check that the valve lifters on the No.1 cylinder are loose and valve lifters on the No.4 are tight.
If not, turn the crankshaft one revolution (360°) and align the mark as above.
| 5. INSPECT VALVE CLEARANCE |
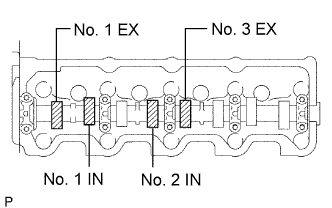 |
Check only the valves indicated in the illustration.
Using a feeler gauge, measure the clearance between the valve lifter and camshaft.
Record the out-of-specification valve clearance measurements. They will be used later to determine the required replacement adjusting shim.
| Intake | 0.20 to 0.30 mm (0.008 to 0.012 in.) |
| Exhaust | 0.40 to 0.50 mm (0.016 to 0.020 in.) |
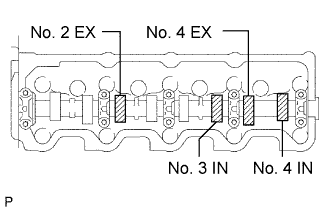 |
Turn the crankshaft one revolution (360°) and align the mark as above. (See procedure in step 3)
Check only the valves indicated in the illustration. Measure the valve clearance. (See procedure in step (a))
| Intake | 0.20 to 0.30 mm (0.008 to 0.012 in.) |
| Exhaust | 0.40 to 0.50 mm (0.016 to 0.020 in.) |
| 6. ADJUST VALVE CLEARANCE |
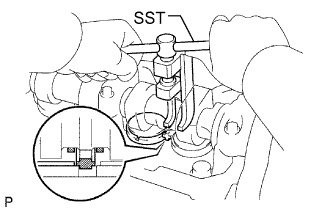 |
Remove the adjusting shim.
Turn the crankshaft so that the cam lobe of the camshaft on the adjusting valve points upward.
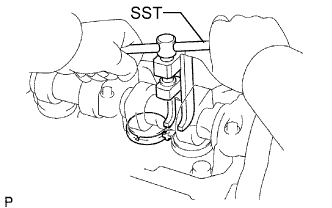
Using SST, press down the valve lifter.
Position the notch of the valve lifter with it facing the exhaust manifold side.
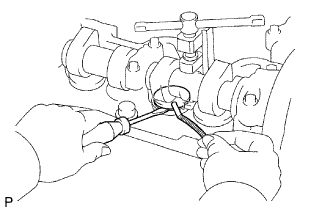 |
Remove the adjusting shim with a screwdriver and magnetic finger.
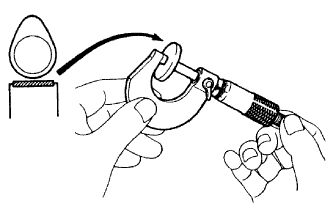 |
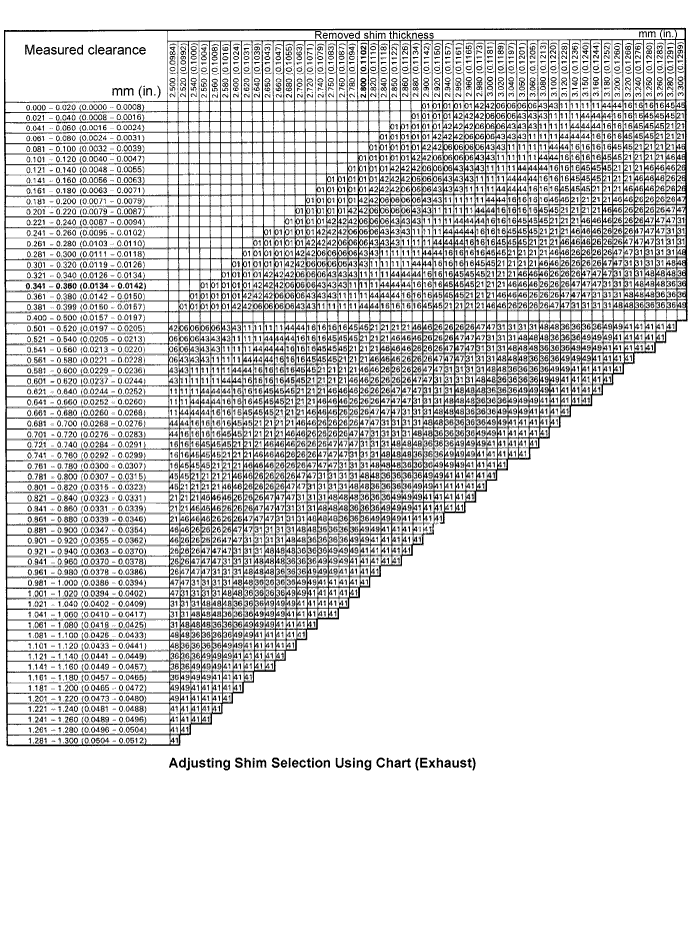
Determine the replacement adjusting shim size by following the formula or charts:
Using a micrometer, measure the thickness of the removed shim.
Calculate the thickness of a new shim so that the valve clearance comes within the specified value.
T = Thickness of removed shim
A = Measured valve clearance
N = Thickness of new shim
| Intake | N = T + (A - 0.25 mm (0.010 in.)) |
| Exhaust | N = T + (A - 0.45 mm (0.018 in.)) |
Select a new shim with a thickness as close as possible to the calculated value.
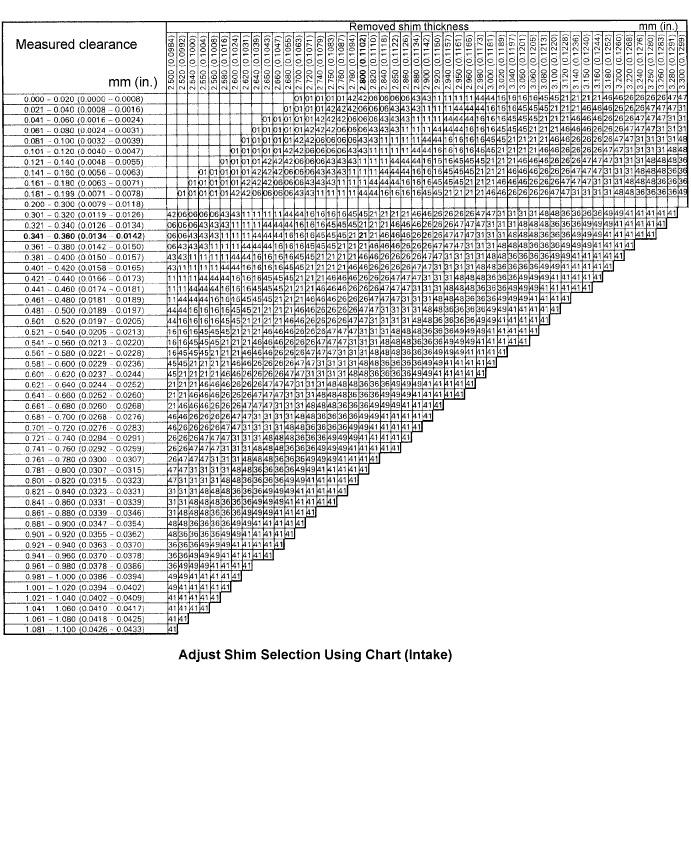
| Shim No. | Thickness | Shim No. | Thickness |
| 01 | 2.50 (0.0984) | 46 | 2.95 (0.1161) |
| 42 | 2.55 (0.1004) | 26 | 3.00 (0.1181) |
| 06 | 2.60 (0.1024) | 47 | 3.05 (0.1201) |
| 43 | 2.65 (0.1043) | 31 | 3.10 (0.1220) |
| 11 | 2.70 (0.1063) | 48 | 3.15 (0.1240) |
| 44 | 2.75 (0.1083) | 36 | 3.20 (0.1260) |
| 16 | 2.80 (0.1102) | 49 | 3.25 (0.1280) |
| 45 | 2.85 (0.1122) | 41 | 3.30 (0.1299) |
| 21 | 2.90 (0.1142) |
| Shim No. | Thickness | Shim No. | Thickness |
| 01 | 2.50 (0.0984) | 46 | 2.95 (0.1161) |
| 42 | 2.55 (0.1004) | 26 | 3.00 (0.1181) |
| 06 | 2.60 (0.1024) | 47 | 3.05 (0.1201) |
| 43 | 2.65 (0.1043) | 31 | 3.10 (0.1220) |
| 11 | 2.70 (0.1063) | 48 | 3.15 (0.1240) |
| 44 | 2.75 (0.1083) | 36 | 3.20 (0.1260) |
| 16 | 2.80 (0.1102) | 49 | 3.25 (0.1280) |
| 45 | 2.85 (0.1122) | 41 | 3.30 (0.1299) |
| 21 | 2.90 (0.1142) |
 |
Install a new adjusting shim.
Place a new adjusting shim on the valve lifter.
Remove the SST.
Recheck the valve clearance.
| 7. INSTALL CYLINDER HEAD COVER SUB-ASSEMBLY |
 |
Remove the any oil packing (FIPG) material.
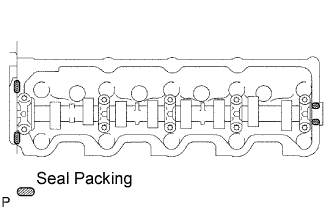
Apply seal packing to the cylinder head as shown in the illustration.
Install the gasket to the cylinder head cover.
Install the cylinder head cover with the 9 bolts and nut. Uniformly tighten the bolts and nuts in several steps.
Connect the ventilation hose.
| 8. INSTALL INTAKE AIR CONNECTOR SUB-ASSEMBLY |
|
Install a new gasket and intake air connector with the bolt and 3 nuts.
Connect the turbo pressure sensor connector.
Connect the ventilation hose.
| 9. CONNECT AIR CLEANER HOSE NO.2 |
Install the air cleaner hose No.2 with the clamp.
| 10. CHECK IDLE SPEED |
Warm up the engine.
When using an intelligent tester:
Connect the intelligent tester to the DLC3.
 |
When not using an intelligent tester:
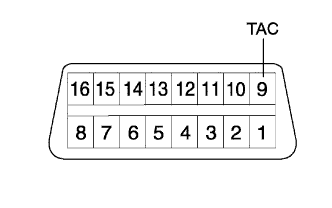
Using SST, connect the tachometer test probe to terminal 9 (TAC) of the DLC3.
Check the idle speed.
| 11. INSPECT MAXIMUM ENGINE SPEED |
Start the engine.
Depress the accelerator pedal all the way.
Check the maximum speed.