AUTOMATIC TRANSMISSION UNIT > REASSEMBLY |
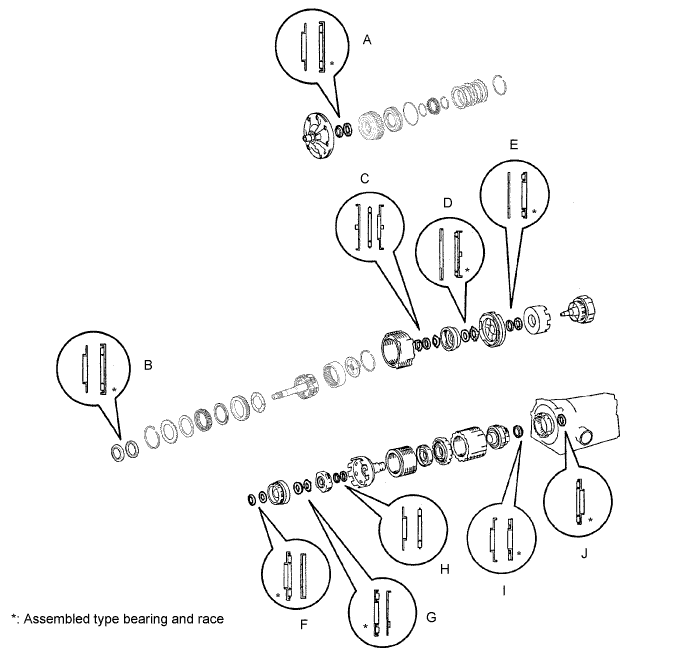
| 1. BEARING POSITION |
| Mark | Front Race Diameter Inside / Outside mm (in.) | Thrust Bearing Diameter Inside / Outside mm (in.) | Rear Race Diameter Inside / Outside mm (in.) |
| A | 28.45 (1.120) / 47.3 (1.862) | 29.2 (1.15) / 50.2 (1.976) | - |
| B | 28.8 (1.134) / 46.4 (1.827) | 28.9 (1.138) / 50.2 (1.976) | - |
| C | 24.7 (0.972) / 41.8 (1.646) | 24.2 (0.953) / 47.8 (1.882) | - |
| D | 37.2 (1.465) / 58.8 (2.315) | 33.8 (1.331) / 50.0 (1.969) | - |
| E | 36.8 (1.449) / 50.9 (2.004) | 33.7 (1.327) / 47.6 (1.874) | - |
| F | 26.0 (1.024) / 48.9 (1.926) | 26.0 (1.024) / 46.7 (1.839) | 26.8 (1.055) / 47.0 (1.850) |
| G | - | 35.2 (1.386) / 53.6 (2.110) | 34.3 (1.350) / 47.8 (1.882) |
| H | 33.7 (1.327) / 47.6 (1.874) | 35.5 (1.398) / 47.7 (1.878) | - |
| I | 28.5 (1.122) / 44.2 (1.740) | 27.7 (1.091) / 44.2 (1.740) | - |
| J | - | 39.38 (1.550) / 58.1 (2.287) | - |
| 2. FIX AUTOMATIC TRANSMISSION CASE SUB-ASSEMBLY |
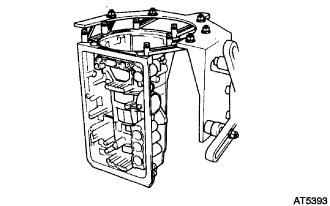 |
Install the transmission case in the overhaul attachment.
| 3. INSTALL 1ST AND REVERSE BRAKE PISTON NO.1 |
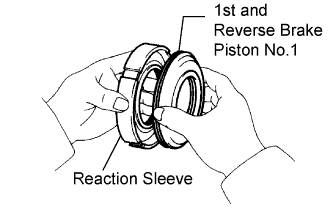 |
Coat 3 new O-rings with ATF.
Install the 2 O-rings on the 1st and reverse brake piston No.1.
Install the O-ring on the reaction sleeve.
Install the 1st and reverse brake piston No.1 to the reaction sleeve.
| 4. INSTALL BRAKE REACTION SLEEVE |
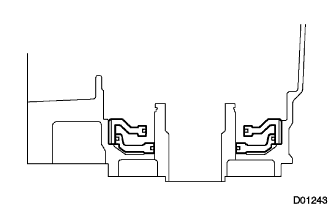 |
Coat new O-ring with ATF, and install it to the reaction sleeve.
With the brake piston No.1 underneath (the rear side), install the brake reaction sleeve and the brake piston No.1 to the transmission case.
| 5. INSTALL 1ST AND REVERSE BRAKE PISTON NO.2 |
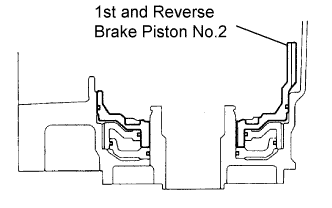 |
Coat new O-ring with ATF.
Install the O-ring on brake piston No.2.
With the spring seat of the piston upwards (the front side), place the piston in the transmission case.
| 6. INSTALL 1ST AND REVERSE BRAKE RETURN SPRING SUB-ASSEMBLY |
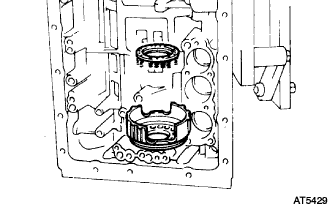 |
Place the piston return spring onto the 1st and reverse brake piston.
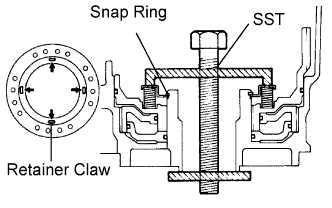 |
Set SST as shown, and compress the return spring with SST.
Using a screwdriver, install the snap ring. Make sure the end gap of the snap ring is not aligned with the spring retainer claw.
| 7. INSPECT PISTON STROKE OF 1ST AND REVERSE BRAKE |
| 8. INSTALL REAR PLANETARY GEAR ASSEMBLY |
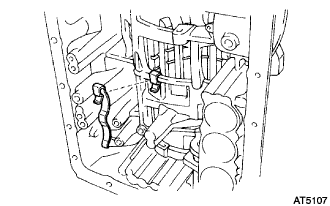 |
Install the leaf spring.
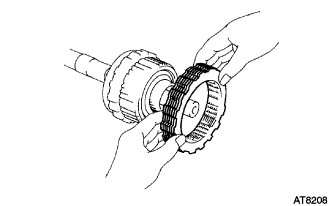 |
Install the flange with the rounded edge facing forward. Reinstall the plates and discs.
Install the 2nd brake drum assembly.
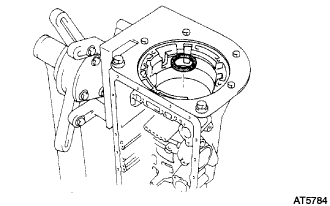 |
Coat the bearing with petroleum jelly and install it onto the case.
| Inside | Outside |
| 39.38 mm (1.5504 in.) | 58.1 mm (2.2874 in.) |
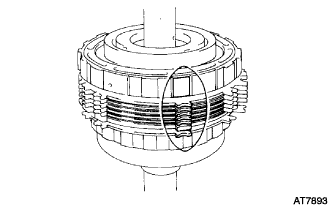 |
Align the teeth on the flange, the discs and the plates.
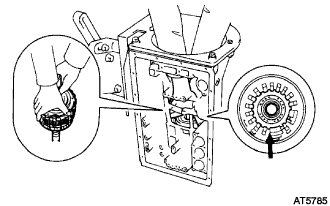 |
Align the splines of the transmission case with the assembled rear planetary gear, the 2nd brake drum, and the 1st and reverse brake pack with the output shaft,
Hold the output shaft with wooden blocks or equivalents.
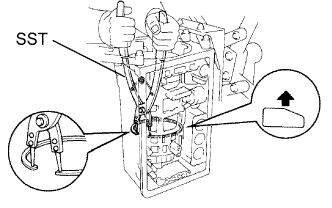 |
Using SST, install the snap ring.
| 9. INSPECT PACK CLEARANCE OF FIRST AND REVERSE BRAKE |
| 10. INSTALL 2ND BRAKE PISTON SLEEVE |
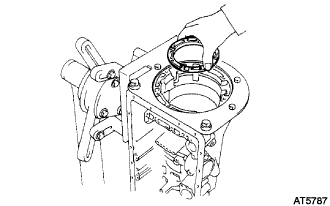 |
Install the brake reaction sleeve.
| 11. INSTALL BRAKE DRUM GASKET |
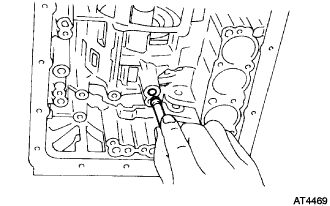 |
Coat a new gasket with ATF.
Install the brake drum gasket.
| 12. INSTALL 1 WAY CLUTCH ASSEMBLY |
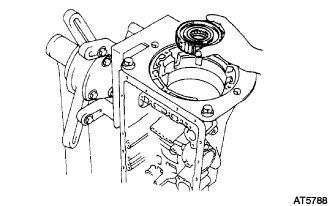 |
Install the thrust washer.
Install the 1 way clutch assembly.
| 13. INSTALL 2ND BRAKE PACK |
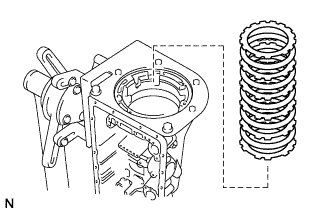 |
Install the 1.8 mm (0.071 in.) thick plate with the rounded edge side of the plate facing the disc.
Install the plates and discs.
Install the flange with the rounded edge of the flange facing the disc.
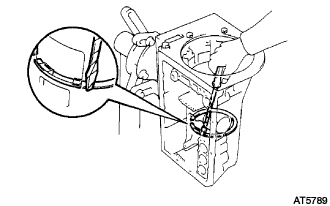 |
Using a screwdriver, install the snap ring.
| 14. INSPECT PACK CLEARANCE OF SECOND BRAKE |
| 15. INSTALL PLANETARY SUN GEAR SUB-ASSEMBLY |
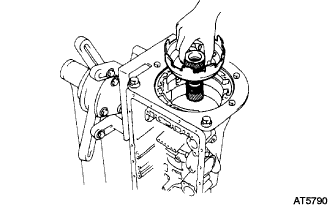 |
While turning the planetary sun gear clockwise, install it into the 1 way clutch.
| 16. INSTALL FRONT PLANETARY GEAR ASSEMBLY |
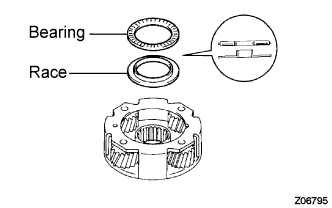 |
Coat the bearing and race with petroleum jelly and install them onto the front planetary gear.
| Inside | Outside | |
| Bearing | 35.5 mm (1.398 in.) | 47.7 mm (1.878 in.) |
| Race | 33.7 mm (1.327 in.) | 47.6 mm (1.874 in.) |
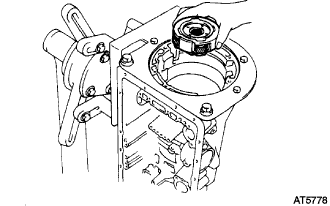 |
Install the front planetary gear to the sun gear input drum.
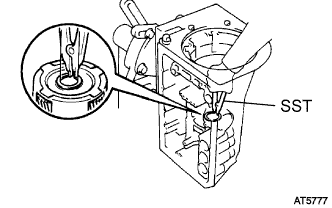 |
Using SST, install the snap ring.
Remove the wooden blocks or equivalent under the output shaft.
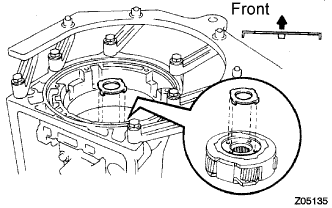 |
Coat the race with petroleum jelly, and install it onto the front planetary gear.
| Inside | Outside |
| 34.3 mm (1.350 in.) | 47.8 mm (1.882 in.) |
| 17. INSTALL 2ND COAST BRAKE BAND ASSEMBLY |
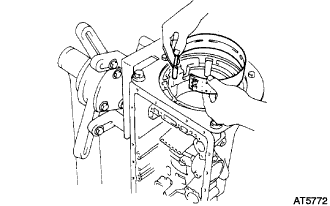 |
Install the 2nd coast brake band to the case.
Using needle-nose pliers, install the E-ring to the pin.
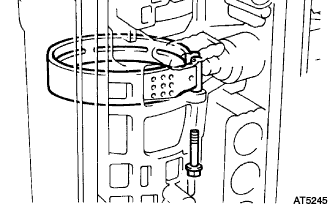 |
Install the pin through the brake band.
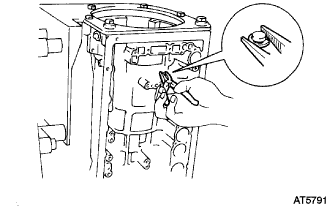 |
Using needle-nose pliers, install the E-ring to the pin.
| 18. INSTALL DIRECT CLUTCH ASSEMBLY |
Install the bearing and thrust washer to the forward clutch.
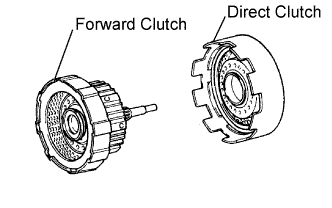 |
Install the direct clutch to the forward clutch.
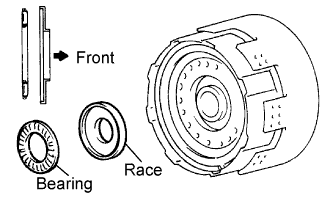 |
Coat the bearing and the race with petroleum jelly, and install them onto the forward clutch.
| Inside | Outside | |
| Race | 26.0 mm (1.024 in.) | 48.9 mm (1.926 in.) |
| Bearing | 26.0 mm (1.024 in.) | 46.7 mm (1.839 in.) |
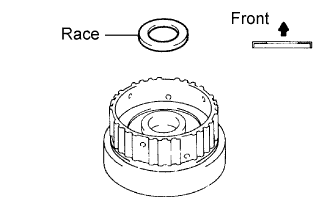 |
Coat the race with the petroleum jelly, and install it onto the front planetary ring gear.
| Inside | Outside | |
| Race | 26.8 mm (1.055 in.) | 47.0 mm (1.850 in.) |
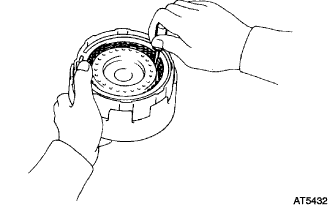 |
Align the flukes of the discs in the forward clutch.
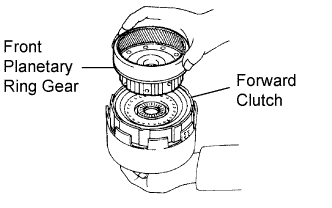 |
Align the splines of the front planetary ring gear with the flukes of the discs and install the front planetary ring gear to the forward clutch.
| 19. INSTALL FRONT PLANETARY RING GEAR SUB-ASSEMBLY |
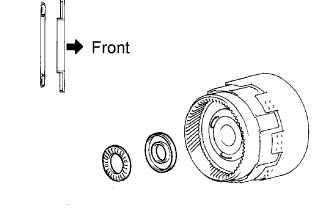 |
Coat the bearing and the race with petroleum jelly, and install them onto the ring gear.
| Inside | Outside | |
| Bearing | 32.6 mm (1.283 in.) | 47.7 mm (1.878 in.) |
| Race | 30.6 mm (1.205 in.) | 53.6 mm (2.110 in.) |
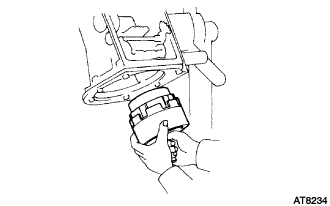 |
Install the assembled direct clutch, the forward clutch and the front planetary ring gear into the transmission case.
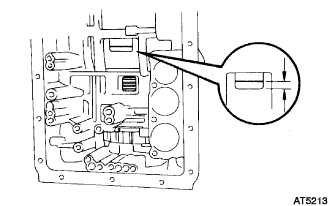 |
Using vernier calipers, measure the distance between the sun gear input drum and the direct clutch drum as shown in the illustration.
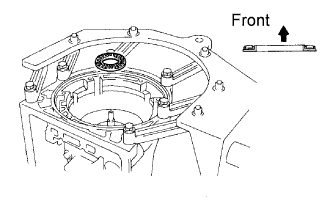 |
Coat the bearing with petroleum jelly and install it onto the forward clutch.
| Inside | Outside | |
| Bearing | 33.7 mm (1.327 in.) | 47.6 mm (1.874 in.) |
| 20. INSTALL 2ND COAST BRAKE PISTON |
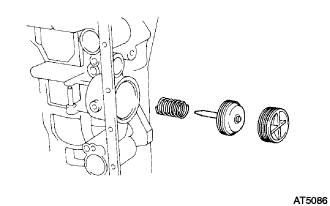 |
Coat 2 new O-rings with ATF and install them to the cover.
Install the spring, the piston assembly and the cover to the case.
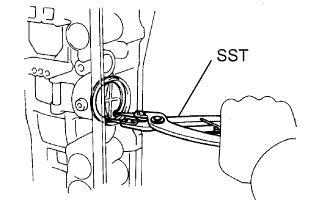 |
Using SST, install the snap ring.
| 21. INSPECT PISTON STROKE OF 2ND COAST BRAKE |
| 22. INSTALL OVERDRIVE SUPPORT SUB-ASSEMBLY |
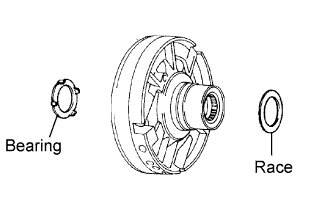 |
Coat the bearing and race with petroleum jelly, and install it onto the O/D support assembly.
| Inside | Outside | |
| Bearing | 36.8 mm (1.449 in.) | 50.9 mm (2.004 in.) |
| Race | 36.8 mm (1.449 in.) | 50.9 mm (2.004 in.) |
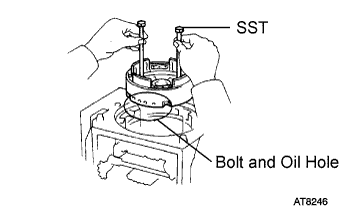 |
Using 2 bolts of SST, aim the bolt and the oil holes of the O/D support toward the valve body side, and align them with the bolt holes of the transmission case, and insert.
Temporarily tighten the 2 bolts.
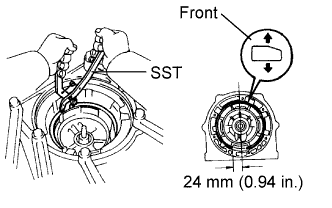 |
Using SST, install the snap ring.
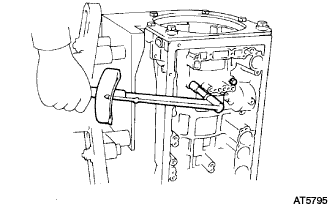 |
Torque the 2 bolts.
| 23. INSPECT OUTPUT SHAFT |
| 24. INSTALL OVERDRIVE BRAKE PACK |
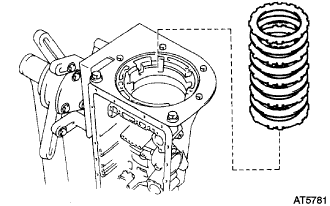 |
Install the 4.0 mm (0.157 in.) thick flange (flat ring) with the rounded edge side of the flange facing the discs.
Install the plates and discs.
Install the flange (stepped ring) with the flat side of the flange facing the disc.
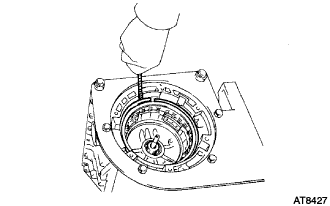 |
Using a screwdriver, install the snap ring.
| 25. INSPECT OVERDRIVE BRAKE PISTON |
| 26. INSTALL OVERDRIVE PLANETARY GEAR ASSEMBLY |
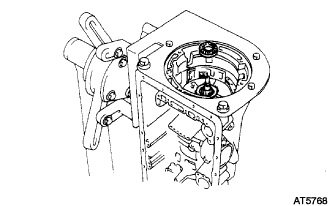 |
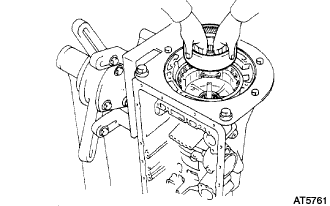
Coat the bearing and race with petroleum jelly, and install it onto the O/D support.
| Inside | Outside | |
| Race | 37.2 mm (1.465 in.) | 58.8 mm (2.315 in.) |
 |
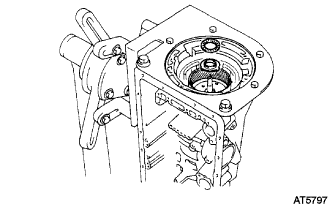
Install the O/D planetary ring gear.
 |
Coat the bearing and the race with petroleum jelly, and install them onto the planetary ring gear.
| Inside | Outside | |
| Bearing | 26.0 mm (1.024 in.) | 46.8 mm (1.843 in.) |
| Race | 24.2 mm (0.953 in.) | 47.8 mm (1.882 in.) |
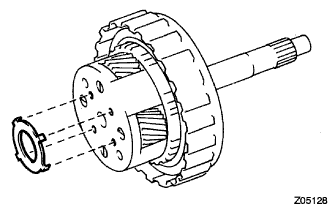 |
Coat the race with petroleum jelly, and install it onto the planetary gear.
| Inside | Outside |
| 24.7 mm (0.9724 in.) | 41.8 mm (1.646 in.) |
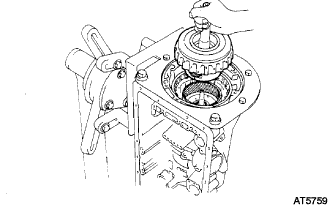 |
Install the O/D planetary gear, O/D direct clutch and one- way clutch.
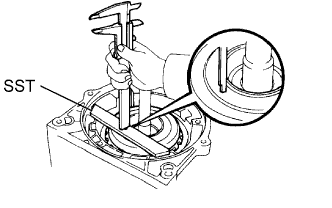 |
Place SST on the transmission case.
Using vernier calipers, measure distance between the tops of SST and the clutch drum.
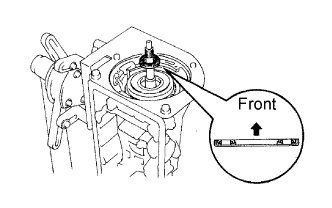 |
Coat the bearing with petroleum jelly and install it onto the O/D direct clutch.
| Inside | Outside | |
| Bearing | 29.2 mm (1.150 in.) | 50.2 mm (1.976 in.) |
| 27. INSTALL OIL PUMP ASSEMBLY |
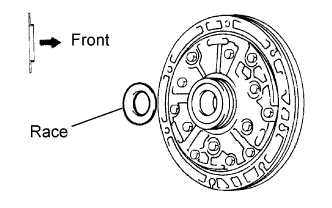 |
Coat the race with petroleum jelly, and install it onto the oil pump.
| Inside | Outside | |
| Race | 28.45 mm (1.120 in.) | 47.3 mm (1.862 in.) |
Coat a new O-ring with ATF, and install it around the pump body.
Place the oil pump through the input shaft, and align the bolt holes of the pump body with the transmission case.
Hold the input shaft, and lightly press the oil pump body to slide the oil seal rings into the O/D direct clutch drum.
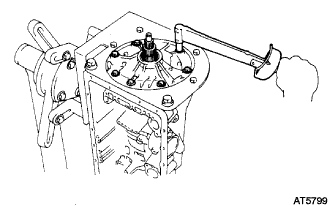 |
Install the 7 bolts.
| 28. INSPECT INPUT SHAFT SUB-ASSEMBLY |
| 29. INSPECT INDIVIDUAL PISTON OPERATION INSPECTION |
| 30. INSTALL MANUAL VALVE LEVER SHAFT OIL SEAL |
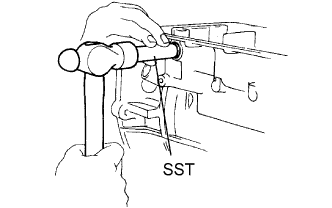 |
Using SST and a hammer, drive in 2 new manual valve lever shaft oil seals.
| 31. INSTALL MANUAL VALVE LEVER SUB-ASSEMBLY |
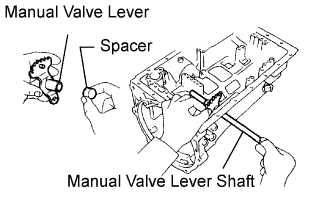 |
Install a new spacer to the manual valve lever.
Install the manual valve lever shaft to the transmission case through the manual valve lever.
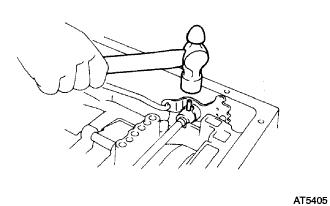 |
Using a hammer, drive in a new pin.
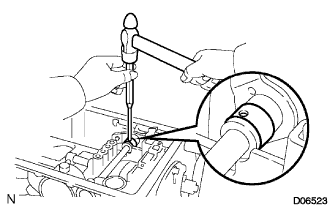 |
Align the manual valve lever indentation with the spacer hole and stake them with a punch.
Make sure the shaft rotates smoothly.
| 32. INSTALL PARKING LOCK PAWL SHAFT |
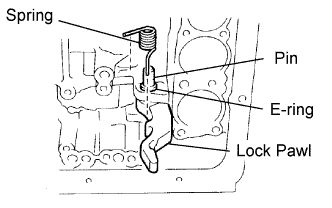 |
Install the E-ring to the shaft.
Install the parking lock pawl, the shaft and the spring.
| 33. INSTALL PARKING LOCK ROD SUB-ASSEMBLY |
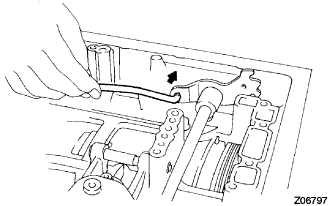 |
Connect the parking lock rod to the manual valve lever.
| 34. INSTALL PARKING LOCK PAWL BRACKET |
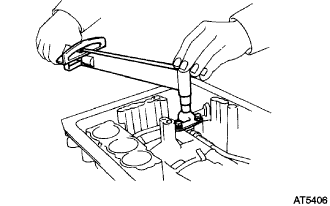 |
Install the parking lock pawl bracket with the 3 bolts.
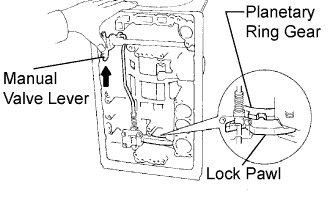 |
Shift the manual valve lever to the P position, and confirm that the planetary ring gear is correctly locked up by the lock pawl.
| 35. INSTALL C-0 ACCUMULATOR PISTON |
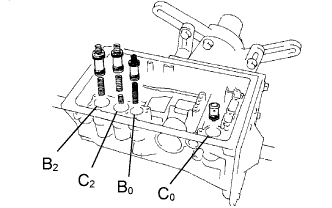 |
Coat new O-ring with ATF, and install them to the piston.
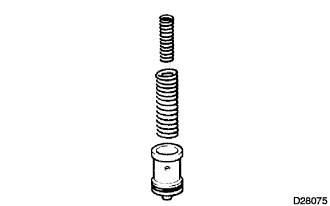 |
Install the 2 springs and the accumulator piston to the hole.
| Spring | Free length outer diameter mm (in.) | Color |
| C0 Inner | 46.0 mm (1.811 in.) 14.02 mm (0.552 in.) | Yellow |
| C0 Outer | 74.6 mm (2.937 in.) 20.9 mm (0.823 in.) | Orange |
| 36. INSTALL B-0 ACCUMULATOR PISTON |
|
Coat new O-rings with ATF, and install them to the piston.
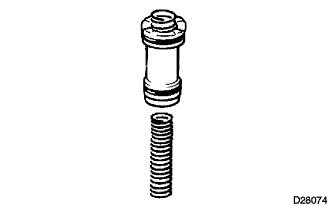 |
Install the spring and the accumulator piston to the hole.
| Spring | Free length outer diameter mm (in.) | Color |
| B0 | 62.0 mm (2.441 in.) 16.0 mm (0.630 in.) | Green |
| 37. INSTALL C-2 ACCUMULATOR PISTON |
|
Coat new O-rings with ATF, and install them to the piston.
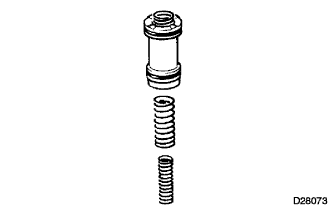 |
Install the 2 springs and the accumulator piston to the hole.
| Spring | Free length outer diameter mm (in.) | Color |
| C2 Inner | 42.1 mm (1.657 in.) 14.7 mm (0.579 in.) | Pink |
| C2 Outer | 68.53 mm (2.698 in.) 20.2 mm (0.795 in.) | Blue |
| 38. INSTALL B-2 ACCUMULATOR PISTON |
|
Coat new O-rings with ATF, and install them to the piston.
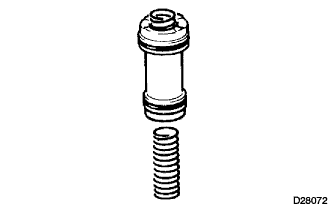 |
Install the spring and the accumulator piston to the hole.
| Spring | Free length outer diameter mm (in.) | Color |
| B2 | 70.5 mm (2.776 in.) 19.9 mm (0.783 in.) | Light green |
| 39. INSTALL CHECK BALL BODY |
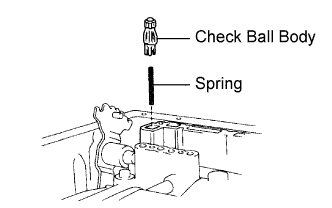 |
Install the check ball body and spring.
| 40. INSTALL TRANSMISSION VALVE BODY ASSEMBLY |
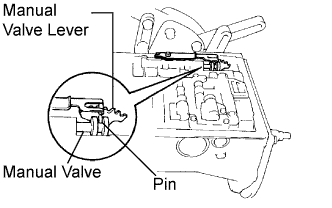 |
Align the groove of the manual valve with the pin of the lever.
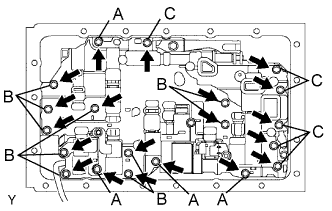 |
Install the 20 bolts.
| 41. INSTALL TRANSMISSION WIRE |
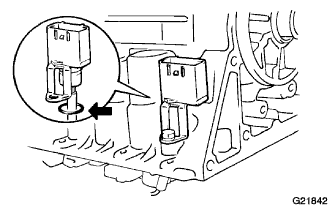 |
Coat a new O-ring with ATF, and install it to the transmission wire.
Install the solenoid wiring to the case, and then install the bolt.
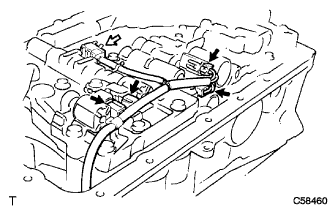 |
Connect the connectors to each shift solenoid valve.
| 42. INSTALL VALVE BODY OIL STRAINER ASSEMBLY |
Using a plastic hammer, install the pipe into the position.
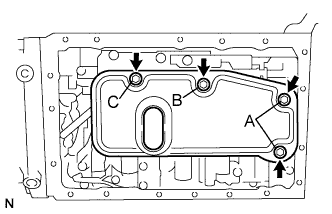 |
Install the oil strainer with the 4 bolts.
| 43. INSTALL TRANSMISSION OIL CLEANER MAGNET |
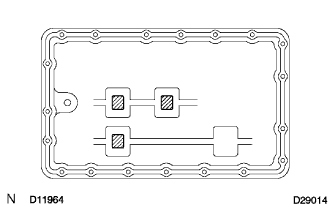 |
Install the 3 magnets on the oil pan.
| 44. INSTALL AUTOMATIC TRANSMISSION OIL PAN SUB-ASSEMBLY |
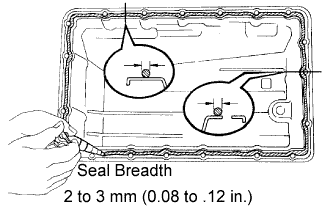 |
Remove any FIPG material and be careful not to drop oil on the contacting surfaces of the transmission case and the oil pan.
Apply FIPG to the oil pan.
Install the oil pan with the 19 bolts.
| 45. INSTALL SENSOR ROTOR |
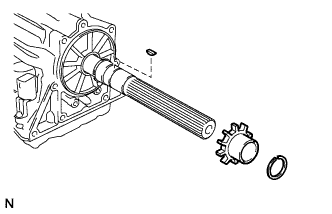 |
Using a snap ring expander, install the front side snap ring.
Install the key and sensor rotor.
Using a snap ring expander, install the rear side snap ring.
| 46. INSTALL EXTENSION HOUSING DUST DEFLECTOR |
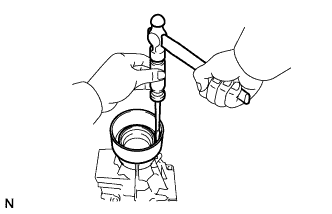 |
Using a screwdriver and hammer, install new extension housing dust deflector.
| 47. INSTALL AUTOMATIC TRANSMISSION EXTENSION HOUSING OIL SEAL |
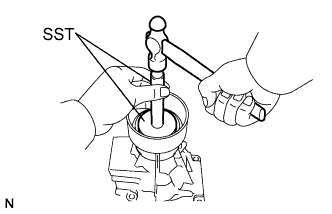 |
Using SST and a hammer, install a new extension housing oil seal.
| 48. INSTALL EXTENSION HOUSING BUSH APPLY TUBE |
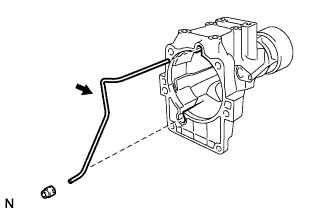 |
Install the extension housing bush apply tube.
| 49. INSTALL EXTENSION HOUSING BUSH APPLY TUBE GASKET |
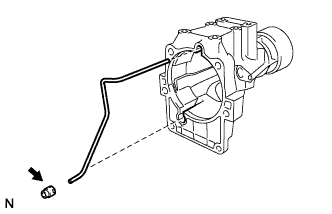 |
Install the extension housing bush apply tube gasket.
| 50. INSTALL EXTENSION HOUSING SUB-ASSEMBLY |
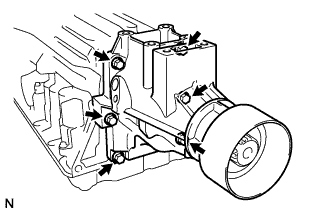 |
Apply seal packing or equivalent to the 6 bolts.
Install the extension housing and a new gasket to the case with the 6 bolts.
| 51. INSTALL TRANSMISSION REVOLUTION SENSOR |
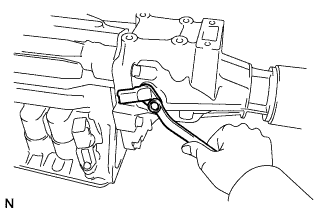 |
Coat a new O-ring with ATF, and install it to the sensor.
Install the revolution sensor with the bolt.
| 52. INSTALL AUTOMATIC TRANSMISSION HOUSING |
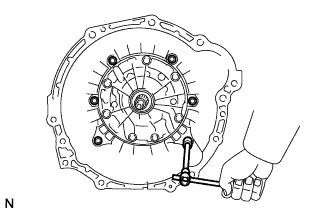 |
Install the transmission housing with the 6 bolts.
| 53. INSTALL SPEED SENSOR |
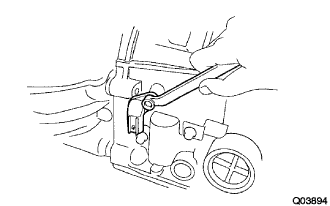 |
Coat a new O-ring with ATF, and install it to the sensor.
Install the speed sensor.
| 54. INSTALL TEMPERATURE SENSOR |
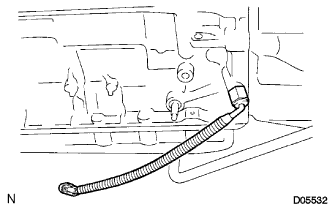 |
Coat a new O-ring with ATF, and install it to the temperature sensor.
Install the temperature sensor.
| 55. INSTALL OIL COOLER TUBE UNION |
Coat a new O-rings with ATF, and install them to the unions.
Install the oil cooler tube unions.
| 56. INSTALL PARK/NEUTRAL POSITION SWITCH ASSEMBLY |
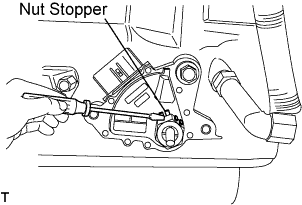 |
Install the park/neutral position switch onto the manual valve lever shaft, and temporarily tighten the adjusting bolt.
Install the nut stopper and a new lock washer. Install the nut.
Using the control shaft lever, fully turn the manual lever shaft back, and then return 2 notches. It is now in neutral.
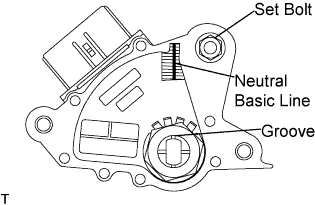 |
Align the neutral basic line with the switch groove, and tighten the adjusting bolt.
Bend the tabs of the lock washer.
| 57. INSTALL TRANSMISSION CASE PLUG ASSEMBLY |
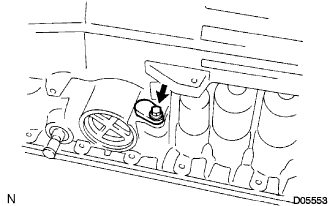 |
Coat a new O-ring with ATF, and install it to the plug.
Install the cable to the case with the bolt.
| 58. INSTALL TRANSMISSION CONTROL SHAFT LEVER LH |
Install the transmission control shaft lever and the washer. Install the nut.
| 59. INSTALL BREATHER PLUG HOSE |
Install the breather plug hose.
| 60. INSTALL DRAIN (ATM) PLUG SUB-ASSEMBLY |