 |
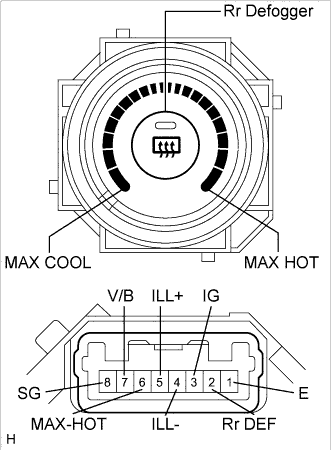
Remove the air mix damper control switch and disconnect the connector.
AIR MIX DAMPER CONTROL SWITCH > INSPECTION |
| 1. INSPECT AIR MIX DAMPER CONTROL SWITCH |
|
Remove the air mix damper control switch and disconnect the connector.
Measure the resistance according to the value(s) in the table below.
| Tester connection | Condition | Specified condition |
| 3 (IG) - 1 (E) | Rr. DEF switch OFF | 10 kΩ or higher |
| 3 (IG) - 1 (E) | Rr. DEF switch ON | Below 1 Ω |
| 3 (IG) - 2 (Rr DEF) | Rr. DEF switch OFF | 10 kΩ or higher |
| 3 (IG) - 2 (Rr DEF) | Rr. DEF switch ON | Below 1 Ω |
| 3 (IG) - 6 (MAX HOT) | Except MAX HOT | 10 kΩ or higher |
| 3 (IG) - 6 (MAX HOT) | MAX HOT | Below 1 Ω |
| 4 (ILL-) - 5 (ILL+) | Always | Below 1 Ω |
| 7 (V/B) - 8 (SG) | MAX HOT | 10 kΩ or higher |
| 7 (V/B) - 8 (SG) | Except MAX HOT | Below 1 Ω |
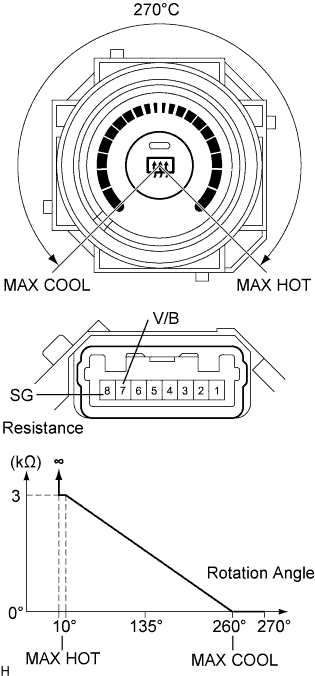 |
Turn the heater control knob and measure the resistance between terminals 7 (V/B) and 8 (SG).
Connect the positive battery terminal to terminal 5 (ILL+), and the negative battery terminal to terminal 4 (ILL-).
Connect the positive battery terminal to terminal 3 (IG), and the negative battery terminal to terminal 1 (E).