 |
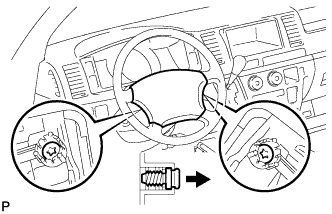
Using a "torx" socket wrench (T30), loosen the 2 "torx" screws until the groove along the screw circumference catches on the screw case.
CLEARANCE WARNING ECU > REMOVAL |
| 1. REMOVE BATTERY NEGATIVE TERMINAL |
| 2. REMOVE STEERING WHEEL COVER LOWER NO.2 |
| 3. REMOVE STEERING WHEEL COVER LOWER NO.3 |
| 4. REMOVE HORN BUTTON ASSEMBLY |
|
Using a "torx" socket wrench (T30), loosen the 2 "torx" screws until the groove along the screw circumference catches on the screw case.
Pull out the steering pad from the steering wheel assembly and support the steering pad with one hand.
Disconnect the horn connector.
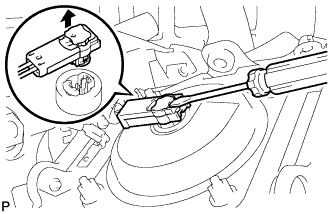 |
Disconnect the connector and remove the steering pad.
| 5. REMOVE STEERING WHEEL ASSEMBLY |
Remove the steering wheel set nut.
Put matchmarks on the steering wheel assembly and steering main shaft assembly.
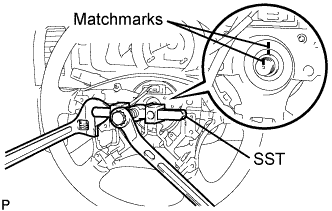 |
Using SST, remove the steering wheel assembly.
| 6. REMOVE STEERING COLUMN COVER LWR |
| 7. REMOVE KEY CYLINDER LIGHT ASSEMBLY |
| 8. REMOVE STEERING COLUMN COVER UPR |
| 9. REMOVE HEADLIGHT DIMMER SWITCH ASSEMBLY |
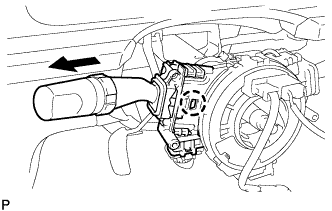 |
Disconnect the connector.
Disengage the claw and remove the headlight dimmer switch as shown in the illustration.
| 10. REMOVE WINDSHIELD WIPER SWITCH ASSEMBLY |
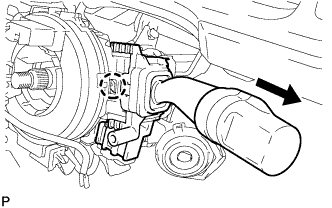 |
Disconnect the connector.
Disengage the claw and remove the wiper switch as shown in the illustration.
| 11. REMOVE INSTRUMENT CLUSTER FINISH PANEL GARNISH NO.2 |
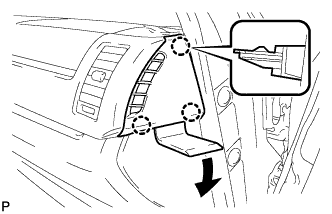 |
Using a moulding remover, disengage the 3 claws and remove the instrument cluster finish panel No.2 garnish.
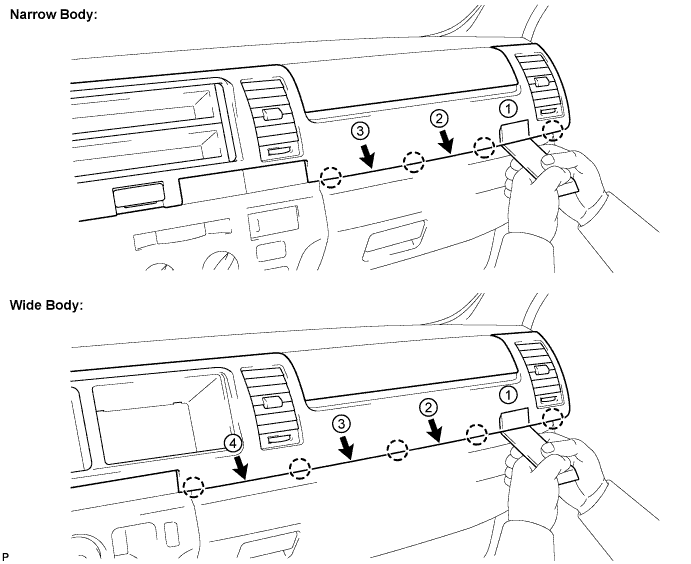
| 12. REMOVE INSTRUMENT CLUSTER FINISH PANEL SUB-ASSEMBLY CENTER |
Using a roof moulding remover, disengage the claws in the order shown in the illustration.
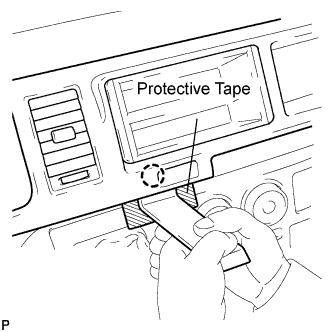 |
Attach tape to the positions shown in the illustration in order to prevent the instrument cluster finish panel sub-assembly center from being damaged.
Using a moulding remover, disengage the claw.
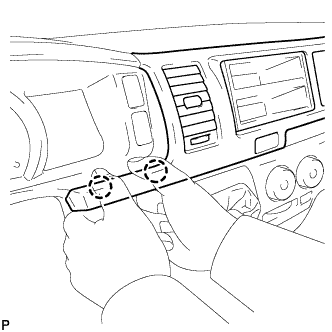 |
Hold the panel as shown in the illustration and pull it toward the rear of the vehicle to disengage the claws.
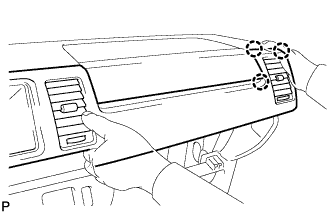 |
While supporting the panel with your right hand, pull it toward the rear of the vehicle to disengage the claws.
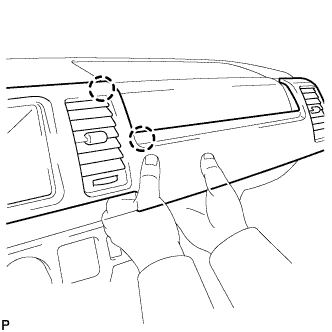 |
Hold the panel as shown in the illustration and disengage the claws.
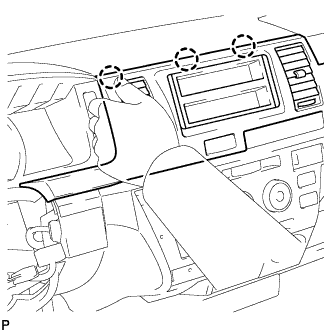 |
Hold the panel as shown in the illustration and pull it toward the rear of the vehicle to disengage the claws. Remove the instrument cluster finish panel sub-assembly center.
| 13. REMOVE INSTRUMENT CLUSTER FINISH PANEL GARNISH NO.1 |
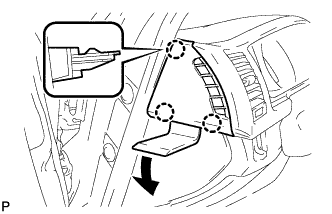 |
Using a moulding remover, disengage the 3 claws and remove the instrument cluster finish panel No.1 garnish.
| 14. REMOVE INSTRUMENT CLUSTER FINISH PANEL ASSEMBLY |
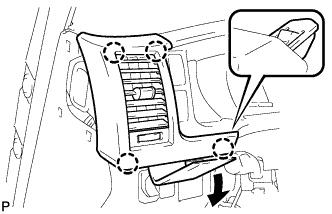 |
Using a moulding remover, disengage the 4 claws and remove the instrument cluster finish panel assembly.
| 15. REMOVE INSTRUMENT CLUSTER FINISH PANEL SUB-ASSEMBLY |
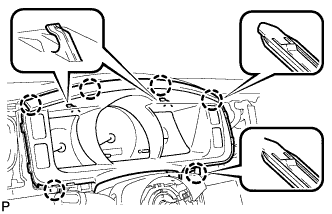 |
Disengage the 6 claws and remove the instrument cluster finish panel sub-assembly.
| 16. REMOVE COMBINATION METER ASSEMBLY |
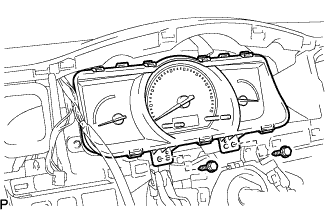 |
Remove the 2 screws.
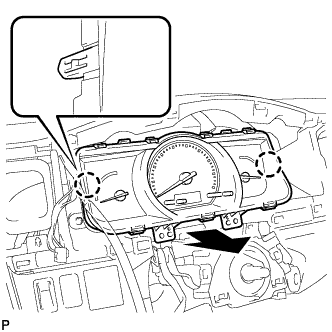 |
Disengage the 2 claws.
Disconnect the connector and remove the combination meter assembly.
| 17. REMOVE INSTRUMENT PANEL CUP HOLDER ASSEMBLY |
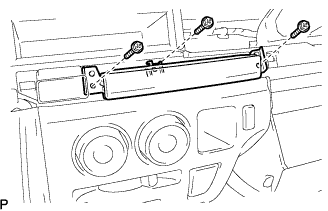 |
Remove the 3 screws <C> and the instrument panel cup holder assembly.
| 18. REMOVE STEREO OPENING COVER |
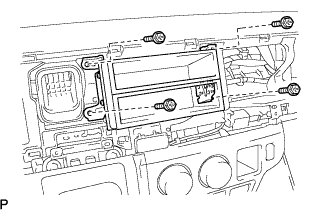 |
Remove the 4 screws <C> and the stereo opening cover with bracket.
| 19. REMOVE RADIO RECEIVER ASSEMBLY |
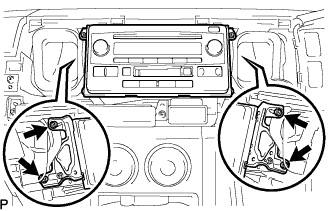 |
Remove the 4 screws.
Disconnect the connectors and the radio receiver assembly with bracket.
| 20. REMOVE INSTRUMENT PANEL FINISH PANEL LOWER |
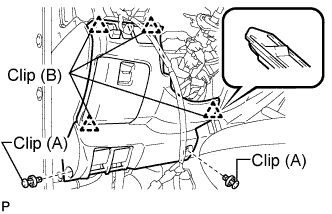 |
Using a clip remover, remove the 2 clips (A).
Disengage the 4 clips (B).
Disconnect the connector.
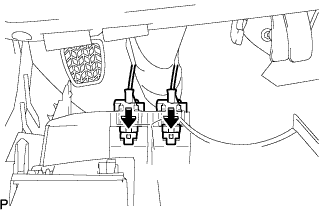 |
Push the positions indicated by the arrows in the illustration to separate the fuel lid lock control cable and bonnet (hood) control cable assembly from the panel.
Remove the instrument panel finish lower.
| 21. REMOVE INSTRUMENT PANEL UNDER COVER SUB-ASSEMBLY NO.1 |
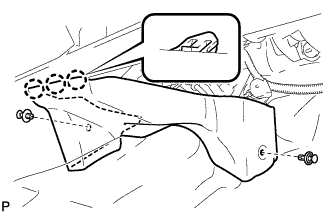 |
Using a clip remover, remove the 2 clips
Disengage the 3 claws and remove the instrument panel No.1 under cover sub-assembly.
| 22. REMOVE PARKING BRAKE HOLE COVER |
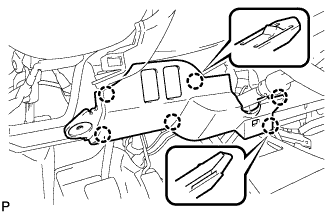 |
Disengage the 6 claws and remove the parking brake hole cover.
| 23. REMOVE SHIFT LEVER KNOB |
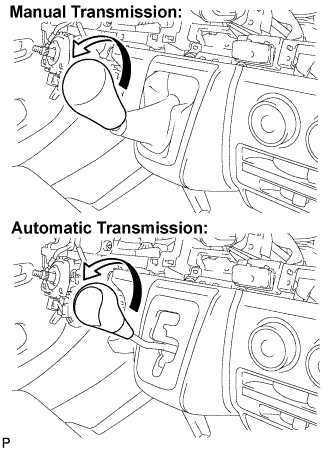 |
Turn the shift lever knob in the direction indicated by the arrow and remove it.
| 24. REMOVE SHIFTING HOLE COVER ASSEMBLY |
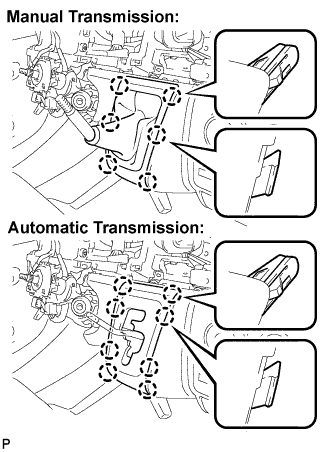 |
Manual Transmission:
Disengage the 6 claws and remove the shifting hole cover assembly.
Automatic Transmission:
Disengage the 8 claws and remove the shifting hole cover assembly.
| 25. REMOVE INSTRUMENT PANEL FINISH PANEL LOWER CENTER |
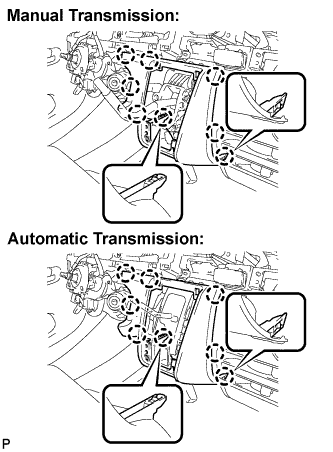 |
Disengage the 8 claws and remove the instrument panel finish panel lower center.
| 26. REMOVE FLOOR SHIFT SHIFT LEVER ASSEMBLY |
| 27. REMOVE SHIFT LOCK CONTROL UNIT ASSEMBLY |
| 28. REMOVE AIR CONDITIONER PANEL SUB-ASSEMBLY |
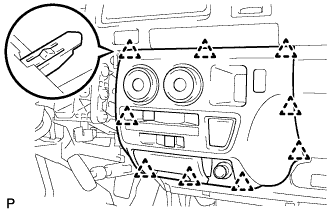 |
Release the 9 clips and the air conditioner panel sub-assembly.
Disconnect the connector and remove the air conditioner panel sub-assembly.
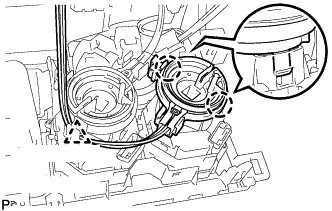 |
Release clamp.
Disengage the 2 claws and then remove the boost ventilator control cable sub-assembly.
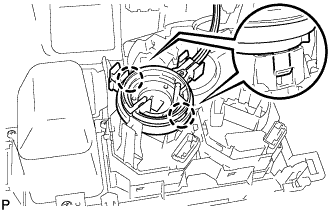 |
Disengage the 2 claws and then remove the defroster damper control cable sub-assembly.
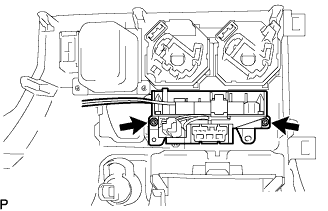 |
Remove the 2 screws and remove the heater control hose.
| 29. REMOVE GLOVE COMPARTMENT DOOR ASSEMBLY |
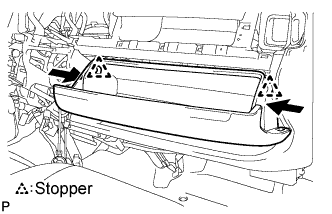 |
Push the positions indicated by the arrows in the illustration inward to release the 2 stoppers.
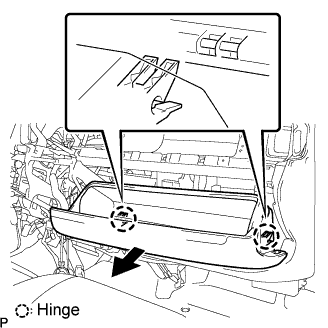 |
Pull the glove compartment door assembly in the direction indicated by the arrow shown in the illustration and disengage the 2 hinges.
Remove the glove compartment door assembly.
| 30. REMOVE FRONT PASSENGER AIRBAG ASSEMBLY |
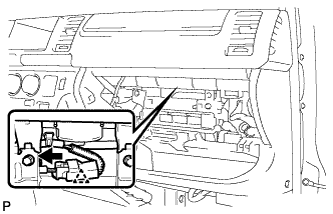
Separate the clamp from the reinforcement.
 |
Disconnect the airbag connector.
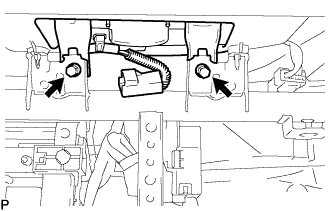 |
Remove the 2 bolts from the reinforcement.
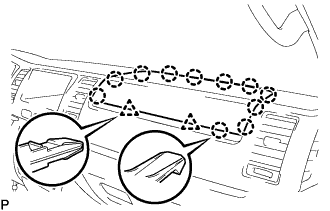 |
Separate the clip and clamp, and remove the instrument panel passenger airbag assembly.
| 31. REMOVE HAZARD WARNING SIGNAL SWITCH ASSEMBLY |
| 32. REMOVE FRONT ASSIST GRIP PLUG |
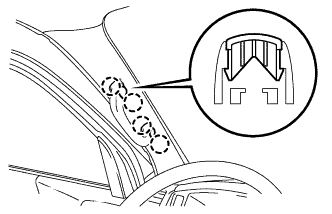 |
Using a screwdriver, disengage the assist grip plug No.1.
| 33. REMOVE ASSIST GRIP ASSEMBLY |
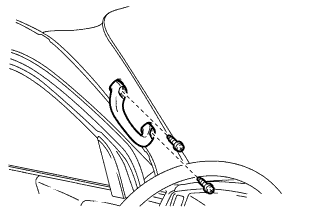 |
Remove the 2 screws and assist grip.
| 34. REMOVE FRONT PILLAR GARNISH LH |
| 35. REMOVE FRONT PILLAR GARNISH RH |
| 36. REMOVE INSTRUMENT PANEL ASSEMBLY |
Remove the 4 bolts <A> and 3 screws <B>.
Remove the 2 nuts <D> and 2 clips.
Disengage the clamps.
Disengage the DLC3 connector from the wire harness clamp bracket.
Disconnect the instrument panel wire No.2 connector. (passenger side)
Pull the instrument panel sub-assembly towards you and check that no wire harnesses are stuck in the body.
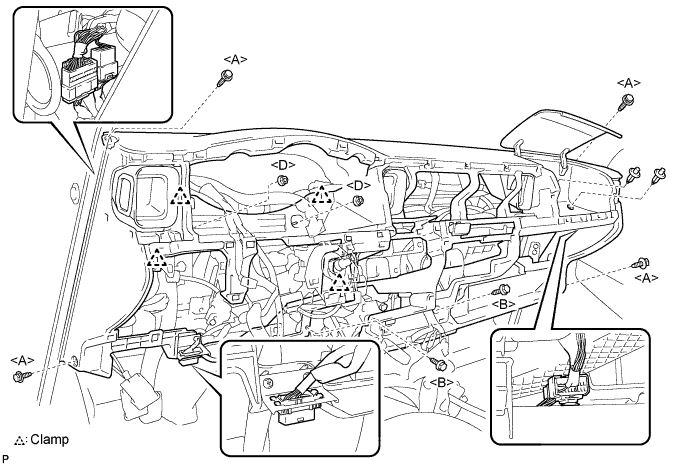
Disconnect the instrument panel wire No.2 connector. (driver side)
| 37. REMOVE CLEARANCE WARNING ECU |
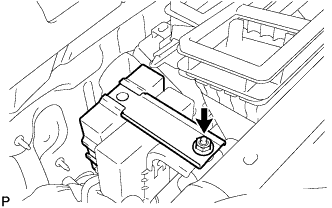 |
Remove the nut.
Disconnect the connector and remove the clearance warning ECU.