REMOVAL
Removal / installation · Vehicles built from Oct 2014
| 1. SEPARATE BATTERY NEGATIVE TERMINAL |
| 2. REMOVE ENGINE UNDER COVER NO.1 (w/ Engine Under Cover No.1) |
| 3. DRAIN ENGINE COOLANT |

- CAUTION:
- Do not remove the radiator reservoir cap sub-assembly while the engine and radiator are still hot. Pressurized, hot engine coolant and steam may be released and cause serious burns.
Loosen the radiator drain cock plug.
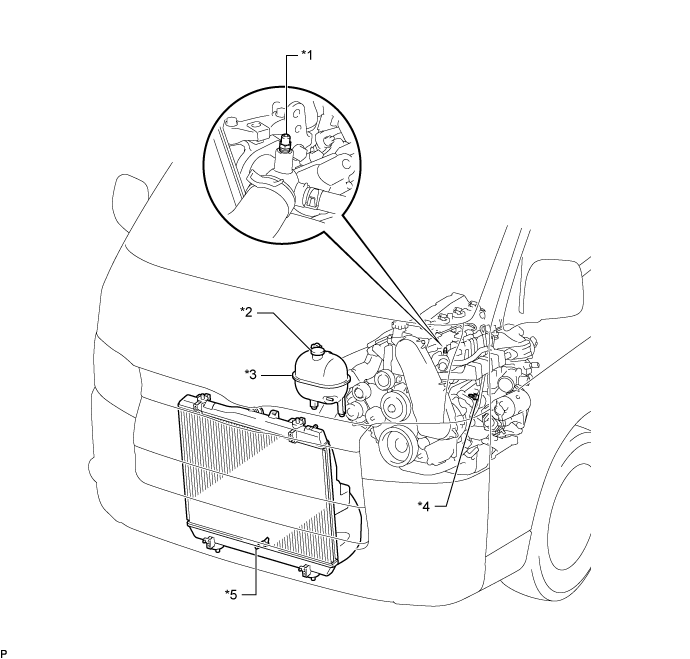

Text in Illustration *1
Bleeder Plug
*2
Radiator Reservoir Cap Sub-assembly
*3
Radiator Reservoir Assembly
*4
Cylinder Block Drain Cock Plug
*5
Radiator Drain Cock Plug
-
-
Remove the radiator reservoir cap sub-assembly.
Loosen the cylinder block drain cock plug (on the engine oil cooler cover), and drain the engine coolant.
Tighten the radiator drain cock plug.
Tighten the cylinder block drain cock plug (on the engine oil cooler cover).
- Torque:
- 8.0 N*m{ 82 kgf*cm , 71 in.*lbf }
| 4. REMOVE FRONT SEAT ASSEMBLY RH (for Hi-back Seat Type) |
Perform the same procedure as above on the opposite side. (Click here)
| 5. REMOVE FRONT SEAT ASSEMBLY RH (for Low-back Seat Type) |
Perform the same procedure as above on the opposite side. (Click here)
| 6. REMOVE FRONT DOOR SCUFF PLATE RH |
| 7. REMOVE ENGINE SERVICE HOLE SUB COVER SUB-ASSEMBLY |
Roll up the carpet, and remove the engine service hole sub cover assembly.
| 8. REMOVE FAN & GENERATOR V BELT |
Remove the drive belt by rotating the tensioner pulley in clockwise direction to loosen its tension with the pulley set bolt of the tensioner.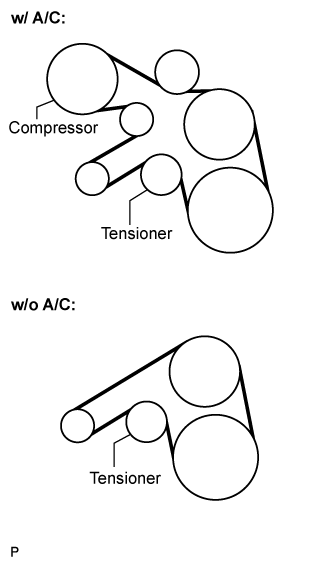
| 9. SEPARATE VANE PUMP OIL RESERVOIR ASSEMBLY |
Remove the 2 bolts and vane pump oil reservoir assembly.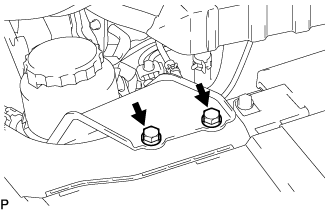
- NOTICE:
- Suspend the vane pump oil reservoir assembly with wire to prevent power steering fluid from spilling out.
| 10. REMOVE TIMING BELT COVER NO.1 |
Remove the wire harness clamp.
Remove the 6 bolts and timing belt cover No.1.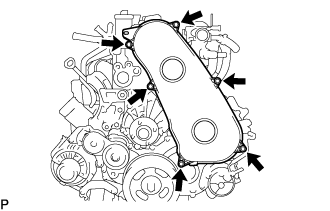
| 11. REMOVE INJECTION PIPE |
- SST
- 09023-12701
Remove the injection pipe.
Remove the 2 nuts and injection pipe clamp No.3.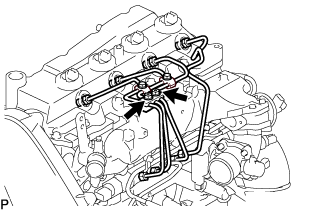
Using SST, remove the 4 injection pipes.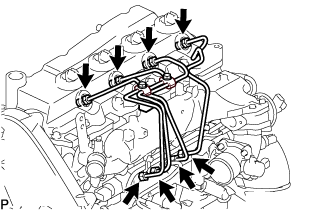
- SST
- 09023-12701
| 12. REMOVE CYLINDER HEAD COVER SUB-ASSEMBLY |
Using a small screwdriver, remove the holder seal by prying the portion between the holder seal and the cutout part of the cylinder head.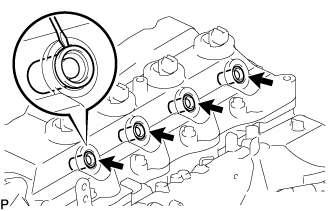
Disconnect the ventilation hose.
Remove the 10 bolts, 2 nuts, cylinder head cover and the cylinder head cover gasket.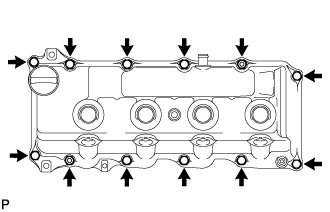
- NOTICE:
- After removing the fuel pipe, put a plastic bag and rubber band to prevent dirt and foreign objects over the injectors inlet.
Remove the 4 No. 3 cylinder head cover gaskets from the cylinder head cover.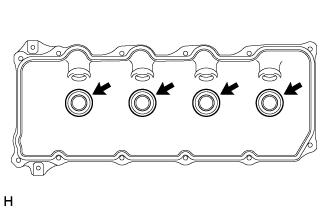
| 13. SET NO.1 CYLINDER TO TDC/ COMPRESSION |
Align the matchmarks of the crankshaft pulley and timing gear case cover by rotating the crankshaft in clockwise direction.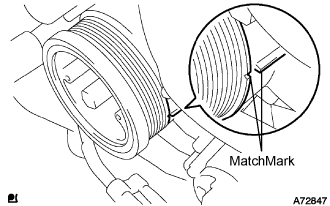
- HINT:
- Make sure that both camnoses on the intake side and exhaust side of the cylinder No.1 face upward.
| 14. REMOVE TIMING BELT |
Turn the crankshaft in the clockwise direction and align the timing marks as shown in the illustration.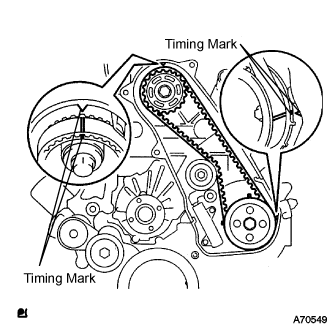
Uniformly loosen the 2 bolts, and remove the chain tensioner assembly No.1.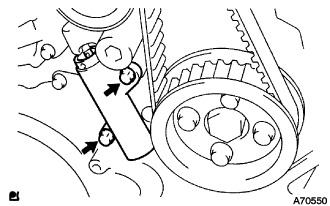
Remove the timing belt.
| 15. REMOVE CAMSHAFT TIMING PULLEY |
Remove the bolt for the camshaft timing pulley while holding the camshaft with a monkey wrench.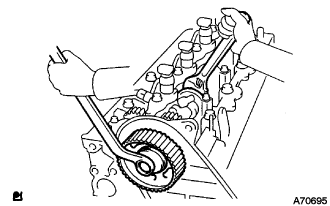
Using SST, remove the camshaft timing pulley.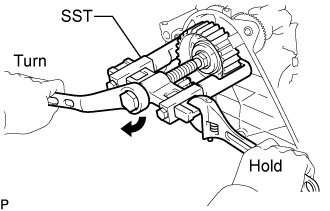
- SST
- 09950-40011
(09951-04010, 09952-04010, 09953-05010, 09957-04010)
09955-04150
| 16. REMOVE TIMING BELT IDLER SUB-ASSEMBLY NO.1 |
Using a 10 mm socket hexagonal wrench remove the timing belt idler No.1.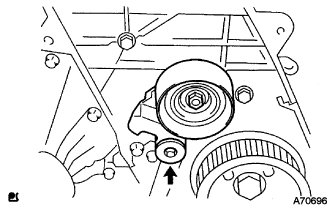
| 17. REMOVE TIMING BELT COVER NO.2 |
Remove the 4 bolts and nuts, then remove the timing belt No.2 cover.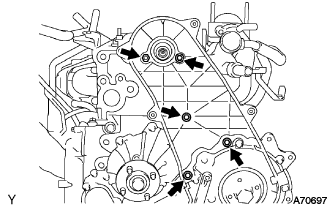
| 18. REMOVE INJECTOR ASSEMBLY |
| 19. REMOVE CAMSHAFT |
Uniformly loosen and remove the 15 camshaft bearing cap bolts in the specified order described in the illustration.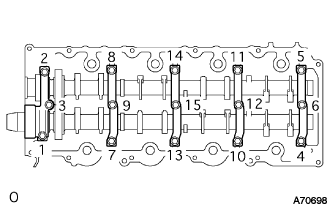
Remove the 5 camshaft bearing caps.
Pull out the oil seal.
Remove the camshaft and No.2 camshaft.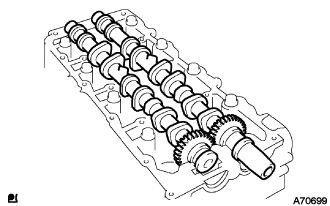
- NOTICE:
- Do not pry the camshaft.
- Do not damage the thrusts of the cylinder head.
- Do not pry the camshaft.