Removal / installation · Vehicles built Oct 2014 – Dec 2016
Versions by build date: Oct 2014 – Dec 2016from Jan 2017
HINT:
Use the same procedure for RHD and LHD vehicles.
The procedure listed below is for LHD vehicles.
Use the same procedure for the RH and LH sides.
The procedure listed below is for the LH side.
1.
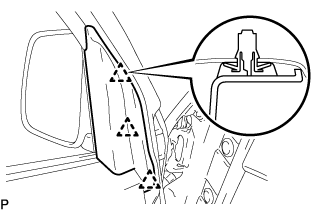
REMOVE FRONT DOOR LOWER FRAME BRACKET GARNISH LH
Detach the 3 clips and remove the front door lower frame bracket garnish LH.
Remove the 3 remaining clips on the body, and reinstall them to the front door lower frame bracket garnish LH.
2.
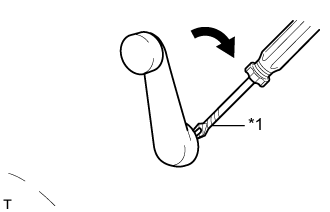
REMOVE FRONT DOOR WINDOW REGULATOR HANDLE ASSEMBLY (w/o Power Window)
Insert a clip remover between the front door regulator inside handle plate and front door trim board sub-assembly LH.
Text in Illustration
*1
Protective Tape
HINT:
Tape the clip remover tip before use.
Turn the handle clockwise to remove the snap ring, front door window regulator handle assembly and plate assembly.
3.
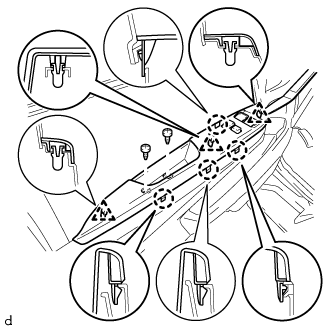
REMOVE POWER WINDOW REGULATOR MASTER SWITCH ASSEMBLY (w/ Power Window)
Remove the 2 screws.
Using a moulding remover, detach the 3 clips and 4 claws.
Disconnect the switch connector and remove the power window regulator master switch assembly.
4.
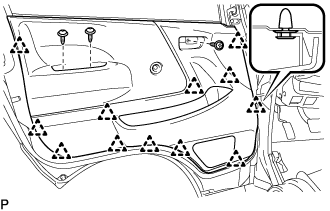
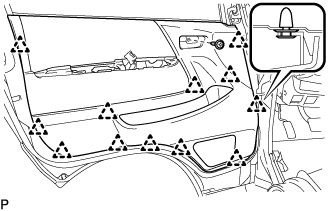
REMOVE FRONT DOOR TRIM BOARD SUB-ASSEMBLY LH (w/o Power Window)
Remove the 3 screws.
Using a clip remover, detach the 12 clips and remove the front door trim board sub-assembly LH.
NOTICE:
Do not place hands on the pocket when removing the front door trim board sub-assembly.
The pocket may detach and discoloration or damage may occur if hands are placed on the pocket when removing the front door trim board sub-assembly.
HINT:
If a clip cannot be reached with the clip remover, pull on the lower trim to remove it.
5.
REMOVE FRONT DOOR TRIM BOARD SUB-ASSEMBLY LH (w/ Power Window)
Remove the screw.
Using a clip remover, detach the 12 clips and remove the front door trim board sub-assembly LH.
NOTICE:
Do not place hands on the pocket when removing the front door trim board sub-assembly.
The pocket may detach and discoloration or damage may occur if hands are placed on the pocket when removing the front door trim board sub-assembly.
HINT:
If a clip cannot be reached with the clip remover, pull on the lower trim to remove it.
6.
REMOVE OUTER REAR VIEW MIRROR ASSEMBLY LH
w/o Retract Mirror:
Install the 3 nuts and outer rear view mirror assembly LH.
Torque:
8.0 N*m{
82 kgf*cm
, 71 in.*lbf
}
w/ Retract Mirror:
Attach the clamp to install the 3 nuts.
Torque:
8.0 N*m{
82 kgf*cm
, 71 in.*lbf
}
Connect the connector to install the outer rear view mirror assembly LH.
7.
REMOVE FRONT DOOR OUTER GLASS WEATHERSTRIP ASSEMBLY LH
8.
REMOVE FRONT DOOR SERVICE HOLE COVER LH
Disconnect the connector and detach the clamp and clip.
Remove the 6 bolts and the front door service hole cover LH.
9.
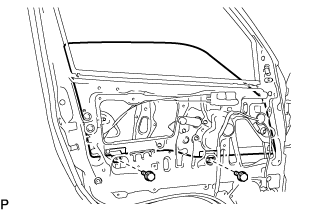
REMOVE FRONT DOOR GLASS SUB-ASSEMBLY LH (w/o Power Window)
Remove the plug hole.
Install the front door window regulator handle assembly, and move the front door glass sub-assembly LH to the position shown in the illustration (where the mounting bolt can be seen).
Remove the 2 bolts and the front door glass sub-assembly LH.
10.
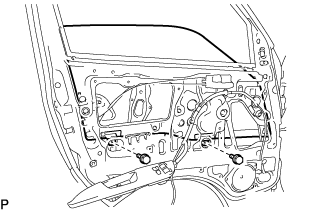
REMOVE FRONT DOOR GLASS SUB-ASSEMBLY LH (w/ Power Window)
Remove the plug hole.
Connect the power window regulator master switch assembly LH, and move the front door glass sub-assembly LH to the position shown in the illustration (where the mounting bolt can be seen).
Remove the 2 bolts and the front door glass sub-assembly LH.
11.
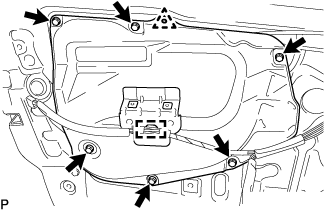
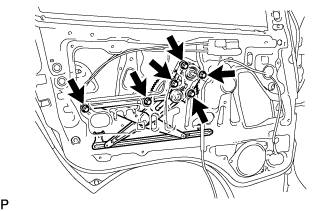
REMOVE FRONT DOOR WINDOW REGULATOR ASSEMBLY LH (w/o Power Window)
Remove the 6 bolts and the front door window regulator assembly LH.
12.
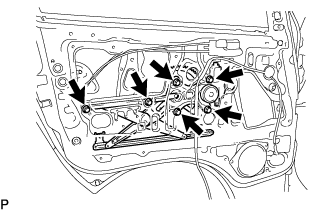
REMOVE FRONT DOOR WINDOW REGULATOR ASSEMBLY LH (w/ Power Window)
Disconnect the connector.
Remove the 6 bolts and the front door window regulator assembly LH.
13.
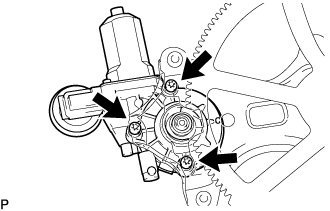
REMOVE POWER WINDOW REGULATOR MOTOR ASSEMBLY LH (w/ Power Window)
Using a "TORX" socket wrench (T25), remove the 3 "TORX" screws and the power window regulator motor assembly LH.
NOTICE:
Perform this procedure only when replacing the power window regulator motor assembly LH or the front door window regulator assembly LH.
14.
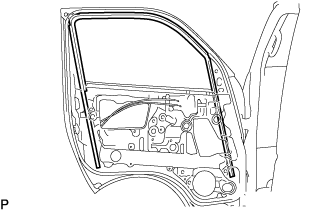
REMOVE FRONT DOOR GLASS RUN LH
Remove the front door glass run LH.
15.
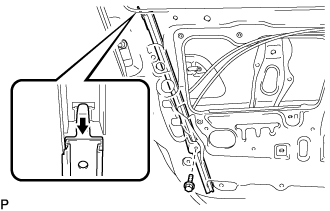
REMOVE FRONT DOOR REAR LOWER FRAME SUB-ASSEMBLY LH
Remove the bolt and the front door rear lower frame sub-assembly LH.
16.
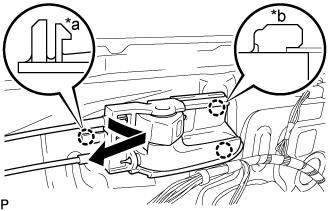
REMOVE FRONT DOOR INSIDE HANDLE SUB-ASSEMBLY LH
Detach the claw (A).
Text in Illustration
*a
Claw (A)
*b
Claw (B)
Detach the 2 claws (B).
17.
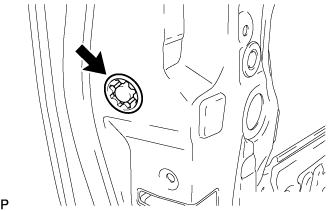
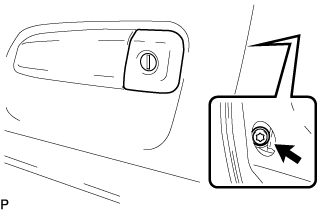
REMOVE FRONT DOOR OUTSIDE HANDLE COVER LH
Remove the plug hole.
Using a "TORX" socket wrench (T30), loosen the "TORX" screw and remove the front door outside handle cover LH with the door lock key cylinder installed.
18.
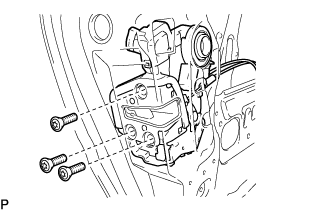
REMOVE FRONT DOOR LOCK ASSEMBLY LH
Using a "TORX" socket wrench (T30), remove the 3 "TORX" screws.
Remove the front door lock assembly LH with the front door inside handle sub-assembly LH installed.
19.
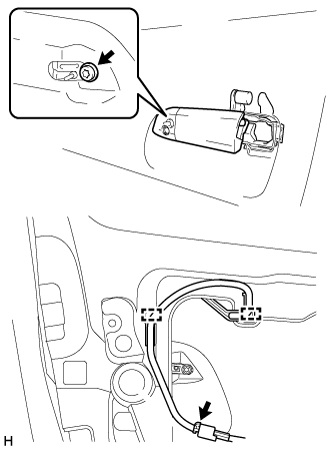
REMOVE FRONT DOOR OUTSIDE HANDLE ASSEMBLY LH (w/ Smart Entry and Start System)
Using a "TORX" socket wrench (T30), loosen the "TORX" screw.
Disconnect the connector.
Detach the 2 clamps.
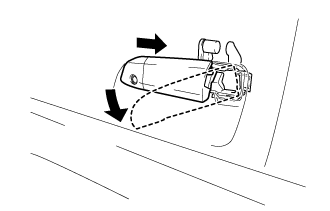
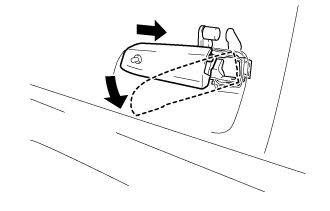
Slide the front door outside handle assembly LH to the rear of the vehicle, and turn it downward to remove.
20.
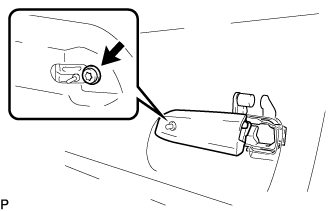
REMOVE FRONT DOOR OUTSIDE HANDLE ASSEMBLY LH (w/o Smart Entry and Start System)
Using a "TORX" socket wrench (T30), loosen the "TORX" screw.
Slide the front door outside handle assembly LH to the rear of the vehicle, and turn it downward to remove.
21.
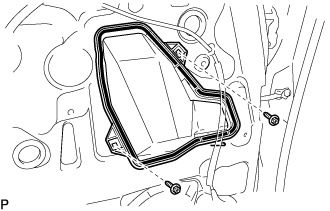
REMOVE FRONT DOOR NO. 2 SERVICE HOLE COVER LH
Remove the 2 screws and the front door No. 2 service hole cover LH.
22.
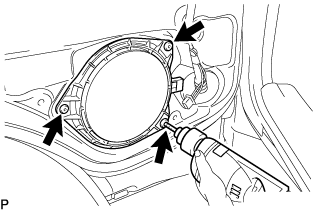
REMOVE FRONT SPEAKER COVER (w/o Front Speaker)
Put a 4 mm (0.157 in.) drill bit into a drill.
Wind tape around the drill bit approximately 5 mm (0.197 in.) from the tip of the drill as shown in the illustration.
HINT:
Tape the 4 mm (0.157 in.) drill bit to prevent the drill bit from going too deep.
Using a drill, drill out the 3 rivet heads and remove the front speaker cover.
NOTICE:
Do not drill the rivet at an angle as this will cause damage to the drill and drill hole. Line up the drill and rivet, and carefully drill out the rivet head.
Even if the flange is taken off, continue drilling and push out the remaining fragments using the drill.
Using a vacuum cleaner, remove the rivet fragments and shavings from the inside of the door.
23.
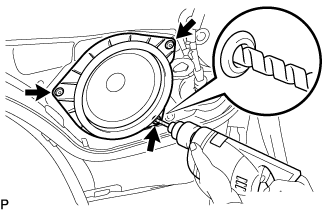
REMOVE FRONT NO. 1 SPEAKER ASSEMBLY (w/ Front Speaker)
Disconnect the connector.
Drill out the 3 rivet heads using a drill with a bit diameter of less than 4 mm (0.16 in.), and remove the front No.1 speaker assembly from the front door panel.
Operate the drill along the rivet head circumference and cut out the flange.
CAUTION:
Be careful. The cut rivet is very hot.
NOTICE:
Do not drill the rivet at an angle as this will cause damage to the drill and drill hole. Line up the drill and rivet, and carefully drill out the rivet head.
Be careful as the cut rivet will be very hot.
After drilling out the flange, continue drilling to push out the shards on the drill.
Using a vacuum cleaner, remove the rivet fragments and shavings from the inside of the door.
24.
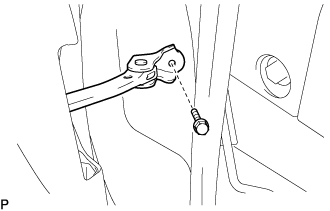
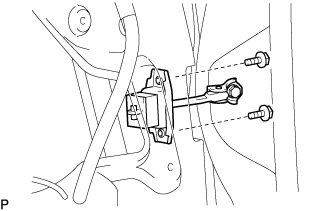
REMOVE FRONT DOOR CHECK ASSEMBLY LH
Remove the bolts.
Remove the 2 bolts and the front door check assembly LH.
25.
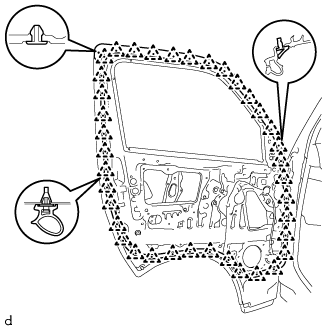
REMOVE FRONT DOOR WEATHERSTRIP LH
Using a clip remover, detach the 38 clips and remove the front door weatherstrip LH.
26.
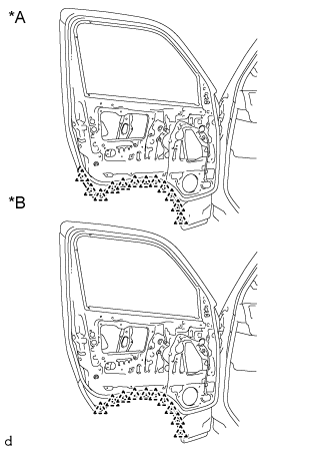
REMOVE FRONT DOOR NO. 2 WEATHERSTRIP LH
for Cold Area: Using a clip remover, detach the 13 clips and remove the front door No. 2 weatherstrip LH.
except Cold Area: Using a clip remover, detach the 10 clips and remove the front door No. 2 weatherstrip LH.