DISASSEMBLY
Removal / installation · Vehicles built Dec 2015 – Dec 2016
Versions by build date: Oct 2014 – Nov 2015 Dec 2015 – Dec 2016 from Jan 2017
| 1.
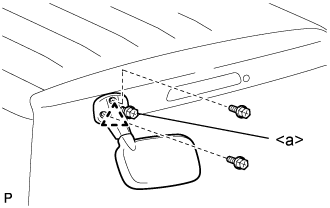
REMOVE OUTER UNDER REAR VIEW MIRROR ASSEMBLY (w/ Outer Under Rear View Mirror)
|
 |
- Remove the 3 screws, disengage the pin and remove the outer under rear view mirror.
- HINT:
- The screw <a> cannot be removed because it is integrated with the outer under view mirror.
| 2.
REMOVE BACK DOOR SERVICE HOLE COVER (for Wide Body) |
|
| 3.
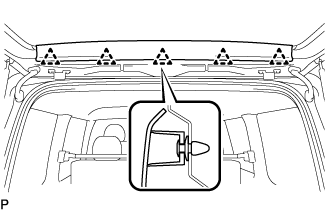
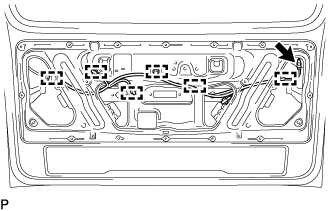
REMOVE UPPER BACK DOOR TRIM BOARD ASSEMBLY (w/o Rear Wiper) |
|
- Detach the 5 clips and remove the upper back door trim board assembly.
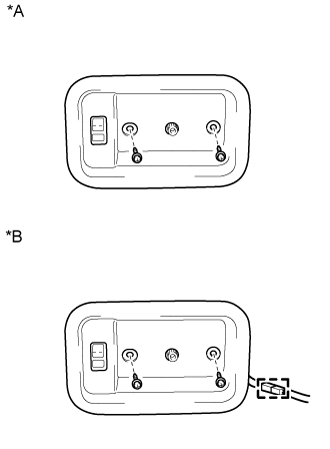
| 4.
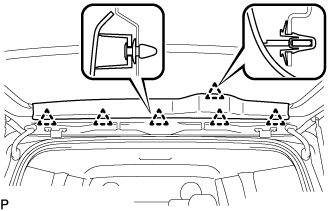
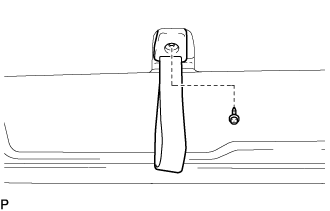
REMOVE UPPER BACK DOOR TRIM BOARD ASSEMBLY (w/ Rear Wiper) |
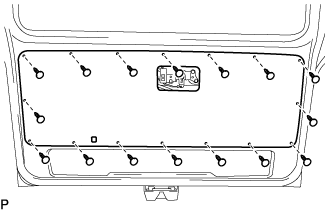
|
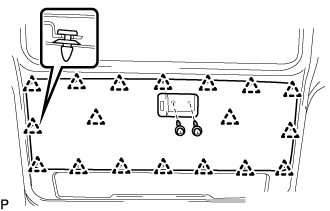
- Detach the 6 clips and remove the upper back door trim board assembly.
Remove the remaining clips on the body, and reinstall them to the upper back door trim board assembly.
| 5.
REMOVE BACK WINDOW GLASS HAMMER ASSEMBLY (w/ Hammer) |
|
(Click here)
| 6.
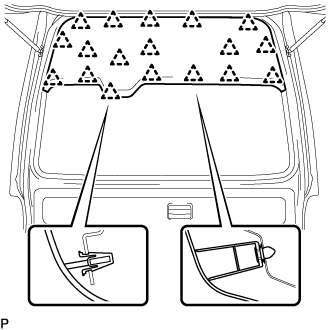
REMOVE UPPER BACK DOOR TRIM BOARD ASSEMBLY (for Wide Body) |
|
Detach the 18 clips and remove the upper back door trim board assembly.
Remove the remaining clips on the body, and reinstall them to the upper back door trim board assembly.
| 7.
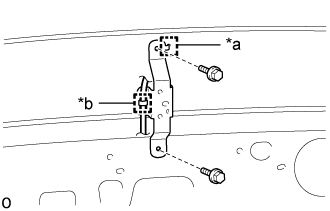
REMOVE QUARTER PANEL REINFORCEMENT BRACKET RH (w/ Hammer) |
|
Detach the clamp.
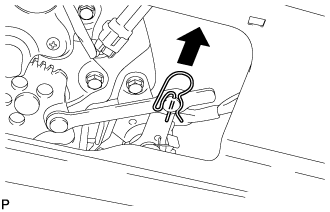
Remove the 2 bolts.
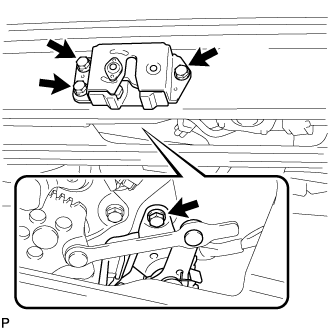
- Detach the guide and remove the quarter panel reinforcement bracket RH.
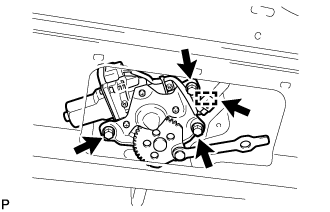
Text in Illustration
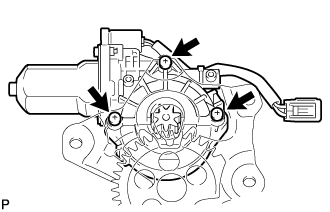
*a
|
Guide
|
*b
|
Clamp
|
| 8.
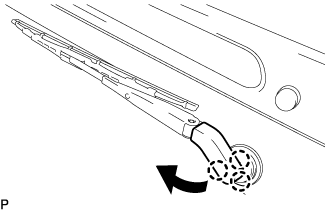
REMOVE REAR WIPER ARM AND BLADE ASSEMBLY (w/ Rear Wiper)
|
|
- Disengage the 3 claws and separate the head cap as shown in the illustration.
Remove the rear wiper arm nut and rear wiper arm and blade assembly.
| 9.
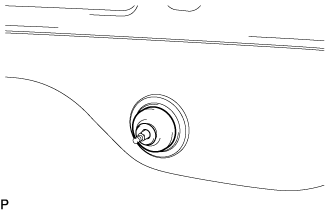
REMOVE REAR WIPER SHAFT COVER (w/ Rear Wiper)
|
|
- Remove the rear wiper shaft cover.
| 10.
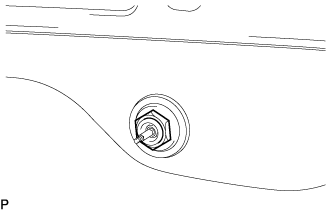
REMOVE NO. 1 REAR WIPER LINK PIVOT WASHER (w/ Rear Wiper)
|
|
- Using the socket wrench (27 mm), remove the lock nut and rear No.1 wiper link pivot washer.
- NOTICE:
- Do not damage the glass.
| 11.
REMOVE REAR WIPER MOTOR ASSEMBLY (w/ Rear Wiper)
|
|
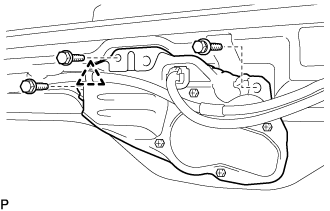
- Disconnect the connector and remove the clamp.
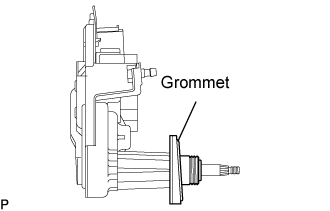
Remove the 3 bolts and rear wiper motor and grommet as a unit.
- Remove the grommet from the rear wiper motor.
| 12.
REMOVE HIGH MOUNTED STOP LIGHT ASSEMBLY (w/ High Mounted Stop Light)
|
|
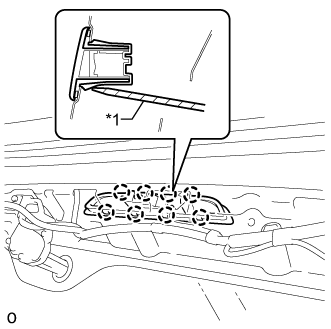
- Disconnect the connector.
Using a screwdriver, detach the 8 claws and remove the high mounted stop light assembly.
Text in Illustration
*1
|
Protective Tape
|
- HINT:
- Tape the screwdriver tip before use.
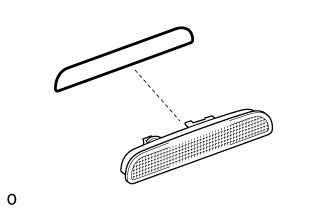
- Remove the gasket from the high mounted stop light assembly.
- NOTICE:
- When removing the high mounted stop light assembly, replace the gasket with a new one.
| 13.
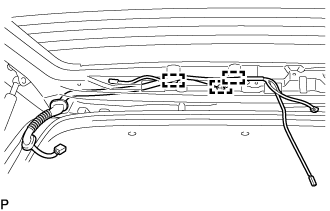
REMOVE NO. 3 BACK DOOR WIRE |
|
Disconnect the connectors.
- Detach the 3 clamps and remove the No. 3 back door wire.
| 14.
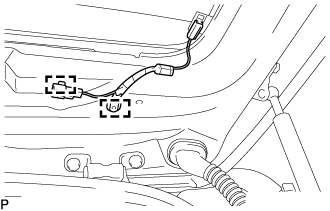
REMOVE NO. 1 REAR WINDOW WIRE |
|
- Detach the 2 clamps and remove the No. 1 rear window wire.
| 15.
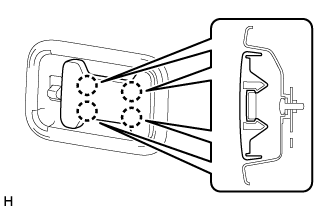
REMOVE BACK DOOR INSIDE HANDLE COVER (w/ Cover) |
|
Detach the 4 claws and remove the back door inside handle cover.
| 16.
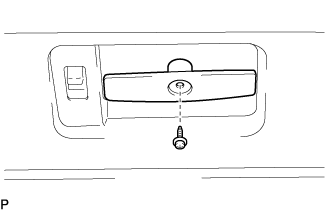
REMOVE BACK DOOR INSIDE HANDLE ASSEMBLY (w/ Back Door Inside Handle) |
|
- Remove the screw and the back door inside handle assembly.
| 17.
REMOVE BACK DOOR INSIDE HANDLE BEZEL (w/ Back Door Inside Handle Bezel) |
|
w/o Illumination:
Remove the 2 screws and the back door inside handle bezel.
w/ Illumination:
Remove the 2 screws and the back door inside handle bezel.
Disconnect the connector.
Text in Illustration
*A
|
w/o Illumination
|
*B
|
w/ Illumination
|
| 18.
REMOVE BACK DOOR PULL STRAP (w/ Strap) |
|
- Remove the screw and back door pull strap.
| 19.
REMOVE BACK DOOR TRIM BOARD (for Board) |
|
- Using a clip remover, remove the 16 clips and the back door trim board.
| 20.
REMOVE BACK DOOR TRIM BOARD (for Molded Door Trim) |
|
- Remove the 2 screws.
Using a clip remover, remove the 18 clips and the back door trim board.
| 21.
REMOVE BACK DOOR INSIDE HANDLE ASSEMBLY (w/ Back Door Inside Handle) |
|
Disconnect the link.
Remove the 3 screws and the back door inside handle assembly.
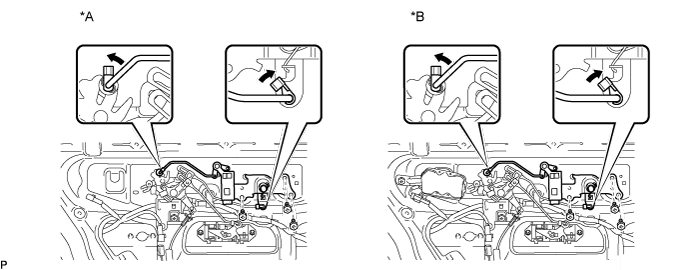

Text in Illustration
*A
|
w/o Power Door Lock
|
*B
|
w/ Power Door Lock
|
| 22.
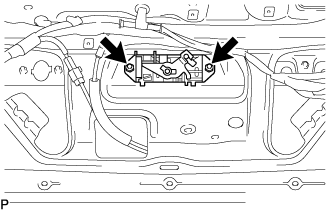
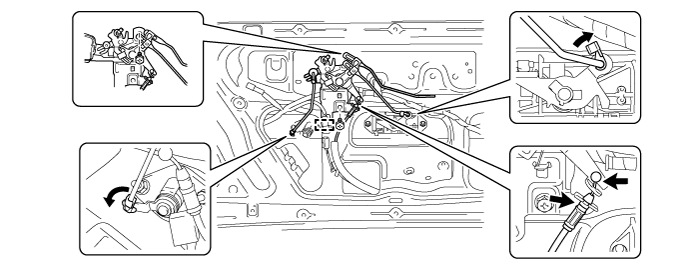
REMOVE BACK DOOR REMOTE CONTROL ASSEMBLY (w/o Power Door Lock) |
|
Disconnect the wire and link.
Detach the clamp.
Remove the 2 screws and the back door remote control assembly.
| 23.
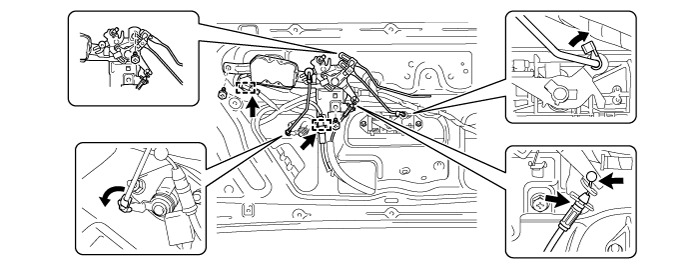
REMOVE BACK DOOR REMOTE CONTROL ASSEMBLY (w/ Power Door Lock) |
|
Disconnect the wire and link.
Detach the 2 clamps.
Remove the 3 screws and the back door remote control assembly.
| 24.
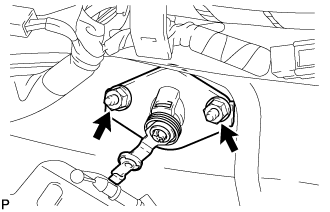
REMOVE BACK DOOR LOCK CYLINDER ASSEMBLY |
|
- Remove the 2 nuts and back door lock cylinder assembly.
| 25.
REMOVE BACK DOOR OUTSIDE HANDLE |
|
- Remove the 2 nuts and the back door outside handle.
| 26.
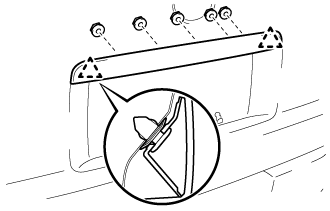
REMOVE BACK DOOR OUTSIDE GARNISH
|
|
w/ Smart Entry and Start System:
Disconnect the 2 connectors.
w/o Smart Entry and Start System:
Disconnect the connector.
- Remove the 5 nuts.
Detach the 2 clips and remove the back door outside garnish.
- Remove the grommet.
| 27.
REMOVE LICENSE PLATE LIGHT ASSEMBLY (w/ Smart Entry and Start System) |
|
- Remove the 2 screws.
- Remove the 2 screws and detach the 2 wire harness clamps.
Remove the 2 license plate light assemblies (smart switch) from the back door outside garnish in the order shown in the illustration.
| 28.
REMOVE DOOR ELECTRICAL KEY SWITCH COVER (w/ Smart Entry and Start System) |
|
Remove the door electrical key switch cover.
| 29.
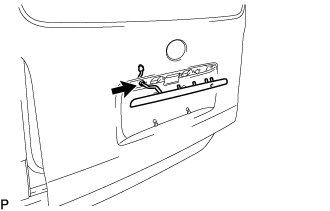
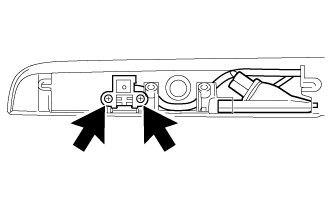
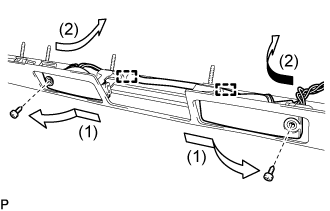
REMOVE LICENSE PLATE LIGHT ASSEMBLY (w/o Smart Entry and Start System)
|
|
- Remove the 2 screws and detach the 2 wire harness clamps.
Remove the 2 license plate lights from the back door outside garnish in the order shown in the illustration.
| 30.
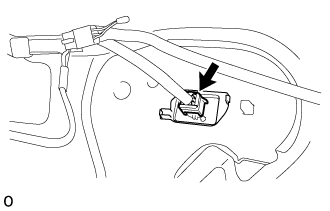
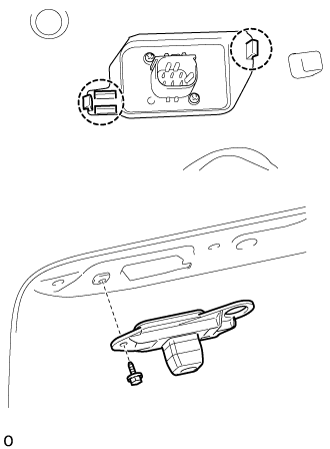
REMOVE TELEVISION CAMERA ASSEMBLY (w/ Rear View Monitor System)
|
|
- Disconnect the connector.
- Remove the screw.
Detach the 2 claws and television camera assembly.
| 31.
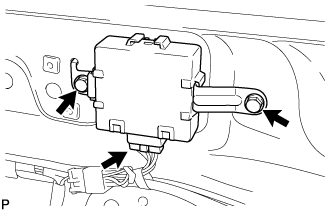
REMOVE BACK DOOR CLOSER RELAY (w/ Easy Closer) |
|
- Disconnect the connector.
Remove the 2 bolts and back door closer relay.
| 32.
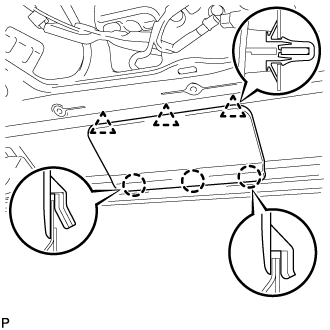
REMOVE BACK DOOR CLOSER COVER (w/ Easy Closer) |
|
- Detach the 3 clips and 3 claws and remove the back closer cover.
| 33.
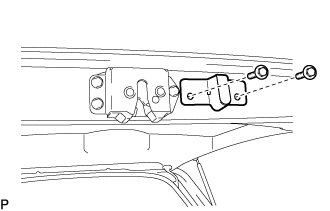
REMOVE BACK DOOR STOPPER BRACKET SUB-ASSEMBLY (for Rough Road Area Spec) |
|
- Remove the 2 bolts and the back door stopper bracket sub-assembly.
| 34.
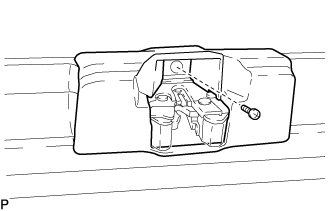
REMOVE BACK DOOR LOCK PROTECTOR (w/ Rear Bumper Step) |
|
- Remove the screw and the back door lock protector.
| 35.
REMOVE PIN HOLD CLIP (w/ Easy Closer)
|
|
- Remove the pin hold clip.
| 36.
REMOVE BACK DOOR LOCK ASSEMBLY (w/ Easy Closer)
|
|
- Remove the 4 bolts and the back door lock assembly.
| 37.
REMOVE BACK DOOR CLOSER MOTOR ASSEMBLY (w/ Easy Closer)
|
|
- Disconnect the connector and detach the clamp.
Remove the 3 bolts and back door closer motor assembly.
| 38.
REMOVE DOOR CONTROL MOTOR (w/ Easy Closer)
|
|
- Using a T25 "TORX" driver, remove the 3 "TORX" screws and door control motor.
| 39.
REMOVE BACK DOOR LOCK ASSEMBLY (w/o Easy Closer) |
|
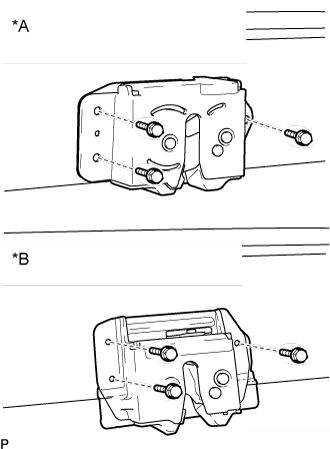
- Remove the 3 bolts and the back door lock assembly.
Text in Illustration
*A
|
w/o Rear Bumper Step
|
*B
|
w/ Rear Bumper Step
|
| 40.
REMOVE NO. 2 BACK DOOR WIRE |
|
- Remove the bolt.
Detach the 6 clamps and remove the No. 2 back door wire.
| 41.
REMOVE BACK DOOR STOPPER LH |
|
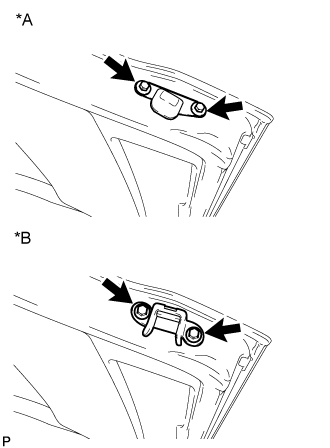
- Remove the 2 bolts and the back door stopper LH.
Text in Illustration
*A
|
for Standard Area Spec
|
*B
|
for Rough Road Area Spec
|
| 42.
REMOVE BACK DOOR STOPPER RH |
|
- HINT:
- Use the same procedure for the LH side.
| 43.
REMOVE BACK DOOR STAY ASSEMBLY LH |
|
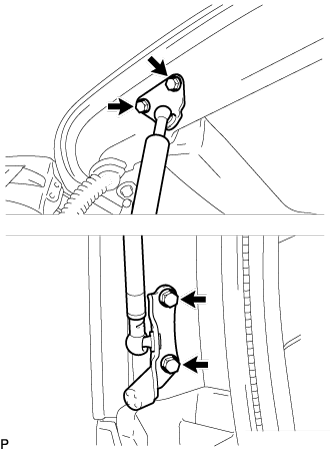
- Remove the 4 bolts and the back door stay assembly LH.
- NOTICE:
- Remove the back door stay while holding the back door to prevent it from moving down.
| 44.
REMOVE BACK DOOR STAY ASSEMBLY RH |
|
- HINT:
- Use the same procedure for the LH side.