INSTALLATION
Removal / installation · Vehicles built from Jan 2017
Versions by build date: Jan 2015 – Dec 2016 from Jan 2017
| 1. INSTALL TRANSMISSION WIRE |

Coat 2 new O-rings with ATF, and install them to the 2 temperature sensors.
Coat a new O-ring with ATF, and install it to the transmission wire.
Install the transmission wire to the automatic transmission case sub-assembly with the bolt.
- Torque:
- 5.4 N*m{ 55 kgf*cm , 48 in.*lbf }
Connect the transmission wire connector.
- HINT:
- Push up the lever until the claw of the transmission wire connector makes a connection sound.
| 2. CONNECT TRANSMISSION WIRE |
Connect the 7 solenoid valve connectors.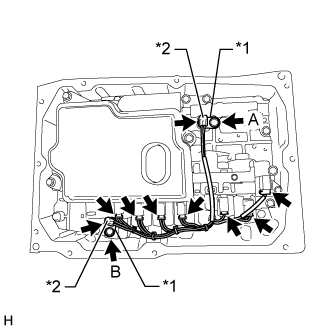

Text in Illustration *1
Temperature Sensor Clamp
*2
Temperature Sensor
Install the 2 temperature sensors and 2 temperature sensor clamps to the transmission valve body assembly with the bolt.
- Torque:
- for Bolt A:
- 10 N*m{ 102 kgf*cm , 7 ft.*lbf }
- for Bolt B:
- 11 N*m{ 112 kgf*cm , 8 ft.*lbf }
| 3. INSTALL AUTOMATIC TRANSMISSION OIL PAN SUB-ASSEMBLY |
Install the 4 transmission oil cleaner magnets to the automatic transmission oil pan sub-assembly as shown in the illustration.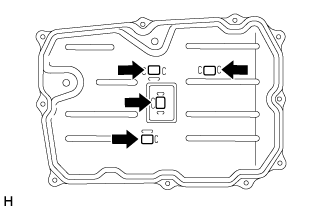
Install a new automatic transmission oil pan gasket to the automatic transmission oil pan sub-assembly.
Install the automatic transmission oil pan sub-assembly with automatic transmission oil pan gasket to the automatic transmission case sub-assembly with the 10 bolts.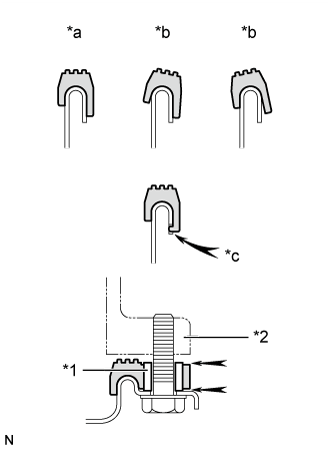
- Torque:
- 7.4 N*m{ 75 kgf*cm , 65 in.*lbf }
Text in Illustration *1
Sleeve
*2
Automatic Transmission Case Sub-assembly
*a
Correct
*b
Incorrect
*c
Protrusion
- NOTICE:
- Make sure that the automatic transmission oil pan gasket seal surface and automatic transmission oil pan sub-assembly contact surface are free of oil and foreign matter.
- Install the automatic transmission oil pan gasket so that there is no slack in the automatic transmission oil pan gasket, and the entire seal surface is level.
- Make sure that the 8 protrusions are properly engaged to the automatic transmission oil pan sub-assembly.
- When installing the automatic transmission oil pan sub-assembly, make sure that the automatic transmission oil pan gasket is not pinched between the sleeve and the seal surface of the automatic transmission case sub-assembly.
- Make sure that the automatic transmission oil pan gasket seal surface and automatic transmission oil pan sub-assembly contact surface are free of oil and foreign matter.
| 4. ADD AUTOMATIC TRANSMISSION FLUID |
Fill the transmission with the correct amount of fluid as listed in the table below.
- Standard Capacity:
Performed Repair
Engine Type
Fill Amount
Automatic transmission assembly replacement (when reusing the torque converter assembly)
1TR-FE, 2TR-FE
2.5 liters (2.6 US qts, 2.2 Imp. qts)
1GD-FTV
4.4 liters (4.6 US qts, 3.9 Imp. qts)
Removal and installation of the automatic transmission oil pan sub-assembly and drain plug
1TR-FE, 2TR-FE
1.0 liters (1.1 US qts, 0.9 Imp. qts)
1GD-FTV
2.5 liters (2.6 US qts, 2.2 Imp. qts)
Removal and installation of the transmission valve body assembly
1TR-FE, 2TR-FE
1.7 liters (1.8 US qts, 1.5 Imp. qts)
1GD-FTV
3.3 liters (3.5 US qts, 2.9 Imp. qts)
Torque converter assembly replacement
1TR-FE, 2TR-FE
2.5 liters (2.6 US qts, 2.2 Imp. qts)
1GD-FTV
4.4 liters (4.6 US qts, 3.9 Imp. qts)
- HINT:
- If the specified amount of automatic transmission fluid cannot be added, perform the following:
Temporarily install the O-ring and refill plug to the automatic transmission assembly.
- HINT:
- Reuse the old O-ring as the refill plug will be removed again to adjust the fluid level.
Lower the vehicle.
Start the engine.
- NOTICE:
- To reduce load, make sure that all electrical systems, such as the air conditioning, lighting system, electric fan and audio system, are off.
Slowly move the shift lever from P to S, then move the shift lever to P.
Allow the engine to idle for 30 seconds to warm it up.
Turn the ignition switch off.
Remove the refill plug and O-ring from the automatic transmission assembly.
Fill the automatic transmission assembly with the correct amount of automatic transmission fluid as listed in the table above.
Temporarily install the O-ring and refill plug to the automatic transmission assembly.
- HINT:
- Reuse the old O-ring as the refill plug will be removed again to adjust the fluid level.
| 5. ADJUST AUTOMATIC TRANSMISSION FLUID |