2014-2019 Hiace · Service Manual STEERING

REMOVAL

Removal / installation · Vehicles built from Jan 2017

Versions by build date: Oct 2014 – Mar 2016 Apr 2016 – Dec 2016 from Jan 2017


1. DISCONNECT CABLE FROM NEGATIVE BATTERY TERMINAL

NOTICE:
Wait for 90 seconds after disconnecting the cable to prevent the airbag working.


2. PLACE FRONT WHEELS FACING STRAIGHT AHEAD

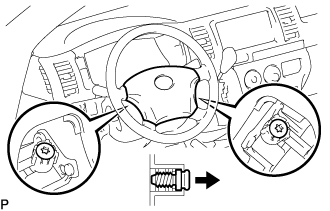
3. REMOVE STEERING PAD (w/o Airbag System)

  1. C299590
    Using a "TORX" socket wrench (T30), loosen the 2 "TORX" screws until the groove along the screw circumference catches on the screw case.

  1. Remove the steering pad.

  1. Disconnect the horn connector.


4. REMOVE STEERING PAD (w/ Airbag System)
(Click here)

5. REMOVE NO. 2 STEERING WHEEL ORNAMENT (w/ Steering Wheel Ornament)

  1. C299594
    Remove the screw.

  1. Detach the 3 guide pins and remove the steering No. 2 steering wheel ornament.


6. REMOVE NO. 1 STEERING WHEEL ORNAMENT (w/ Steering Wheel Ornament)

HINT:
Refer to the step "REMOVE NO. 2 STEERING WHEEL ORNAMENT (w/ Steering Wheel Ornament)".


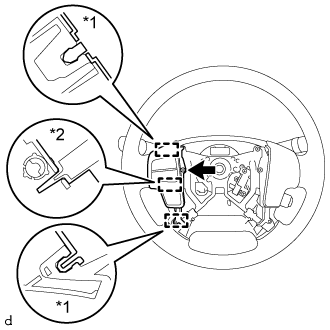
7. REMOVE STEERING PAD SWITCH LH (w/ Steering Pad Switch)
  1. Disconnect each connector.

  1. E289393E01
    Remove the screw.

  1. Detach the 2 pins and guide and remove the steering pad switch LH.

    Text in Illustration 
    *1
    Pin
    *2
    Guide


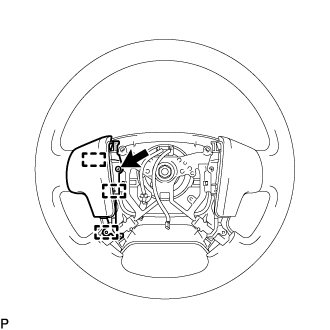
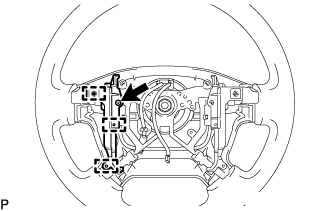
8. REMOVE STEERING PAD COVER LH (w/o Steering Wheel Ornament)

  1. C299606
    Remove the 2 screws.

  1. Detach the 3 guide pins and remove the steering pad cover LH.


9. REMOVE STEERING PAD COVER RH (w/o Steering Wheel Ornament)

HINT:
Refer to the step "REMOVE STEERING PAD COVER LH (w/o Steering Wheel Ornament)".


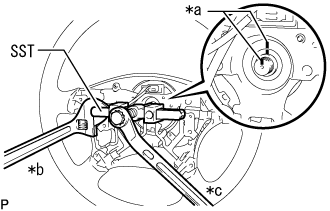
10. REMOVE STEERING WHEEL ASSEMBLY
  1. Remove the steering wheel set nut.

  1. C299578E01
    Put matchmarks on the steering wheel assembly and steering main shaft assembly.
    Text in Illustration 
    *a
    Matchmark
    *b
    Hold
    *c
    Turn

  1. Using SST, remove the steering wheel assembly.

    SST
    09950-50013   (09951-05010, 09952-05010, 09953-05020, 09954-05021)

    NOTICE:
    Apply a small amount of grease to the threads and tip of SST (09953-05020) before use.


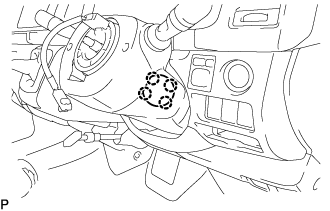
11. REMOVE NO. 2 STEERING COLUMN LOWER COVER (w/ Smart Entry and Start System)

  1. C299749
    Detach the 4 claws and remove the No. 2 steering column lower cover.


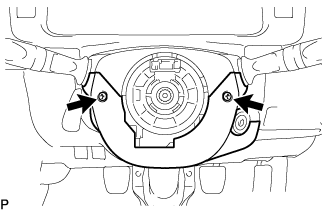
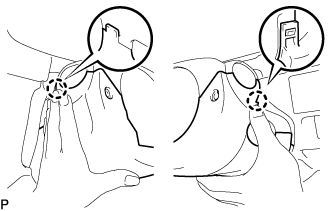
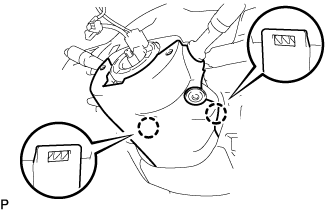
12. REMOVE STEERING COLUMN LOWER COVER

HINT:
Adjust the position of the steering tilt mechanism when performing the procedure.

  1. C299615
    Remove the 2 "TORX" screws (T25) from the steering column lower cover.

  1. C299580
    Push the steering column lower cover inward on both sides to detach the 2 claws.

  1. C299748
    Detach the 2 claws and remove the steering column lower cover.


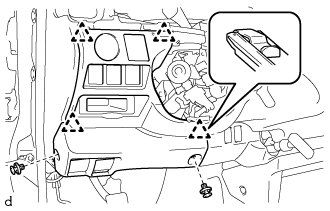
13. REMOVE INSTRUMENT PANEL FINISH LOWER PANEL

  1. B365544
    Using a clip remover, remove the 2 clips.

  1. Detach the 4 clips and remove the instrument panel finish lower.

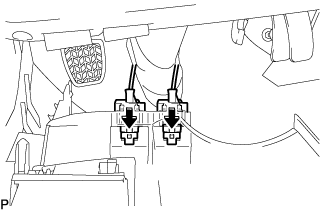
  1. Disconnect each connector.

  1. B102838
    Push the positions indicated by the arrows in the illustration to disconnect the fuel lid lock control cable and bonnet (hood) control cable assembly from the instrument panel finish lower.


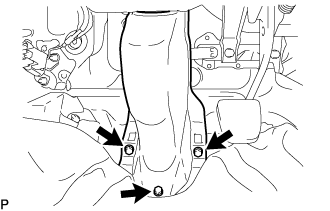
14. REMOVE STEERING COLUMN HOLE COVER

  1. C299582
    Remove the 3 bolts and the steering column hole cover.


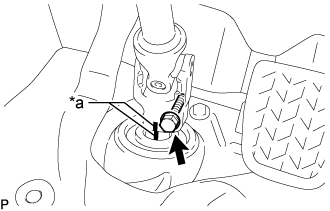
15. DISCONNECT NO. 2 STEERING INTERMEDIATE SHAFT ASSEMBLY

  1. C299601E01
    Remove the bolt.
    *a
    Matchmark

  1. Slide the No. 2 steering intermediate shaft assembly and put matchmarks on the steering intermediate assembly and the No. 2 steering intermediate shaft assembly.


16. REMOVE STEERING COLUMN ASSEMBLY
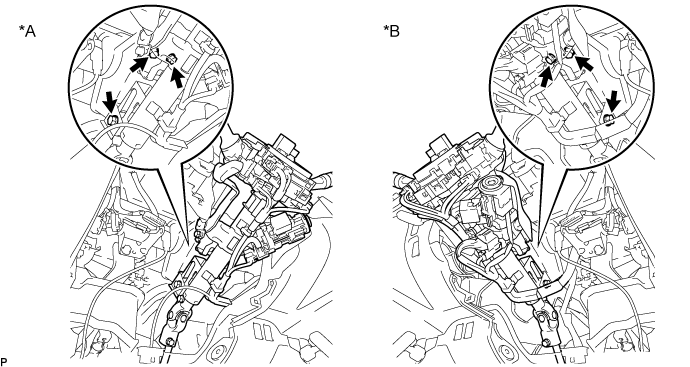
  1. Disconnect the connectors and wire harness clamps from the steering column assembly.

  1. Remove the 3 bolts and the steering column assembly.

    C299611E01

    Text in Illustration 
    *A
    LHD
    *B
    RHD

    NOTICE:
    Make sure that the lever of the steering tilt mechanism is in the locked condition.


17. REMOVE STEERING COLUMN UPPER COVER

  1. C299599E01
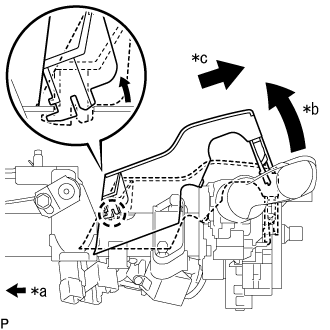
    Remove the steering column upper cover from the steering column assembly.
    Text in Illustration 
    *a
    Front of Vehicle
    *b
    Raise the backside of the steering column upper cover
    *c
    Pull diagonally backwards so that the claw of the steering column upper cover does not break

    NOTICE:
    If the steering column upper cover is removed by pulling it directly upwards, the claw may become damaged.


18. REMOVE TURN SIGNAL SWITCH WITH SPIRAL CABLE ASSEMBLY

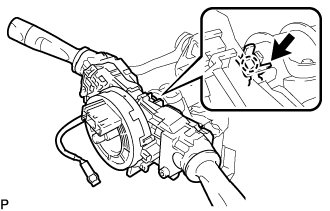
  1. w/o Smart Entry and Start System:

    1. C299595
      Use pliers to loosen the clamp, and then using a thin-bladed screwdriver, lift the claw upward and remove the turn signal switch with spiral cable assembly from the steering column assembly.

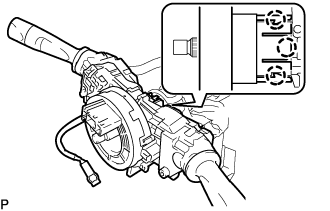
  1. w/ Smart Entry and Start System:

    1. C316363
      Using a thin-bladed screwdriver, detach the 3 claws and remove the turn signal switch with spiral cable assembly from the steering column assembly.

← REMOVAL (Apr 2016 – Dec 2016)DISASSEMBLY (from Oct 2014) →