INSTALLATION
Removal / installation · Vehicles built Oct 2014 – Mar 2016
Versions by build date: Oct 2014 – Mar 2016 from Apr 2016
| 1. INSTALL COMPRESSOR AND MAGNETIC CLUTCH |

Install the compressor and magnetic clutch with the 4 bolts.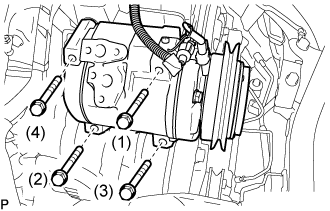

- Torque:
- 25 N*m{ 255 kgf*cm , 18 ft.*lbf }
- NOTICE:
- Tighten the bolts in the order shown in the illustration to install the compressor and magnetic clutch.
| 2. INSTALL COOLER REFRIGERANT SUCTION HOSE NO.1 |
Remove the attached vinyl tape from the hose.
Apply sufficient compressor oil (ND-OIL 8) to a new O-ring and the fitting surface of the compressor and magnetic clutch.
- Compressor oil:
- ND-OIL 8 or equivalent
Install the O-ring onto the cooler refrigerant suction hose No.1.
Install the cooler refrigerant suction hose No.1 onto the compressor and magnetic clutch with the bolt.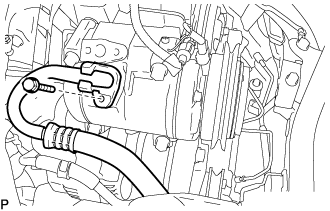
- Torque:
- 9.8 N*m{ 100 kgf*cm , 87 in.*lbf }
| 3. INSTALL COOLER REFRIGERANT DISCHARGE HOSE NO.1 |
Remove the attached vinyl tape from the hose.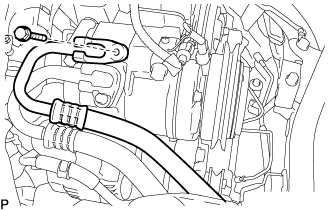
Apply sufficient compressor oil (ND-OIL 8) to a new O-ring and the fitting surface of the compressor and magnetic clutch.
- Compressor oil:
- ND-OIL 8 or equivalent
Install the O-ring onto the cooler refrigerant discharge hose No.1.
Install the cooler refrigerant discharge hose No.1 onto the compressor and magnetic clutch with the bolt.
- Torque:
- 9.8 N*m{ 100 kgf*cm , 87 in.*lbf }
| 4. INSTALL V (COOLER COMPRESSOR TO CRANKSHAFT PULLEY) BELT NO.1 |
Install the V belt as shown in the illustration.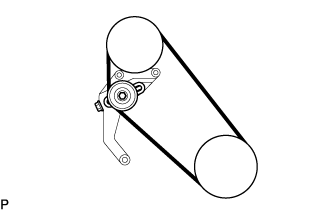
| 5. ADJUST V (COOLER COMPRESSOR TO CRANKSHAFT PULLEY) BELT NO.1 |
Tightening the bolt , adjust the tension of the V belt.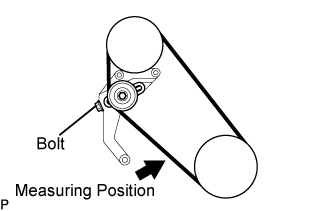
Apply drive belt tension by turning bolt.
Drive belt deflection
- New belt:
- 11 to 15 mm (0.43 to 0.59 in.)
- Used belt:
- 15 to 20 mm (0.59 to 0.78 in.)
Drive belt tension
- New belt:
- 372 to 608 N (38 to 62 kgf)
- Used belt:
- 196 to 392 N (20 to 40 kgf)
- NOTICE:
- When installing a new belt, readjust the belt tension after 5 minutes of idling so that tension is within the specified range.
- When readjusting the belt tension, adjust the belt once again after 5 minutes of idling so that tension is within the specified range.
- When installing a new belt, readjust the belt tension after 5 minutes of idling so that tension is within the specified range.
Apply drive belt tension by turning bolt.
Tighten nut.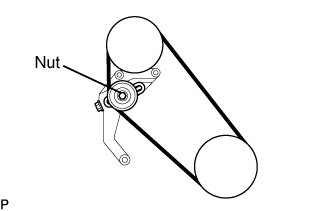
- Torque:
- 43 N*m{ 438 kgf*cm , 32 ft.*lbf }
| 6. INSTALL ENGINE UNDER COVER NO.1 |
| 7. INSTALL ENGINE SERVICE HOLE SUB COVER SUB-ASSEMBLY |
Install the 5 bolts and engine service hole cover.
- Torque:
- 13 N*m{ 133 kgf*cm , 10 ft.*lbf }
| 8. INSTALL FRONT SEAT ASSEMBLY RH (for Hi-back Seat Type) |
Perform the same procedure as above on the opposite side. (Click here)
| 9. INSTALL FRONT SEAT ASSEMBLY RH (for Low-back Seat Type) |
Perform the same procedure as above on the opposite side. (Click here)
| 10. INSTALL FRONT DOOR SCUFF PLATE RH |
| 11. CHARGE REFRIGERANT |
Perform vacuum purging using a vacuum pump.
Charge with refrigerant HFC-134a (R134a).
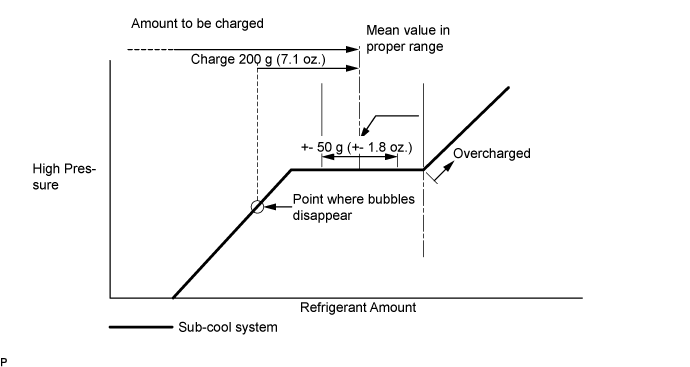
- Standard:
- Single A/C:
- 520 to 580g (18.3 to 20.5 oz.)
- Dual A/C:
- 670 to 730g (23.0 to 25.7 oz.)
- SST
- 07110-58060
(07117-58090, 07117-78050, 07117-58070, 07117-58060, 07117-58080, 07117-88060, 07117-88070, 07117-88080)
- NOTICE:
- Do not operate the cooler compressor before charging refrigerant as the cooler compressor does not work properly without any refrigerant, which causes the compressor to overheat.
- Approximately 100 g (3.5 oz.) of refrigerant may need to be charged after bubbles disappear. The refrigerant amount should be checked by quantity, and not with the sight glass.
- Do not operate the cooler compressor before charging refrigerant as the cooler compressor does not work properly without any refrigerant, which causes the compressor to overheat.
- HINT:
- Prepare a service can to recharge refrigerant if using the refrigerant gas collected with the freon collection/recycling device because the collective rate of the device is approximately 90%.
| 12. WARM UP ENGINE |
Warm up the engine at less than 1,850 rpm for 2 minutes or more after charging refrigerant.
- NOTICE:
- Be sure to warm up the compressor when turning the A/C switch on after removing and installing the cooler refrigerant lines (including the compressor), to prevent damage to the compressor.
| 13. CHECK FOR LEAKAGE OF REFRIGERANT |
After recharging refrigerant gas, check for leakage of refrigerant gas using a halogen leak detector.
Carry out the test under the following conditions:
- Stop the engine.
- Secure good ventilation (the gas leak detector may react to volatile gases which are not refrigerant, such as evaporated gasoline and exhaust gas).
- Repeat the test 2 or 3 times.
- Make sure that there is some refrigerant remaining in the refrigeration system.
When the compressor is off: approx. 392 to 588 kPa (4 to 6 kgf/cm2, 57 to 85 psi)
- Stop the engine.
Using a gas leak detector, check for leakage of the refrigerant line.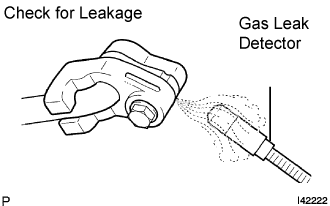
Bring the gas leak detector close to the drain hose with the detector's power off.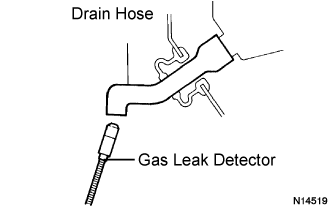
- HINT:
- After the blower motor has stopped, let the cooling unit stand for more than 15 minutes.
- Bring the gas leak detector sensor under the drain hose.
- When bringing the gas leak detector close to the drain hose, make sure that the gas leak detector does not react to volatile gases.
If such reaction is unavoidable, the vehicle must be lifted up.
- After the blower motor has stopped, let the cooling unit stand for more than 15 minutes.
If a gas leak is not detected on the drain hose, remove the blower motor control from the cooling unit. Insert the gas leak detector sensor into the unit and perform the test.
Disconnect the pressure switch connector and leave it for approximately 20 minutes. Bring the gas leak detector close to the pressure switch and perform the test.