INSTALLATION
Removal / installation · Vehicles built from Jan 2017
Versions by build date: Oct 2014 – Dec 2016 from Jan 2017
- HINT:
- Use the same procedure for RHD and LHD vehicles.
- The procedure listed below is for LHD vehicles.
- Use the same procedure for the RH and LH sides.
- The procedure listed below is for the LH side.
- Use the same procedure for RHD and LHD vehicles.
| 1. INSTALL OUTER REAR VIEW MIRROR ASSEMBLY LH |

w/o Retract Mirror:
Install the 3 nuts and outer rear view mirror assembly LH.
- Torque:
- 8.0 N*m{ 82 kgf*cm , 71 in.*lbf }
w/ Retract Mirror:
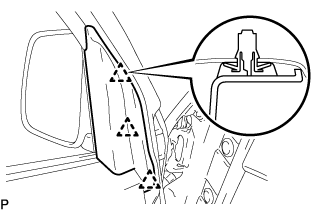
Attach the clamp to install the 3 nuts.
- Torque:
- 8.0 N*m{ 82 kgf*cm , 71 in.*lbf }
Connect the connector to install the outer rear view mirror assembly LH.
| 2. INSTALL FRONT DOOR TRIM BOARD SUB-ASSEMBLY LH (w/ Power Window, w/ Retract Mirror) |
Attach the 12 clips and install the front door trim board sub-assembly LH with the screw.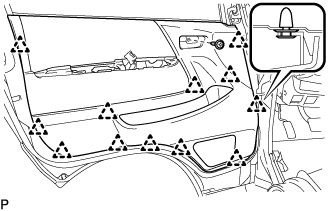

| 3. INSTALL FRONT DOOR TRIM BOARD SUB-ASSEMBLY LH (w/o Power Window, w/ Retract Mirror) |
Attach the 12 clips and install the front door trim board sub-assembly LH with the 3 screws.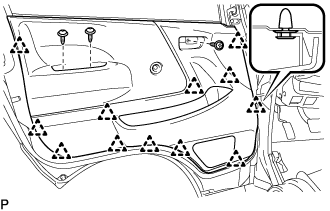
| 4. INSTALL POWER WINDOW REGULATOR MASTER SWITCH ASSEMBLY (w/ Power Window, w/ Retract Mirror) |
Connect the connector.
Attach the 3 clips and 4 claws and install the power window regulator master switch assembly with the 2 screws.
| 5. INSTALL FRONT DOOR WINDOW REGULATOR HANDLE ASSEMBLY (w/o Power Window, w/ Retract Mirror) |
Temporarily install the front door window regulator handle assembly, and completely close the front door glass.
Install the front door window regulator handle assembly with front door window regulator handle shaft snap ring at the angle shown in the illustration.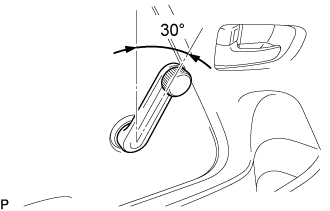
| 6. INSTALL FRONT DOOR LOWER FRAME BRACKET GARNISH LH |
Attach the 3 clips to install the front door lower frame bracket garnish LH.