REMOVAL
Removal / installation · Vehicles built Oct 2014 – Mar 2016
Versions by build date: Oct 2014 – Mar 2016 Apr 2016 – Dec 2016 Jan 2017 – Nov 2017 from Dec 2017
| 1.
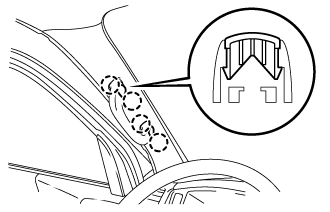
REMOVE FRONT ASSIST GRIP NO. 1 PLUG
|
 |
- Using a screwdriver, detach the 4 claws and remove the 2 front assist grip plugs No. 1.
- HINT:
- Tape the screwdriver tip before use.
- Use the same procedures described for the other side.
| 2.
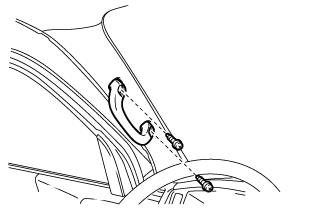
REMOVE ASSIST GRIP ASSEMBLY
|
|
- Remove the 2 screws and assist grip assembly.
- HINT:
- Use the same procedures described for the other side.
| 3.
REMOVE FRONT PILLAR GARNISH LH
|
|
w/o Rear Cooler (Click here)w/ Rear Cooler (Click here)
| 4.
REMOVE FRONT PILLAR GARNISH RH |
|
| 5.
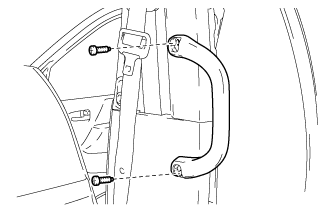
REMOVE ASSIST GRIP ASSEMBLY REAR
|
|
- Remove the 2 screws and assist grip assembly rear.
| 6.
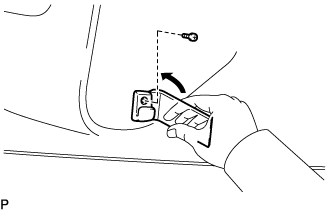
REMOVE VISOR HOLDER
|
|
- HINT:
- Use the same procedures described for the other side.
- Remove the screw.
Using a moulding remover, detach the claw and remove the visor holder.
| 7.
REMOVE VISOR ASSEMBLY LH
|
|
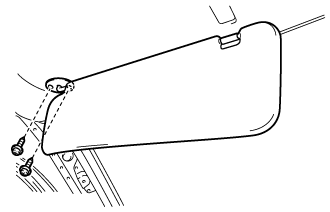
- Remove the 2 screws and visor assembly LH.
| 8.
REMOVE VISOR ASSEMBLY RH
|
|
- HINT:
- Use the same procedures described for the LH side.
| 9.
REMOVE ROOM LIGHT ASSEMBLY NO. 1
|
|
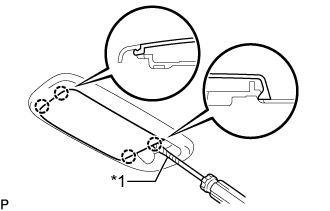
- Using a screwdriver, detach the 4 claws and remove the light cover.
- HINT:
- Tape the screwdriver tip before use.
Text in Illustration
*1
|
Protective Tape
|
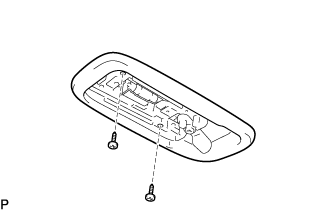
- Remove the 2 screws and room light assembly No. 1.
Disconnect the connector.
| 10.
REMOVE ROOF HEADLINING NO. 1
|
|
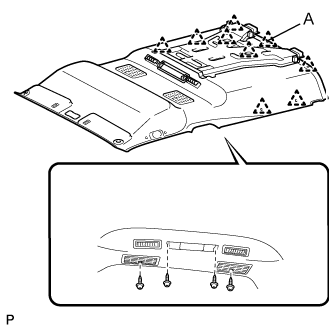
- Remove the 4 screws.
Using a clip remover, remove the 8 clips.
Using a clip remover, detach the clip A and remove the roof headlining No. 1.
| 11.
REMOVE INNER REAR VIEW MIRROR ASSEMBLY |
|
(Click here)
| 12.
REMOVE WINDSHIELD WIPER ARM COVER
|
|
Remove the 2 windshield wiper arm covers.
| 13.
REMOVE FRONT WIPER ARM AND BLADE ASSEMBLY RH
|
|
Remove the nut and front wiper arm and blade assembly RH.
| 14.
REMOVE FRONT WIPER ARM AND BLADE ASSEMBLY LH
|
|
Remove the nut and front wiper arm and blade assembly LH.
| 15.
REMOVE COWL VENT COVER RH
|
|
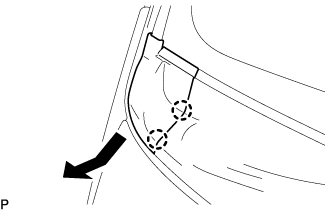
- Disengage the 2 claws and remove the cowl vent cover RH as shown in the illustration.
| 16.
REMOVE COWL VENT COVER LH
|
|
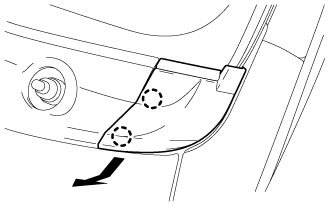
- Disengage the 2 claws and remove the cowl vent cover LH as shown in the illustration.
| 17.
REMOVE COWL TOP VENTILATOR LOUVER SUB-ASSEMBLY
|
|
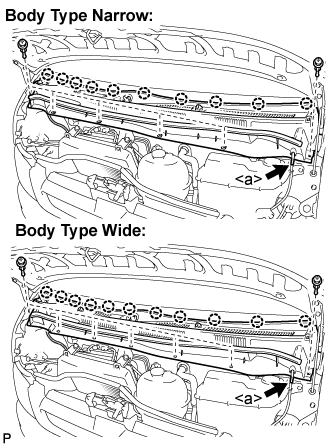
- Disconnect the washer hose at position <a> shown in the illustration.
Body type narrow:
Disengage the 10 claws, and remove the 6 clips and cowl top ventilator louver sub-assembly.
Body type wide:
Disengage the 11 claws, and remove the 7 clips and cowl top ventilator louver sub-assembly.
| 18.
REMOVE WINDSHIELD WIPER MOTOR AND LINK ASSEMBLY
|
|
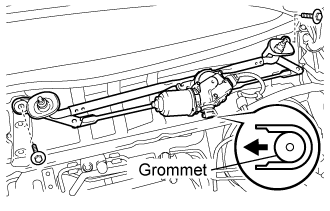
- Disconnect the connector.
Remove the 2 bolts.
Disengage the grommet and remove the windshield wiper motor and link assembly as shown in the illustration.
| 19.
REMOVE OUTER UPPER WINDSHIELD MOULDING |
|
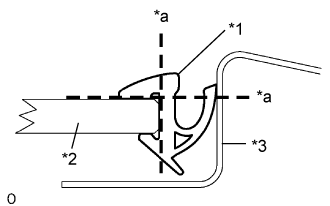
- Using a knife, cut off the moulding as shown in the illustration.
- NOTICE:
- Be careful not to damage the vehicle body with the knife.
Text in Illustration
*1
|
Moulding
|
*2
|
Windshield Glass
|
*3
|
Vehicle Body
|
*a
|
Cut
|
Remove the remaining moulding.
- HINT:
- Make a partial cut in the moulding. Then pull and remove it by hand.
| 20.
REMOVE WINDSHIELD GLASS |
|
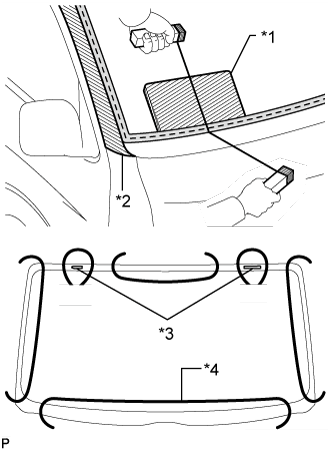
- Apply protective tape to the outer surface of the vehicle body to prevent scratches.
From the interior, insert a piano wire between the vehicle body and glass as shown in the illustration.
Tie objects that can serve as handles (for example, wooden blocks) to both wire ends.
- NOTICE:
- When separating the glass from the vehicle, be careful not to damage the vehicle's paint or interior/exterior ornaments.
- To prevent the instrument panel from being scratched when removing the glass, place a plastic sheet between the piano wire and instrument panel.
Text in Illustration
*1
|
Plastic Sheet
|
*2
|
Protective Tape
|
*3
|
Stopper
|
*4
|
Piano Wire
|
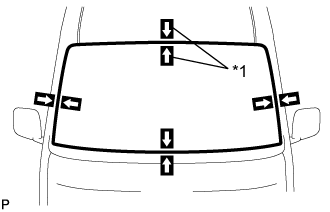
- Place matchmarks over the windshield glass and vehicle body on the locations indicated in the illustration.
- HINT:
- Matchmarks do not need to be placed if the windshield glass is not going to be reused.
Text in Illustration
*1
|
Matchmark
|
Cut through the adhesive by pulling the piano wire around the windshield glass.
Disengaged the spacers.
Using a suction cup, remove the windshield glass.
- NOTICE:
- Leave as much adhesive on the vehicle body as possible when removing the windshield glass.