INSTALLATION
Removal / installation · Vehicles built Apr 2016 – Dec 2016
Versions by build date: Oct 2014 – Mar 2016 Apr 2016 – Dec 2016 from Jan 2017
| 1. CLEAN QUARTER WINDOW GLASS |

Using a scraper, remove the spacers, clips, dam and adhesive from the rear quarter window glass.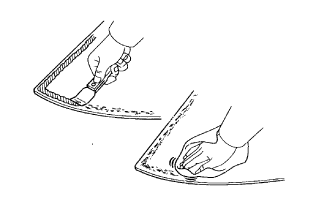

Clean the outer edge of the rear quarter window glass with non-residue solvent.
- NOTICE:
- Do not touch the surface after cleaning it.
- Even if using new rear quarter window glass, clean the rear quarter window glass with non-residue solvent.
- Do not touch the surface after cleaning it.
| 2. CLEAN VEHICLE BODY |
Clean and shape the contact surface of the vehicle body.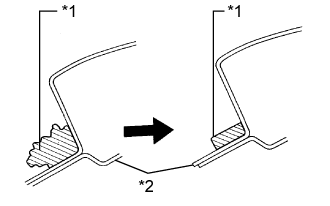
On the contact surface of the vehicle body, use a knife to cut away excess adhesive as shown in the illustration.
- HINT:
- Leave as much adhesive on the vehicle body as possible.
- NOTICE:
- Be careful not to damage the vehicle body.
Clean the contact surface of the vehicle body with cleaner.
- HINT:
- Even if all the adhesive has been removed, clean the vehicle body.
Text in Illustration *1
Adhesive
*2
Vehicle Body
| 3. INSTALL QUARTER WINDOW GLASS SPACER LH |
Apply Primer G to the glass where the quarter window glass spacers will be installed.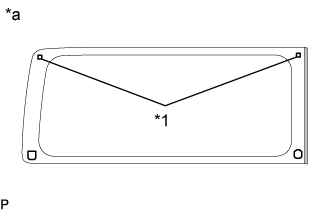
- HINT:
- If primer G is applied to an area other than that which is specified, wipe off the primer with non-residue solvent before it dries.
- NOTICE:
- Allow the Primer G to dry for 3 minutes or more.
- Throw away any leftover Primer G.
- Do not apply too much Primer G.
- Allow the Primer G to dry for 3 minutes or more.
Text in Illustration *1
Rear Quarter Window Glass Spacer
*a
Backside
Install 2 new spacers onto the rear quarter window glass as shown in the illustration.
| 4. INSTALL REAR SIDE WINDOW CLIP LH |
Apply Primer G to the glass where the rear side window clip will be installed.
- HINT:
- If primer G is applied to an area other than that which is specified, wipe off the primer with non-residue solvent before it dries.
- NOTICE:
- Allow the Primer G to dry for 3 minutes or more.
- Throw away any leftover Primer G.
- Do not apply too much Primer G.
- Allow the Primer G to dry for 3 minutes or more.
| 5. INSTALL NO. 1 REAR SIDE WINDOW ADHESIVE DAM LH |
Apply Primer G to the glass where the No. 1 rear side window adhesive dam will be installed.
- HINT:
- If primer G is applied to an area other than that which is specified, wipe off the primer with non-residue solvent before it dries.
- NOTICE:
- Allow the Primer G to dry for 3 minutes or more.
- Throw away any leftover Primer G.
- Do not apply too much Primer G.
- Allow the Primer G to dry for 3 minutes or more.
| 6. INSTALL REAR SIDE WINDOW SEAL SET PLATE LH (w/ Window Seal Set Plate) |
- NOTICE:
- Be sure to replace the rear side window seal set plate LH with a new one.
Apply primer to the installation area within the mark-off line of the rear side window seal set plate LH shown in the illustration.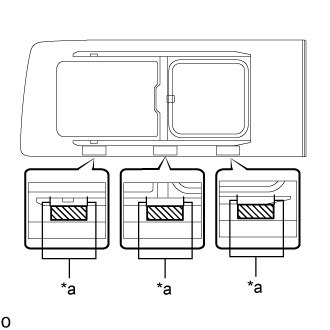
- NOTICE:
- Do not apply too much primer.
Text in Illustration *a
Mark-off Line
Apply adhesive to the rear side window seal set plate LH shown in the illustration.
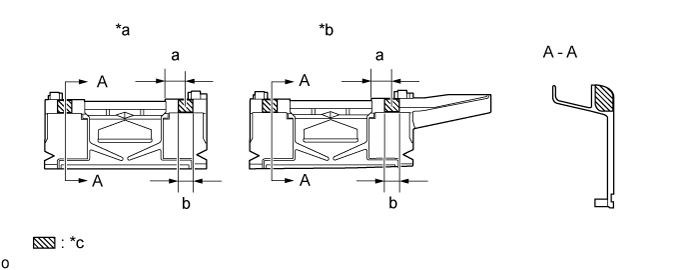
Text in Illustration *a
Installation Position: Center, Rear
*b
Installation Position: Front
*c
Adhesive
-
-
- Standard:
Area
Specified Condition
a
14.0 mm (0.552 in.)
b
10.0 mm (0.394 in.)
- NOTICE:
- Throw away any leftover Primer.
Remove the peeling paper from the face of the rear side window seal set plate LH.
Set the position as shown in the illustration and install the rear side window seal set plate LH to the area within the mark-off line.
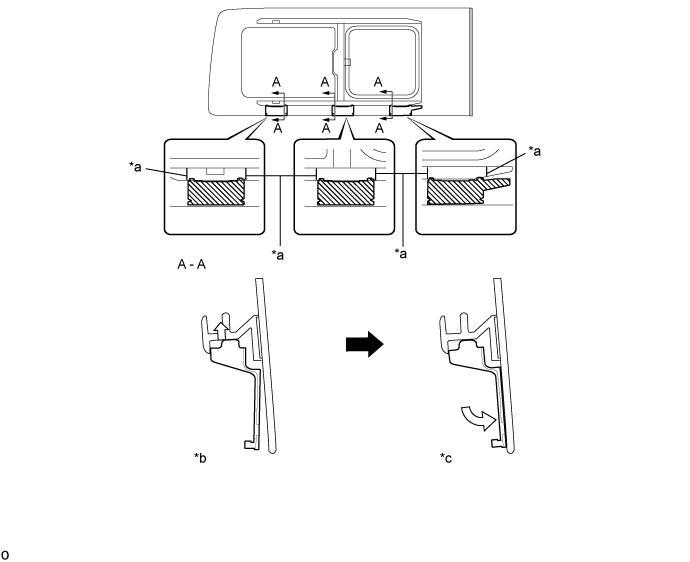
Text in Illustration *a
Mark-off Line
*b
While lifting the surface that has double-sided tape attached, make contact with the bottom surface of the rail.
*c
While contacting the bottom surface of the rail, rotate and attach the double-sided tape.
-
-
- HINT:
- Front and rear position: Install to the area within the mark-off lines.
- Upper and lower position: Make contact with the bottom surface of the rail and install.
- Front and rear position: Install to the area within the mark-off lines.
After the adhesive hardens, pour a small amount of water into the rail water channel, being careful not to spill any, and check that the water drains from the lower section of the rear side window seal set plate LH.
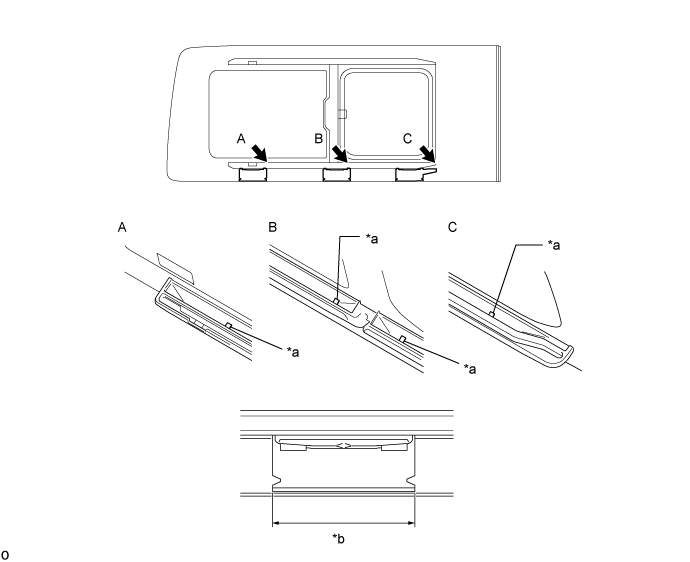
Text in Illustration *a
Water Channel
*b
OK: Water Drains from Bottom Tip Only
| 7. INSTALL REAR QUARTER WINDOW GLASS |
Using a brush or sponge, apply Primer M to the exposed part of the vehicle body.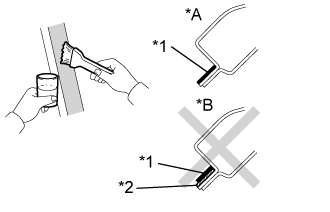
- NOTICE:
- Allow the Primer M to dry for 3 minutes or more.
- Do not apply Primer M to the adhesive.
- Throw away any leftover Primer M.
- Do not apply too much Primer M.
- Allow the Primer M to dry for 3 minutes or more.
Text in Illustration *A
CORRECT
*B
INCORRECT
*1
Primer M
*2
Adhesive
Using a brush or sponge, apply Primer G to the contact surface of the rear quarter window glass.
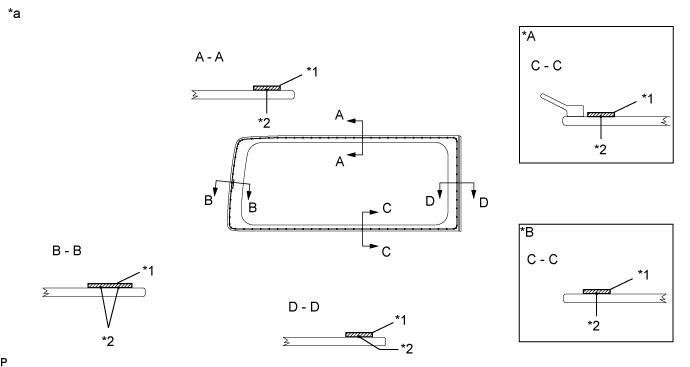
Text in Illustration *A
RH 5 DOOR
*B
RH 4 DOOR
*1
Primer G
*2
Adhesive Center Line
*a
Backside
-
-
- HINT:
- If Primer G is applied to an area other than that which is specified, wipe off the primer with non-residue solvent before it dries.
- NOTICE:
- Allow the Primer G to dry for 3 minutes or more.
- Throw away any leftover Primer G.
- Do not apply too much Primer G.
- Allow the Primer G to dry for 3 minutes or more.
Apply adhesive to the rear quarter window glass.
- Adhesive:
- Toyota Genuine Windshield Glass Adhesive or equivalent
Cut off the tip of cartridge nozzle as shown in the illustration.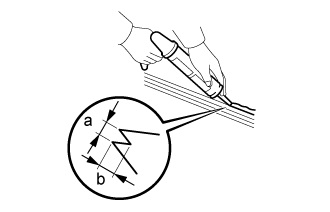
- Specification:
Area
Measurement
a
12.0 mm (0.472 in.)
b
8.0 mm (0.315 in.)
- HINT:
- After cutting off the tip, use all adhesive within the time written in the table below.
Usage Time Frame Temperature
Usage Time Frame
35°C (95°F)
15 minutes
20°C (68°F)
1 hour 40 minutes
5°C (41°F)
8 hours
Load the sealer gun with the cartridge.
Apply adhesive to the back door glass as shown in the illustration.
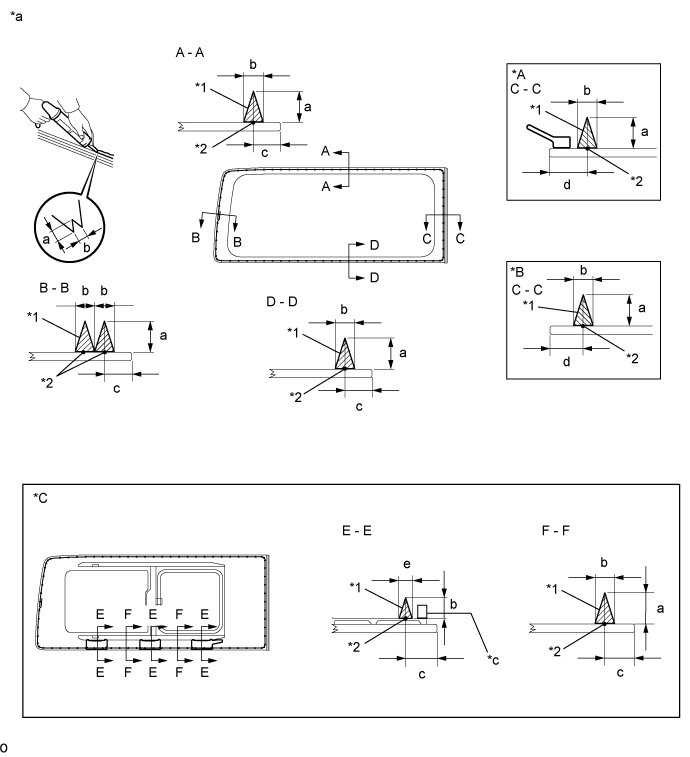
Text in Illustration *A
RH 5 DOOR
*B
RH 4 DOOR
*C
w/ Window Seal Set Plate
-
-
*1
Adhesive
*2
Adhesive Center Line
*3
EPT Sealer
-
-
*a
Backside
-
-
Specification Area
Measurement
a
12.0 mm (0.472 in.)
b
8.0 mm (0.315 in.)
c
11.5 mm (0.452 in.)
d
14.6 mm (0.574 in.)
e
6.0 mm (0.236 in.)
Install the rear quarter window glass to the vehicle body.
Lightly press the front surface of the rear quarter window glass to ensure that the rear quarter window glass is securely fit to the vehicle body.
- NOTICE:
- Check that the spacers are attached to the vehicle body correctly.
- Check that the vehicle body and rear quarter window glass have a small gap between them.
- Check that the spacers are attached to the vehicle body correctly.
Hold the rear quarter window glass in place securely with protective tape or equivalent until the adhesive hardens.
- NOTICE:
- Do not drive the vehicle for the amount of time written in the table below.
Minimum Time Temperature
Minimum Time Prior to Driving Vehicle
35°C (95°F)
1 hour 30 minutes
20°C (68°F)
5 hours
5°C (41°F)
24 hours
| 8. INSTALL EMERGENCY HAMMER CAUTION PLATE (w/ Emergency Hammer Caution Plate) |
- HINT:
- Only for the RH side.
Install the emergency hammer caution plate as shown in the illustration.
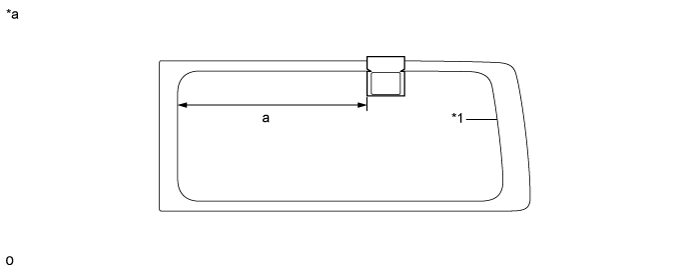
Text in Illustration *1
Ceramic Line
-
-
*a
Backside
-
-
Specification Area
Measurement
a
699 mm (27.5 in.)
Remove the peeling tape.
| 9. CHECK FOR LEAKS AND REPAIR |
Conduct a leak test after the adhesive has completely hardened.
| 10. INSTALL ROOF SIDE GARNISH INNER UPPER LH |
| 11. INSTALL QUARTER PILLAR GARNISH LH |
| 12. INSTALL QUARTER TRIM PANEL ASSEMBLY REAR LH |
| 13. INSTALL BACK DOOR WEATHERSTRIP |
| 14. INSTALL BACK DOOR SCUFF PLATE |
| 15. CONNECT FRONT SEAT OUTER BELT ASSEMBLY LH |
Connect the front seat outer belt assembly RH with the bolt.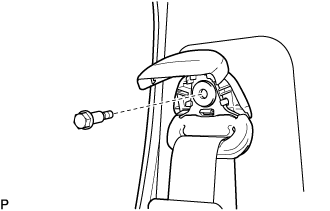
- Torque:
- 42 N*m{ 428 kgf*cm , 31 ft.*lbf }
Attach the 2 claws to close the cover.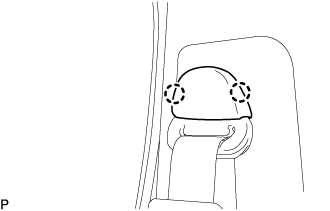
Connect the front seat outer belt assembly RH with the bolt.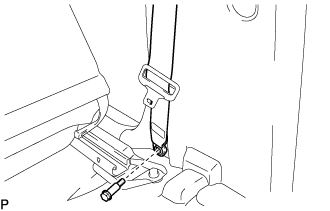
- Torque:
- 42 N*m{ 428 kgf*cm , 31 ft.*lbf }