INSTALLATION
Removal / installation · Vehicles built Oct 2014 – Mar 2016
Versions by build date: Oct 2014 – Mar 2016 Apr 2016 – Dec 2016 from Jan 2017
| 1. INSTALL INSTRUMENT CLUSTER FINISH PANEL SUB-ASSEMBLY LOWER CENTER (AIR CONDITIONING CONTROL ASSEMBLY) |

w/ No. 3 Heater Control Knob
Attach the 2 claws to connect the air mix damper control cable sub-assembly to the No. 3 heater control knob.
Attach the 2 claws to connect the heater control cable sub-assembly to the heater control knob.
Attach the 2 claws to connect the air inlet damper control cable sub-assembly to the No. 2 heater control knob.
Connect the cable to the clamp.
Connect the connector.
Attach the 8 claws to install the instrument cluster finish panel sub-assembly lower center (air conditioning control assembly).
| 2. INSTALL INSTRUMENT PANEL FINISH PANEL LOWER CENTER |
Connect the fuel lid lock control cable and bonnet (hood) control cable assembly to the instrument panel finish lower.
Attach the 4 clips to install the instrument panel finish panel lower.
Install the 2 clips.
| 3. INSTALL SHIFTING HOLE COVER ASSEMBLY |
for Manual Transmission:
Attach the 6 claws to install the shifting hole cover assembly.
for Automatic Transmission:
Attach the 8 claws to install the shifting hole cover assembly.
| 4. INSTALL SHIFT LEVER KNOB |
Turn the shift lever knob in the direction indicated by the arrow and install it.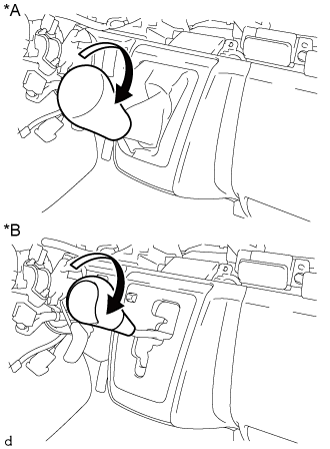

Text in Illustration *A
for Manual Transmission
*B
for Automatic Transmission
| 5. INSTALL PARKING BRAKE HOLE COVER |
Attach the 6 claws to install the parking brake hole cover.
| 6. INSTALL INSTRUMENT PANEL NO. 1 UNDER COVER SUB-ASSEMBLY |
Attach the 3 claws to instrument panel under cover sub-assembly No. 1.
Install the the 2 clips.
| 7. INSTALL INSTRUMENT PANEL FINISH PANEL LOWER |
Connect the fuel lid lock control cable and bonnet (hood) control cable assembly to the instrument panel finish lower.
Attach the 4 clips to install the instrument panel finish panel lower.
Install the 2 clips.