INSTALLATION
Removal / installation · Vehicles built from Jan 2015
| 1. INSTALL SHIFT LOCK CONTROL UNIT ASSEMBLY |

Install the shift lock control unit assembly with the 4 bolts.
- Torque:
- 14 N*m{ 138 kgf*cm , 10 ft.*lbf }
Connect the clamp and 2 connectors to the shift lock control unit assembly.
| 2. CONNECT TRANSMISSION CONTROL CABLE ASSEMBLY |
Turn the nut of the transmission control cable assembly approximately 180° counterclockwise. While holding the nut in place, securely push the stopper in all the way.
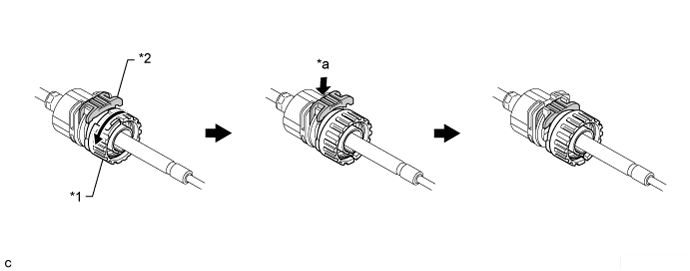

Text in Illustration *1
Stopper
*2
Nut
*a
Push in
-
-
- NOTICE:
- Do not over-rotate the nut as it will come off the internal spring and the transmission control cable assembly will not be reusable.
Install the outer part of the transmission control cable assembly to the shift lock control unit assembly. Check that the spring is positioned at "A" and push in the stopper.
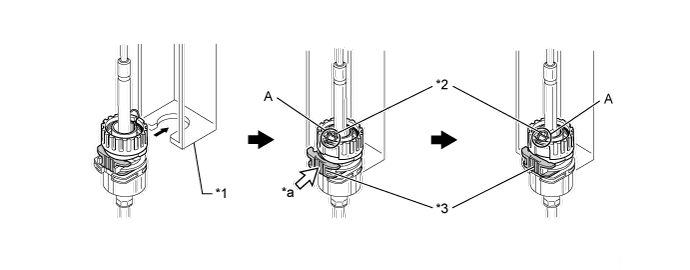
Text in Illustration *1
Shift Lock Control Unit Assembly
*2
Spring
*3
Stopper
-
-
*a
Push in
-
-
- NOTICE:
- Ensure that the groove on the transmission control cable assembly is securely fitted to the shift lock control unit assembly.
- HINT:
- If the stopper cannot be pushed in, slightly turn the nut clockwise and then push in the stopper again.
Connect the end of the transmission control cable assembly to the shift lock control unit assembly.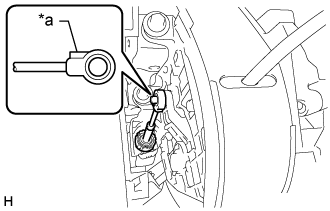
Text in Illustration *a
Protrusion
- NOTICE:
- Securely connect the cable end until it fits securely against the base of the pin.
- Connect the cable end with the protrusion facing the front of the vehicle.
- Securely connect the cable end until it fits securely against the base of the pin.
| 3. INSTALL INSTRUMENT PANEL FINISH PANEL LOWER CENTER |
Attach the 8 claws to install the instrument panel finish panel lower center.
| 4. INSTALL PARKING BRAKE HOLE COVER |
Attach the 6 claws to install the parking brake hole cover.
| 5. INSTALL INSTRUMENT PANEL FINISH PANEL LOWER |
Connect the fuel lid lock control cable and bonnet (hood) control cable assembly to the instrument panel finish lower.
Attach the 4 clips to install the instrument panel finish panel lower.
Install the 2 clips.
| 6. INSTALL INSTRUMENT PANEL UNDER COVER SUB-ASSEMBLY NO. 1 |
Attach the 3 claws to instrument panel under cover sub-assembly No. 1.
Install the the 2 clips.
| 7. INSTALL FLOOR SHIFT POSITION INDICATOR HOUSING SUB-ASSEMBLY |
Attach the 8 claws to install the floor shift position indicator housing sub-assembly.
| 8. INSTALL SHIFT LEVER CAP |
Attach the 2 claws to install the shift lever cap to the floor shift position indicator housing sub-assembly.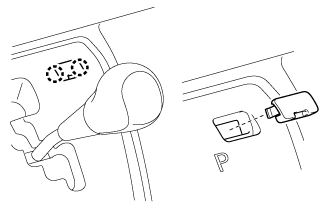
| 9. INSTALL SHIFT LEVER KNOB |
Install the shift lever knob and twist it in the direction indicated by the arrow.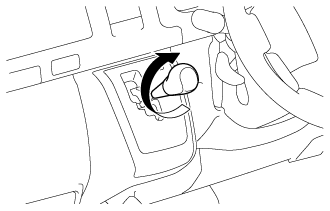
| 10. ADJUST SHIFT LEVER POSITION |
Remove the clip and nut and disconnect the control shaft lever to transmission control cable assembly from the No. 1 transmission control cable bracket.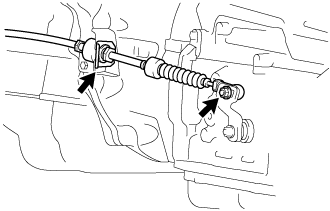
Turn the control shaft lever clockwise until it stops, and then return the control shaft lever counterclockwise 2 notches to N.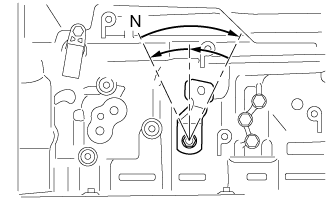
Move the shift lever to N, and with the cable end lightly pushed toward the front of the vehicle, install the transmission control cable assembly to the transmission control shaft lever LH with the nut.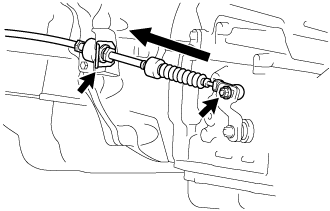
- Torque:
- 15 N*m{ 148 kgf*cm , 11 ft.*lbf }
- HINT:
- Tighten the nut with no slack in the control cable.
Connect the transmission control shift cable assembly to the No. 1 transmission control cable bracket with a new clip.
After adjustment, check the function and operation of the shift lever.
| 11. INSPECT SHIFT LEVER POSITION |
When moving the shift lever from P to R with the ignition switch to ON and the brake pedal depressed, make sure that the shift lever moves smoothly and correctly to P.
Make sure that the shifting lever moves smoothly and can be moderately operated.
When starting the engine, make sure that the vehicle moves forward when shifting from N to D and moves rearward when shifting to R.