REMOVAL
Removal / installation · Vehicles built from Jan 2017
Versions by build date: Oct 2014 – Dec 2016 from Jan 2017
| 1.
REMOVE REAR NO. 1 SEAT ASSEMBLY |
 |
w/o Headrest:
(Click here)
w/ Headrest:
(Click here)
| 2.
REMOVE REAR NO. 2 SEAT ASSEMBLY |
|
w/o Headrest:
(Click here)
w/ Headrest:
(Click here)
| 3.
REMOVE REAR NO. 3 SEAT ASSEMBLY |
|
for Bench Type Seatback:
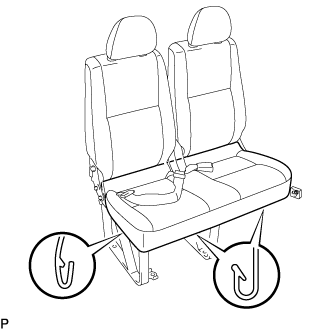
(Click here)
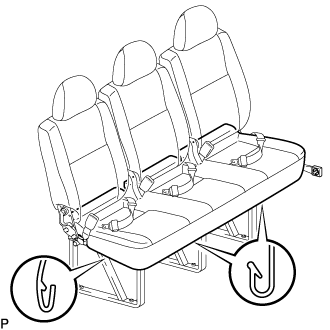
for Separate Type Seatback:
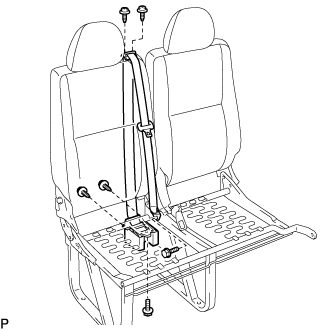
(Click here)
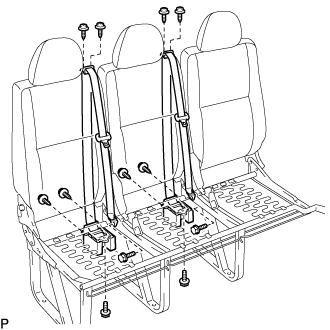
| 4.
REMOVE REAR NO. 4 SEAT ASSEMBLY
|
|
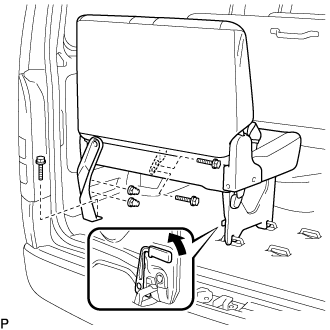
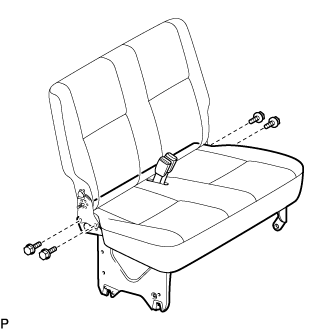
- Remove the 3 bolts and 2 nuts.
Pull the lever in the direction indicated by the arrow in the illustration, release the 2 locks, and remove the rear No.4 seat assembly.
| 5.
REMOVE RECLINING ADJUSTER RELEASE HANDLE NO. 1 (for Rear No. 1 Seat Assembly Swiveling Seat Type)
|
|
Using a screwdriver, disengage the claw and remove the reclining adjuster release handle No.1.
- HINT:
- Tape the screwdriver tip before use.
| 6.
REMOVE RECLINING ADJUSTER COVER LH (for Rear No. 1 Seat Assembly Swiveling Seat Type)
|
|
Disengage the 2 claws and remove the screw and reclining adjuster cover LH.
| 7.
REMOVE RECLINING ADJUSTER COVER RH (for Rear No. 1 Seat Assembly Swiveling Seat Type)
|
|
Disengage the 2 claws and remove the screw and reclining adjuster cover RH.
| 8.
REMOVE SEAT TRACK ADJUSTING HANDLE KNOB (for Rear No. 1 Seat Assembly Swiveling Seat Type)
|
|
Remove the screw and seat track adjusting handle knob.
| 9.
REMOVE REAR SEAT TURN TABLE COVER (for Rear No. 1 Seat Assembly Swiveling Seat Type)
|
|
Remove the 6 screws and 2 rear seat turntable covers.
| 10.
REMOVE REAR SEAT BELT ASSEMBLY OUTER (for Rear No. 1 Seat Assembly Swiveling Seat Type) |
|
Remove the bolt and rear seat belt assembly outer.
| 11.
REMOVE RECLINING ADJUSTER RELEASE HANDLE NO. 2 RH (for Rear No. 2 Seat Assembly)
|
|
- Using a screwdriver, disengage the claw and remove the reclining adjuster release handle No. 2 RH.
- HINT:
- Tape the screwdriver tip before use.
| 12.
REMOVE RECLINING ADJUSTER RELEASE HANDLE NO. 3 RH (for Rear No. 3 Seat Assembly)
|
|
- Using a screwdriver, disengage the claw and remove the reclining adjuster release handle No.3 RH.
- HINT:
- Tape the screwdriver tip before use.
| 13.
REMOVE RECLINING ADJUSTER COVER RH (for Rear No. 2 Seat Assembly)
|
|
- Disengage the 3 claws and remove the 2 screws and reclining adjuster cover RH.
| 14.
REMOVE RECLINING ADJUSTER COVER RH (for Rear No. 3 Seat Assembly)
|
|
- Disengage the 3 claws and remove the 2 screws and reclining adjuster cover RH.
- HINT:
- Tape the screwdriver tip before use.
| 15.
REMOVE REAR SEAT BELT ASSEMBLY INNER (for Rear No. 2 Seat Assembly)
|
|
- Remove the bolt and rear seat belt assembly inner.
| 16.
REMOVE REAR SEAT BELT ASSEMBLY INNER (for Rear No. 3 Seat Assembly)
|
|
- HINT:
- Follow the same procedure as for the rear No.2 seat assembly.
| 17.
REMOVE RECLINING ADJUSTER RELEASE HANDLE NO. 2 LH (for Rear No. 2 Seat Assembly)
|
|
- HINT:
- Use the same procedures for the RH side and LH side.
| 18.
REMOVE RECLINING ADJUSTER RELEASE HANDLE NO. 3 LH (for Rear No. 3 Seat Assembly)
|
|
- HINT:
- Use the same procedures for the RH side and LH side.
| 19.
REMOVE RECLINING ADJUSTER COVER LH (for Rear No. 2 Seat Assembly)
|
|
- HINT:
- Use the same procedures for the RH side and LH side.
| 20.
REMOVE RECLINING ADJUSTER COVER LH (for Rear No. 3 Seat Assembly)
|
|
- HINT:
- Use the same procedures for the RH side and LH side.
| 21.
REMOVE NO. 2 SEAT CUSHION COVER SUB-ASSEMBLY WITH PAD (for Rear No. 2 Seat Assembly)
|
|
- Disengage the hooks and remove the No. 2 seat cushion cover sub-assembly with pad.
| 22.
REMOVE NO. 3 SEAT CUSHION COVER SUB-ASSEMBLY WITH PAD (for Rear No. 3 Seat Assembly)
|
|
- Disengage the hooks and remove the No.3 seat cushion cover sub-assembly with pad.
| 23.
REMOVE REAR SEAT 3 POINT TYPE BELT ASSEMBLY (for Rear No. 2 Seat Assembly) |
|
- Remove the 4 screws.
Remove the 2 bolts and rear seat 3 point type belt assembly.
| 24.
REMOVE REAR SEAT 3 POINT TYPE BELT ASSEMBLY (for Rear No. 3 Seat Assembly) |
|
- Remove the 8 screws.
Remove the 4 bolts and 2 rear seat 3 point type belt assemblies.
| 25.
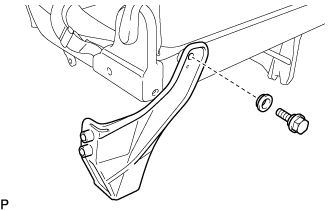
REMOVE NO. 4 SEAT LEG BRACKET REAR (for Rear No. 4 Seat Assembly)
|
|
- Remove the bolt, spacer and No.4 seat leg bracket rear.
| 26.
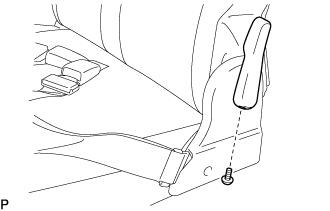
REMOVE RECLINING ADJUSTER RELEASE HANDLE (for Rear No. 4 Seat Assembly)
|
|
- Remove the screw and reclining adjuster release handle.
| 27.
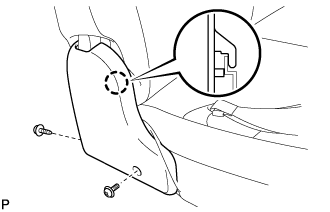
REMOVE RECLINING ADJUSTER COVER LH (for Rear No. 4 Seat Assembly)
|
|
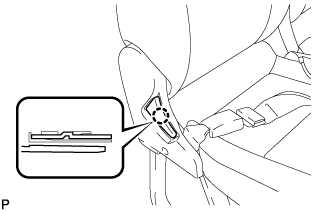
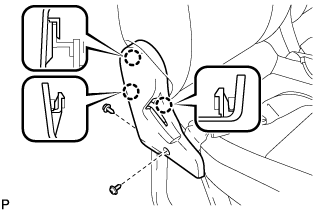
- Disengage the claw and remove the 2 screws and reclining adjuster cover LH.
| 28.
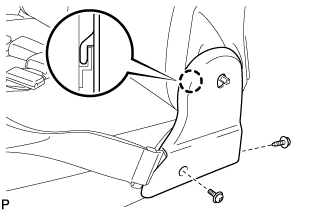
REMOVE RECLINING ADJUSTER COVER RH (for Rear No. 4 Seat Assembly)
|
|
- Disengage the claw and remove the 2 screws and reclining adjuster cover RH.
| 29.
REMOVE LAP BELT OUTER ANCHOR COVER (for Rear No. 4 Seat Assembly)
|
|
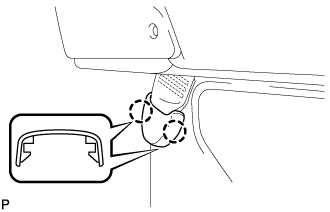
- Disengage the 2 claws and remove the lap belt outer anchor cover.
| 30.
DISCONNECT REAR SEAT 3 POINT TYPE BELT ASSEMBLY (for Rear No. 4 Seat Assembly)
|
|
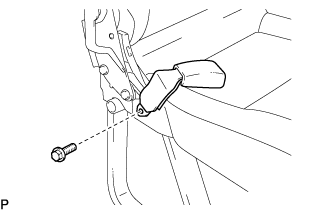
Remove the bolt and disconnect the rear seat 3-point type belt assembly.
| 31.
REMOVE NO. 4 SEAT CUSHION COVER SUB-ASSEMBLY WITH PAD (for Rear No. 4 Seat Assembly)
|
|
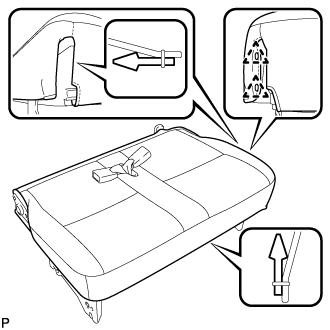
- Remove the 4 bolts and No.4 seat cushion assembly.
- Disengage the hooks and remove the 2 clips and No.4 seat cushion cover sub-assembly with pad.
| 32.
REMOVE REAR SEAT HEADREST ASSEMBLY (for Rear No. 4 Seat Assembly) |
|
| 33.
REMOVE REAR SEAT CUSHION (for Rear No. 4 Seat Assembly)
|
|
Remove the screw and rear seat cushion.
| 34.
REMOVE REAR SEAT HEADREST SUPPORT (for Rear No. 4 Seat Assembly)
|
|
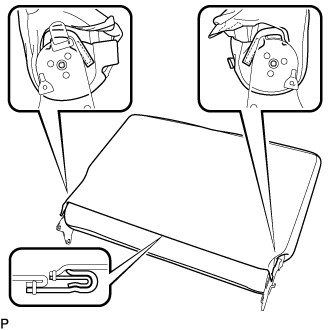
- Open the fastener of the No.4 seatback cover sub-assembly.
Disengage the hook and turn back the No.4 seatback cover sub-assembly.
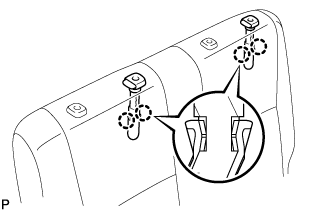
- Disengage the 2 claws and remove the 2 rear seat headrest supports.
| 35.
REMOVE REAR SEATBACK LOCK BEZEL UPPER (for Rear No. 4 Seat Assembly) |
|
| 36.
REMOVE REAR SEATBACK LOCK BEZEL LOWER (for Rear No. 4 Seat Assembly) |
|
| 37.
REMOVE NO. 4 SEATBACK COVER SUB-ASSEMBLY WITH PAD (for Rear No. 4 Seat Assembly) |
|
| 38.
REMOVE REAR SEAT CUSHION SHIELD INNER NO. 1 (for Rear No. 4 Seat Assembly) |
|
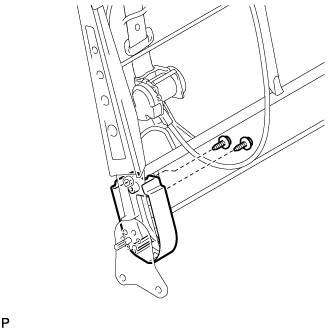
- Remove the 3 screws and rear seat cushion shield inner No. 1.
| 39.
REMOVE REAR SEAT SHOULDER BELT HOLE COVER (for Rear No. 4 Seat Assembly) |
|
- Remove the 2 screws and rear seat shoulder belt hole cover.
| 40.
REMOVE REAR SEAT 3 POINT TYPE BELT ASSEMBLY (for Rear No. 4 Seat Assembly) |
|
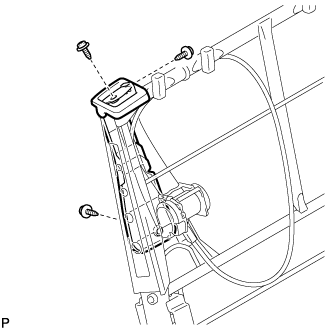
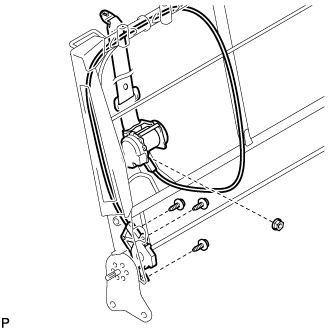
- Remove the 3 screws.
Remove the nut and rear 3 point type belt assembly.
| 41.
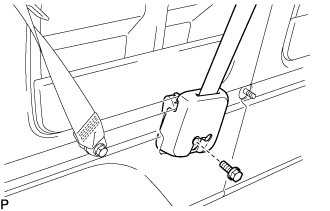
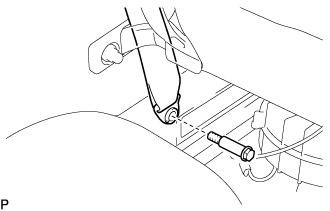
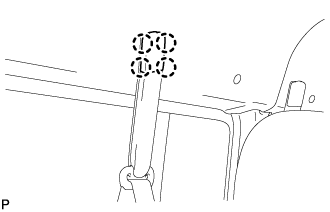
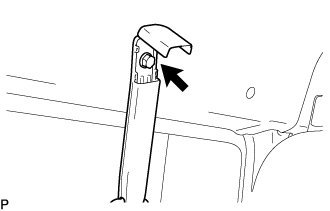
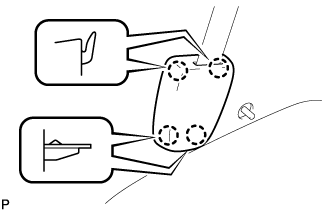
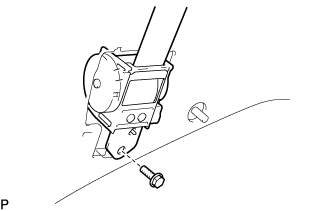
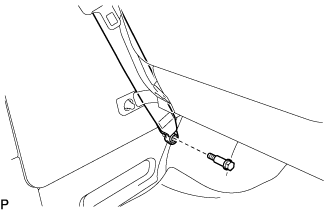
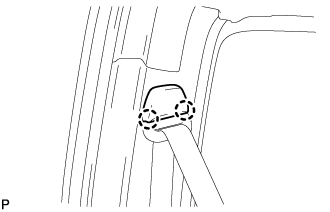
REMOVE REAR SEAT BELT ASSEMBLY OUTER |
|
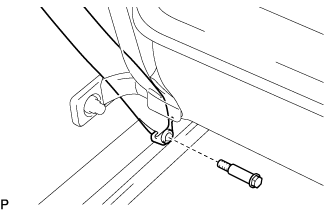
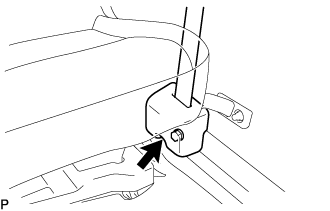
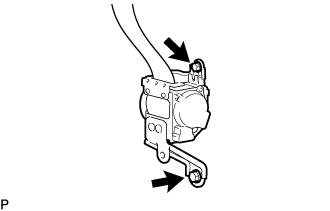
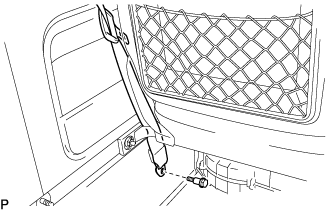
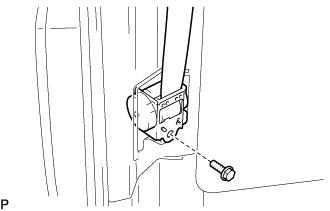
- Remove the bolt and disconnect the floor side of the rear seat belt assembly outer.
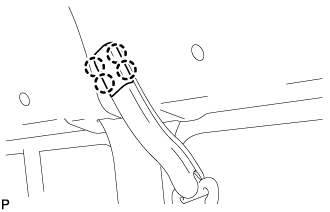
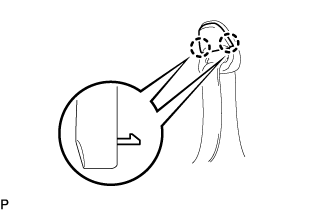
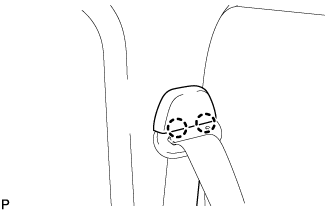
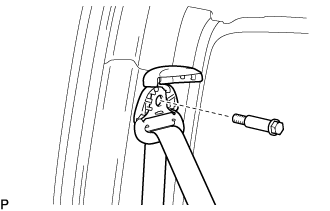
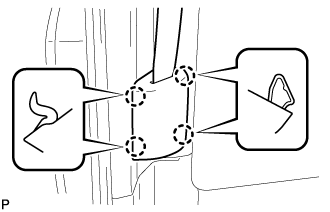
- Using a screwdriver, detach the 4 claws and open the shoulder side cover of the rear seat belt assembly outer.
- HINT:
- Tape the screwdriver tip before use.
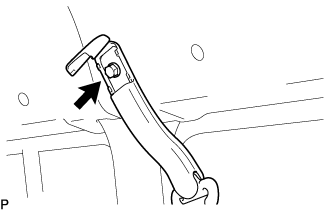
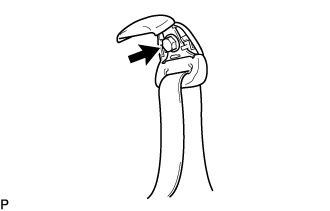
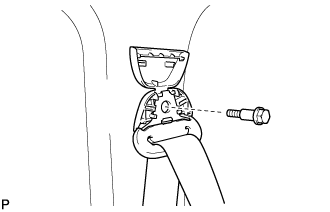
- Loosen the bolt and disconnect the shoulder side of the rear seat belt assembly outer.
- Loosen the bolt and remove the rear seat belt assembly outer.
for Rear No. 1 Seat Bench Seat Type:
- w/ Cover:
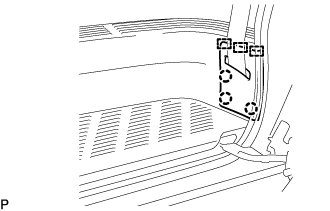
Detach the 3 claws and 3 guides, and then remove the side trim cover.
Loosen the bolt and disconnect the floor side of the rear seat belt assembly outer.
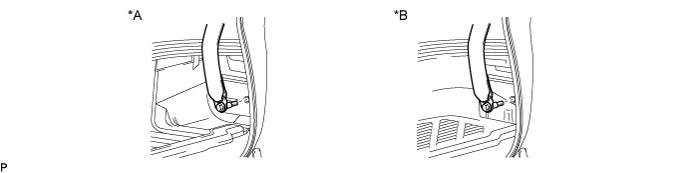

Text in Illustration
*A
|
w/o Cover
|
*B
|
w/ Cover
|
- Using a screwdriver, detach the 2 claws and open the shoulder side cover of the rear seat belt assembly outer.
- HINT:
- Tape the screwdriver tip before use.
- Loosen the bolt and disconnect the shoulder side of the rear seat belt assembly outer.
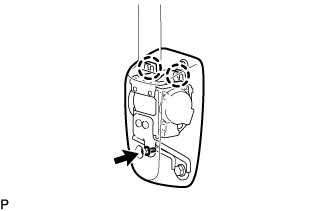
- Loosen the bolt.
Detach the 2 claws and remove the retractor cover of the rear seat belt assembly outer.
- Remove the 2 bolts and rear seat belt assembly outer.
w/ Cover:
Remove the bolt from the floor side of the rear seat belt assembly outer.
Remove the side trim cover from the rear seat belt assembly outer.
| 42.
REMOVE REAR NO. 2 SEAT BELT ASSEMBLY OUTER |
|
- Remove the bolt and disconnect the floor side of the rear No. 2 seat belt assembly outer.
- Using a screwdriver, detach the 2 claws and open the shoulder side cover of the rear No. 2 seat belt assembly outer.
- HINT:
- Tape the screwdriver tip before use.
- Remove the bolt and disconnect the shoulder side of the rear No. 2 seat belt assembly outer.
- Remove the bolt and rear No. 2 seat belt assembly outer.
| 43.
REMOVE REAR NO. 3 SEAT BELT ASSEMBLY OUTER |
|
- Remove the bolt and disconnect the floor side of the rear No. 3 seat belt assembly outer.
- Using a screwdriver, detach the 4 claws and open the shoulder side cover of the rear No. 3 seat belt assembly outer.
- HINT:
- Tape the screwdriver tip before use.
- Loosen the bolt and disconnect the shoulder side of the rear No. 3 seat belt assembly outer.
- Using a screwdriver, detach the 4 claws and remove the retractor cover of the rear No. 3 seat belt assembly outer.
- HINT:
- Tape the screwdriver tip before use.
- Remove the bolt and rear No. 3 seat belt assembly outer.
| 44.
REMOVE REAR NO. 4 SEAT BELT ASSEMBLY OUTER |
|
- Remove the bolt and disconnect the floor side of the rear No. 4 seat belt assembly outer.
- Using a screwdriver, detach the 2 claws and open the shoulder side cover of the rear No. 4 seat belt assembly outer.
- HINT:
- Tape the screwdriver tip before use.
- Remove the bolt and disconnect the shoulder side of the rear No. 4 seat belt assembly outer.
- Using a screwdriver, detach the 4 claws and remove the retractor cover of the rear No. 4 seat belt assembly outer.
- HINT:
- Tape the screwdriver tip before use.
- Remove the bolt and rear No. 4 seat belt assembly outer.