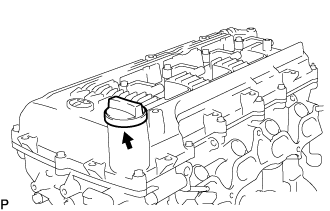
REASSEMBLY
Removal / installation · Vehicles built from Jan 2015
Versions by build date: Oct 2014 – Dec 2014 from Jan 2015
| 1. INSTALL TIGHT PLUG |

- NOTICE:
- If water leaks from the tight plug or the plug corrodes, replace it.
Apply adhesive around the tight plugs.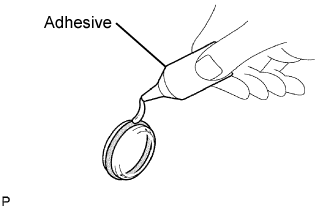

- Adhesive:
- Toyota Genuine Adhesive 1324, Three Bond 1324 or equivalent
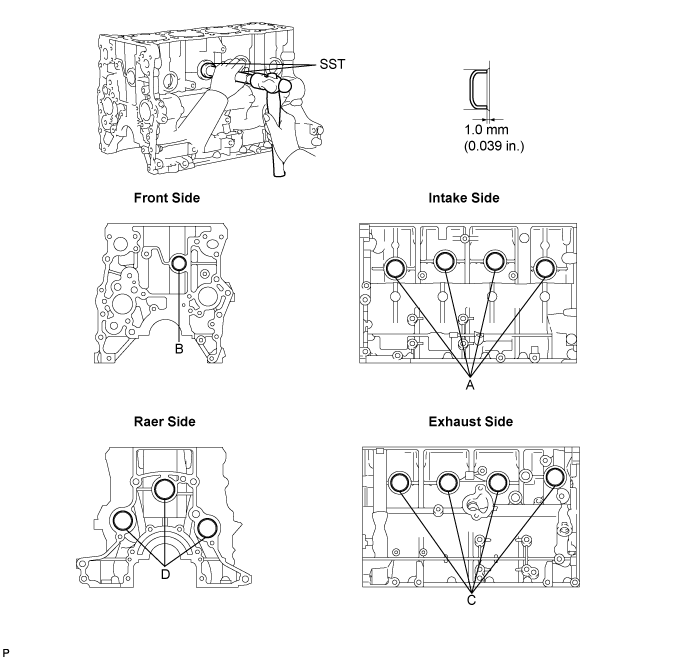
Using SST and a hammer, tap in new tight plugs as shown in the illustration.
Using SST, tap in the 8 tight plugs A and C.
- SST
- 09950-60010
(09951-00350)
09950-70010 (09951-07100)
Using SST, tap in the tight plug B.
- SST
- 09950-60010
(09951-00300)
09950-70010 (09951-07100)
Using SST, tap in the 3 tight plugs D.
- SST
- 09950-60010
(09951-00400)
09950-70010 (09951-07100)
| 2. INSTALL STUD BOLT |
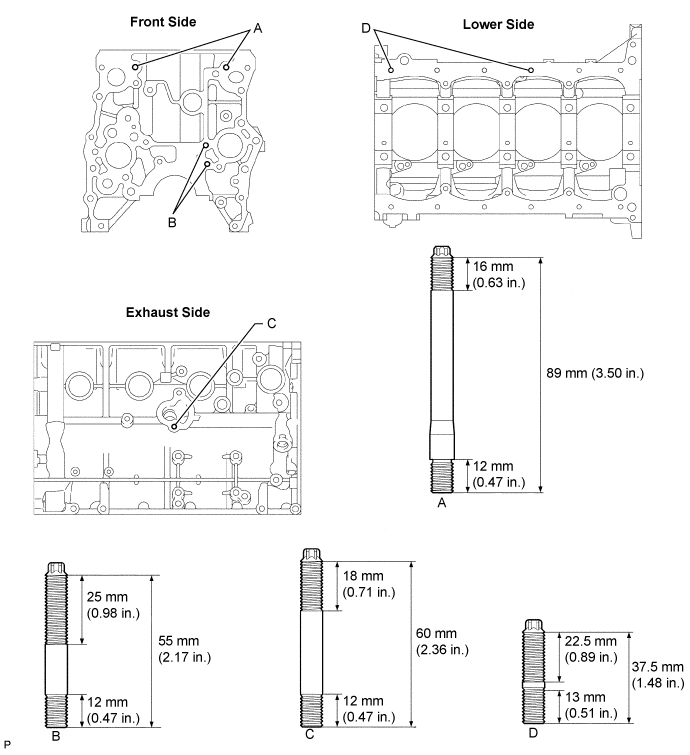
Using an E8 "torx" socket wrench, install the stud bolts A.
- Torque:
- 7.5 N*m{ 77 kgf*cm , 66 in.*lbf }
Using an E7 "torx" socket wrench, install the stud bolts B and D.
- Torque:
- 7.5 N*m{ 77 kgf*cm , 66 in.*lbf }
Apply adhesive to the hole for the stud bolt C on the cylinder block. Using an E7 "torx" socket wrench, install the stud bolts C.
- Torque:
- 7.5 N*m{ 77 kgf*cm , 66 in.*lbf }
- NOTICE:
- If the stud bolt is deformed or the threads are damaged, replace it.
| 3. INSTALL STRAIGHT PIN |
Using a plastic hammer, tap in new straight pins to the cylinder block.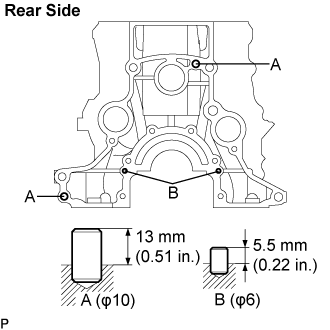
| 4. INSTALL RING PIN |
Using a plastic hammer, tap in new ring pins to the cylinder block.
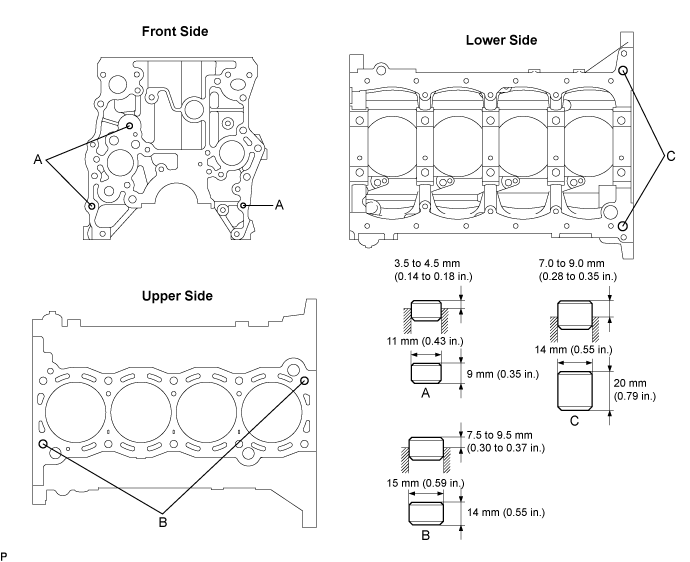
| 5. INSTALL BALANCESHAFT DRIVEN GEAR NO.2 |
Mount the head portion of the balanceshaft in a vise.
- NOTICE:
- Do not damage the balanceshaft.
Install the balanceshaft thrust washer No.2 (● 1) and balanceshaft driven gear No.2 (● 2).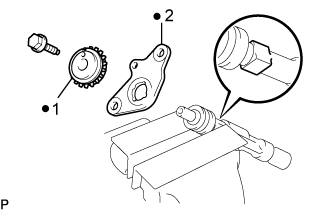
Install and torque the bolt.
- Torque:
- 36 N*m{ 365 kgf*cm , 26 ft.*lbf }
| 6. INSTALL NO.2 BALANCESHAFT |
Install the balanceshaft to the cylinder block.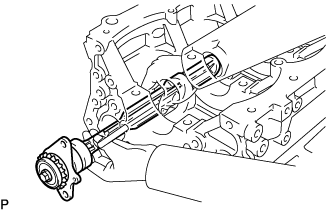
- NOTICE:
- When installing the balanceshaft, make sure to support the balanceshaft with both hands and avoid scratching the balanceshaft bearing on the cylinder block side.
Install and torque the 2 bolts.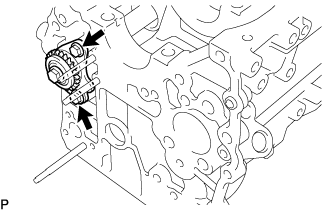
- Torque:
- 18 N*m{ 184 kgf*cm , 13 ft.*lbf }
| 7. INSTALL BALANCESHAFT DRIVEN GEAR NO.1 |
Mount the head portion of the balanceshaft in a vise.
- NOTICE:
- Do not damage the balanceshaft.
Install the balanceshaft thrust spacer (● 4), balanceshaft thrust washer No.1 (● 3), sliding key (● 2) and balanceshaft driven gear No.1 (● 1).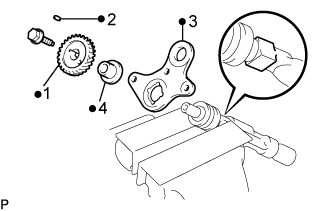
Install and torque the bolt.
- Torque:
- 36 N*m{ 365 kgf*cm , 26 ft.*lbf }
| 8. INSTALL NO.1 BALANCESHAFT |
Install the No.1 balanceshaft to the cylinder block.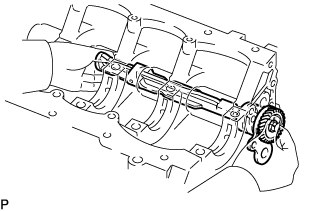
- NOTICE:
- When installing the balanceshaft, make sure to support the balanceshaft with both hands and avoid scratching the balanceshaft bearing on the cylinder block side.
Install and torque the bolt.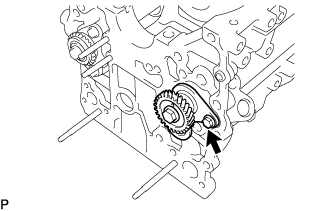
- Torque:
- 18 N*m{ 184 kgf*cm , 13 ft.*lbf }
| 9. INSTALL CYLINDER BLOCK WATER DRAIN COCK SUB-ASSEMBLY |
Apply adhesive around the drain cock.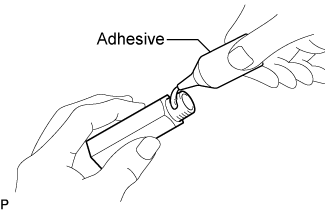
Install the cylinder block water drain cock as shown in the illustration.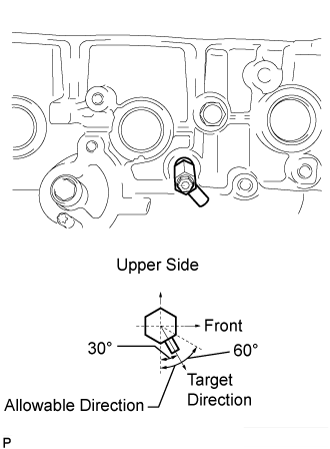
- Torque:
- 25 N*m{ 250 kgf*cm , 18 ft.*lbf }
Install the water drain cock plug to the water drain cock sub-assembly.
- Torque:
- 13 N*m{ 130 kgf*cm , 9 ft.*lbf }
| 10. INSTALL OIL NOZZLE NO.1 SUB-ASSEMBLY |
Using an E7 "torx" socket wrench, install the oil nozzles.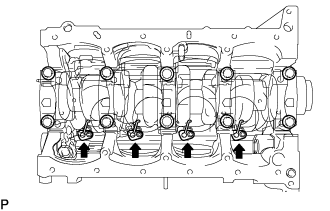
- Torque:
- 7.0 N*m{ 71 kgf*cm , 62 in.*lbf }
| 11. INSTALL CONNECTING ROD SMALL END BUSH |
Align the oil holes of a new bush and the connecting rod.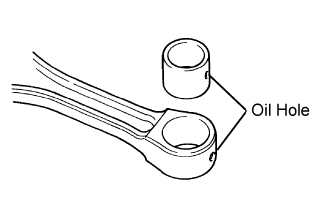
Using SST and a press, press in the bush.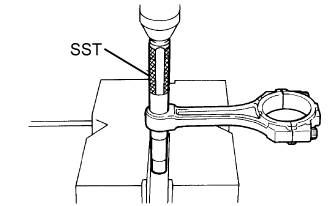
- SST
- 09222-30010
Using a pin hole grinder, hone the bush to obtain the standard specified clearance (See disassembly, step 107) between the bush and piston pin.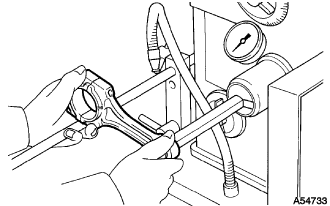
Check that the piston pin fits at normal room temperature.
Coat the piston pin with engine oil, and push it into the connecting rod with your thumb.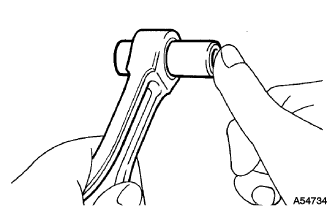
| 12. INSTALL W/PIN PISTON SUB-ASSEMBLY |
Assemble the piston and connecting rod.
Using a screwdriver, install a new snap ring at one end of the piston pin hole.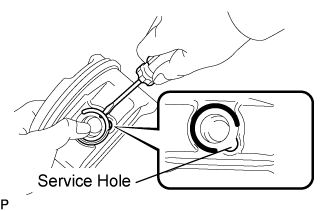
Gradually heat the piston to approximately 80 to 90°C (176 to 194°F).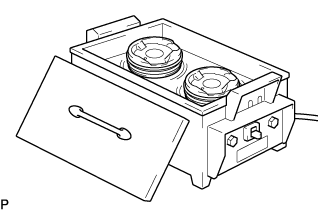
Coat the piston pin with engine oil.
Align the front marks of the piston and connecting rod, and push in the piston pin with your thumb.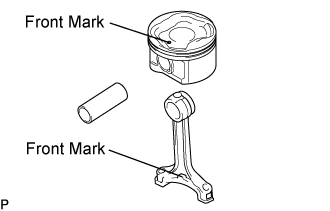
- HINT:
- The piston and pin are a matched set.
Check the fitting condition between the piston and piston pin by trying to move the piston back and forth on the piston pin.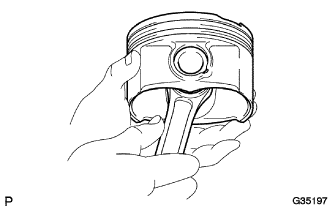
Using a screwdriver, install a new snap ring at the other end of the piston pin hole.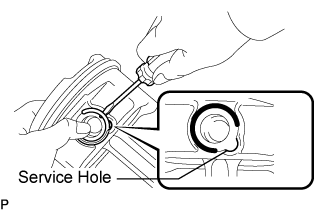
| 13. INSTALL PISTON RING SET |
Install the oil ring expander by hand.
Using a piston ring expander, install the oil ring rail.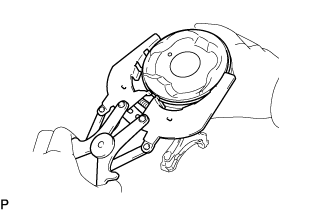
Using a piston ring expander, install the 2 compression rings so that the painted marks are positioned as shown in the illustration.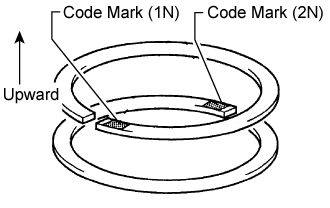
- HINT:
- Install the compression ring No.1 with the code mark (1N) facing upward.
- Install the compression ring No.2 with the code mark (2N) facing upward.
- Install the compression ring No.1 with the code mark (1N) facing upward.
Position the piston rings so that the ring ends are as shown in the illustration.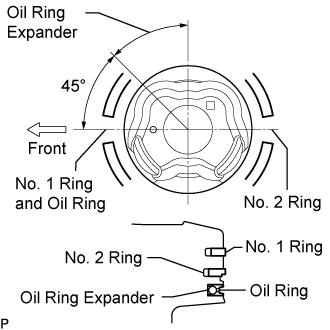
- NOTICE:
- Do not align the ring ends.
| 14. INSTALL CRANKSHAFT BEARING |
- NOTICE:
- Do not apply engine oil to the bearing's contact area and backside.
- The crankshaft bearing cap bolt is tightened in 2 progressive steps.
- Do not apply engine oil to the bearing's contact area and backside.
Clean the main journal, and the both surfaces of the bearing.
Install the upper bearing.
Install the upper bearing to the cylinder block as shown in the illustration.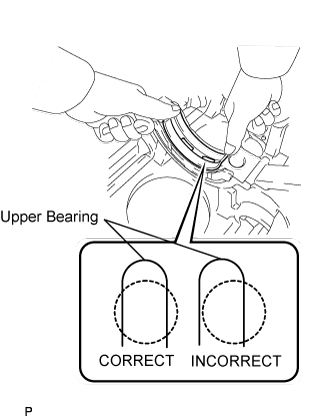
Journal
Dimension
# 1, 5
3.75 mm (0.1476 in.)
# 3
1.75 mm (0.0689 in.)
# 2, 4
2.75 mm (0.1083 in.)
- NOTICE:
- Do not apply engine oil to the bearing's contact area and backside.
Install the lower bearing.
Install the lower bearing to the bearing cap.
Using vernier calipers, measure the distance between the bearing cap's edge and the lower bearing's edge.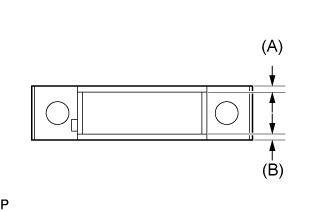
- Dimension (A - B):
- 0.3 mm (0.0118 in.) or less
Journal
Dimension (A)
# 1, 5
3.83 mm (0.1508 in.)
# 3
1.74 mm (0.0685 in.)
# 2, 4
2.75 mm (0.1083 in.)
- NOTICE:
- Do not apply engine oil to the bearing's contact area and backside.
With the upper bearing and lower bearing installed, use a plastic hammer to install the bearing caps to the cylinder block.
- NOTICE:
- Make sure that the bearing caps are installed in the correct positions and direction.
Using vernier calipers, measure the amount of misalignment between the upper bearing and lower bearing, as shown in the illustration.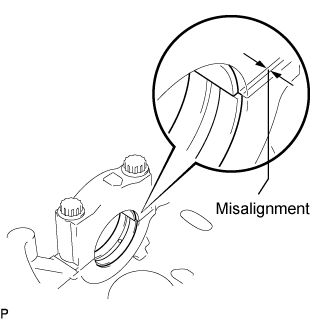
- Standard:
- 0.9 mm (0.035 in.) or less
Remove the bearing cap.
Install the crankshaft thrust washer upper to the cylinder block.
Install the 2 thrust washers under the No.3 journal position of the cylinder block with the oil grooves facing outward.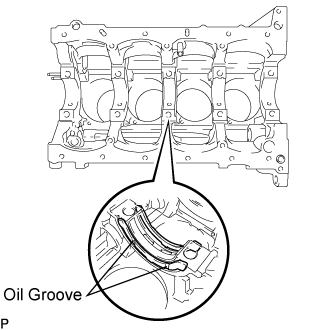
- NOTICE:
- Be careful when installing the thrust bearing upper and lower as they are similar but cannot be interchanged.
Install the 2 thrust washers on the No.3 bearing cap with the grooves facing outward.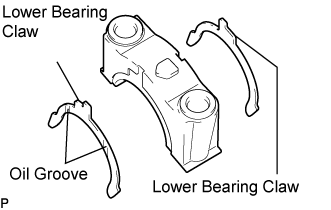
- NOTICE:
- Be careful when installing the thrust bearing upper and lower as they are similar but cannot be interchanged. The bearing lower has a claw as shown in the illustration.
Apply engine oil to the lower bearing.
| 15. INSTALL CRANKSHAFT |
Apply engine oil to the upper bearing, then place the crankshaft on the cylinder block.
Install the 5 crankshaft bearing caps in their proper locations.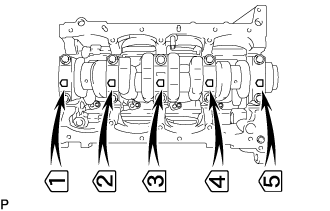
Install the crankshaft bearing cap bolts.
- HINT:
- The main bearing cap bolts are tightened in 2 progressive steps.
Step 1
Install and uniformly tighten the 10 main bearing cap bolts in the sequence shown in the illustration.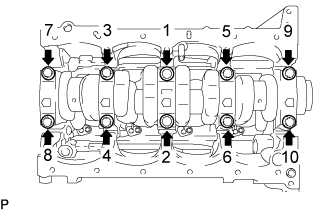
- Torque:
- 39 N*m{ 398 kgf*cm , 29 ft.*lbf }
Step 2
Mark the front of the bearing cap bolts with paint.
Retighten the bearing cap bolts by 90° in the order above.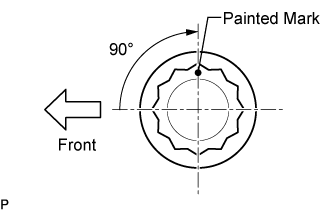
Check that the painted mark is now at a 90° angle to the front.
Check that the crankshaft turns smoothly.
Check the crankshaft thrust clearance (See disassembly, step 86).
| 16. INSTALL CONNECTING ROD BEARING |
Align the bearing claw with the groove of the connecting rod or connecting cap.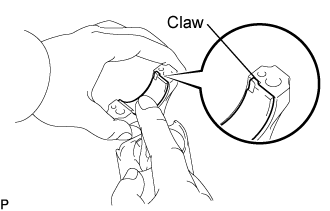
Install the bearings in the connecting rod and connecting rod cap.
- NOTICE:
- Clean the backside of the bearing and the bearing surface of the connecting rod.
| 17. INSTALL PISTON SUB-ASSEMBLY W/CONNECTING ROD |
Apply engine oil to the cylinder walls, the pistons, and the surfaces of the connecting rod bearings.
Position the piston rings so that the ring ends are as shown in the illustration.
- NOTICE:
- Do not align the ring ends.
Using a piston ring compressor, push the correctly numbered piston and connecting rod assembly into the cylinder with the front mark of the piston facing forward.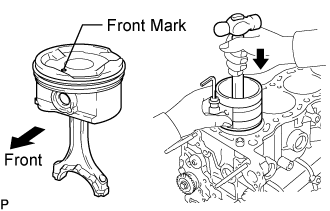
Match the numbered connecting rod cap with the connecting rod.
- NOTICE:
- Match the numbered connecting rod cap with the connecting rod.
Check that the front mark of the connecting rod cap is facing forward.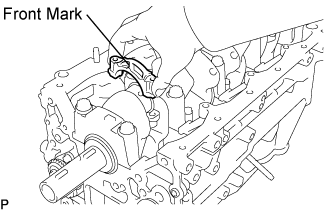
Apply a light coat of engine oil to the threads and under the heads of the connecting rod cap bolts.
Install and alternately tighten the bolts of the connecting rod cap in several steps.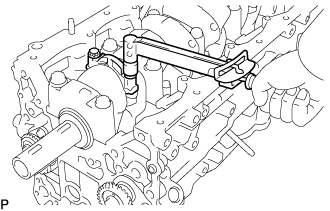
- Torque:
- 25 N*m{ 250 kgf*cm , 18 ft.*lbf }
Mark the front side of each connecting cap bolt with paint.
Retighten the cap bolts by 90° as shown.
Check that the painted mark is now at a 90° angle to the front.
Check that the crankshaft turns smoothly.
Check the connecting rod thrust clearance (See disassembly, step 82).
| 18. INSTALL INTAKE VALVE GUIDE BUSH |
Using a caliper gauge, measure the bush bore diameter of the cylinder head.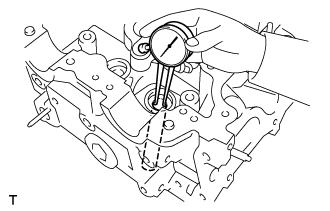
- Cylinder bore diameter:
- 10.285 to 10.306 mm (0.4049 to 0.4057 in.)
Select a new guide bush (STD or O/S 0.05).
If the bush bore diameter of the cylinder head is greater than 10.306 mm (0.4057 in.), machine the bush bore to the dimension of 10.335 to 10.356 mm (0.4069 to 0.4077 in.) to install a O/S 0.05 valve guide bush.Bush bore diameter
Bush size
10.285 to 10.306 mm (0.4049 to 0.4057 in.)
Use STD
10.335 to 10.356 mm (0.4069 to 0.4077 in.)
Use O/S 0.05
If the bush bore diameter of the cylinder head is greater than 10.356 mm (0.4077 in.), replace the cylinder head.
Heat the cylinder head to 80 to 100°C (176 to 212°F).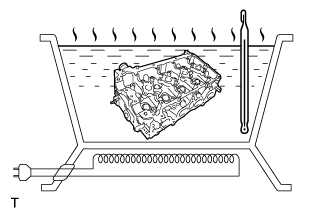
Place the cylinder head on wooden blocks.
Using SST, tap in a new valve guide bush to the specified protrusion height.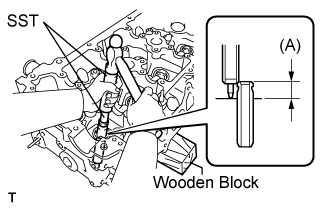
- Protrusion height (A):
- 9.8 to 10.2 mm (0.3858 to 0.4016 in.)
- SST
- 09201-10000
(09201-01050)
09950-70010 (09951-07100)
Using a sharp 5.5 mm reamer, ream the valve guide bush to obtain the standard specified clearance.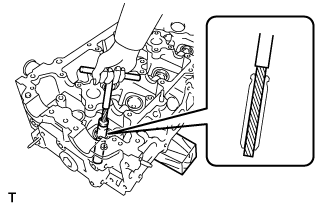
- Standard oil clearance:
- 0.025 to 0.060 mm (0.0010 to 0.0023 in.)
| 19. INSTALL EXHAUST VALVE GUIDE BUSH |
Using a caliper gauge, measure the bush bore diameter of the cylinder head.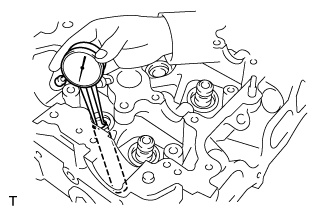
- Cylinder bore diameter:
- 10.285 to 10.306 mm (0.4049 to 0.4057 in.)
Select a new guide bush (STD or O/S 0.05)
If the bush bore diameter of the cylinder head is greater than 10.306 mm (0.4057 in.), machine the bush bore to the dimension of 10.335 to 10.356 mm (0.4069 to 0.4077 in.) to install a O/S 0.05 valve guide bush.Bush bore diameter
Bush size
10.285 to 10.306 mm (0.4049 to 0.4057 in.)
Use STD
10.335 to 10.356 mm (0.4069 to 0.4077 in.)
Use O/S 0.05
If the bush bore diameter of the cylinder head is greater than 10.356 mm (0.4077 in.), replace the cylinder head.
Heat the cylinder head to 80 to 100°C (176 to 212°F).
Place the cylinder head on wooden blocks.
Using SST, tap in a new valve guide bush to the specified protrusion height.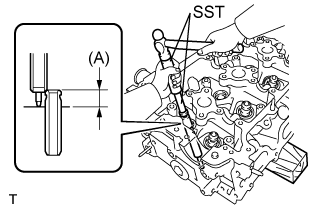
- SST
- 09201-10000
(09201-01050)
09950-70010 (09951-07100)
- Protrusion height:
- (A)
- 7.6 to 8.0 mm (0.2992 to 0.3150 in.)
Using a sharp 5.5 mm reamer, ream the valve guide bushing to obtain the standard specified clearance.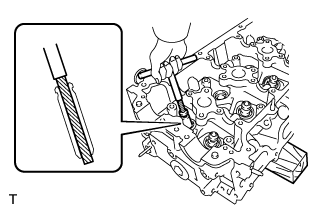
- Standard oil clearance:
- 0.030 to 0.065 mm (0.0012 to 0.0026 in.)
| 20. INSTALL CAMSHAFT BEARING CAP SETTING RING PIN |
- NOTICE:
- It is not necessary to remove the ring pin unless it is being replaced.
Using a plastic hammer, tap in a new ring pin until the pin stops.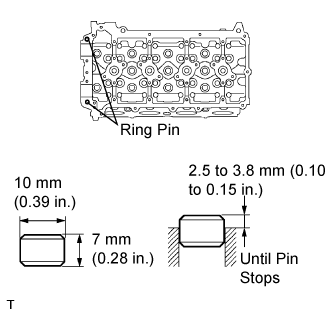
| 21. INSTALL TIGHT PLUG NO.1 |
- NOTICE:
- If water leaks from the tight plug or the plug corrodes, replace it.
Apply adhesive to the tight plug hole of the cylinder head.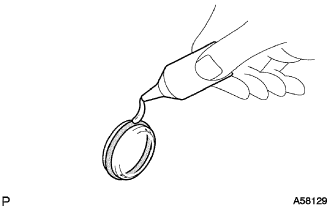
- Adhesive:
- Toyota Genuine Adhesive 1324, Three Bond 1324 or equivalent
Using SST, tap in a new tight plug to the cylinder head as shown in the illustration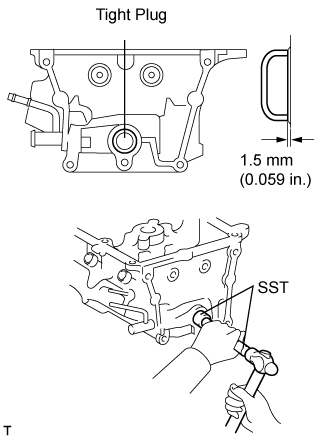
- SST
- 09950-60010
(09951-00250)
09950-70010 (09951-07100)
| 22. INSTALL STUD BOLT |
- NOTICE:
- If the stud bolt is deformed or the threads are damaged, replace it.
Using E6 and E7 "torx" socket wrenches, install the stud bolts.
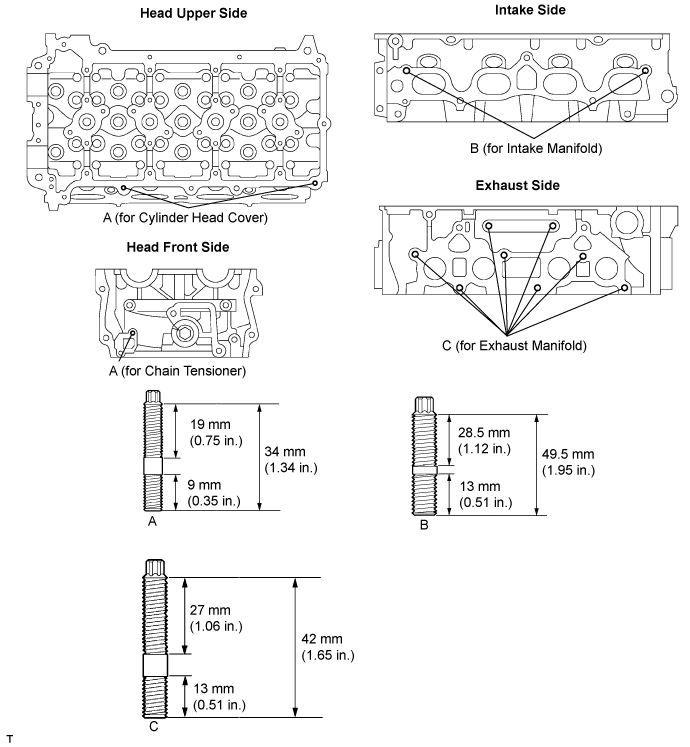
- Torque:
- for stud bolt A:
- 3.0 N*m{ 31 kgf*cm , 27 in.*lbf }
- for stud bolt B:
- 7.5 N*m{ 76 kgf*cm , 66 in.*lbf }
- for stud bolt C:
- 7.5 N*m{ 76 kgf*cm , 66 in.*lbf }
| 23. INSTALL W/HEAD STRAIGHT SCREW PLUG NO.1 |
Using a 10 mm hexagon wrench, install 3 new gaskets and the straight screw plugs.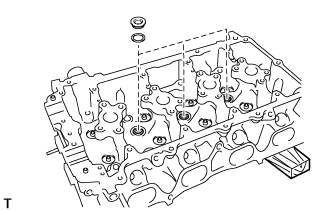
- Torque:
- 44 N*m{ 449 kgf*cm , 32 ft.*lbf }
| 24. INSTALL W/HEAD STRAIGHT SCREW PLUG NO.2 |
Using a 19 mm hexagon wrench, install a new gasket and the straight screw plug.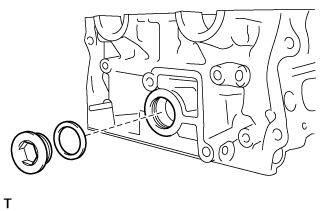
- Torque:
- 90 N*m{ 918 kgf*cm , 66 ft.*lbf }
| 25. INSTALL OIL CONTROL VALVE FILTER |
Check that no foreign matter is on the mesh part of the filter.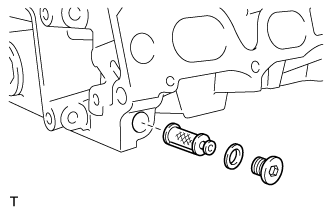
If foreign objects are present, clean the part thoroughly.
Using a 8 mm hexagon wrench, install a new gasket and the oil control valve filter with the screw plug.
- Torque:
- 30 N*m{ 306 kgf*cm , 22 ft.*lbf }
| 26. INSTALL VALVE SPRING SEAT |
Install the valve spring seats to the cylinder head.
| 27. INSTALL VALVE STEM OIL SEAL |
Apply a light coat of engine oil to new oil seals.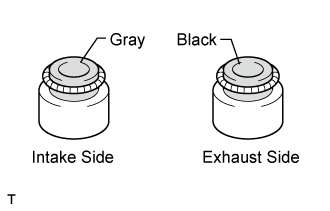
- NOTICE:
- Pay attention when installing the intake and exhaust oil seals. For example, installing the intake oil seal into the exhaust side or installing the exhaust oil seal to the intake side can cause installation problems later.
- HINT:
- The intake valve oil seals are gray and the exhaust valve oil seals are black.
Using SST, push in the oil seals.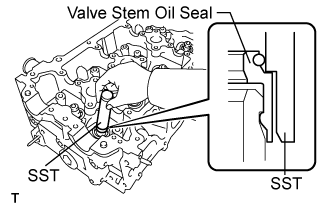
- SST
- 09201-41020
- NOTICE:
- Failure to use SST will cause the seal to be damaged or improperly seated.
| 28. INSTALL INTAKE VALVE |
Apply plenty of engine oil to the tip area of the intake valve shown in the illustration.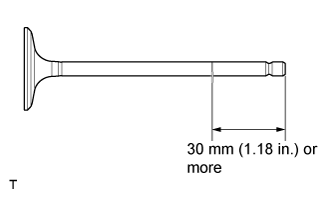
Install the valve, compression spring and spring retainer to the cylinder head.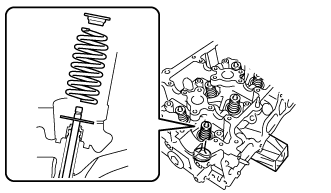
- NOTICE:
- Install the same parts in the same combination to the original locations.
Using SST and wooden blocks, compress the spring and install the 2 retainer locks.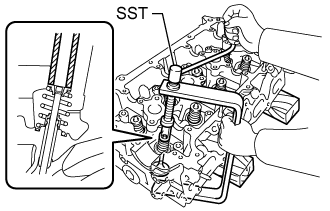
- SST
- 09202-70020
09202-00021
Using a 5 mm pin punch and plastic hammer, lightly tap the valve stem tip to ensure a proper fit.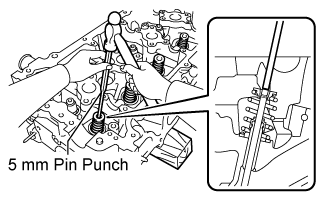
- NOTICE:
- Do not damage the valve stem tip.
| 29. INSTALL EXHAUST VALVE |
Apply plenty of engine oil to the tip area of the intake valve shown in the illustration.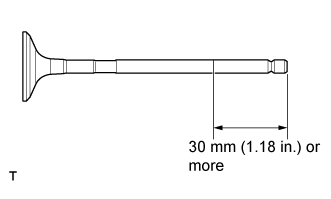
Install the valve, compression spring and spring retainer to the cylinder head.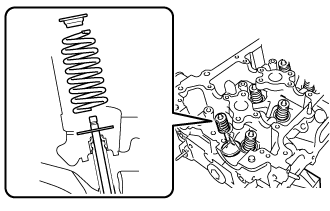
- NOTICE:
- Install the same parts in the same combination to the original locations.
Using SST and wooden blocks, compress the spring and install the 2 retainer locks.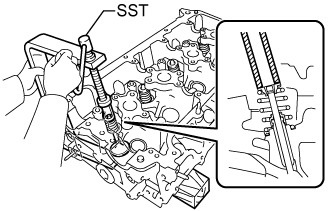
- SST
- 09202-70020
09202-00021
Using a 5 mm pin punch and plastic hammer, lightly tap the valve stem tip to ensure a proper fit.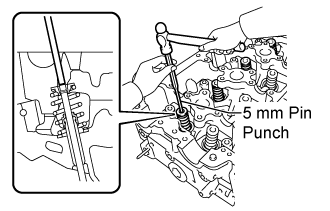
- NOTICE:
- Do not damage the valve stem tip.
| 30. INSTALL VALVE LASH ADJUSTER ASSEMBLY |
- NOTICE:
- Keep the lash adjuster free from dirt and foreign objects.
- Only use clean engine oil.
- Keep the lash adjuster free from dirt and foreign objects.
Place the lash adjuster into a container full of engine oil.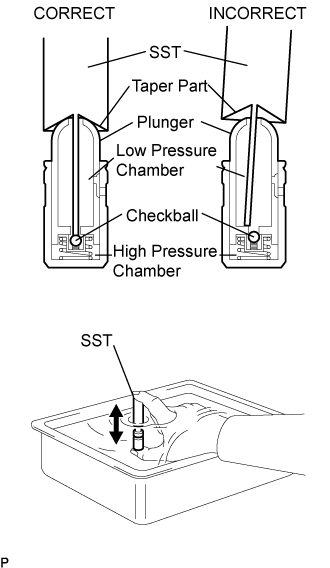
Insert the SST's tip into the lash adjuster's plunger and use the tip to press down on the checkball inside the plunger.
- SST
- 09276-75010
Squeeze the SST and lash adjuster together to move the plunger up and down 5 to 6 times.
Check the movement of the plunger and bleed the air.
- OK:
- Plunger is very difficult to move.
After bleeding the air, remove the SST. Then quickly and firmly press the plunger with a finger.
- OK:
- Plunger is very difficult to move.
Install the lash adjusters.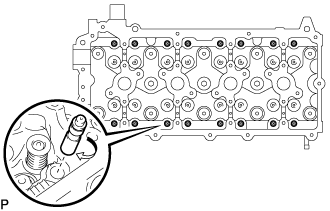
- NOTICE:
- Install the lash adjuster to the original position.
| 31. INSTALL VALVE STEM CAP |
Apply a light coat of engine oil to the valve stem caps.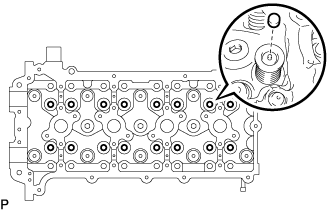
Install the valve stem caps to the cylinder head.
| 32. INSTALL CRANKSHAFT PULLEY SET KEY |
Install the 2 pulley keys to the crankshaft.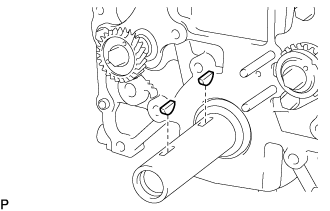
| 33. INSTALL CHAIN VIBRATION DAMPER NO.4 |
Install the vibration damper No.4 with the 2 bolts.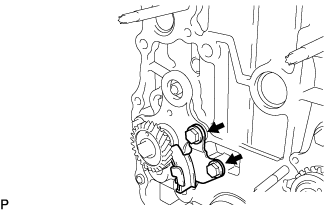
- Torque:
- 18 N*m{ 185 kgf*cm , 13 ft.*lbf }
| 34. INSTALL NO.2 CHAIN SUB-ASSEMBLY |
Install the timing sprocket No.2 as shown in the illustration.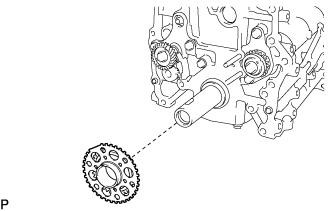
- NOTICE:
- Check that the No.1 cylinder is at TDC and that the weights of the No.1 and No.2 balanceshafts are at the bottom side.
- HINT:
- Install the sensor plate with the front mark facing forward.
As shown in the illustration, install the chain on the sprocket and gear with the painted marks aligned with the timing marks on the sprocket and gear.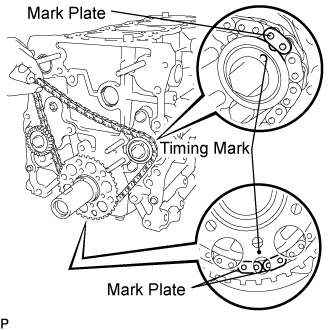
Fit the other mark link of the crankshaft timing sprocket behind the large timing mark of the balanceshaft drive gear.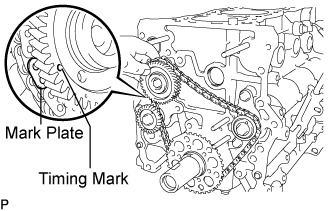
Insert the balanceshaft drive gear shaft through the balanceshaft drive gear so that it fits into the thrust plate hole.
Align the small timing mark of the balanceshaft drive gear with the timing mark of the balanceshaft timing gear.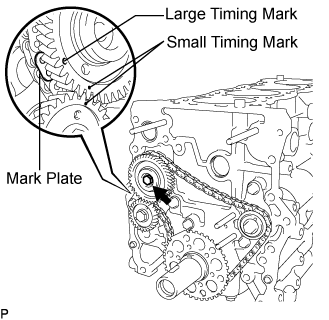
Install the bolt to the balanceshaft drive gear and tighten it.
- Torque:
- 25 N*m{ 255 kgf*cm , 18 ft.*lbf }
Check that each timing mark is matched with the corresponding mark link.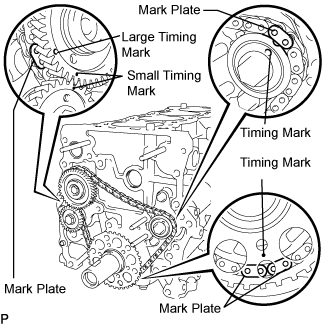
- NOTICE:
- Check that the No.1 cylinder is at TDC and that the weights of the No.1 and No.2 balanceshafts are at the bottom side.
| 35. INSTALL CHAIN TENSIONER ASSEMBLY NO.2 |
Install the chain tensioner assembly No.2 with the nut.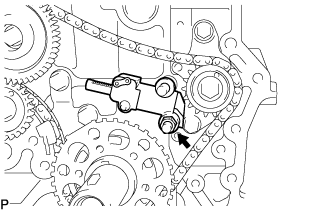
- Torque:
- 18 N*m{ 185 kgf*cm , 13 ft.*lbf }
- NOTICE:
- Assemble the chain tensioner with the pin installed, then remove the pin after assembly. When doing this, do not push the vibration damper against the chain.
Move the stopper plate downward to release the lock, and push the plunger deep into the tensioner.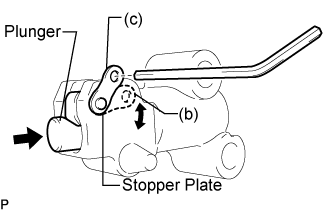
Move the stopper plate upward to set the lock, and insert a hexagon wrench into the stopper plate hole.
| 36. INSTALL CHAIN VIBRATION DAMPER NO.3 |
Install the chain vibration damper No.3 with the 2 bolts.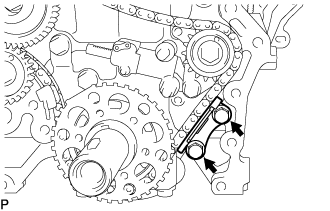
- Torque:
- 18 N*m{ 185 kgf*cm , 13 ft.*lbf }
| 37. INSTALL CHAIN VIBRATION DAMPER NO.2 |
Install the chain vibration damper No.2 with the bolt.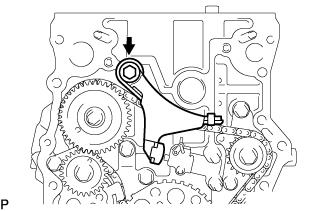
- Torque:
- 27 N*m{ 270 kgf*cm , 20 ft.*lbf }
| 38. INSTALL W/HEAD TAPER SCREW PLUG NO.1 |
Install the screw plug No.1 to the cylinder block.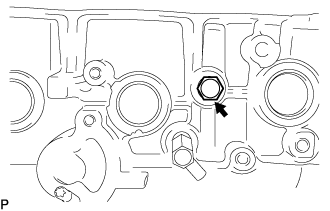
- Torque:
- 25 N*m{ 250 kgf*cm , 18 ft.*lbf }
| 39. INSTALL OIL FILTER BRACKET SUB-ASSEMBLY |
Using a hexagon wrench, install the oil filter bracket union.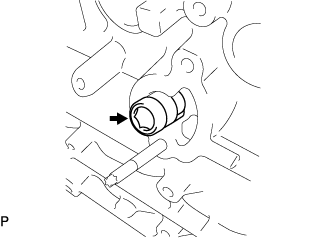
- Torque:
- 25 N*m{ 255 kgf*cm , 18 ft.*lbf }
Install a new oil filter bracket gasket to the oil filter bracket.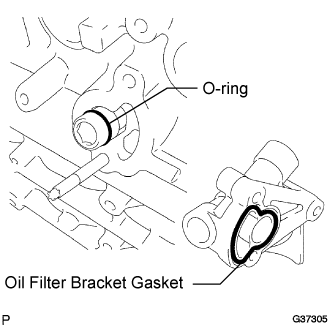
Install a new O-ring to the oil filter bracket union.
- NOTICE:
- Apply a light coat of engine oil to the new O-ring and oil filter bracket.
Install 2 new gaskets and the 2 screw plugs to the oil filter bracket.
- Torque:
- 49 N*m{ 500 kgf*cm , 36 ft.*lbf }
Install the oil filter bracket with the 2 bolts and nut.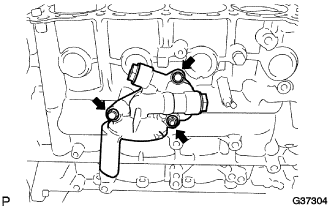
- Torque:
- 25 N*m{ 255 kgf*cm , 18 ft.*lbf }
Using a 27 mm socket wrench, install the oil filter union.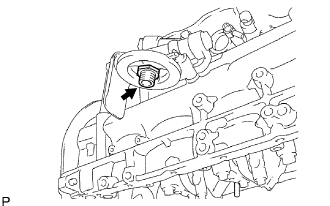
- Torque:
- 43 N*m{ 439 kgf*cm , 32 ft.*lbf }
| 40. INSTALL OIL FILTER SUB-ASSEMBLY |
Check and clean the oil filter installation surface.
Apply clean engine oil to the gasket of a new oil filter.
Lightly screw the oil filter into place, and tighten it until the gasket contacts the seat.
Using SST, tighten the oil filter.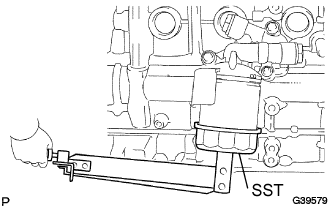
- SST
- 09228-06501
- When using a torque wrench:
- Using a torque wrench, tighten the oil filter.
- Torque:
- 17 N*m{ 175 kgf*cm , 13 ft.*lbf }
- When not using a torque wrench:
- Tighten the oil filter an additional 3/4 turn.
| 41. INSTALL ENGINE REAR OIL SEAL |
Place the oil seal retainer on wooden blocks.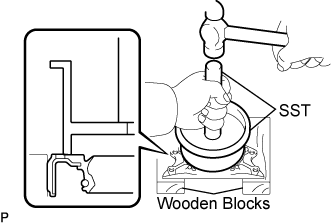
Using SST, tap in a new oil seal until its surface is flush with the oil seal retainer edge.
- SST
- 09223-15030
09950-70010 (09951-07150)
- NOTICE:
- Keep the lip free from foreign matter.
- Do not tap the oil seal at an angle.
- Keep the lip free from foreign matter.
| 42. INSTALL ENGINE REAR OIL SEAL RETAINER |
Apply seal packing in a continuous bead as shown in the illustration.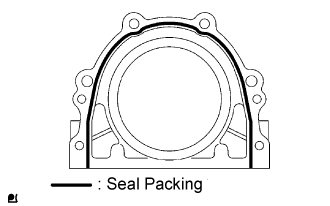
- Seal packing:
- Toyota Genuine Seal Packing Black, Three Bond 1207B or equivalent
- Seal width:
- 2.0 to 3.0 mm (0.079 to 0.118 in.)
- NOTICE:
- Remove any oil from the contact surface.
- Install the crankcase within 3 minutes after applying seal packing.
- Do not start the engine for at least 4 hours after installing.
- Remove any oil from the contact surface.
Install the oil seal retainer with the 6 bolts.
- Torque:
- 13 N*m{ 133 kgf*cm , 10 ft.*lbf }
| 43. INSTALL CYLINDER HEAD GASKET |
Apply a continuous bead (seal width: 4.0 to 7.0 mm (0.15 to 0.28 in.)) of seal packing to the cylinder block upper side and cylinder head gasket upper side as shown in the illustration.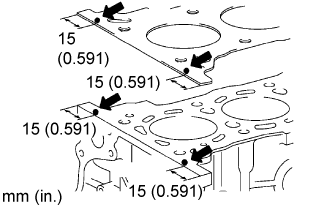
- Seal packing:
- Toyota Genuine Seal Packing 1282B, Three Bond 1282B or equivalent
- Seal width:
- 4.0 to 7.0 mm (0.15 to 0.28 in.)
- NOTICE:
- Remove any oil from the contact surface.
- Install the cylinder head gasket within 3 minutes after applying the seal packing.
- Install the cylinder head bolt within 15 minutes after applying the seal packing.
- Do not put into engine oil within 4 hours of installation.
- Remove any oil from the contact surface.
Install a new cylinder head gasket on the cylinder block surface with the Lot No. stamp upper side facing upward.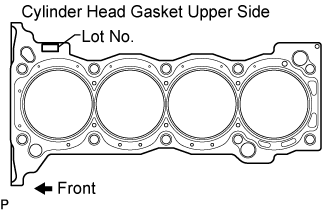
- NOTICE:
- Make sure that the installation direction is correct.
- Place the cylinder head gently to avoid damaging the gasket with the bottom part of the head.
- Make sure that the installation direction is correct.
| 44. INSTALL CYLINDER HEAD SUB-ASSEMBLY |
- HINT:
- The cylinder head bolts are tightened in 3 progressive steps.
Place the cylinder head on the cylinder block.
Apply a light coat of engine oil to the threads and under the heads of the cylinder head bolts.
Step 1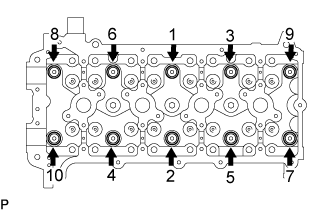
Install and uniformly tighten the 10 cylinder head bolts with the plate washers, in several steps, in the sequence shown.
- Torque:
- 39 N*m{ 398 kgf*cm , 29 ft.*lbf }
Step 2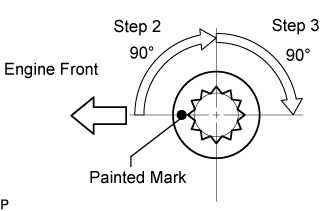
Mark the cylinder head bolt head with paint as shown in the illustration.
Retighten the cylinder head bolts by 90°.
Step 3
Retighten the cylinder head bolts by an additional 90°.
Check that the painted mark is now facing rearward.
Seal packing will seep out on the engine's front side. Thoroughly wipe clean any seal packing.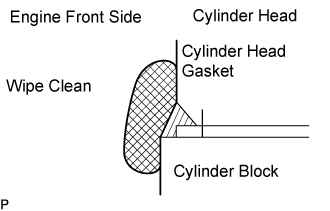
| 45. INSTALL CAMSHAFT TIMING GEAR OR SPROCKET |
Using SST, grip the hexagonal portion, and then secure the SST and No. 2 camshaft in a vise as shown in the illustration.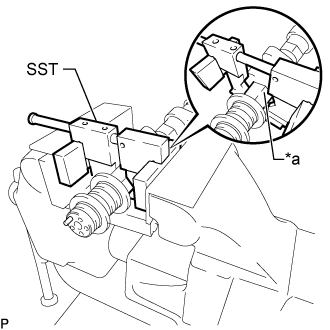
- SST
- 09212-31010
Text in Illustration *a
Hexagonal Portion
- NOTICE:
- Do not damage the No. 2 camshaft.
- Never grip areas other than the hexagonal portion, as this may cause damage.
- Do not damage the No. 2 camshaft.
Install the camshaft timing sprocket to the camshaft with the sprocket bolt.
- Torque:
- 78 N*m{ 795 kgf*cm , 58 ft.*lbf }
| 46. INSTALL CAMSHAFT TIMING GEAR ASSEMBLY |
Using SST, grip the hexagonal portion, and then secure the SST and camshaft in a vise as shown in the illustration.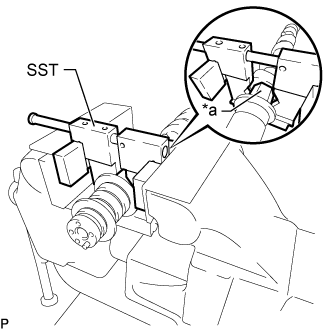
- SST
- 09212-31010
Text in Illustration *a
Hexagonal Portion
- NOTICE:
- Do not damage the camshaft.
- Never grip areas other than the hexagonal portion, as this may cause damage.
- Do not damage the camshaft.
Put the camshaft timing gear and camshaft together by aligning the key groove and straight pin.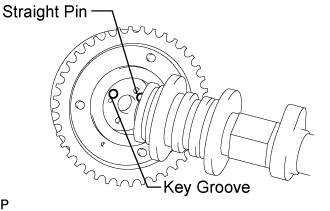
Lightly press the gear against the camshaft, and turn the gear. Push further at the position where the pin enters the groove.
- CAUTION:
- Do not turn the camshaft timing gear in the retard direction (the right angle).
Check that there is no clearance between the gear's fringe and the camshaft.
Tighten the fringe bolt with the camshaft timing gear fixed.
- Torque:
- 78 N*m{ 795 kgf*cm , 58 ft.*lbf }
Check that the camshaft timing gear can move in the retard direction (the right angle), and is locked at the most retarded position.
| 47. INSTALL VALVE ROCKER ARM SUB-ASSEMBLY NO.1 |
Set the 16 rocker arms to the lash adjusters.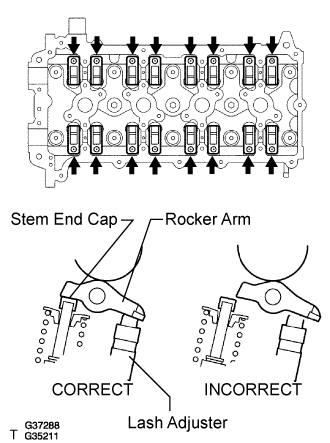
- NOTICE:
- Before and after setting the camshaft and No.2 camshaft, firmly set the rocker arm to the lash adjuster.
| 48. INSTALL CAMSHAFTS |
Apply clean engine oil to the camshaft's cam portion and the cylinder head journals.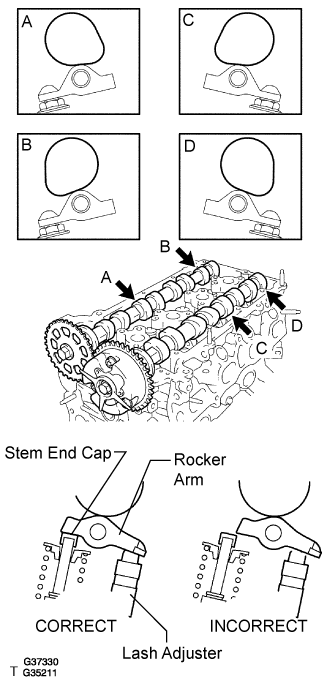
Set the camshaft and No.2 camshaft as shown in the illustration.
- NOTICE:
- Before and after setting the camshaft and No.2 camshaft, firmly set the rocker arm to the lash adjuster.
| 49. INSTALL CAMSHAFT BEARING CAP |
Temporarily install the camshaft bearing cap No.1.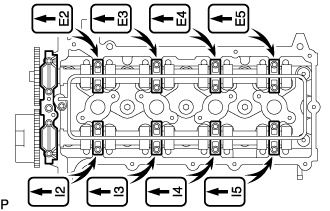
Check the proper location of each camshaft bearing cap No.2 and install them.
Install a new O-ring to the camshaft bearing cap No.1.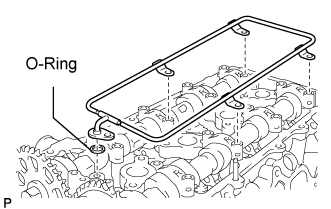
Temporarily install the oil delivery pipe.
Tighten the 21 bolts and 20 washers in the order shown in the illustration.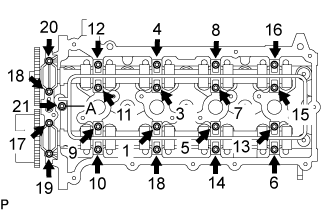
- Torque:
- for bolt A:
- 12 N*m{ 122 kgf*cm , 9 ft.*lbf }
- for bolts except A:
- 16 N*m{ 160 kgf*cm , 11 ft.*lbf }
| 50. INSTALL CRANKSHAFT TIMING GEAR |
Install the timing gear as shown in the illustration.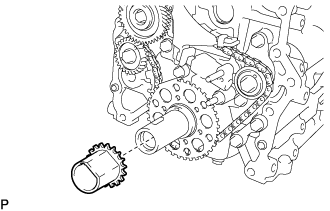
| 51. INSTALL CHAIN VIBRATION DAMPER NO.1 |
Install the vibration damper with the bolt and nut.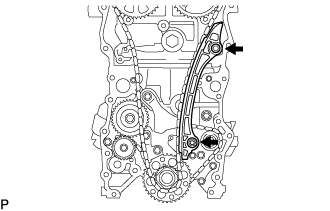
- Torque:
- for bolt:
- 21 N*m{ 214 kgf*cm , 15 ft.*lbf }
- for nut:
- 18 N*m{ 184 kgf*cm , 13 ft.*lbf }
Remove the pin from the chain tensioner assembly No.2 and release the plunger.
| 52. INSTALL CHAIN SUB-ASSEMBLY |
As shown in the illustration, install the chain on the sprocket and gear with the painted marks aligned with the timing marks on the sprocket and gear.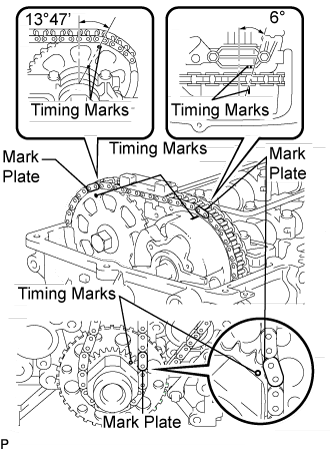
- HINT:
- The camshaft mark plate is orange.
- The crankshaft mark plate is yellow.
- The camshaft mark plate is orange.
Use a rope to tie the chain of the crankshaft timing sprocket. Tie the rope near the sprocket.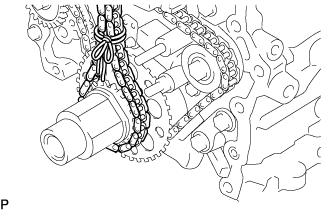
- NOTICE:
- After the chain tensioner has been installed, the rope must be removed.
- HINT:
- The rope is tied so that the chain will not jump a tooth.
| 53. INSTALL CHAIN TENSIONER SLIPPER |
Install the tensioner slipper with the bolt.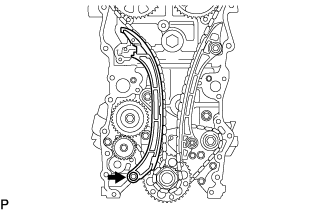
- Torque:
- 21 N*m{ 214 kgf*cm , 15 ft.*lbf }
| 54. INSTALL CHAIN TENSIONER ASSEMBLY NO.1 |
Install a new gasket and the chain tensioner No.1 with the bolt and nut.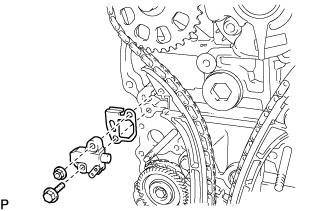
- Torque:
- 10 N*m{ 102 kgf*cm , 7 ft.*lbf }
Move the stopper plate upward to release the lock, and push the plunger deep into the tensioner.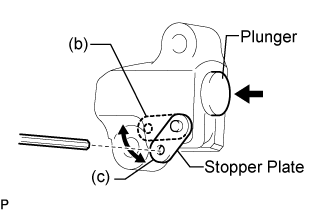
Move the stopper plate downward to set the lock, and insert a hexagon wrench into the stopper plate hole.
| 55. INSTALL TIMING CHAIN GUIDE |
Install a new O-ring and the chain guide with the 2 bolts.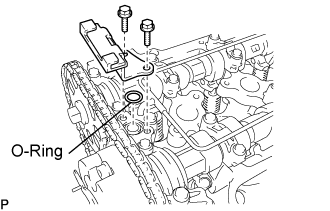
- Torque:
- 10 N*m{ 102 kgf*cm , 7 ft.*lbf }
| 56. INSTALL TIMING CHAIN CASE OIL SEAL |
Place the timing chain cover on wooden blocks.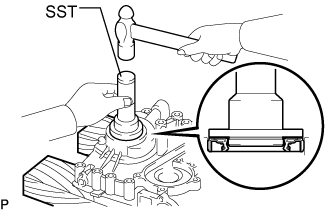
Using SST, tap in a new oil seal until its surface is flush with the timing gear case edge.
- SST
- 09223-50010
- NOTICE:
- Keep the lip free from foreign matter.
- Do not tap the oil seal at an angle.
- Keep the lip free from foreign matter.
| 57. INSTALL WATER PUMP ASSEMBLY |
Install a new gasket and the water pump with the 8 bolts.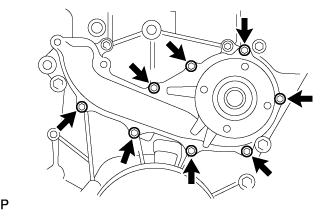
- Torque:
- 8.9 N*m{ 91 kgf*cm , 79 in.*lbf }
| 58. INSTALL OIL PUMP RELIEF VALVE |
Coat the relief valve with engine oil.
Insert the relief valve and spring into the timing chain cover hole.
Install a new gasket to the plug.
Using a 27 mm socket wrench, install the plug.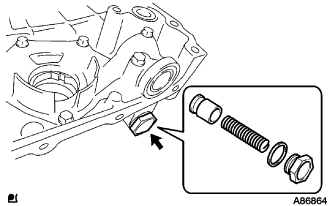
- Torque:
- 49 N*m{ 500 kgf*cm , 36 ft.*lbf }
| 59. INSTALL TIMING CHAIN OR BELT COVER SUB-ASSEMBLY |
Using a 10 mm socket hexagon wrench, install the timing chain cover plug.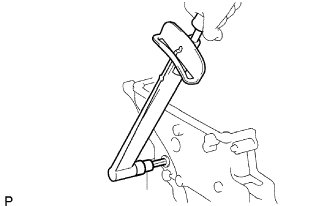
- Torque:
- 17 N*m{ 170 kgf*cm , 12 ft.*lbf }
Install 3 new O-rings to the timing chain cover sub-assembly as shown in the illustration.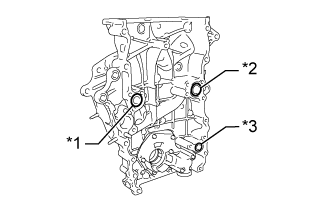
Text in Illustration *1
Water Pump O-ring
*2
Water Pump Upper O-ring
*3
Oil Pump O-ring
Align the drive rotor spline of the oil pump and crankshaft timing gear as shown in the illustration.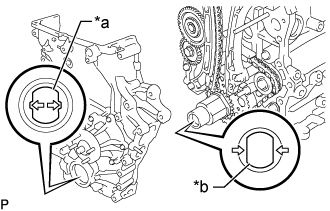
Text in Illustration *a
Drive Rotor Spline
*b
Crankshaft Timing Gear
Apply seal packing to the timing chain cover sub-assembly in a continuous line as shown in the following illustration.
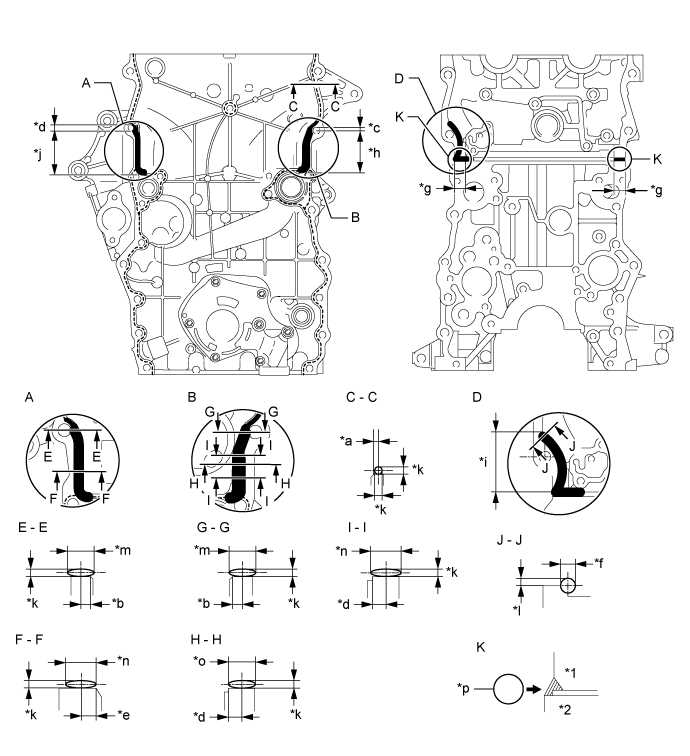
Text in Illustration *1
Cylinder Head Sub-Assembly
*2
Cylinder Block Sub-assembly
*a
2.0 mm (0.0787 in.)
*b
2.5 mm (0.0984 in.)
*c
5.0 mm (0.197 in.)
*d
6.0 mm (0.236 in.)
*e
7.0 mm (0.276 in.)
*f
8.0 mm (0.315 in.) or more
*g
20 mm (0.787 in.)
*h
54 mm (2.13 in.)
*i
56.5 mm (2.22 in.)
*j
58 mm (2.28 in.)
*k
2.5 to 4.0 mm (0.0984 to 0.157 in.)
*l
5.0 to 6.0 mm (0.197 to 0.236 in.)
*m
9.0 to 13 mm (0.354 to 0.512 in.)
*n
10 to 14 mm (0.394 to 0.551 in.)
*o
12 to 16 mm (0.472 to 0.630 in.)
*p
Seal Packing
- Seal packing:
- Toyota Genuine Seal Packing Black, Three Bond 1207B or equivalent
- NOTICE:
- When the contact surfaces are wet, wipe them with an oil-free cloth before applying seal packing.
- Install the timing chain cover sub-assembly within 3 minutes and tighten the bolts within 15 minutes after applying seal packing.
- Do not add the engine oil for at least 4 hours after the installation.
- Do not start the engine for at least 4 hours after the installation.
- When the contact surfaces are wet, wipe them with an oil-free cloth before applying seal packing.
w/ Air Conditioning:
Install the timing chain or belt cover sub-assembly with the 16 bolts and nut, and tighten the 16 bolts and nut in the sequence shown in the illustration.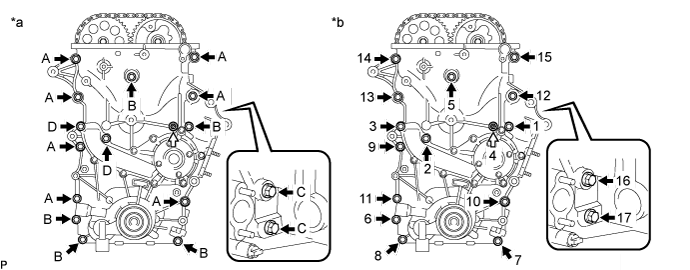
Text in Illustration *a
Types of nut and bolt
*b
Tightening Order

Bolt

Nut
- Torque:
- for bolt A:
- 57 N*m{ 581 kgf*cm , 42 ft.*lbf }
- for bolt B:
- 23 N*m{ 235 kgf*cm , 17 ft.*lbf }
- for bolt C:
- 21 N*m{ 214 kgf*cm , 15 ft.*lbf }
- for bolt D:
- 25 N*m{ 255 kgf*cm , 18 ft.*lbf }
- for nut:
- 23 N*m{ 235 kgf*cm , 17 ft.*lbf }
- Bolt Length:
Item
Length
Thread Diameter
Bolt A
75 mm (2.95 in.)
10 mm (0.394 in.)
Bolt B
75 mm (2.95 in.)
8 mm (0.315 in.)
Bolt C
40 mm (1.57 in.)
8 mm (0.315 in.)
Bolt D
90 mm (3.54 in.)
8 mm (0.315 in.)
w/o Air Conditioning:
Install the timing chain or belt cover sub-assembly with the 18 bolts and nut, and tighten the 18 bolts and nut in the sequence shown in the illustration.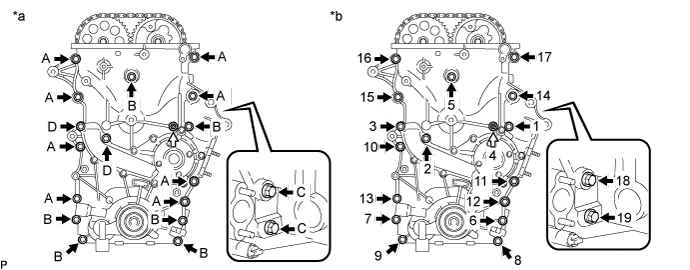
Text in Illustration *a
Types of nut and bolt
*b
Tightening Order
Bolt
Nut
- Torque:
- for bolt A:
- 57 N*m{ 581 kgf*cm , 42 ft.*lbf }
- for bolt B:
- 23 N*m{ 235 kgf*cm , 17 ft.*lbf }
- for bolt C:
- 21 N*m{ 214 kgf*cm , 15 ft.*lbf }
- for bolt D:
- 25 N*m{ 255 kgf*cm , 18 ft.*lbf }
- for nut:
- 23 N*m{ 235 kgf*cm , 17 ft.*lbf }
- Bolt Length:
Item
Length
Thread Diameter
Bolt A
75 mm (2.95 in.)
10 mm (0.394 in.)
Bolt B
75 mm (2.95 in.)
8 mm (0.315 in.)
Bolt C
40 mm (1.57 in.)
8 mm (0.315 in.)
Bolt D
90 mm (3.54 in.)
8 mm (0.315 in.)
w/ Air Conditioning: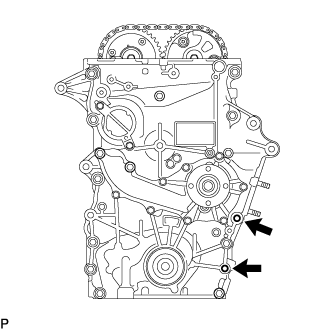
Remove the seal packing from the 2 bolt holes for the No. 1 compressor mounting bracket.- NOTICE:
- Do not use any cleaners to remove the seal packing.
| 60. INSTALL OIL STRAINER SUB-ASSEMBLY |
Install the oil strainer sub-assembly with the 6 bolts, and tighten the 6 bolts in the sequence shown in the illustration.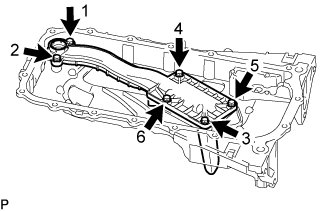
- Torque:
- 10 N*m{ 102 kgf*cm , 7 ft.*lbf }
| 61. INSTALL OIL PAN SUB-ASSEMBLY |
Install the stud bolt.
Using an E6 "torx" socket wrench, install the stud bolts.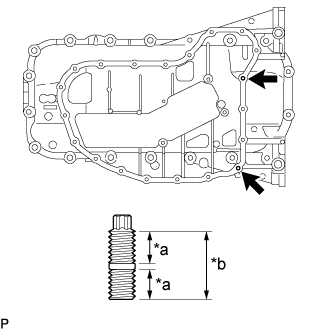
Text in Illustration *a
9.0 mm (0.354 in.)
*b
19.0 mm (0.748 in.)
- Torque:
- 3.0 N*m{ 31 kgf*cm , 27 in.*lbf }
Remove any old packing (FIPG material) and be careful not to drop any oil on the contact surfaces of the cylinder block sub-assembly and oil pan sub-assembly.
Apply seal packing as shown in the illustration.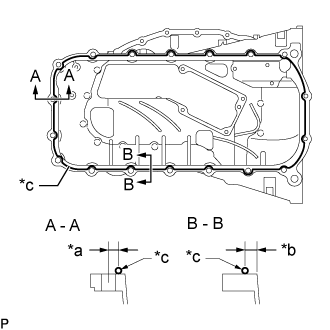
- Seal packing:
- Toyota Genuine Seal Packing Black, Three Bond 1207B or equivalent
- Standard seal diameter:
- 2.0 to 3.0 mm (0.0787 to 0.118 in.)
Text in Illustration *a
8.0 mm (0.315 in.)
*b
6.5 mm (0.256 in.)
*c
Seal Packing
- NOTICE:
- Install the oil pan sub-assembly within 3 minutes and tighten the bolts within 15 minutes after applying seal packing.
- Do not add the engine oil for at least 4 hours after the installation.
- Do not start the engine for at least 4 hours after the installation.
- Install the oil pan sub-assembly within 3 minutes and tighten the bolts within 15 minutes after applying seal packing.
Install a new gasket to the oil strainer sub-assembly.
Install the oil pan sub-assembly with the 16 bolts and 2 nuts, and tighten the 16 bolts and 2 nuts in the sequence shown in the illustration.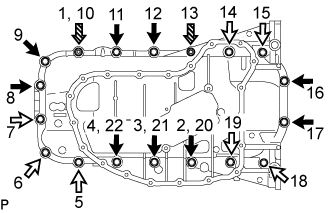
- Torque:
- 26 N*m{ 265 kgf*cm , 19 ft.*lbf }
- Bolt Length:
Item
Length
Bolt A
20 mm (0.787 in.)
Bolt B
40 mm (1.57 in.)
Text in Illustration
Bolt A
Bolt B
Nut
| 62. INSTALL NO. 2 OIL PAN SUB-ASSEMBLY |
Remove any old packing (FIPG material) and be careful not to drop any oil on the contact surfaces of the oil pan sub-assembly and No. 2 oil pan sub-assembly.
Apply seal packing as shown in the illustration.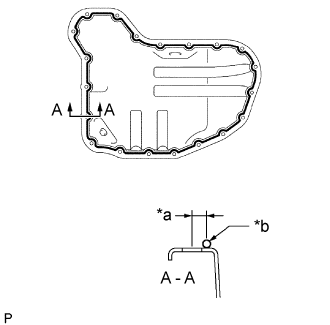
- Seal packing:
- Toyota Genuine Seal Packing Black, Three Bond 1207B or equivalent
- Standard seal diameter:
- 3.0 to 4.0 mm (0.118 to 0.157 in.)
Text in Illustration *a
6.0 mm (0.236 in.)
*b
Seal Packing
- NOTICE:
- Install the No. 2 oil pan sub-assembly within 3 minutes and tighten the bolts within 15 minutes after applying seal packing.
- Do not add the engine oil for at least 4 hours after the installation.
- Do not start the engine for at least 4 hours after the installation.
- Install the No. 2 oil pan sub-assembly within 3 minutes and tighten the bolts within 15 minutes after applying seal packing.
Install the No. 2 oil pan sub-assembly with the 18 bolts and 2 nuts, and tighten the 18 bolts and 2 nuts in the sequence shown in the illustration.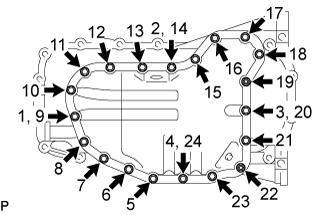
- Torque:
- 9.0 N*m{ 92 kgf*cm , 80 in.*lbf }
Install a new gasket and the oil pan drain plug.
- Torque:
- 38 N*m{ 382 kgf*cm , 28 ft.*lbf }
| 63. INSTALL CRANKSHAFT PULLEY |
Align the pulley set key with the key groove of the pulley, and slide it on the pulley.
Using SST, install a new pulley bolt.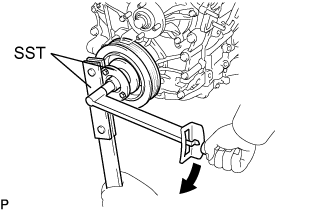
- Torque:
- 260 N*m{ 2,650 kgf*cm , 192 ft.*lbf }
- SST
- 09213-54015
(91651-60855)
09330-00021
- NOTICE:
- Do not reuse the pulley bolt.
| 64. INSTALL CYLINDER HEAD COVER SUB-ASSEMBLY |
Apply seal packing as shown in the illustration.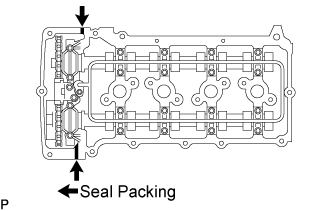
Install the 2 gaskets to the head cover.
- Seal packing:
- Toyota Genuine Seal Packing Black, Three Bond 1207B or equivalent
- NOTICE:
- Remove any oil from the contact surface.
- Install the crankcase within 3 minutes after applying seal packing.
- Do not start the engine for at least 4 hours after installing.
- Remove any oil from the contact surface.
Temporarily install the cover with the 19 bolts and 2 nuts.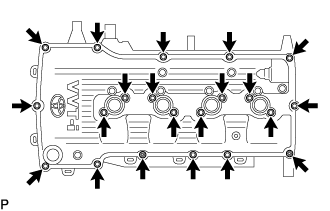
Fully tighten the bolts (A) shown in the illustration.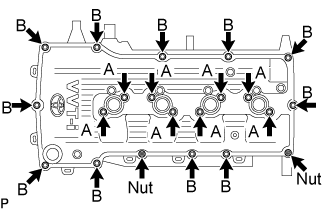
- Torque:
- 9.0 N*m{ 92 kgf*cm , 80 in.*lbf }
Fully tighten the bolts (B) shown in the illustration.
- Torque:
- 9.0 N*m{ 92 kgf*cm , 80 in.*lbf }
- HINT:
- Make sure the tightening torque of bolts (A).
| 65. INSTALL CAMSHAFT TIMING OIL CONTROL VALVE ASSEMBLY |
Install the camshaft timing oil control valve assembly with the bolt.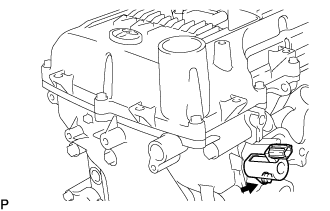
- Torque:
- 8.0 N*m{ 82 kgf*cm , 71 in.*lbf }
| 66. INSTALL CRANK POSITION SENSOR |
Apply engine oil to the O-ring.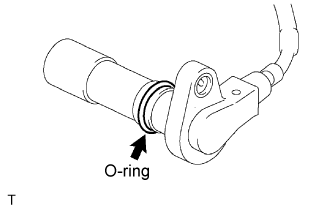
Install the crankshaft position sensor with the bolt.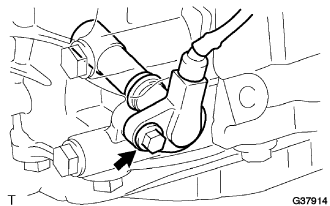
- Torque:
- 8.5 N*m{ 87 kgf*cm , 75 in.*lbf }
| 67. INSTALL CAM POSITION SENSOR |
Apply engine oil to the O-ring.
Install the camshaft position sensor with the bolt.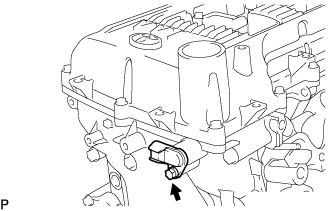
- Torque:
- 8.5 N*m{ 87 kgf*cm , 75 in.*lbf }
| 68. INSTALL VENTILATION VALVE SUB-ASSEMBLY |
Install the ventilation valve sub-assembly.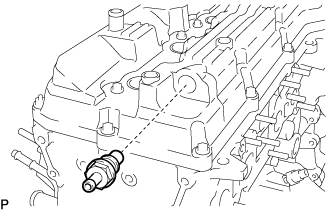
- Torque:
- 5.0 N*m{ 51 kgf*cm , 44 in.*lbf }
| 69. INSTALL OIL FILLER CAP SUB-ASSEMBLY |
Install the oil filler cap sub-assembly.