REASSEMBLY
Removal / installation · Vehicles built from Dec 2015
Versions by build date: Oct 2014 – Nov 2015 from Dec 2015
| 1. INSTALL OUTPUT SHAFT ASSEMBLY |

Install the output shaft assembly into the intermediate plate by pulling on the output shaft assembly and tapping on the intermediate plate with a plastic hammer.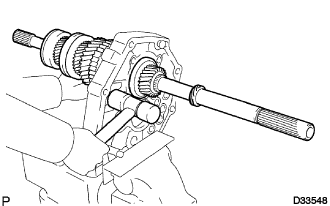

Using a snap ring expander, install the output shaft bearing snap ring to the output shaft assembly.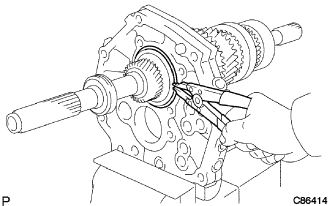
- HINT:
- Be sure the output shaft bearing snap ring is flush with the intermediate plate surface.
| 2. INSTALL INPUT SHAFT ASSEMBLY |
Coat the input shaft assembly and synchronizer ring No.1 with gear oil, and install them to the output shaft.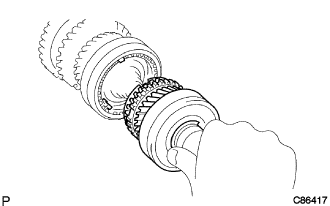
| 3. INSTALL COUNTER GEAR |
Coat the input shaft and the synchronizer ring No.2 with gear oil.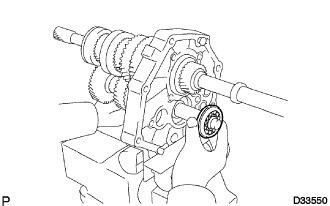
Temporarily install the counter gear assembly and a new counter shaft center bearing to the intermediate plate.
- NOTICE:
- Install the bearing (with snap ring) to the counter gear's rear side.
Using a plastic hammer, install the counter shaft center bearing to the intermediate plate by tapping the outer race of the counter shaft center bearing.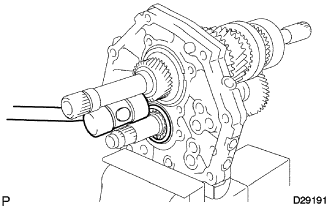
- HINT:
- Hold the front side of the counter gear by hand.
| 4. INSTALL OUTPUT SHAFT REAR BEARING(MTM) RETAINER |
Using a "torx" socket wrench T40, install the output shaft rear bearing retainer to the intermediate plate with the 4 screws.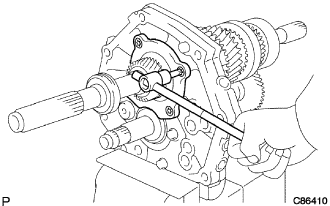
- Torque:
- 18 N*m{ 185 kgf*cm , 13 ft.*lbf }
| 5. INSTALL REVERSE IDLER GEAR SUB-ASSEMBLY |
Install the reverse idler gear shaft and reverse idler gear sub-assembly to the intermediate plate.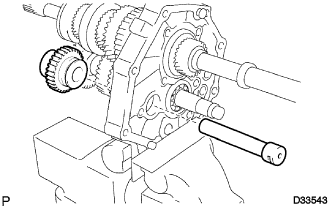
Install the reverse idler gear shaft stopper to the intermediate plate with the bolt.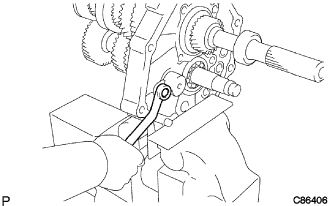
- Torque:
- 17 N*m{ 175 kgf*cm , 12 ft.*lbf }
| 6. INSTALL REVERSE SHIFT ARM |
Install a new E-ring and the shift fork to the shift arm.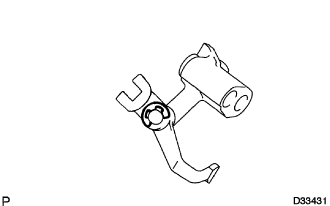
| 7. INSTALL REVERSE SHIFT ARM BRACKET |
Install the arm bracket with the shift arm to the intermediate plate.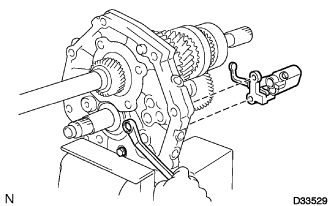
Install the 2 bolts.
- Torque:
- 18 N*m{ 185 kgf*cm , 13 ft.*lbf }
| 8. INSTALL 5TH GEAR BEARING INNER RACE LOCK BALL |
Install the 5th gear bearing inner race lock ball.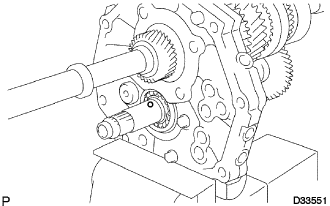
| 9. INSTALL 5TH GEAR THRUST WASHER |
Install the 5th gear thrust washer.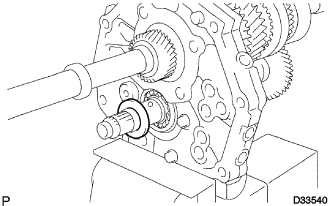
| 10. INSTALL COUNTER SHAFT 5TH GEAR |
Install the counter shaft 5th gear assembly to the counter gear.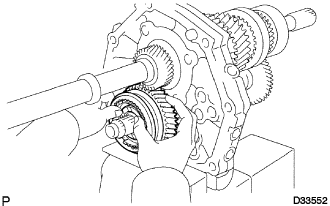
Temporarily install the synchronizer ring No.3 on the gear spline piece No.5.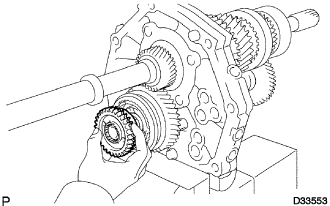
Dismount the intermediate plate from the vise.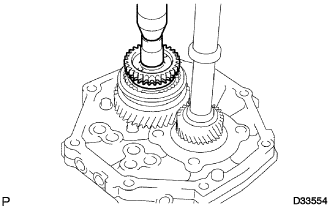
Stand the manual transmission as shown in the illustration.
Using a press and 22 mm socket wrench, install the gear spline piece No.5 with the synchronizer ring No.3 slots aligned with the shifting keys.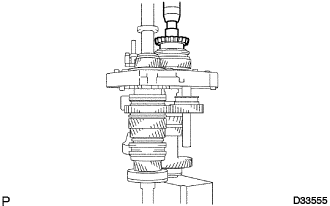
Mount the intermediate plate in a vise.
Select a counter gear rear shaft snap ring that will allow the minimum amount of axial play.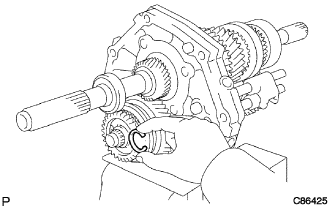
- Standard clearance:
- 0.1 mm (0.00390in.) or less
Counter gear rear shaft snap ring thickness Mark
Thickness: mm (in.)
A
2.80 to 2.85 (0.110 to 0.112)
B
2.85 to 2.90 (0.112 to 0.114)
C
2.90 to 2.95 (0.114 to 0.116)
D
2.95 to 3.00 (0.116 to 0.118)
E
3.00 to 3.05 (0.118 to 0.120)
F
3.05 to 3.10 (0.120 to 0.122)
G
3.10 to 3.15 (0.122 to 0.124)
Using a brass bar and a hammer, install the counter gear rear shaft snap ring to the counter gear.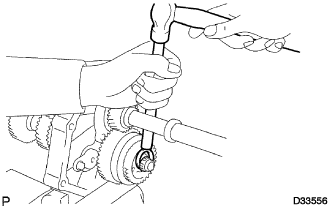
| 11. INSPECT COUNTER SHAFT 5TH GEAR THRUST CLEARANCE |
Using a feeler gauge, measure the counter shaft 5th gear thrust clearance.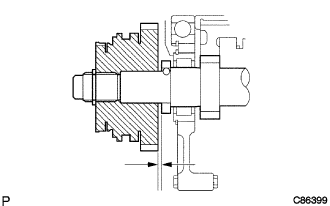
- Standard clearance:
- 0.125 to 0.325 mm (0.0049 to 0.0128 in.)
- Maximum clearance:
- 0.325 mm (0.0128 in.)
| 12. INSTALL GEAR SHIFT HEAD NO.1 |
Install the gear shift head No.1 to the gear shift fork shaft No.1.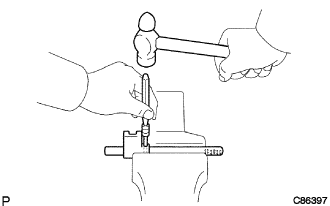
Using a pin punch and a hammer, drive in the slotted spring pin to the gear shift fork shaft No.1.
| 13. INSTALL GEAR SHIFT FORK NO.2 |
Coat the gear shift fork No.2 with gear oil, and install it to the transmission hub sleeve No.2.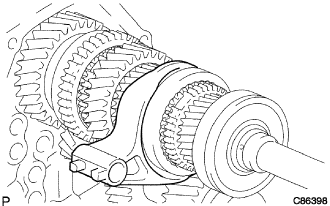
| 14. INSTALL GEAR SHIFT FORK SHAFT NO.1 |
Coat the gear shift fork No.1 with gear oil, and install it to the reverse gear.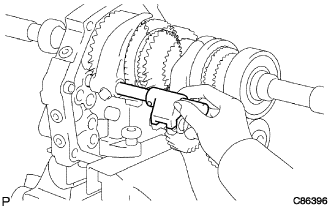
Install the gear shift fork shaft No.1 through the gear shift fork No.2, gear shift fork No.1 and intermediate plate.
Tighten the shift fork bolt.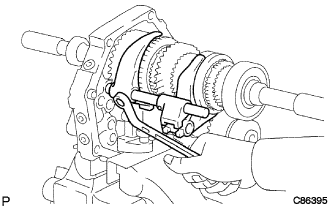
- Torque:
- 20 N*m{ 204 kgf*cm , 14 ft.*lbf }
| 15. INSTALL SHIFT INTER LOCK PIN NO.2 |
Coat the shift inter lock pin No.2 with MP grease, and install it into the gear shift fork shaft No.2.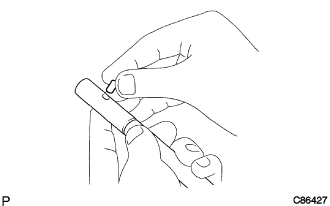
| 16. INSTALL GEAR SHIFT FORK SHAFT NO.2 |
Coat the shift inter lock pin No.1 with MP grease.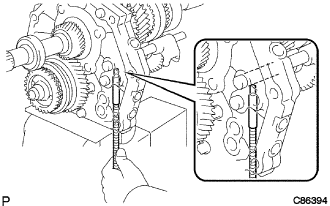
Using a magnetic finger, install the shift inter lock pin No.1 to the intermediate plate.
Install the gear shift fork shaft No.2 through the gear shift fork No.2 and intermediate plate.
Using a pin punch (5 mm) and a hammer, Install the slotted spring pin to the gear shift fork No.2.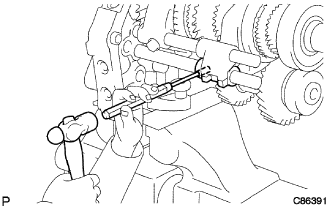
Install the shift fork shaft snap ring to the gear shift fork shaft No.2.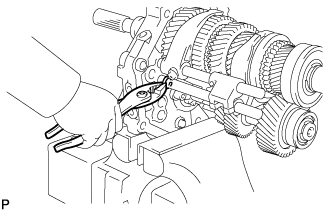
| 17. INSTALL SHIFT INTER LOCK PIN NO.2 |
Coat the shift inter lock pin No.2 with MP grease, and install it into the reverse shift fork shaft.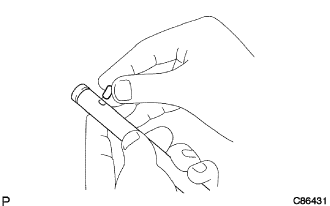
| 18. INSTALL REVERSE SHIFT FORK SHAFT |
Coat the shift inter lock pin No.1 with MP grease.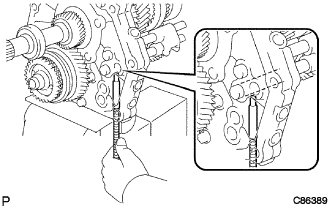
Using a magnetic finger, install the shift inter lock pin No.1 to the intermediate plate.
Install the ball and compression spring to the reverse shift fork.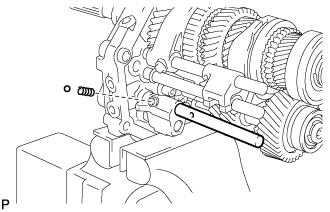
Using a screwdriver, install the reverse shift fork shaft by pushing the ball gently.
Apply gear oil to the gear shift head No.3, and install it to the reverse shift fork shaft.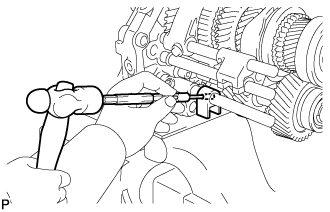
Using a pin punch (5 mm) and a hammer, install the slotted spring pin to the reverse shift fork shaft.
| 19. INSTALL REVERSE SHIFT HEAD |
Install the reverse shift head to the reverse shift fork shaft.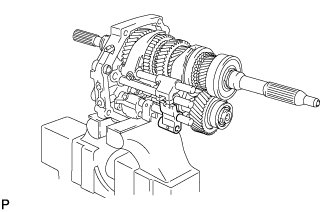
| 20. INSTALL GEAR SHIFT FORK SHAFT NO.4 |
Coat the reverse shift fork ball with MP grease.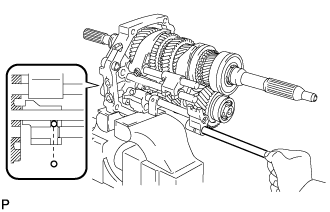
Using a magnetic finger, install the reverse shift fork ball to the reverse shift fork.
Install the gear shift fork shaft No.4 through the reverse shift fork.
Coat the shift inter lock ball No.1 with MP grease.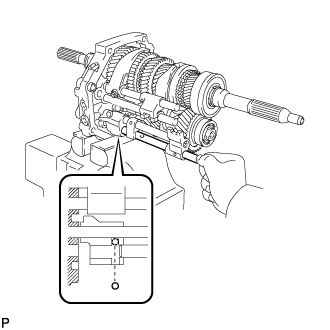
Using a magnetic finger, install the shift inter lock ball No.1 to the intermediate plate.
Install the gear shift fork shaft No.4 through the gear shift fork No.3 and intermediate plate.
Install the shift fork bolt to the gear shift fork No.3.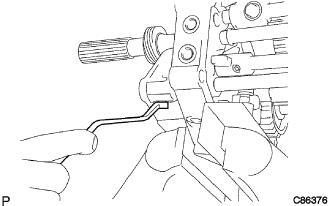
- Torque:
- 20 N*m{ 204 kgf*cm , 14 ft.*lbf }
Using a brass bar and a hammer, install the snap ring to the gear shift fork shaft No.4.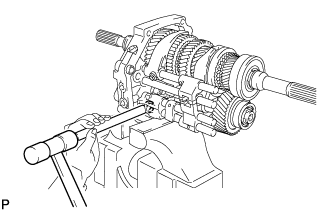
Using a pin punch (5 mm) and a hammer, install the slotted spring pin to the gear shift fork shaft No.4.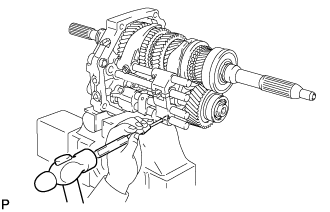
| 21. INSTALL SHIFT DETENT BALL NO.2 |
Coat the shift detent ball No.2 with MP grease.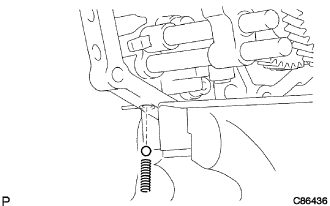
Install the shift detent ball No.2 and shift detent ball compression spring to the intermediate plate.
Coat the shift detent ball spring seat No.2 with adhesive.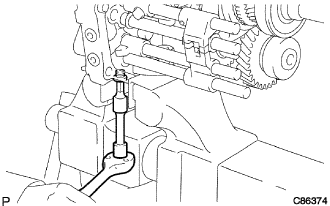
- Adhesive:
- Toyota Genuine Adhesive 1344, Three Bond 1344 or equivalent
Using a "torx" socket wrench T40, install the shift detent ball spring seat No.2 to the intermediate plate.
- Torque:
- 19 N*m{ 190 kgf*cm , 14 ft.*lbf }
| 22. INSTALL SHIFT DETENT BALL |
Coat the 3 shift detent balls with MP grease, and install these balls and 3 compression springs to the intermediate plate.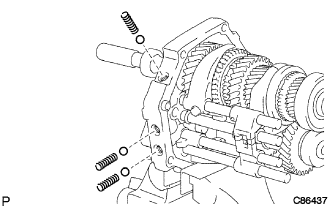
Coat the 3 shift detent ball spring seats No.1 with adhesive.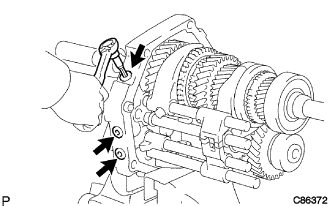
- Adhesive:
- Toyota Genuine Adhesive 1344, Three Bond 1344 or equivalent
Using a "torx" socket wrench T40, install the 3 shift detent ball spring seats No.1 to the intermediate plate.
- Torque:
- 19 N*m{ 190 kgf*cm , 14 ft.*lbf }
| 23. INSTALL MANUAL TRANSMISSION CASE |
Apply seal packing to the manual transmission case as shown in the illustration.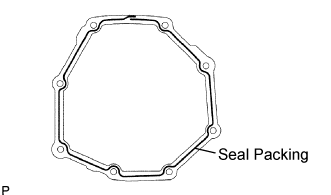
- Seal packing:
- Toyota Genuine Seal Packing 1281, Three Bond 1281 or equivalent
Stand the intermediate plate as shown in the illustration.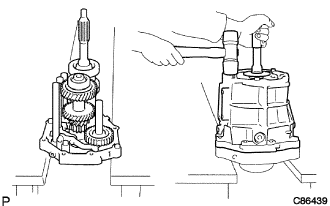
Using a plastic hammer, install the manual transmission case to the intermediate plate as shown in the illustration.
| 24. INSTALL COUNTER GEAR FRONT BEARING SNAP RING NO.1 |
Using a snap ring expander, install the counter gear front bearing snap ring No.1 to the counter gear front bearing.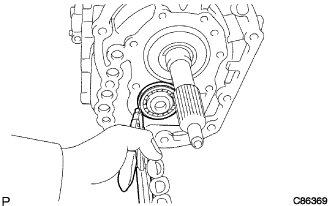
| 25. INSTALL FRONT BEARING SHAFT SNAP RING |
Using a snap ring expander, install the front bearing shaft snap ring to the input shaft front bearing.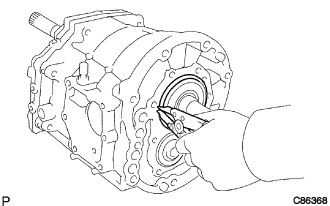
| 26. INSTALL TRANSMISSION FRONT BEARING RETAINER OIL SEAL |
Using SST, press in a new transmission front bearing retainer oil seal to the front bearing retainer.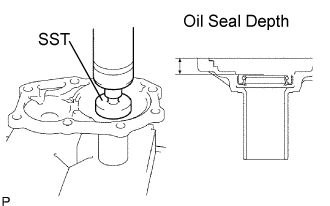
- SST
- 09950-60010
(09952-06010, 09951-00440)
- Oil seal depth:
- 12.5 to 13.5 mm (0.492 to 0.531 in.)
| 27. CHECK BEARING RETAINER FRONT(MTM) |
Check that "FIPG" is imprinted on the bearing retainer front.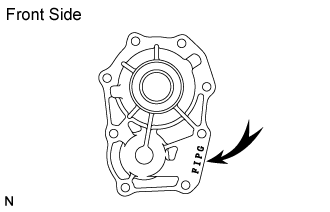
| 28. INSTALL BEARING RETAINER FRONT(MTM) |
w/o Gasket: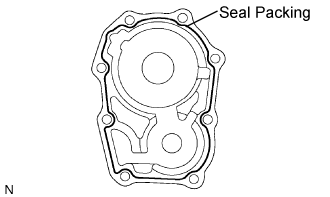
Apply seal packing to the bearing retainer front as shown in the illustration.
- Seal packing:
- Toyota Genuine Seal Packing 1281, Three Bond 1281 or equivalent
w/ Gasket:
Install the bearing retainer front with gasket to the transmission case.
w/o Gasket:
Install the bearing retainer front to the transmission case.
Apply adhesive to the bolt threads.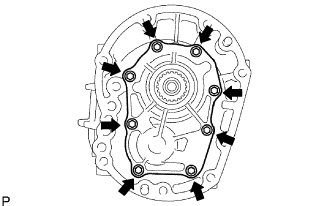
- Adhesive:
- Toyota Genuine Adhesive 1344, Three Bond 1344 or equivalent
Install the 8 bolts to the manual transmission case.
- Torque:
- 17 N*m{ 175 kgf*cm , 12 ft.*lbf }
| 29. INSTALL MANUAL TRANSMISSION EXTENSION HOUSING OIL SEAL |
Using SST, drive in a new manual transmission extension housing oil seal to the extension housing.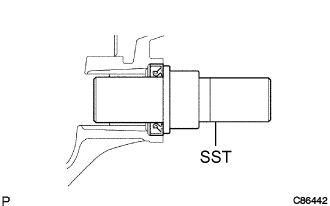
- SST
- 09325-20010
| 30. INSTALL EXTENSION HOUSING OIL RECEIVER PIPE NO.1 |
Install the extension housing oil receiver pipe No.1 to the the extension housing.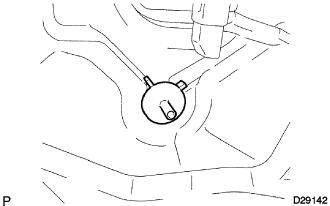
| 31. INSTALL EXTENSION HOUSING OIL RECEIVER PIPE |
Install the extension housing oil receiver pipe to the extension housing with the bolt.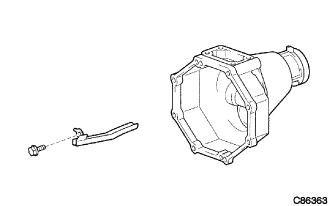
- Torque:
- 11 N*m{ 115 kgf*cm , 8 ft.*lbf }
| 32. INSTALL TRANSMISSION MAGNET |
Install the transmission magnet to the extension housing.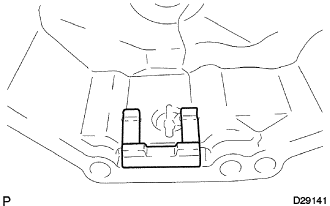
| 33. INSTALL EXTENSION HOUSING DUST(MTM) DEFLECTOR |
Using a plastic hammer, install the extension housing dust deflector to the extension housing.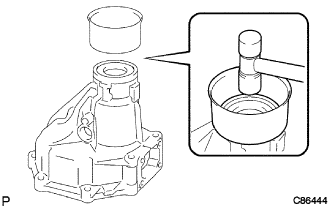
| 34. INSTALL EXTENSION (MTM) HOUSING SUB-ASSEMBLY |
Apply seal packing to the extension housing as shown in the illustration.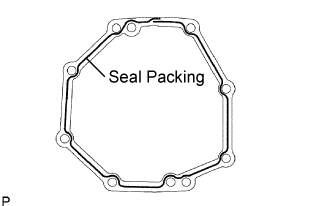
- Seal packing:
- Toyota Genuine Seal Packing 1281, Three Bond 1281 or equivalent
Install the extension housing to the manual transmission case with the 8 bolts.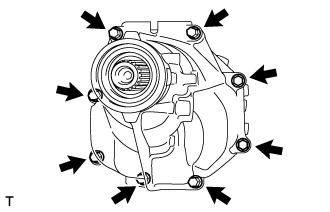
- Torque:
- 37 N*m{ 377 kgf*cm , 27 ft.*lbf }
| 35. INSTALL SHIFT LEVER SHAFT HOUSING SUB-ASSEMBLY |
Shift the gear shift fork No.2, gear shift head and reverse shift head to the neutral position.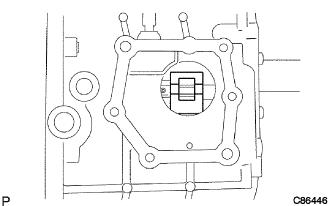
Install a new shift lever shaft housing gasket to the manual transmission case.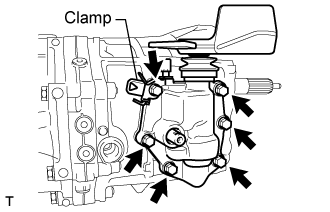
Apply sealant to the threads of the 4 yellow bolts and 2 bluish-silver bolts.
Install the clamp and shift lever shaft housing assembly to the manual transmission case with the 6 bolts.
- Torque:
- 17 N*m{ 175 kgf*cm , 12 ft.*lbf }
| 36. INSTALL CLUTCH HOUSING |
Install the clutch housing.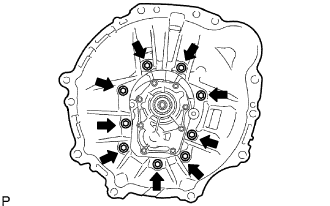
Apply adhesive to the bolt threads.
- Adhesive:
- Toyota Genuine Adhesive 1344, Three Bond 1344 or equivalent
Install the 9 bolts to the clutch housing.
- Torque:
- 37 N*m{ 377 kgf*cm , 27 ft.*lbf }
| 37. INSTALL BACK UP LIGHT SWITCH ASSEMBLY |
Using SST, install the back up light switch assembly to the manual transmission case.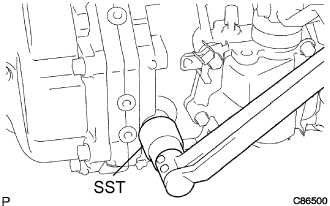
- SST
- 09817-16011
- Torque:
- 37 N*m{ 377 kgf*cm , 27 ft.*lbf }
| 38. INSTALL SPEEDOMETER SENSOR |
Install a new O-ring to the speedometer sensor.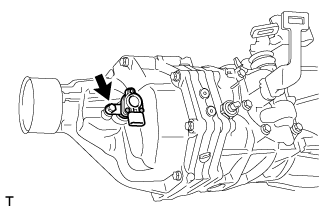
Install the speedometer sensor to the extension housing with the bolt.
- Torque:
- 11 N*m{ 115 kgf*cm , 8 ft.*lbf }
| 39. INSTALL DRAIN (MTM) PLUG SUB-ASSEMBLY |
Using a 10 mm hexagon socket wrench, install a new gasket and the drain plug to the manual transmission case.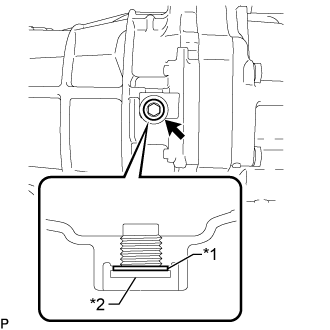
Text in Illustration *1
Gasket
*2
Drain Plug
- Torque:
- 44 N*m{ 450 kgf*cm , 33 ft.*lbf }
| 40. INSTALL MANUAL TRANSMISSION FILLER PLUG |
Install a new gasket and the filler plug to the manual transmission case.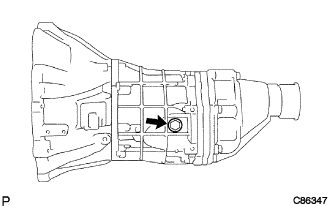
- Torque:
- 37 N*m{ 377 kgf*cm , 27 ft.*lbf }