P2120 Throttle / Pedal Position Sensor / Switch "D" Circuit
Diagnostic trouble codes · Vehicles built from Jan 2017
Also covers:
- P2122 Throttle / Pedal Position Sensor / Switch "D" Circuit Low Input
- P2123 Throttle / Pedal Position Sensor / Switch "D" Circuit High Input
- P2125 Throttle / Pedal Position Sensor / Switch "E" Circuit
- P2127 Throttle / Pedal Position Sensor / Switch "E" Circuit Low Input
- P2128 Throttle / Pedal Position Sensor / Switch "E" Circuit High Input
- P2138 Throttle / Pedal Position Sensor / Switch "D" / "E" Voltage Correlation
Versions by build date: Oct 2014 – Dec 2014 Jan 2015 – Nov 2015 Dec 2015 – Mar 2016 Apr 2016 – Dec 2016 from Jan 2017
DESCRIPTION
- HINT:
- This is the repair procedure for the accelerator pedal position sensor.
- This electrical throttle system does not use a throttle cable.
- This accelerator pedal position sensor is a non-contact type.
- This is the repair procedure for the accelerator pedal position sensor.
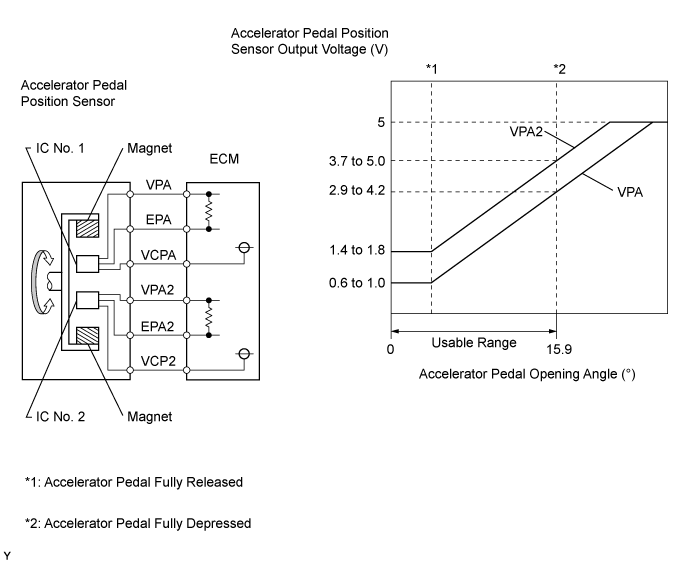
In the accelerator pedal position sensor, the voltage applied to terminals VPA and VPA2 of the ECM changes between 0 V and 5 V in proportion to the opening angle of the accelerator pedal. The VPA is a signal to indicate the actual accelerator pedal opening angle which is used for engine control, and the VPA2 is a signal to indicate information about the opening angle which is used for detecting malfunctions. The ECM judges the current opening angle of the accelerator pedal using signals from terminals VPA and VPA2, and the ECM controls the injection volume based on these signals.

| DTC Detection Drive Pattern |
DTC Detection Condition |
Trouble Area |
Ignition switch ON
|
Condition (a) continues for 0.5 seconds (1 trip detection logic): (a) VPA is below 0.4 V and VPA2 is more than 2.7 deg, or VPA is higher than 4.8 V. |
|
| DTC Detection Drive Pattern |
DTC Detection Condition |
Trouble Area |
Ignition switch ON
|
Conditions (a) and (b) continue for 0.5 seconds (1 trip detection logic): (a) VPA is below 0.4 V. (b) VPA2 is more than 2.7 deg. |
|
| DTC Detection Drive Pattern |
DTC Detection Condition |
Trouble Area |
Ignition switch ON
|
Condition (a) continues for 2.0 seconds (1 trip detection logic): (a) VPA is higher than 4.8 V. |
|
| DTC Detection Drive Pattern |
DTC Detection Condition |
Trouble Area |
Ignition switch ON
|
Condition (a) continues for 0.5 seconds (1 trip detection logic): (a) VPA2 is below 1.2 V and VPA is more than 2.7 deg, or VPA2 is higher than 4.8 V and VPA is higher than 0.4 V but below 3.45 V. |
|
| DTC Detection Drive Pattern |
DTC Detection Condition |
Trouble Area |
Ignition switch ON
|
Conditions (a) and (b) continue for 0.5 seconds (1 trip detection logic): (a) VPA2 is below 1.2 V. (b) VPA1 is more than 2.7 deg. |
|
| DTC Detection Drive Pattern |
DTC Detection Condition |
Trouble Area |
Ignition switch ON
|
Conditions (a) and (b) continue for 2.0 seconds (1 trip detection logic): (a) VPA2 is higher than 4.8 V. (b) VPA is higher than 0.4 V but below 3.45 V. |
|
| DTC Detection Drive Pattern |
DTC Detection Condition |
Trouble Area |
Ignition switch ON
|
Conditions (a) or (b) continue for 2.0 seconds (1 trip detection logic): (a) The difference between VPA and VPA2 is less than 0.02 V. (b) VPA is below 0.4 V and VPA2 is below 1.2 V. |
|
| DTC No. |
Data List |
| P2120 |
|
| P2122 | |
| P2123 | |
| P2125 | |
| P2127 | |
| P2128 | |
| P2138 |
WIRING DIAGRAM
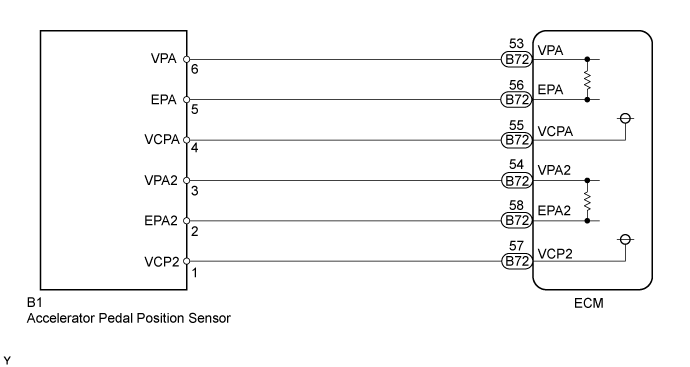
INSPECTION PROCEDURE
- NOTICE:
- After replacing the ECM, the new ECM needs registration (Click here) and initialization (Click here).
- HINT:
- Read freeze frame data using the GTS. Freeze frame data records the engine condition when malfunctions are detected. When troubleshooting, freeze frame data can help determine if the vehicle was moving or stationary, if the engine was warmed up or not, and other data from the time the malfunction occurred.
| 1. READ VALUE USING GTS (ACCELERATOR PEDAL POSITION) |

Connect the GTS to the DLC3.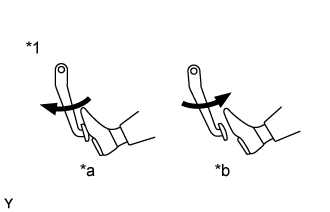
Turn the ignition switch to ON and turn the GTS on.
Enter the following menus: Powertrain / Engine and ECT / Data List / Accel Sens. No.1 Volt % and Accel Sens. No.2 Volt %.
Read the values.
- Standard Voltage:
Accelerator Pedal
Accel Sens. No.1 Volt %
Accel Sens. No.2 Volt %
Released
10 to 22%
24 to 40%
Depressed
52 to 90%
68 to 99%
Text in Illustration *1
Accelerator Pedal Assembly
*a
Depressed
*b
Released
Result Result
Proceed to
NG
A
OK
B
|
|
||||

| A | |
 |
| 2. CHECK HARNESS AND CONNECTOR (ACCELERATOR PEDAL POSITION SENSOR - ECM) |
Disconnect the accelerator pedal position sensor connector.
Disconnect the ECM connectors.
Measure the resistance according to the value(s) in the table below.
- Standard Resistance:
Tester Connection
Condition
Specified Condition
B1-1 (VCP2) - B72-57 (VCP2)
Always
Below 1 Ω
B1-2 (EPA2) - B72-58 (EPA2)
Always
Below 1 Ω
B1-3 (VPA2) - B72-54 (VPA2)
Always
Below 1 Ω
B1-4 (VCPA) - B72-55 (VCPA)
Always
Below 1 Ω
B1-5 (EPA) - B72-56 (EPA)
Always
Below 1 Ω
B1-6 (VPA) - B72-53 (VPA)
Always
Below 1 Ω
B1-1 (VCP2) or B72-57 (VCP2) - Body ground
Always
10 kΩ or higher
B1-2 (EPA2) or B72-58 (EPA2) - Body ground
Always
10 kΩ or higher
B1-3 (VPA2) or B72-54 (VPA2) - Body ground
Always
10 kΩ or higher
B1-4 (VCPA) or B72-55 (VCPA) - Body ground
Always
10 kΩ or higher
B1-5 (EPA) or B72-56 (EPA) - Body ground
Always
10 kΩ or higher
B1-6 (VPA) or B72-53 (VPA) - Body ground
Always
10 kΩ or higher
Reconnect the accelerator pedal position sensor connector.
Reconnect the ECM connector.
|
|
||||
| OK | |
|
| 3. INSPECT ECM TERMINAL VOLTAGE (VCPA AND VCP2 TERMINALS) |
Disconnect the accelerator pedal position sensor connector.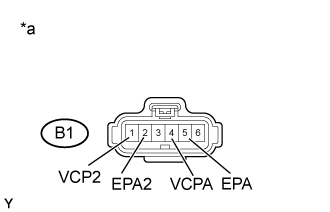
Measure the voltage according to the value(s) in the table below.
- Standard Voltage:
Tester Connection
Switch Condition
Specified Condition
B1-4 (VCPA) - B1-5 (EPA)
Ignition switch ON
4.5 to 5.5 V
B1-1 (VCP2) - B1-2 (EPA2)
Ignition switch ON
4.5 to 5.5 V
Text in Illustration *a
Front view of wire harness connector
(to Accelerator Pedal Position Sensor)
Reconnect the accelerator pedal position sensor connector.
|
|
||||
| OK | |
|
| 4. REPLACE ACCELERATOR PEDAL ROD ASSEMBLY |
Replace the accelerator pedal rod assembly (Click here).
|
|
||||
| 5. REPLACE ECM |
Replace the ECM (Click here).
|
|
||||
| 6. REPAIR OR REPLACE HARNESS OR CONNECTOR |
Repair or replace the harness or connector.
| NEXT | |
|
| 7. CONFIRM WHETHER MALFUNCTION HAS BEEN SUCCESSFULLY REPAIRED |
Connect the GTS to the DLC3.
Clear the DTCs (Click here).
Turn the ignition switch off and leave the vehicle for 30 seconds.
Turn the ignition switch to ON.
Fully release the accelerator pedal for 3 seconds or more, then depress it partway for 3 seconds or more, and then fully depress it for 3 seconds or more.
Confirm that the DTC is not output again.
| NEXT | ||
 |
||
| ||