INSTALLATION
Removal / installation · Vehicles built from Oct 2014
| 1. INSTALL CRANKSHAFT POSITION SENSOR |

Apply a light coat of engine oil to the O-ring of the crankshaft position sensor.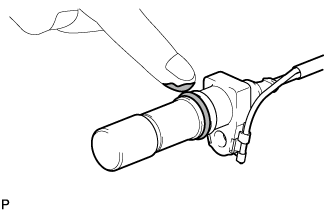

TYPE A:
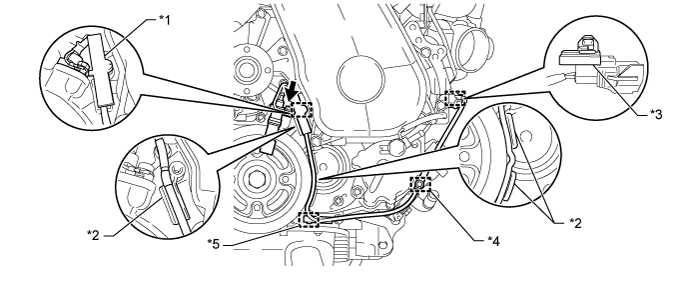
Text in Illustration *1
Clamp
*2
Protrusion
*3
Wire Harness Clamp (A)
*4
Wire Harness Clamp (B)
*5
Wire Harness Clamp (C)
-
-
Install the wire harness clamp (A) to the crankshaft position sensor connector.
Install the crankshaft position sensor with the bolt.
- Torque:
- 8.5 N*m{ 87 kgf*cm , 75 in.*lbf }
- NOTICE:
- Make sure that the O-ring is not damaged or does not jump out of position during installation.
Install a new clamp.
- NOTICE:
- Make sure that no portion of the clamp remains in the clamp installation hole. If there is any portion of the clamp remaining, remove it.
- Make sure the crankshaft position sensor wire harness is installed in the position shown in the illustration.
- Make sure that no portion of the clamp remains in the clamp installation hole. If there is any portion of the clamp remaining, remove it.
Attach the crankshaft position sensor connector to the No. 1 vacuum transmitting pipe.
Connect the crankshaft position sensor connector.
Attach the 2 wire harness clamps (B, C).
TYPE B:
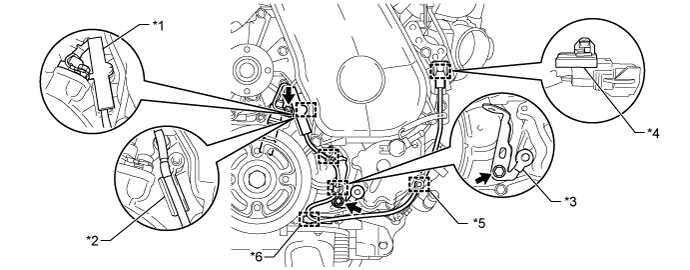
Text in Illustration *1
Clamp
*2
Protrusion
*3
Bracket (Clamp)
*4
Wire Harness Clamp (A)
*5
Wire Harness Clamp (B)
*6
Wire Harness Clamp (C)
Install the wire harness clamp (A) to the crankshaft position sensor connector.
Install the crankshaft position sensor with the bolt.
- Torque:
- 8.5 N*m{ 87 kgf*cm , 75 in.*lbf }
- NOTICE:
- Make sure that the O-ring is not damaged or does not jump out of position during installation.
Install the bracket (clamp) with the bolt.
- Torque:
- 13 N*m{ 132 kgf*cm , 9.5 ft.*lbf }
Install a new clamp.
- NOTICE:
- Make sure that no portion of the clamp remains in the clamp installation hole. If there is any portion of the clamp remaining, remove it.
- Make sure the crankshaft position sensor wire harness is installed in the position shown in the illustration.
- Make sure that no portion of the clamp remains in the clamp installation hole. If there is any portion of the clamp remaining, remove it.
Attach the crankshaft position sensor connector to the No. 1 vacuum transmitting pipe.
Connect the crankshaft position sensor connector.
Attach the 2 wire harness clamps (B, C).
Attach the 2 wire harness clamps to the bracket (clamp).
| 2. TEMPORARILY INSTALL FAN PULLEY |
Temporarily install the fan pulley with the 4 nuts.
| 3. INSTALL FAN AND GENERATOR V BELT |
Rotate the V-ribbed belt tensioner pulley clockwise, and then install the fan and generator V belt.
- NOTICE:
- Make sure that the fan and generator V belt is set properly on each pulley.
Check that the indicator mark of the V-ribbed belt tensioner (Click here).
| 4. TIGHTEN FAN PULLEY |
Tighten the 4 nuts and install the fan pulley.
- Torque:
- 23 N*m{ 235 kgf*cm , 17 ft.*lbf }
| 5. CONNECT VANE PUMP OIL RESERVOIR ASSEMBLY |
Connect the vane pump oil reservoir with the 2 bolts.
- Torque:
- 8.0 N*m{ 82 kgf*cm , 71 in.*lbf }